Partitioning your Mac’s Hard Drive (HDD) comes with a smattering of benefits like easy installation for multiple operating systems or VMs, a streamlined data backup process, and more. Partitioning an SSD isn’t as beneficial, but still makes it simple to sort and store your machine’s data.
With that said, there are situations where deleting a partition on your Mac is the goal.
So, we’ve put this guide together to help you learn how to delete a partition on Mac using multiple methods. Here’s everything you need to know.
- How to delete a partition on Mac using Disk Utility
- How to erase a Mac partition
- Remove a partition on Mac using Terminal
- Delete Boot Camp partition to remove Windows from your Mac
How to delete a partition on Mac using Disk Utility
Before we get started, it’s important to understand that deleting a partition will erase its stored data. The best course of action to make sure you don’t lose any photos or documents is to make a backup of your Mac’s data.
Now that you have a backup made, or intend to delete the data in a partition, let’s head over to Disk Utility. To delete a Mac partition on an HDD or SSD:
- Navigate to Launchpad → Disk Utility.
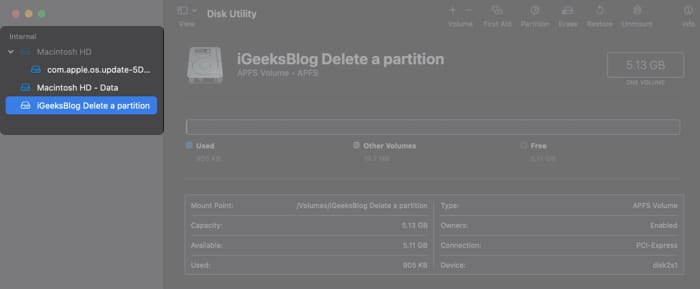
- Select the partition you want to delete on the left hand sidebar. We’ve selected the partition iGeeksBlog Delete a partition.
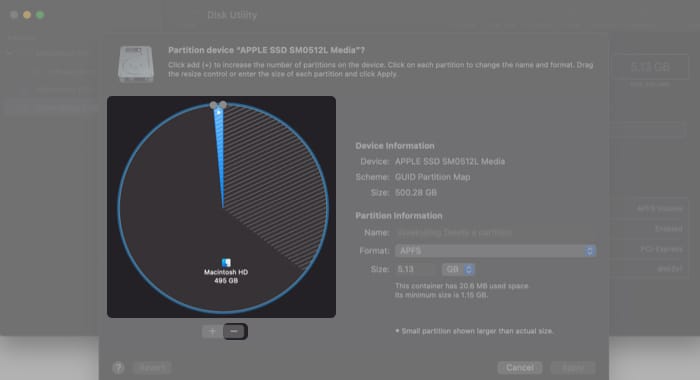
- Make sure the partition you want to delete is selected in the pie chart. Click the minus (-) button. The pie chart will update to show you intend to remove the selected partition.
- Click Apply.
- A popup window will appear with a message “This partition will be removed”. Click Partition to confirm and let your Mac work its magic.
- Click Done. That’s it! You just learned how to delete a Mac partition.
Deleting a partition is a bit different from erasing one. Deleting a partition will remove it from your machine, while erasing a partition will only clear its data.
How to erase a Mac partition
To erase a partition on Mac:
- Navigate to Launchpad → Disk Utility.
- Select the partition you want to erase on the left hand sidebar. We’ve selected the partition iGeeksBlog Erase a partition.
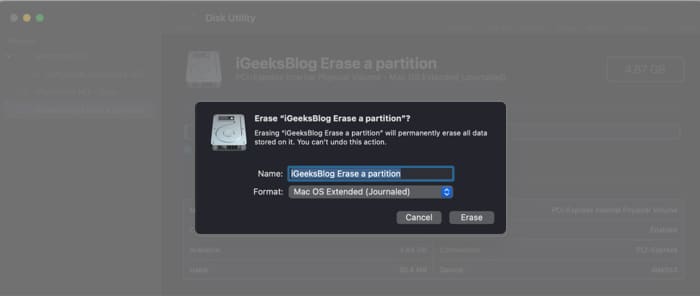
- Choose Erase on the top toolbar.
- Verify you’ve selected the right partition by reviewing the name and editing it if you choose to. Click Erase.
- As soon as you click Done, you’re done! The partition remains on your Mac free of any data it previously held.
If you want to delete a partition but Disk Utility isn’t working out, you’ll have to look to alternative means.
How to remove a partition on Mac using Terminal
Terminal is there for when Disk Utility can’t help. To remove a partition on Mac using Terminal:
Note: Remember, before entering any commands in the terminal, make sure you have a backup of your data stored on the cloud or an external drive. If you run into any problems, use Disk Utility’s First Aid function.
- Head to Launchpad → Terminal.
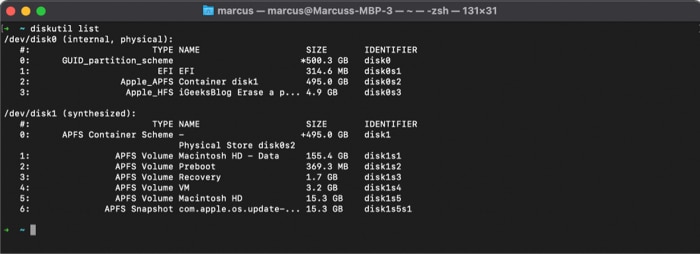
- Enter the command “diskutil list” to display your HDD or SSD’s partitions and volumes. Identify the partition you want to delete (we’ll be using iGeeksBlog Erase a partition from the last section).
- Enter the command “diskutil eraseVolume jhfs+ drive /dev/disk0s3”, with the correct identifier in place of “disk0s3” to delete the partition. So, you may need to use “disk0s2”, for instance.
- Your terminal will display a progress bar. When you see “Finished erase on disk0s3” (or whatever disk you erased), you’re almost done.
- Use “diskutil list” again to check if you’ve erased the partition. Look at the name; if your partition’s name reset, you’ve been successful. Now you need to merge the erased partition with your main.
- The partition should now be visible in Disk Utility. Select and delete it using the process outlined in “How to delete a partition on Mac using Disk Utility” to reclaim your disk space.
Delete Boot Camp partition to remove Windows from your Mac
If you want to free up the space that Windows 10 takes up, you’ll need to delete its partition in Boot Camp Assistant. Luckily, Mac makes this process super simple:
- Launchpad → Boot Camp Assistant
- Click Restore, enter your password, then click OK.
That’s it, pretty easy stuff. You can give Disk Utility a once-over to make sure your disk is formatted the way you want it. If you encounter the error message “Erase Assistant is not supported on this Mac,” there are a few steps you can take to fix it.
Wrapping up…
Hopefully, you were able to remove or erase a partition from your Mac with our help.
If you run into any trouble, let us know more about your situation in the comments below and we’ll do our best to help you out.
Have any other questions about your Mac, iPhone, or other Apple devices? Ask away in the comments.
You might like to read:



Leave a Reply