More people are turning to eSIM technology to streamline their cellular requirements. However, as with all new technologies, eSIMs have their share of problems, with many users reporting problems during or after eSIM installation. In this article, I’ll provide some of the best solutions to fix eSIM not working on iPhone.
Before moving on to the troubleshooting procedures, I’d recommend going through our guide to ensure you have switched to an eSIM using the right approach. Depending on the carrier, the procedure for activating an eSIM on an iPhone can vary, but it typically entails scanning a QR code or entering a unique code given to you by the carrier.
With the basics taken care of, let’s look at how to fix eSIM not working on iPhone.
1. Ensure that eSIM is activated
If you are experiencing problems with the eSim on your iPhone, you should first check whether your eSIM has been activated. If the activation status is negative, you may do the following:
- Keep patience: Assuming that you’re residing in a country where eSIMs are permitted and your carrier offers this service, the first thing to do is to wait for the eSIM to become active. The time it takes for activation can vary depending on your location and carrier, which can range between a few hours to a day or two. You should wait for some time before reaching out to your carrier to ask for an estimated activation time.
- Generate a new QR code: I recommend you hold off on creating a new QR code for a day or two if your carrier offers an automated procedure that can be carried out by using a specific carrier app and generates one to scan for the activation of the eSIM. An updated QR code will undoubtedly make it easier for you to install and activate your eSIM on your iPhone successfully.
2. Reset Network Settings on iPhone
Resetting the network settings can be a solution to the network issues on your iPhone. Resetting it will make the device forget every Wi-Fi network, Bluetooth connection, and VPN setting it has ever used.
- Launch Settings.
- Select General → Choose Transfer or Reset iPhone.

- Tap Reset → Select Reset Network Settings.

- Enter the passcode.
- Confirm by tapping Reset Network Settings.

3. Turn off/on eSIM
By toggling your eSIM off and on, you can prompt your iPhone to reconnect to the networks and potentially fix any issues you face. Follow the simple steps outlined below to do so.
- Launch Settings → Choose Cellular Data.
In certain regions, you might see Mobile Data. - Select the eSIM provider → Toggle off/on the button next to Turn On This Line.

4. Toggle on/off Airplane Mode
Toggling on and off Airplane mode can effectively refresh your eSIM network. This action resets the connections, which gives your phone a chance to reestablish them.
- Access the Control Center by swiping down from the top right corner of the screen.
On iPhones with a Home Button, you’ll need to swipe up. - Tap on the Airplane icon. It will turn yellow.
- Wait for a few seconds.
- Tap the Airplane icon again to turn it off.

5. Switch off your VPN
Connecting to a VPN service can improve your device’s functionality while also enhancing your online security and privacy. However, using VPN with an eSIM can also cause some issues. In some circumstances, the VPN may stop your iPhone from successfully connecting to the cellular network or gaining access to the eSIM.
You might be able to fix this problem by turning off your VPN and trying to set up your eSIM once more.
- Head to the Settings app → Go to General
- Scroll down and select VPN & Device Management → Toggle off VPN.
Note:
It is recommended that you refer to the official article provided by your VPN provider to disable any third-party VPN applications you may have installed on your iPhone.
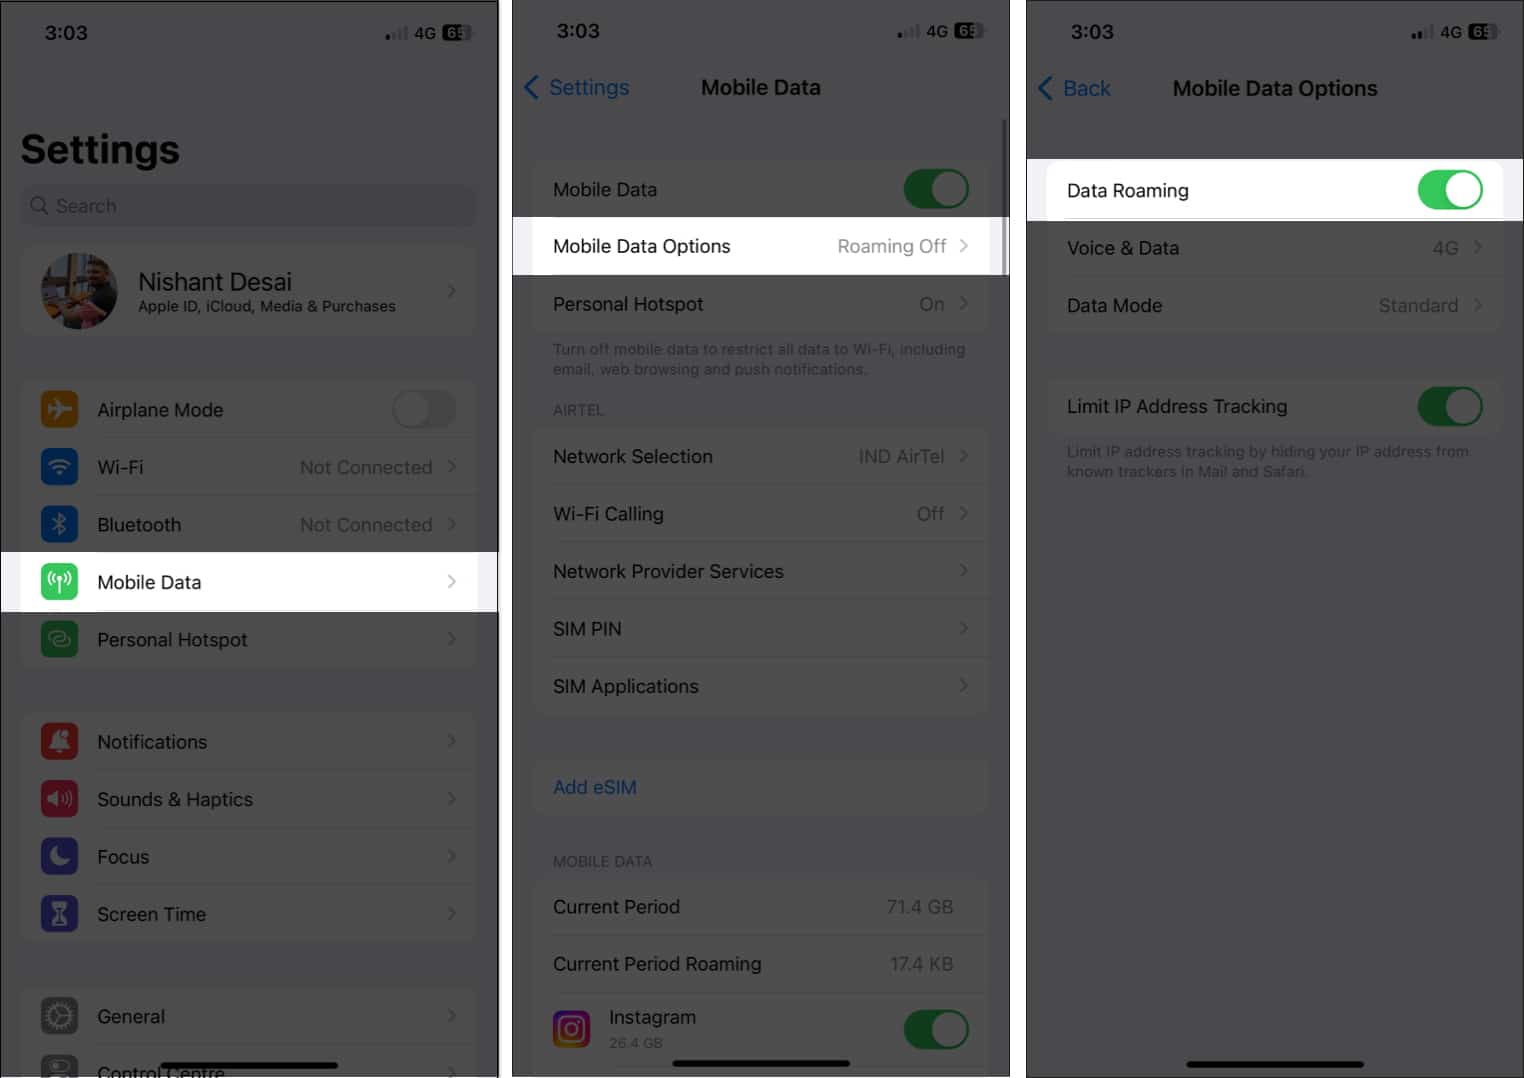
6. Turn on Data Roaming
Data Roaming is a feature that allows your device to connect to a cellular network outside of your home country or region. So, if you’re traveling and can’t connect to a network, activating data roaming can trigger the activation of your eSIM and allow you to use it properly.
- Navigate to Settings → Go to General.
- Tap Cellular/Mobile Data Options.
- Toggle on Data Roaming.

7. Manually select a network
Low reception can also be a root cause of bad experiences with your iPhone’s eSIM. However, manually selecting a network can often resolve the issue.
- Navigate to Settings.
- Choose Cellular/Mobile Data → Tap Network Selection.
- Toggle off the button next to Automatic.

Now, the available networks in your current area will be searched for and displayed by your eSIM. From the list on your screen, tap and choose your carrier. Your eSIM will now manually register itself on the network of your carrier, which ought to resolve your problem.
8. Turn off Low Data Mode
Low Data Mode may conflict with some carriers and complicate your eSIM functionality. As a solution, I suggest you disable Low Data Mode on your iPhone when encountering eSIM-related issues.
- Head to Settings.
- Select Mobile/Cellular Data → Choose Mobile Data Options.

- Tap Data Mode → Select anything else Low Data Mode.

9. Turn off Limit IP Address Tracking
Limiting IP Address Tracking is a new feature that, in some circumstances, is enabled by default and stops your device from connecting to a cellular network.
There are chances that the eSIM provider you currently use does not support this feature. To turn off the same on your device, follow the instructions below.
- Launch Settings.
- Choose Mobile/Cellular Data → Pick Mobile Data Options.
- Toggle off Limit IP Address Tracking.

10. Deactivate private DNS
If your iPhone’s eSIM isn’t working, you should try deactivating private DNS. Enabling the private DNS might obstruct the eSIM’s functionality and make it malfunction or completely stop working.
- Launch Settings.
- Select Wi-Fi → Tap (i) button next to the Wi-Fi you’re connected to.
- Toggle off the button next to Private Wi-Fi Address.

11. Delete and re-install your eSIM
Reinstalling your eSIM is a potent solution to fix eSIM not working on iPhone. To do this, you’ll need to delete the existing eSIM from your device and then add it again. The exact process will depend on your carrier and the specific iPhone model you’re using, but generally, you can access your eSIM settings by the steps illustrated below.
- Open the Settings app.
- Select Cellular/Mobile Data → Choose your eSIM provider.
- Select Remove Cellular Plan/Delete eSIM.

- The subsequent steps will now change based on your carrier; carefully follow the on-screen instructions.
Post that, you can read our article on how to activate and use eSIM on an iPhone to reinstall your eSIM.
12. Other common fixes:
- Contact your carrier: Contacting your carrier is a good option if you face issues with your iPhone eSIM not working or while transferring it, as they could troubleshoot any issues that may be occurring on their end, such as a problem with your account or a network outage.
- Restart your iPhone: A simple restart reboot can be a quick and effective solution to perform if your iPhone’s eSIM is not working properly. This process can clear any temporary glitches or errors that may be causing the problem.
- Update your iPhone: Not only is Apple quick to provide you with a software update with bug fixes, but it also releases improvements for its current iteration with the new updates. Go to Settings → General → Software Update → select Download and Install if there’s an update available.
- Check pending carrier updates: Important fixes and cellular connectivity enhancements can be found in carrier updates, which may be able to fix any problems with your eSIM not functioning.
Head to the Settings app on your iPhone → tap General → choose About → follow the on-screen instructions to install the new updates. - Reset your iPhone: Resetting your iPhone can restore it to its factory defaults by erasing all data and settings. Therefore, I don’t personally recommend you reset your iPhone unless all other solutions have been exhausted.
- Contact Apple Support: If none of the above solutions work for you, contact Apple Support. The eSIM functionality of your iPhone can be troubleshot and fixed by a specialized team of professionals at Apple.
13. Switch to a physical SIM
While eSIMs have numerous benefits over traditional SIM cards, such as the ability to store multiple phone numbers and activate a new phone plan without a physical card, they can also be more complex to set up and are susceptible to technical issues.
Switching to a physical SIM card may be a permanent solution to any problems you are experiencing with your eSIM.
However, it is important to ensure that your phone is compatible with a physical SIM card by consulting your carrier. It’s worth noting that the latest iPhone 14 models sold in the USA no longer support physical SIM cards.
Moreover, it’s essential to have the correct type of SIM for your device.
Connectivity found!
Losing connectivity can cause frustration, which is not an ideal situation. However, the above-mentioned solutions are intended to offer useful advice for addressing any eSIM-related problems on an iPhone running iOS 16. If you have encountered any other issues with any Apple device, please leave them in the comments, and I’ll make sure to address them with a solution.