
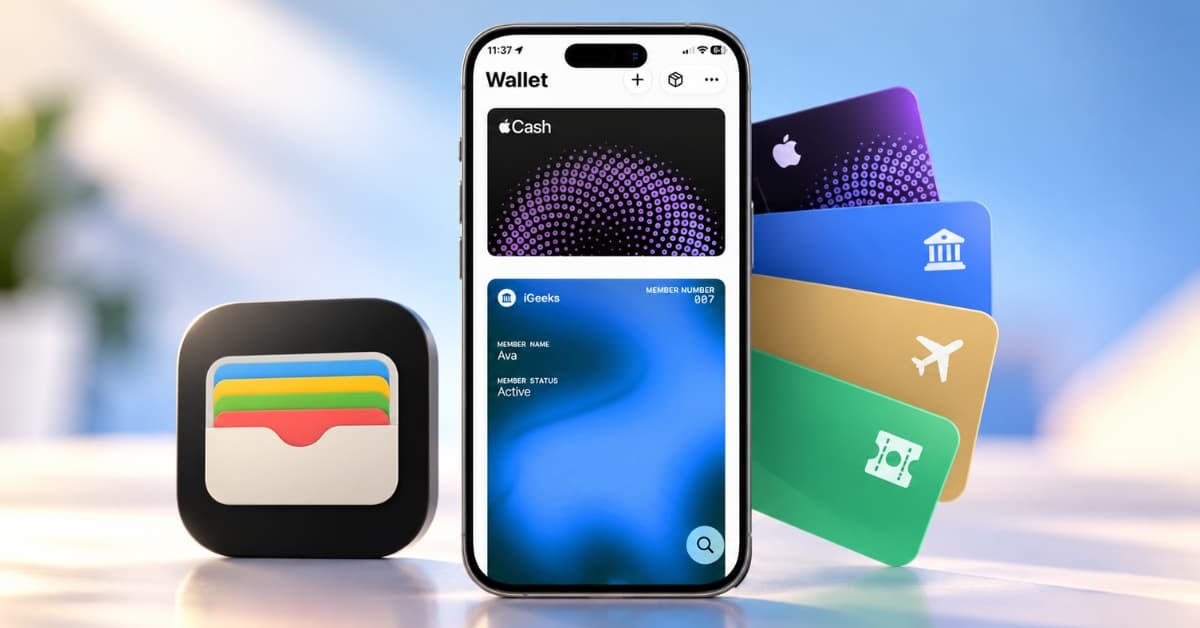
We’ve all faced the hassle of carrying loyalty cards, tickets, or passes because they didn’t have an official Add to Apple Wallet button. So, forgetting the card meant losing the benefit. I’ve often wished there were an easier way to keep all these cards in one place, and iOS 27 offers a solution with its Create a Pass feature in Apple Wallet.
With this feature, you can create custom passes from photos, screenshots, or card details, and keep any cards on your iPhone even if their digital version isn’t available in the Wallet app. In this guide, I’ll show you how to add tickets, loyalty cards, gym memberships, and other useful cards to Apple Wallet.
What is Create a Pass in Apple Wallet?
Before iOS 27, adding a ticket or membership card to Apple Wallet often depended on whether the business supported Apple’s digital pass system. If it didn’t, you usually had to keep the physical card, save a screenshot, or open the company’s app whenever you needed it.
With iOS 27, Apple introduces a more flexible Create a Pass option. It lets you build a digital representation of a card or ticket and store it in the Wallet app. The best part is that I can create passes from photos or screenshots containing a barcode or QR code, or manually select a template and enter the details myself.
Here are some practical examples of what you can create:
- Loyalty and rewards cards: Keep a store’s membership number or scannable loyalty code in Wallet.
- Membership cards: Store compatible gym, library, or club membership details.
- Event tickets: Create a pass containing a stable barcode or QR code from a ticket.
- Gift cards: Keep a gift card’s details and supported code together.
- Other useful passes: Organize certain coupons, insurance information, and other details using the available templates and fields.
The important distinction is that a custom pass is not necessarily an official pass issued by a business. It stores the information you provide, but the business still determines whether its barcode, QR code, or membership details are accepted.
What you need before creating an Apple Wallet pass
I recommend gathering everything you need before opening Wallet. It makes the process easier and reduces the chances of saving a pass with incorrect information.
You’ll need:
- An iPhone running iOS 27 or later.
- A physical card, photo, screenshot, or digital ticket.
- A readable barcode or QR code if the business uses one.
- The correct membership or ticket details, or other information you want to include.
There is one compatibility detail to remember. Apple’s photo-and-screenshot pass creation uses Visual Intelligence. So, you need an iPhone 15 Pro, iPhone 15 Pro Max, or iPhone 16 model or later, updated to iOS 27.
Manual pass creation is a separate workflow, so don’t assume that you can’t create passes on older iPhones.
How to create a custom pass in Apple Wallet
iOS 27 offers multiple ways to add any type of card and passes to your Wallet, similar to Google Wallet.
Method 1: Scanning the physical card
This is the first method I’d try to add a physical loyalty, membership, library, parking, or rewards card that has a barcode or QR code.
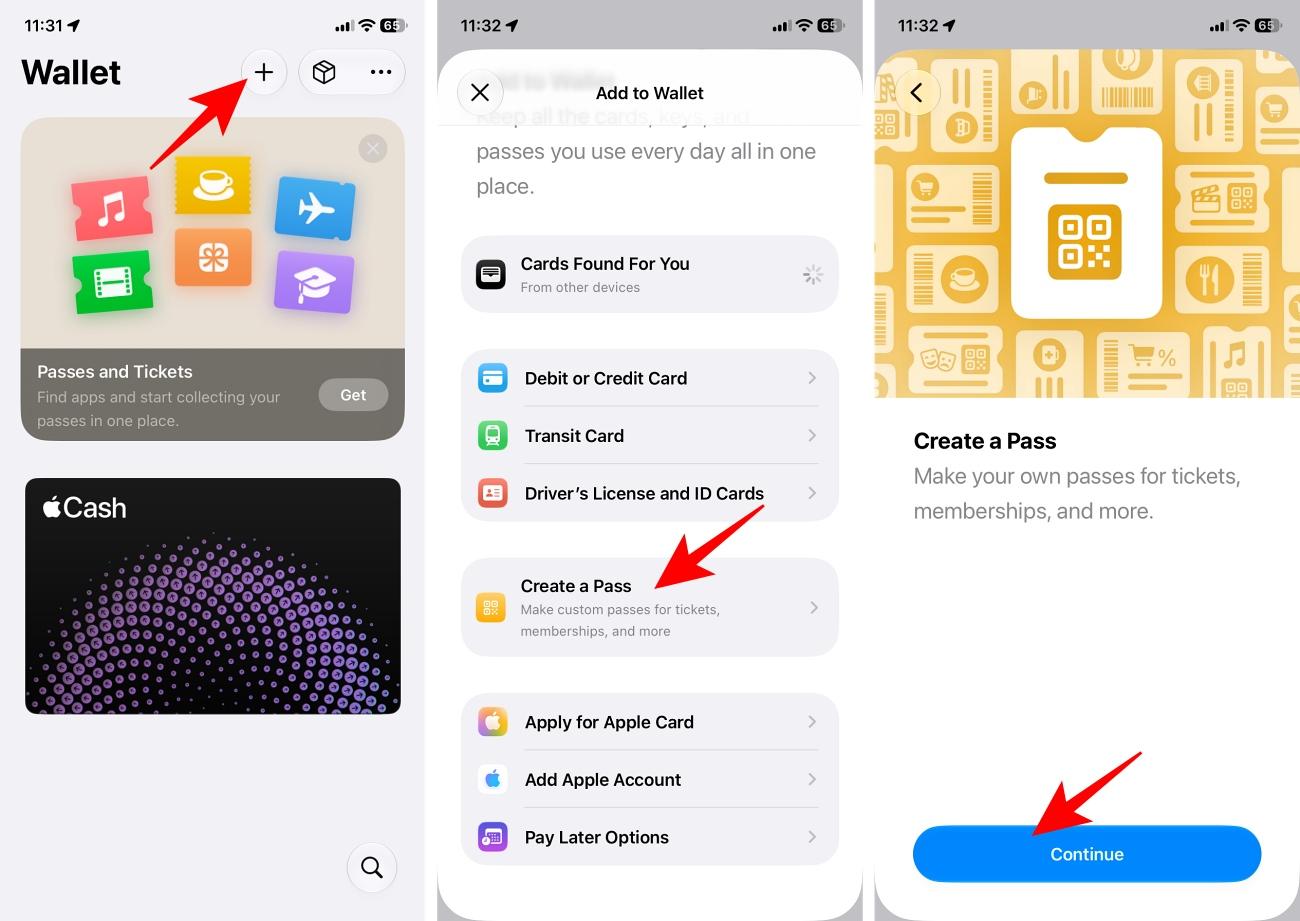
- Open the Wallet app on your iPhone and tap the Add (+) button.
- Look for Create a Pass and select it.
- Tap Continue to use Visual Intelligence.
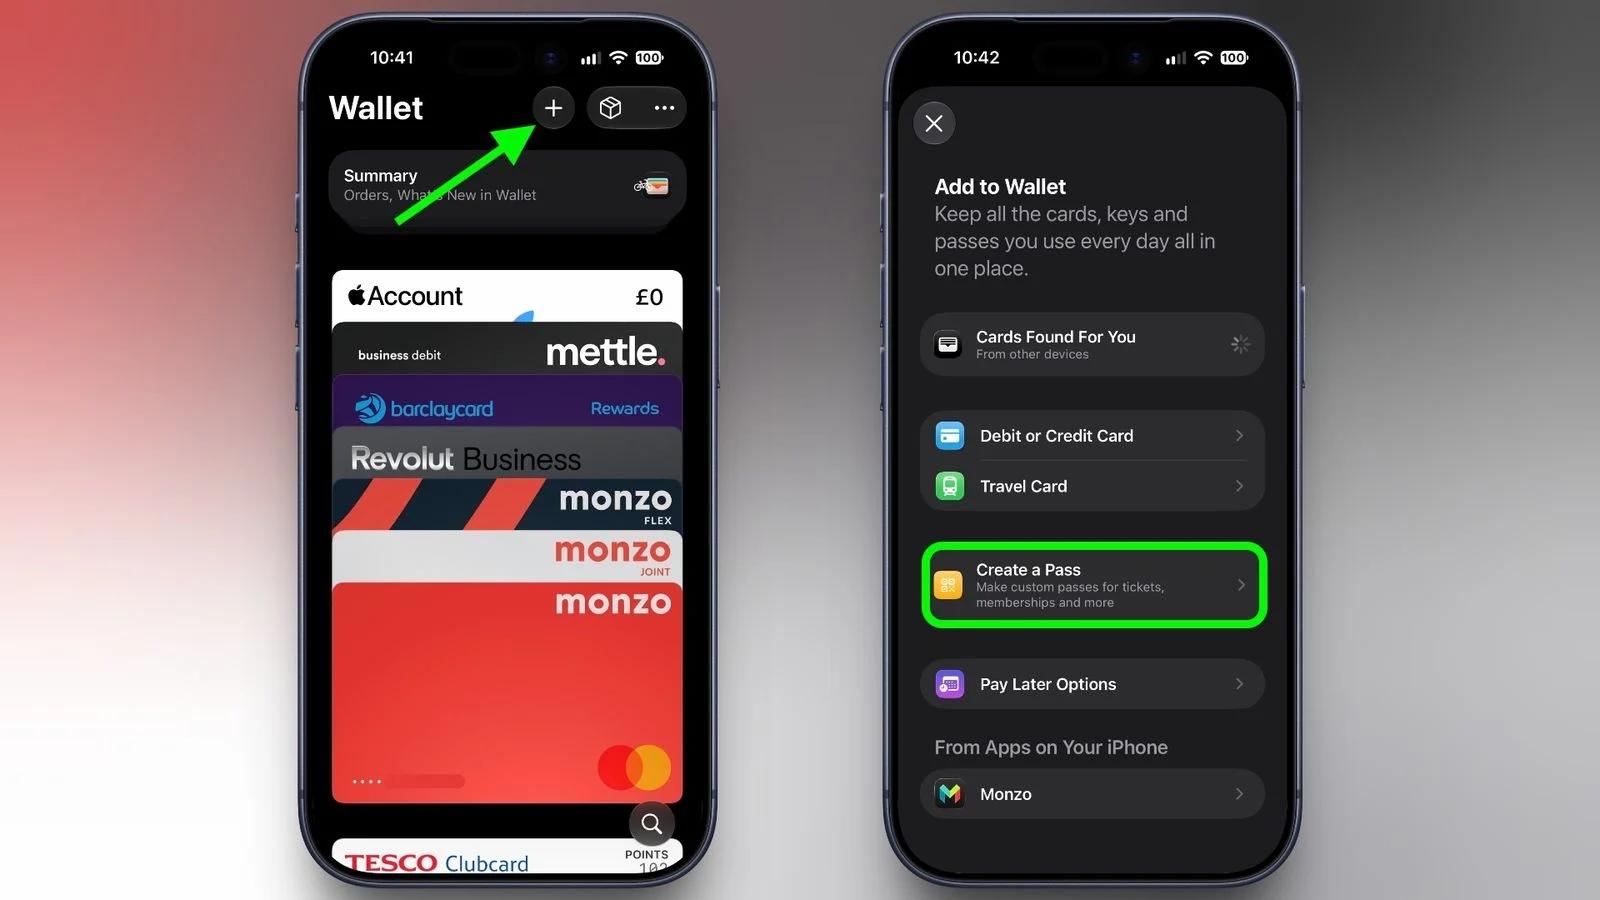
Image Credit: Macrumors - Place the card on a flat surface, use good lighting, and make sure the barcode or QR code is visible. Avoid reflections, shadows, and blurry images.
- Tap the shutter to take a photo.
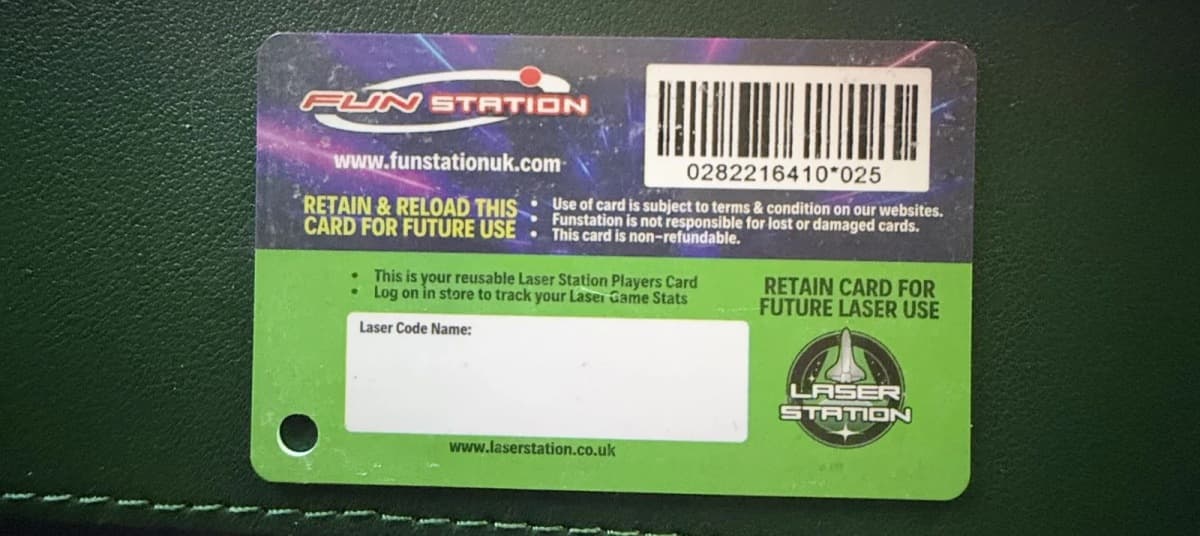
Image Credit: Macrumors - Now wait for your iPhone to identify the card and match it to a template.
- Review the following:
- The business or membership name.
- The membership or card number.
- Any additional fields that were recognized.
- The barcode or QR code, where supported.
- If everything looks right, tap Add.
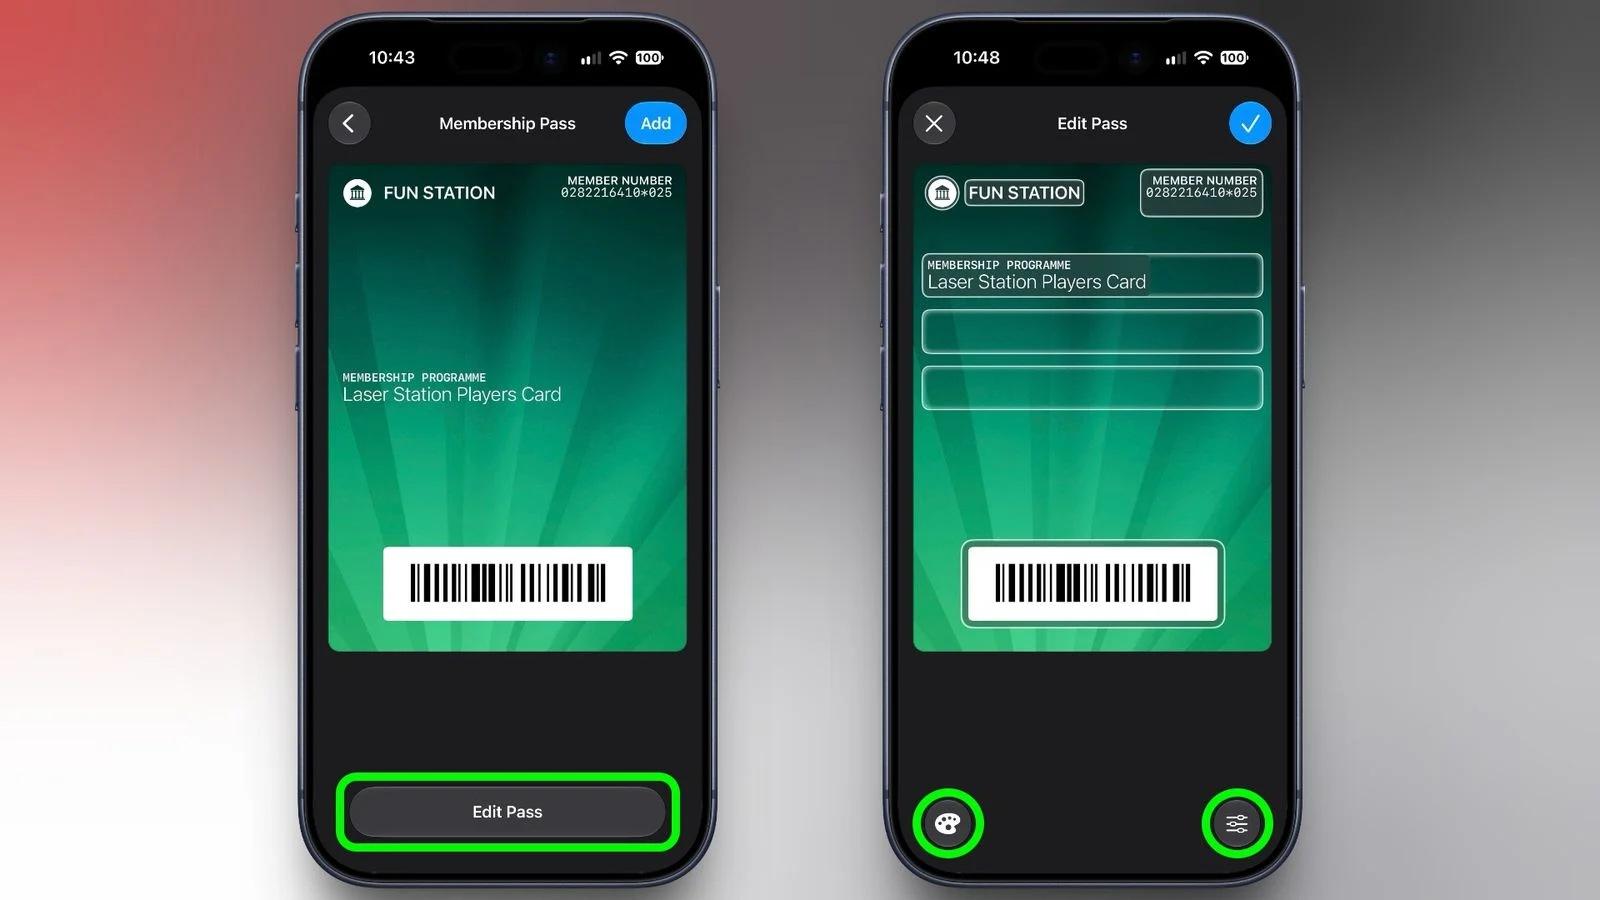
Image Credit: Macrumors
Your custom pass should now appear in Apple Wallet alongside your other passes. Open it whenever you need to present its details or code.
The Wallet app also offers an editing option to adjust the appearance and information. If you have several rewards cards, giving each pass a recognizable name and appearance helps you find the correct one. I will share the steps later in the post.
Method 2: Use a photo or screenshot
You don’t always need to start inside Wallet. If you already have a photo or screenshot of a ticket or membership card, you may try creating a pass from it.
This is especially useful for digital tickets received by email or membership cards that you have previously photographed.
- Take a photo or screenshot containing the barcode or QR code.
- Open the image in Photos.
- Tap the i button to open the photo’s information panel, or swipe up, and look for the Add Pass to Wallet option when iOS recognizes the code.
- Tap the option and follow the on-screen instructions.
- Review the details and save the pass by tapping Add.
If the button doesn’t appear, it doesn’t necessarily mean the image is unusable. Try the manual creation method described below.
Method 3: Create the pass manually
If automatic recognition doesn’t work or your iPhone doesn’t support Visual Intelligence, manual creation gives you another option.
Some airlines, event organizers, cinemas, and booking services provide an official Add to Apple Wallet button. When that option is available, use it first. The official pass may contain additional information or functionality that a manually created pass cannot reproduce.
But what if your ticket only arrives as a PDF or an email attachment?
Here’s what I would try:
- Open Wallet and tap the Add (+) button.
- Select Create a Pass.
- Tap Create Pass Manually.
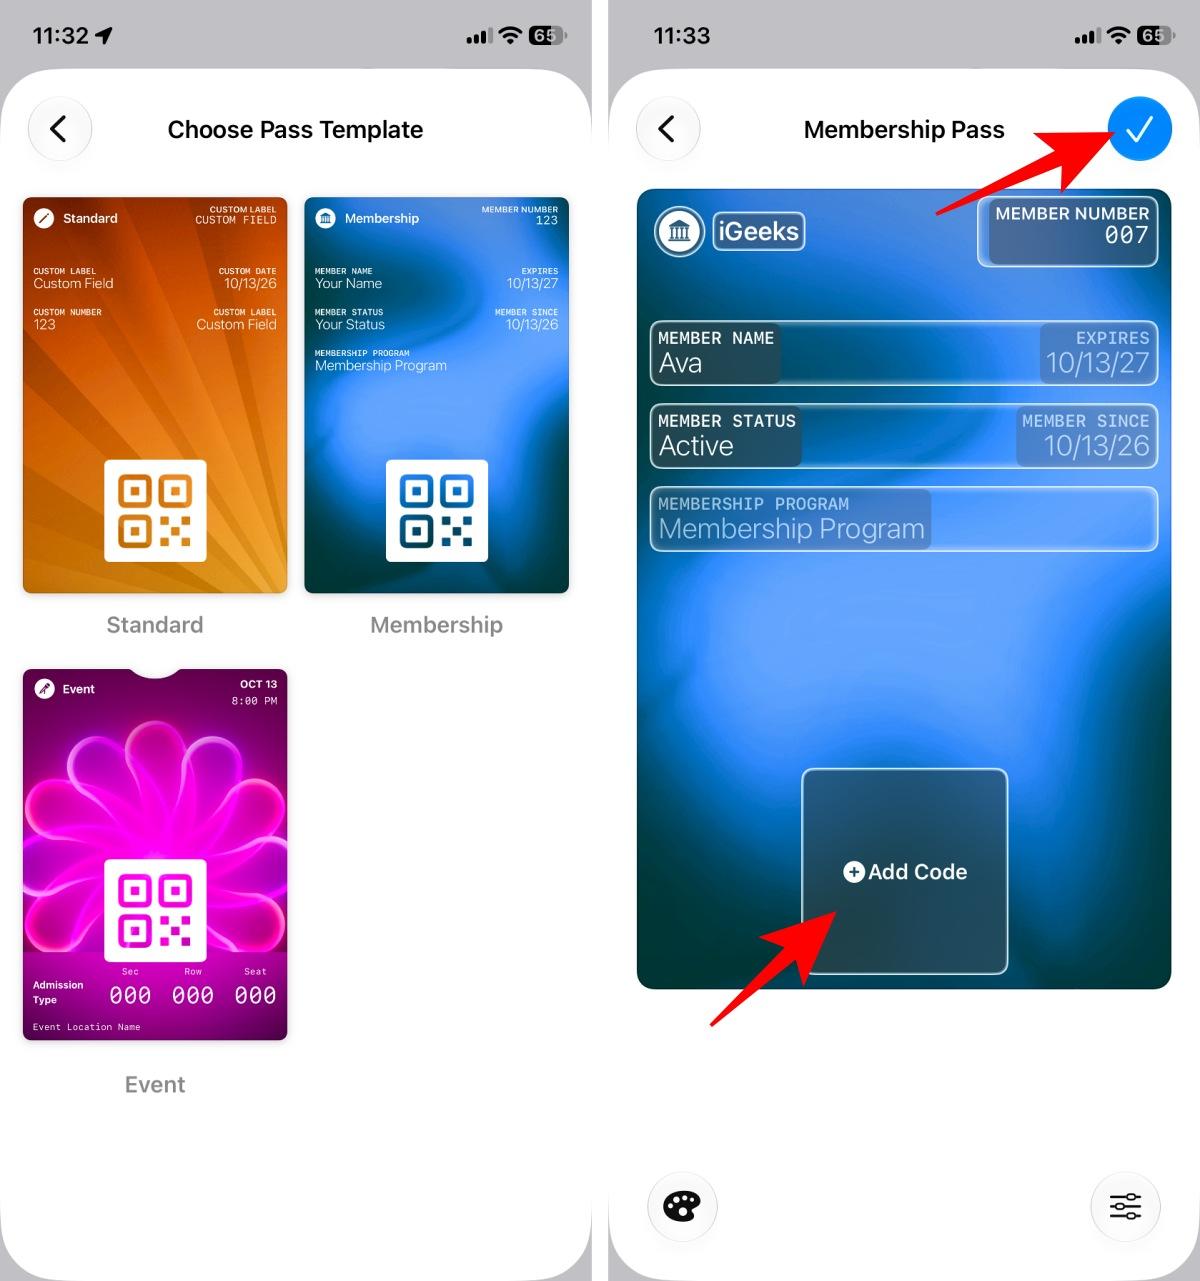
- Choose a suitable template.
- Enter the relevant information and edit the available fields.
- Follow the available barcode or QR code options, then save the pass.
For example, you might create a custom pass for a local concert, a museum visit, or an event with a static admission code. I also use this method to save in-store gift card details.
Still, creating a custom pass in Wallet does not automatically turn it into a valid ticket. There are venues where the original ticket, an account-linked pass, an official barcode, or a changing code is needed. A custom pass may not work in those situations.
My recommendation: Keep the original photo or PDF file until you ensure that the saved pass contains all the necessary information. If a retailer offers passes via Apple Wallet, I would prefer the official pass.
How to edit or delete a custom pass in Apple Wallet
Creating the pass is only half the job. You may later want to correct a membership number, change the color, or remove an expired ticket.
To edit an Apple Wallet pass:
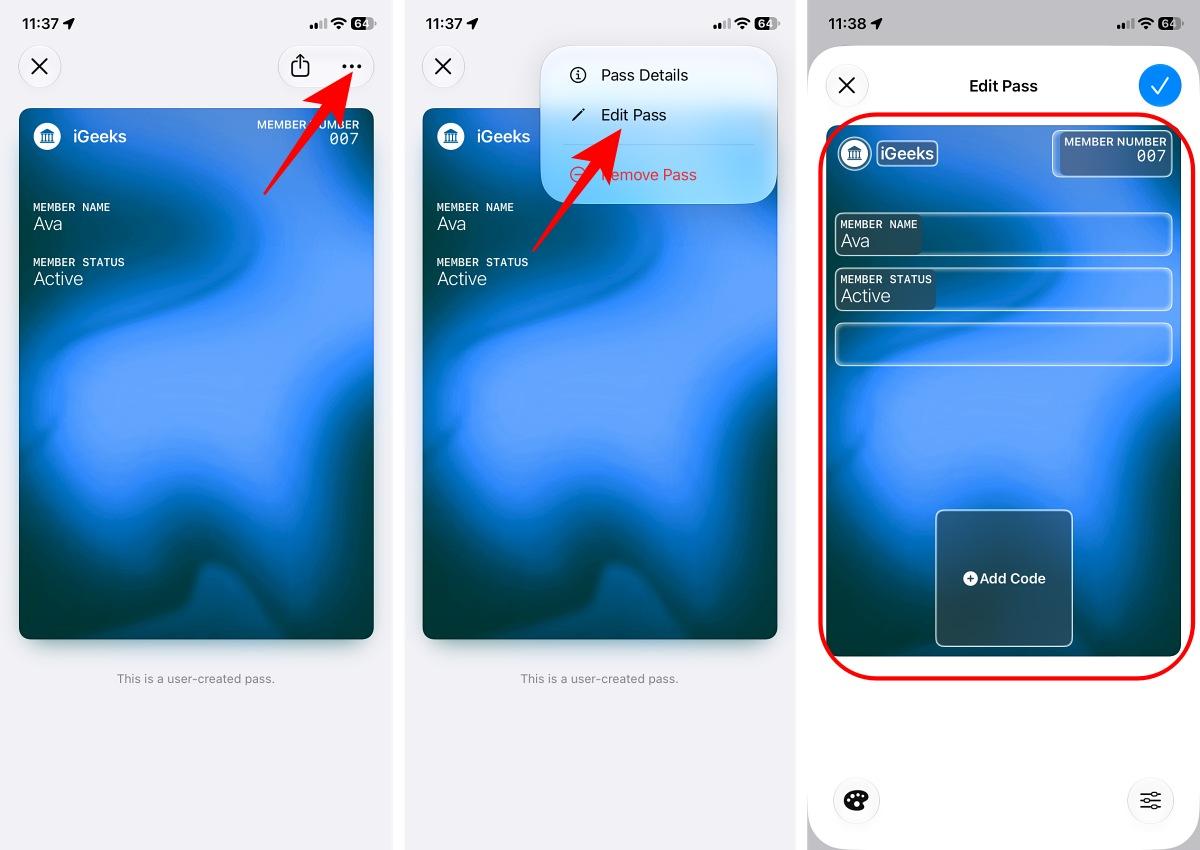
- Open Wallet and select the custom pass.
- Tap the More (three-dot) button.
- Choose Edit Pass from the menu.
- Edit the fields, like membership number, program name, etc.
- If you want to add more details, tap the Edit button > Add/Remove Fields. You may select Member status, Member since, Expires, VIN, etc. fields depending on the pass type.
- To change the appearance, tap the palette icon and select Background Color. Choose a color and texture you like.
- Tap the checkmark to save your changes.
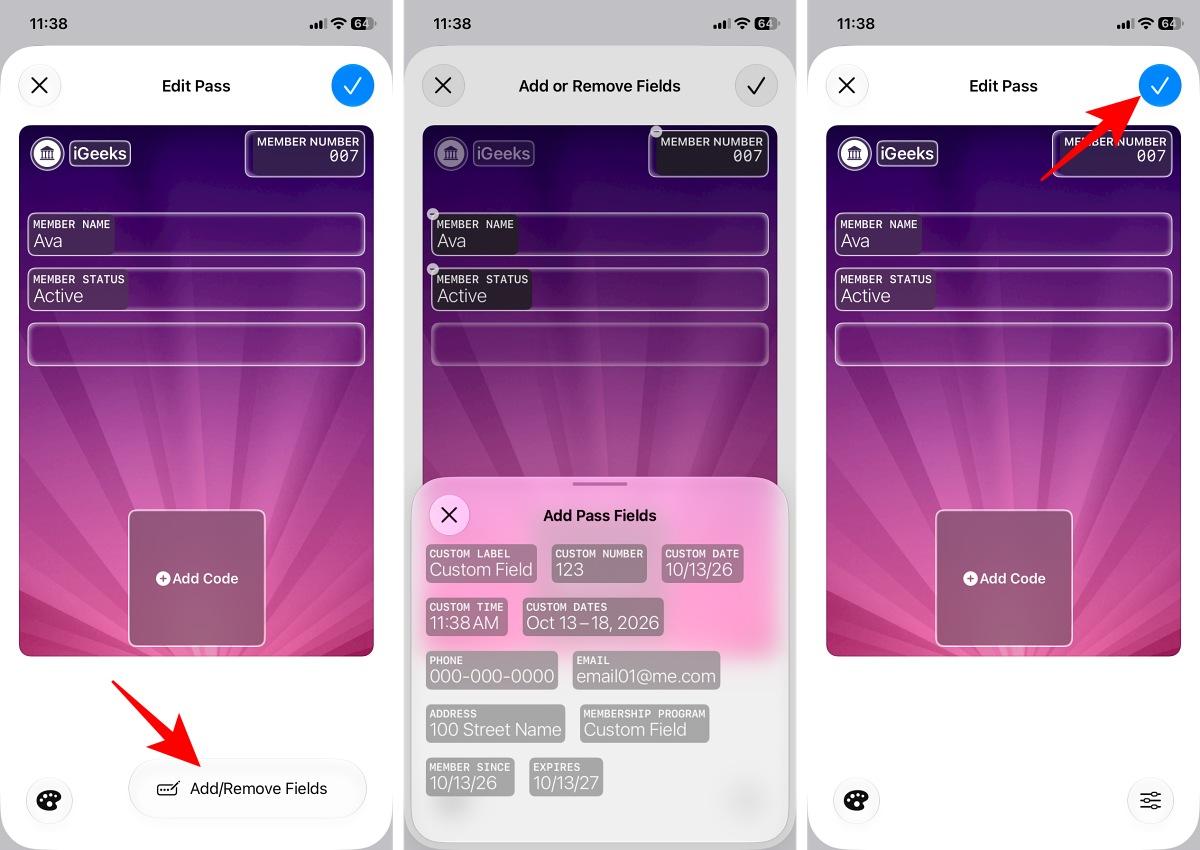
You can use this workflow to make a pass easier to identify or correct details that were entered incorrectly.
Delete a custom pass:
To remove a pass you no longer need:
- Open Wallet and select the pass.
- Tap the More button.
- Select the Remove Pass option.
- Confirm the removal when prompted.
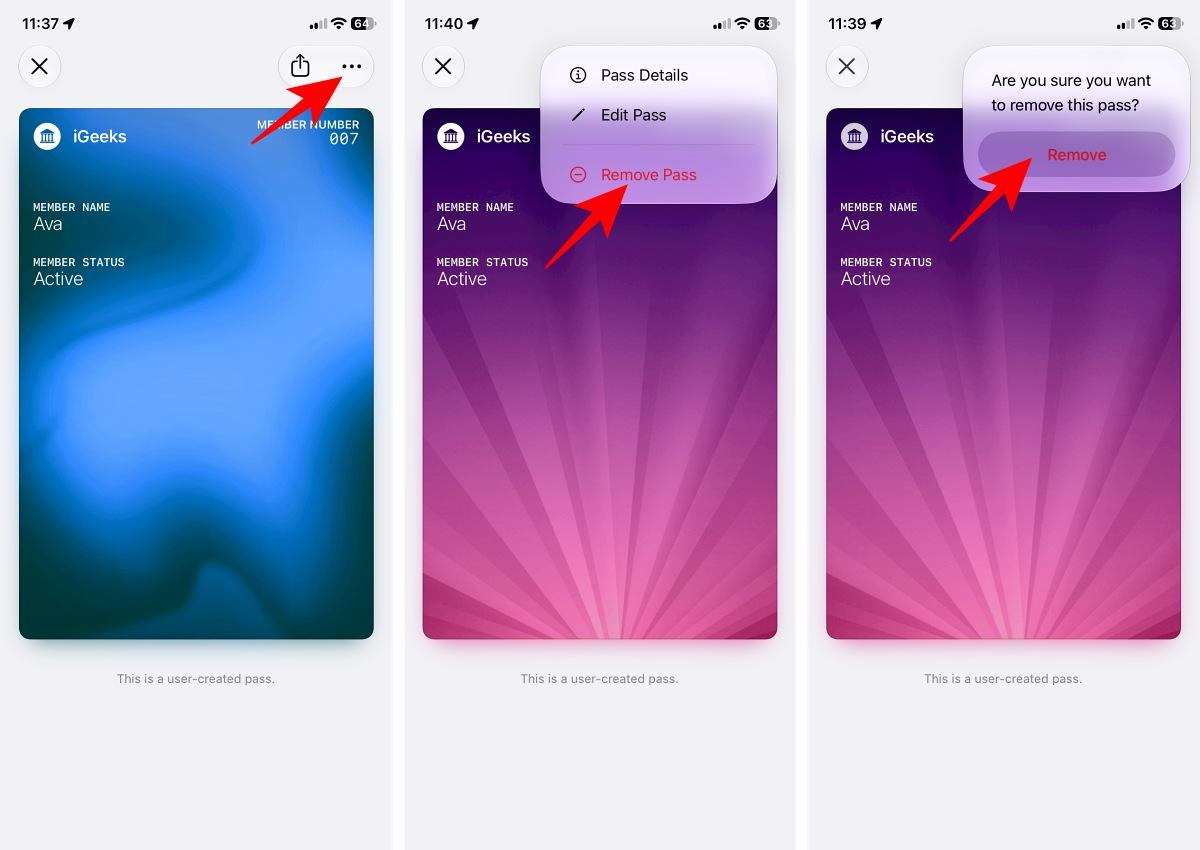
Deleting a custom pass from Wallet doesn’t cancel a membership, refund a ticket, or delete the underlying account with the business.
How to use your custom pass at a Store or Event
Once you’ve added a custom pass to Apple Wallet, using it is pretty straightforward.
Here’s how to use your pass when you are at the counter:
- Open Apple Wallet and select your custom pass.
- Show the barcode or QR code on the screen if the store or venue accepts it.
- If you need to refer to the original card, tap View Original Photo to open the photo or screenshot used to create the pass.
Another handy feature is Pass Details. Whenever I am filling out any form or need to use the card number, I open the pass and tap the three dots. Go to Pass Details to see the member number, merchant name, website, and other details, then copy them.
Things I learned while moving cards into Apple Wallet
Creating custom passes in Apple Wallet is a convenient way to keep all loyalty cards, membership cards, and tickets organized, especially when official Wallet support is missing. However, there are a few things worth knowing before you start moving everything into Wallet.
- A clear photo makes a difference: While making a pass from a photo/screenshot, please be sure that the card info and the barcode are readable. Always verify the info before saving the pass.
- “View Original Photo” can be useful: I like the idea of keeping the original card image accessible from the pass. It gives you another way to check the original details when the custom pass doesn’t show everything.
- Dynamic codes are a different story: Some businesses refresh their membership or ticket codes regularly. A saved photo of an old code may not work, so the official app or pass is often the better option.
- Keep your original cards for now: Before leaving a physical card at home, check whether the custom pass is accepted at checkout or entry. This is particularly important for event tickets and memberships.
Common problems when creating Apple Wallet passes
Creating a custom pass in Apple Wallet is fairly simple, but you might run into a few problems along the way. If you can’t create a pass, the barcode doesn’t scan, or the pass doesn’t work at checkout, here’s what you can try.
| Common problem | Why it happens | How to fix it |
|---|---|---|
| Create a Pass option is missing | iOS version, device compatibility, or feature availability | Update to iOS 27 and check whether the feature is supported on your iPhone. |
| Barcode or QR code won’t scan | Blurry photo, glare, or cropped code | Take a clear photo in good lighting and keep the entire code visible. |
| Custom pass doesn’t work at checkout | The business may require an official pass or dynamic barcode | Use the official app or pass, or confirm whether the business accepts custom passes. |
| Card details are incorrect | Automatic scanning may misread text or numbers | Verify the details and edit the pass. |
| Manual pass creation isn’t working | The selected template may not support the required information | Try another suitable template or use the original card or ticket. |
Final thoughts
The most useful thing about iOS 27’s Create a Pass feature is that it gives me another option when a business hasn’t provided an official Apple Wallet pass. Instead of keeping every loyalty card in my physical wallet or hunting through screenshots, I can try organizing compatible cards and tickets in one place.
Just remember to check whether your custom pass works before leaving the physical card at home. After all, the goal is to make your wallet lighter, not to get stuck at the checkout counter again!