
The best thing about memories is that you can share them with people. The iCloud’s Shared Albums allow you to bond over your best photos and videos with friends, family, or whoever you like. But are you making the most of this feature? Let me help with this extensive guide on Shared Albums and how to use them on iPhone and iPad.
What are Shared Albums, and how do they work?
As the name suggests, these albums allow you to share images and videos with others. It’s secure and private, as only people with the album link can see the content.
Further, you can share the album not only across Apple’s ecosystem but also with Android or Windows users. It can also work as a collaborative album, as each party can access, comment, and add stuff to it.
How many photos or videos can I add to Shared Albums?
A shared album can contain up to 5000 photos and videos with a maximum share size of 1GB. After that, you’ll have to delete some content to make space for a new one.
Interestingly, while interrelated, the iCloud photo library and Shared Albums are distinct features. Unlike the photo library or Photo Stream, Shared Albums don’t count toward your iCloud storage.
File types supported in Shared Albums
| Image formats | Video formats |
| HEIF | HEVC |
| JPEG | MP4 |
| RAW | QuickTime |
| PNG | H.264 |
| GIF | MPEG-4 |
| TIFF |
In addition, you can add special formats like live photos, slow-motion, time-lapse, and memory videos. However,
- Pictures and videos may lose resolution to 2048 pixels unless they’re panoramic pictures with up to 5400 pixels.
- GIFs should be 100MB and smaller.
- Videos up to 15 minutes can support 720p resolution.
Now that you understand the Shared Albums feature better let’s start by showing you how to get it on your iPhone.
How to turn on Shared Albums on iPhone
To use Shared Albums on your iPhone, you need to enable it. You can accomplish this in two ways: from iCloud settings or via Photos settings. I will first show the iCloud method.
- Go to Settings → [your name] → iCloud.
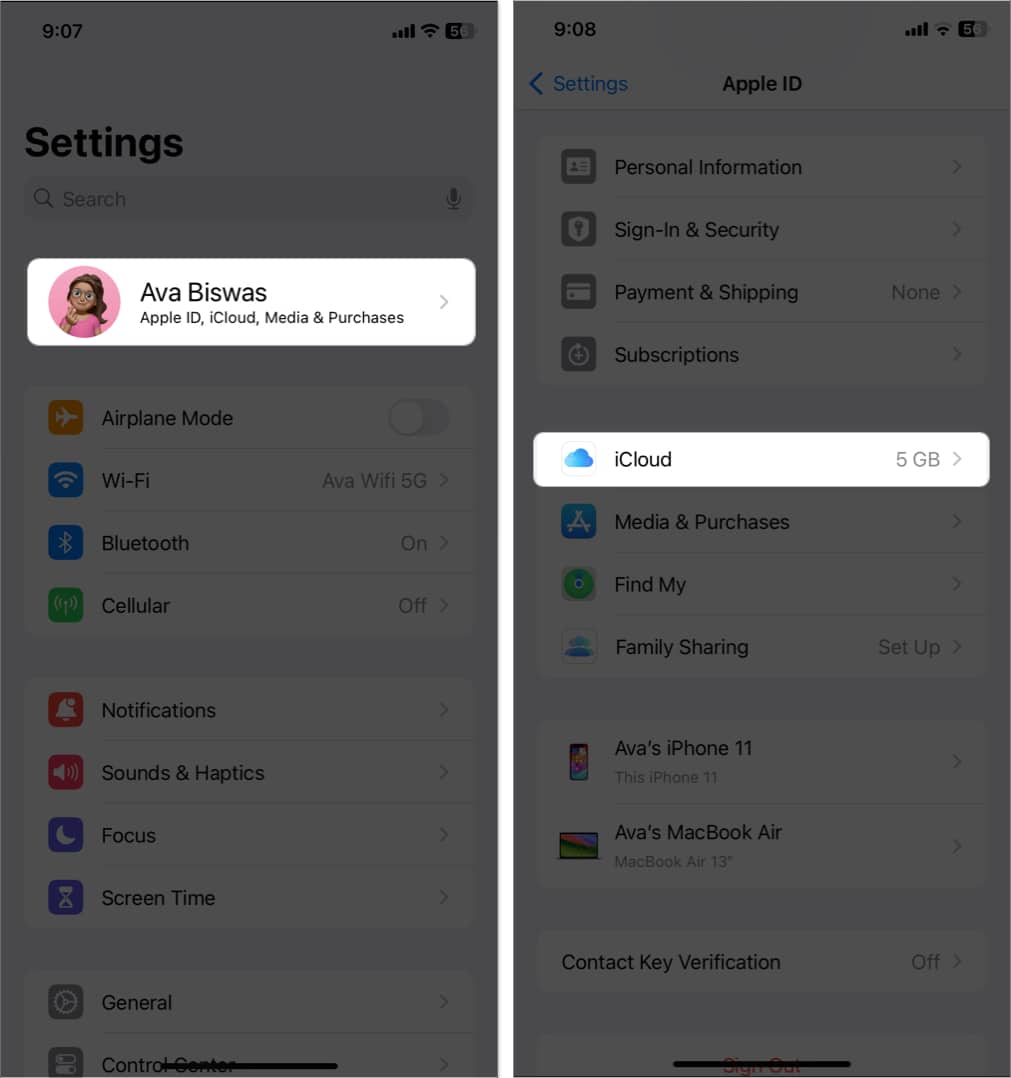
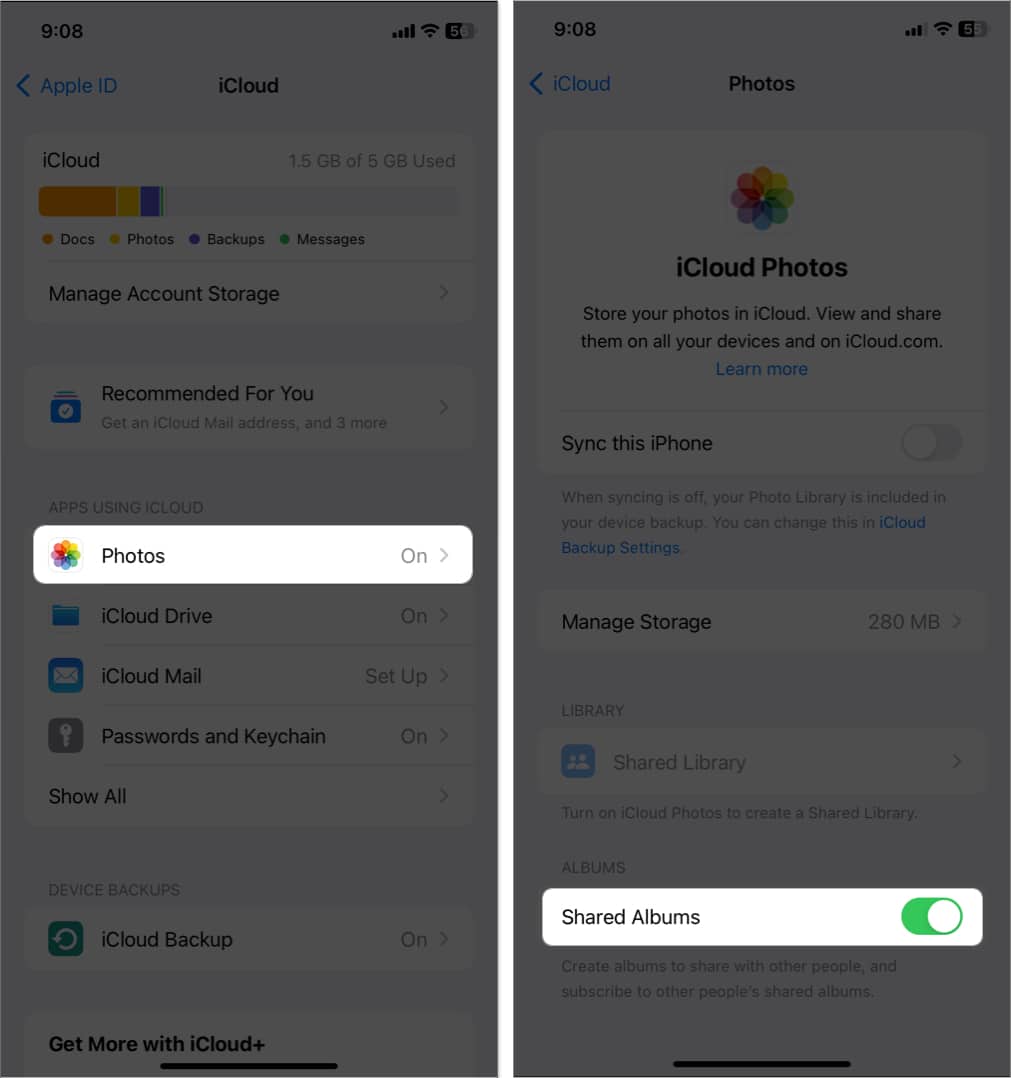
- Tap Photos.
- Here, toggle on Shared Albums.


For the alternative method, go to Settings → Photos → toggle on Shared Albums.
Things to note
- Ensure your iPhone or iPad is updated to the latest iOS and iPadOS.
- You’ve already set up iCloud on your iOS device.
- If you want to use multiple devices for album sharing, all must run on the same Apple ID.
- To use Shared Albums, your iPhone must be connected to the internet.
Once you’ve enabled the feature on your iPhone, you’re all set to create Shared Albums.
How to create Shared Album on iPhone and iPad
- Open the Photos app → Albums.
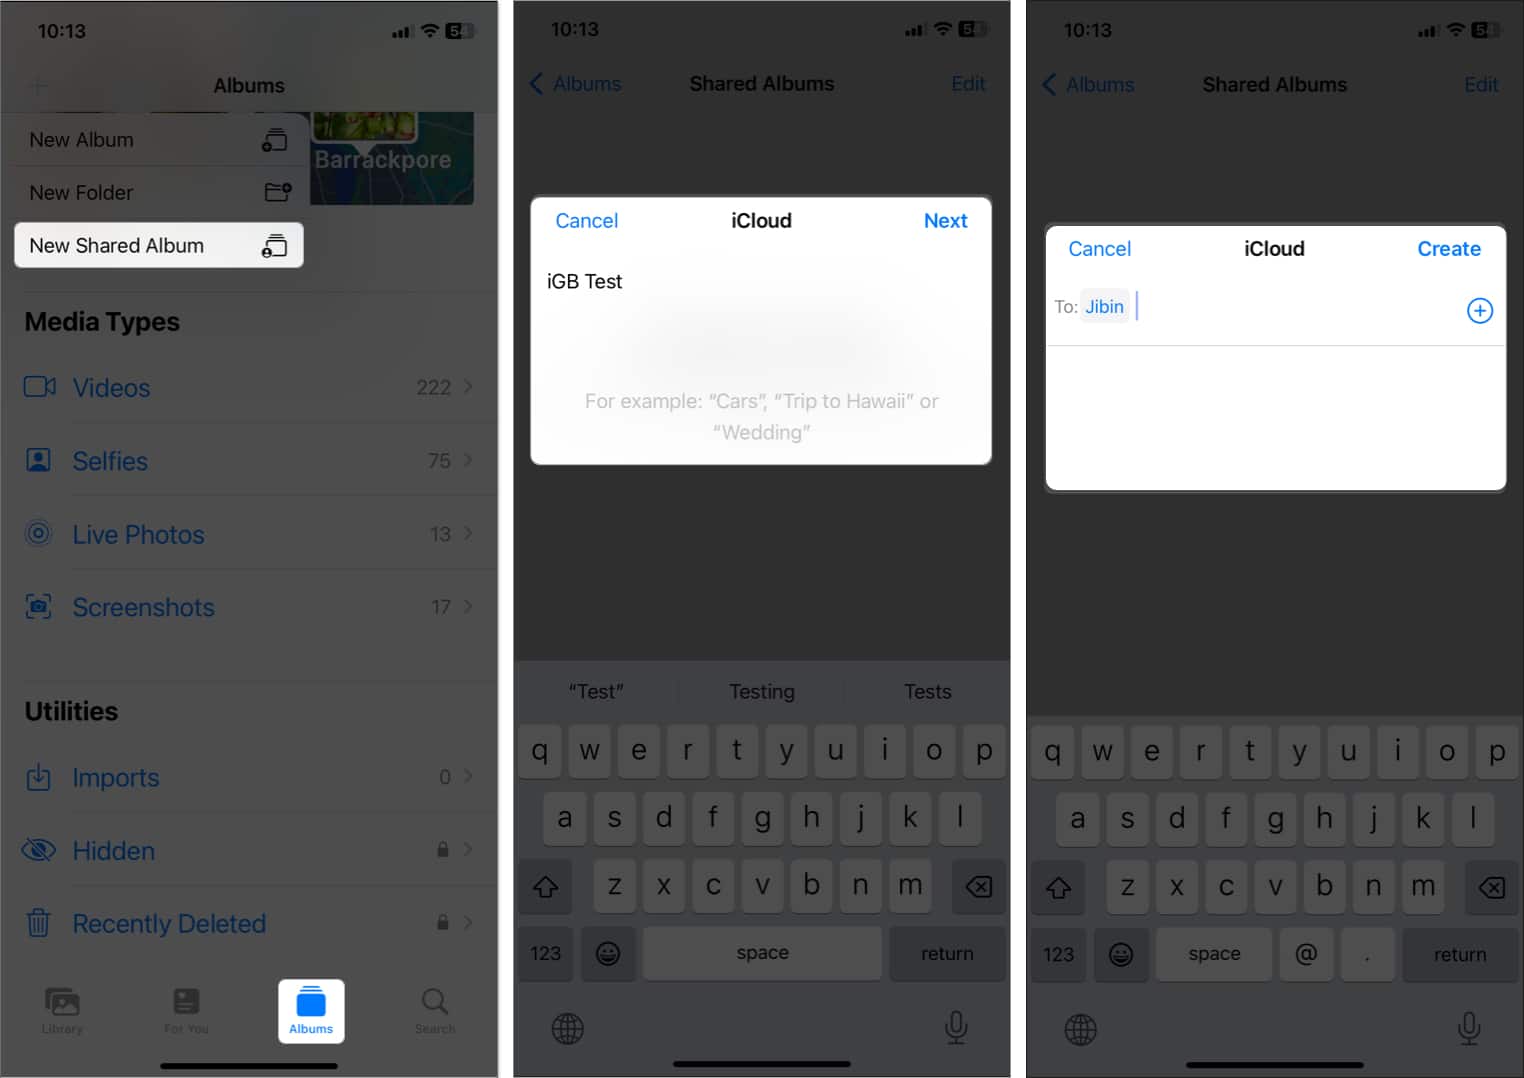
- Now, tap the Add button (+) at the top left.
- Select New Shared Album.
- Name the album and tap Next.
- Enter the recipient’s contact number and hit Create.
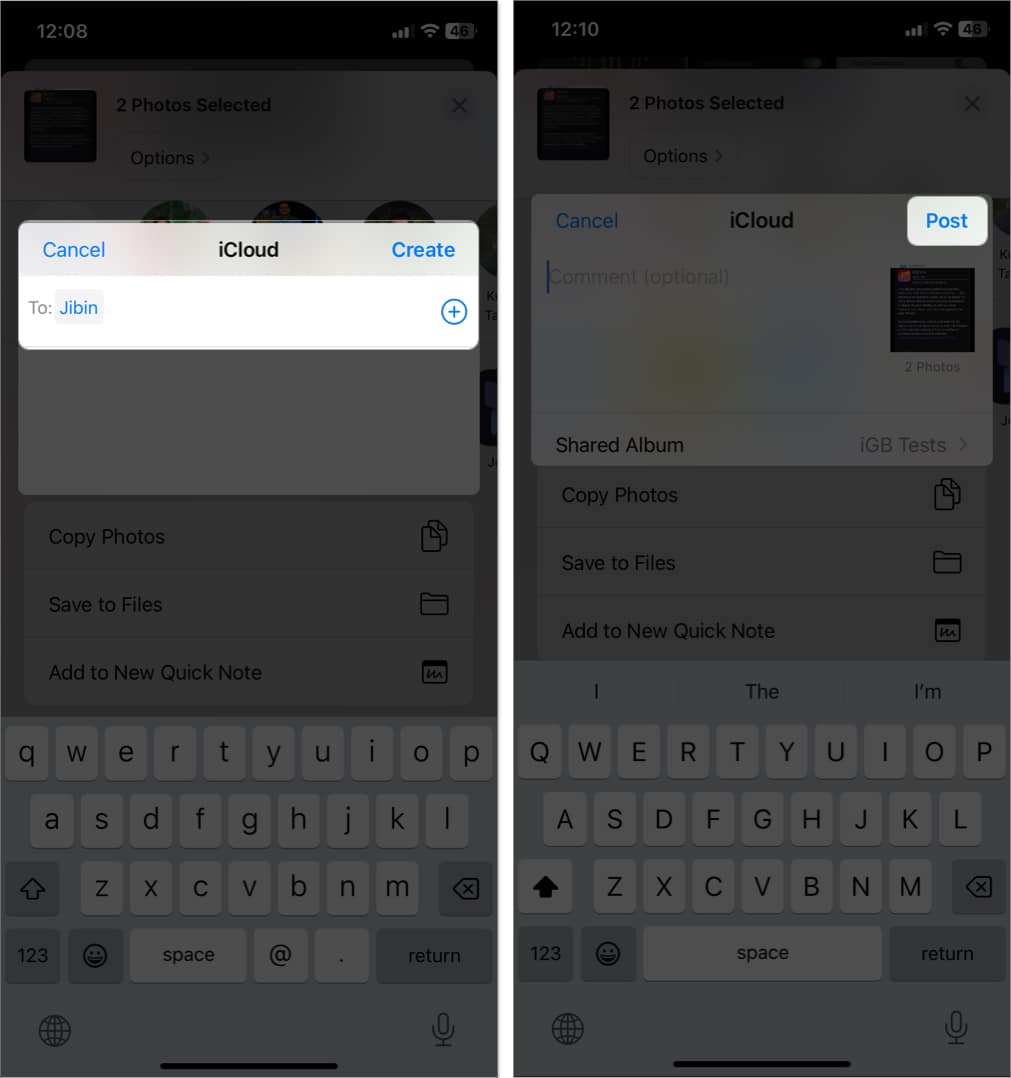
Alternatively, you can create a Shared Album from a photo.
- Open Photos → Select photos you want to add to the album.
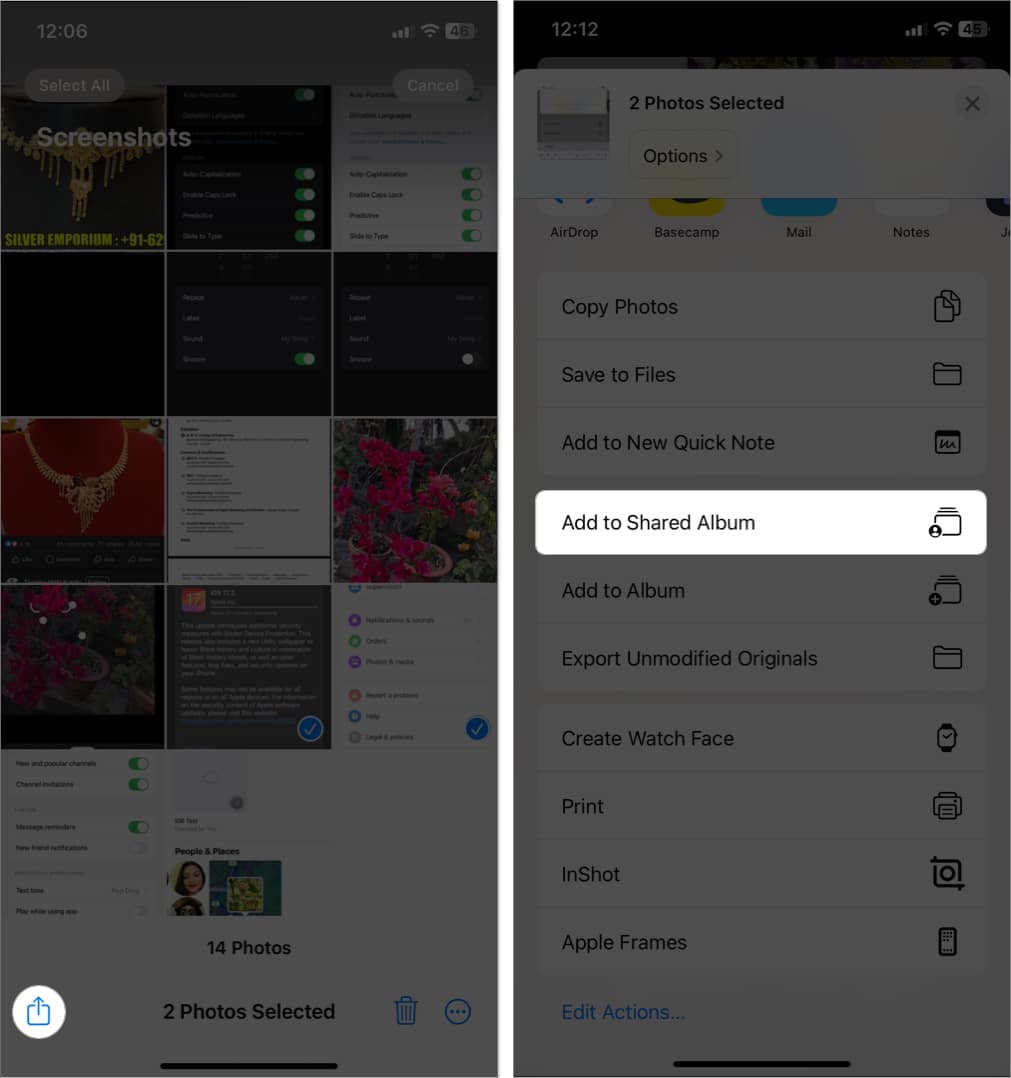
- Tap the Share icon → Add to Shared Album.
- Enter album name → Tap Next.
- Choose a contact Tap Create.
- Finally, tap Post.


Once the Shared Album is created, the recipient will be notified of your invitation. They can choose to accept the invite to see the Shared Album or reject the request. You will receive a notification when they subscribe to the album.
Join Shared Album on your iPhone
When you receive the invitation for a Shared Album, tap the notification or go to Photos → For You → Shared Album Activity → Tap Accept or Decline on the new album.
Note: You must enable Shared Album to see and accept the invite.
The invite is also sent to your email ID; just open the mail and follow on-screen notifications to subscribe.
Now that you have created or joined a Shared Album, you may wonder how to access those albums. Follow the steps below to find out!
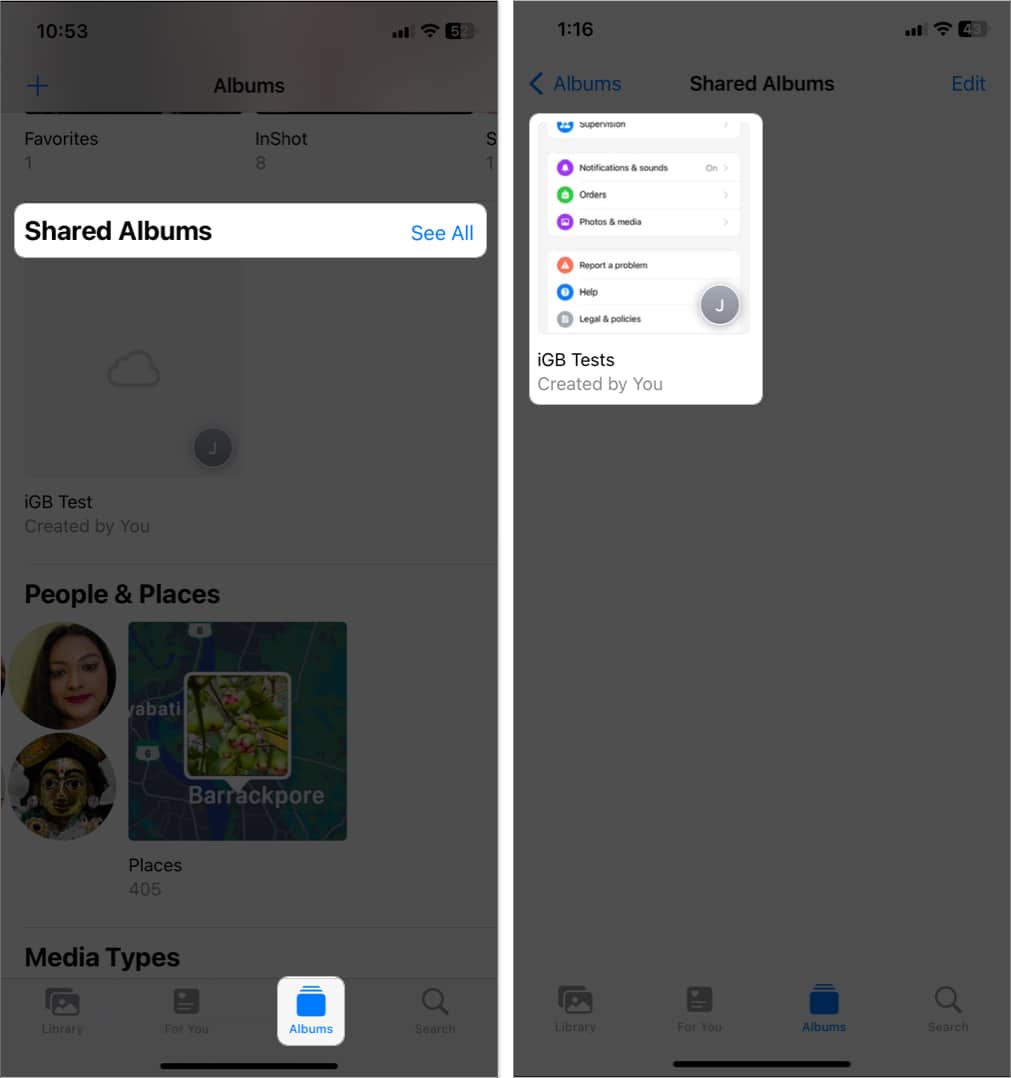
Where to find Shared Albums on iPhone
- Launch the Photos app → Albums tab.
- Scroll down to the Shared Albums category.
- Tap See All to view all shared albums.
- Tap the album you want to open and access the photos and videos.

How to manage Shared Albums on iPhone and iPad
There are plenty of things you can do with a Shared Album on iPhone. I have detailed all of them below.
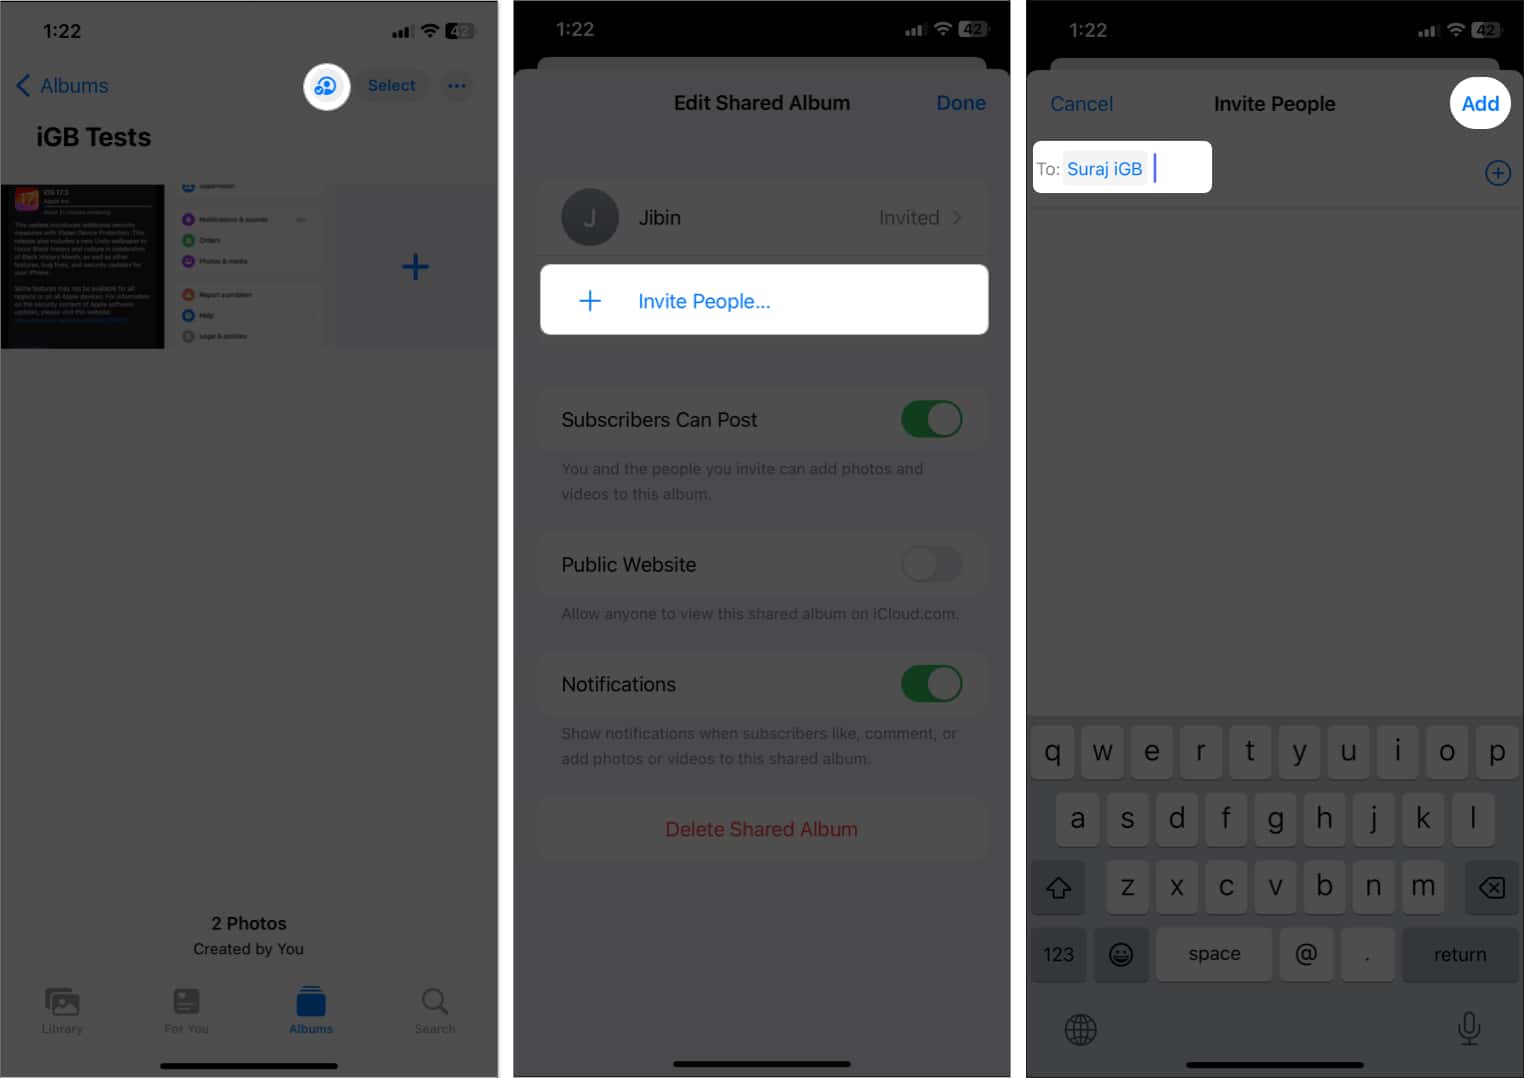
Add subscribers or invite more people
- Select the album that you want to share with more people.
- Tap People
- Select + Invite People.
- Add the contact name or number and tap Add.
Again, an invite will be shared, and the recipient can accept, ignore, or reject it accordingly. You can also share albums with your loved ones who don’t use iCloud by enabling public viewing.
Turn on public viewing in iCloud
Open shared album → People icon → Toggle on Public Website → Tap Share Link to share the link with anyone.![]()
Add photos and videos to the shared album
You can add photos and videos to the shared album in two ways:
Method 1
Open the shared album → Tap the + button → Select the photos or videos → Tap Add → Write a comment (optional) → Tap Post.![]()
Method 2
- Select the photos or videos you want to move into the shared album.
- Tap the Share button at the bottom.
- Scroll down and select Add to Shared Album.
- Select the shared album and add a comment if you want.
- Hit Post to add it.
Allow subscribers to add photos or videos to the album
By default, subscribers can add photos and videos to the album. If not, you can enable the setting. Go to Shared Album → People icon → Toggle on Subscribers Can Post. You can choose to disable the feature anytime; simply toggle it off.![]()
Add or delete comments in a shared photo
You can also add comments later to individual photos. Open the shared album → Select photo → Tap Add a comment → Type in → Send.
To delete a comment, open the photo → Tap the comment → Long-press it, and select Delete.
You can also tap the thumb icon to like the photo.
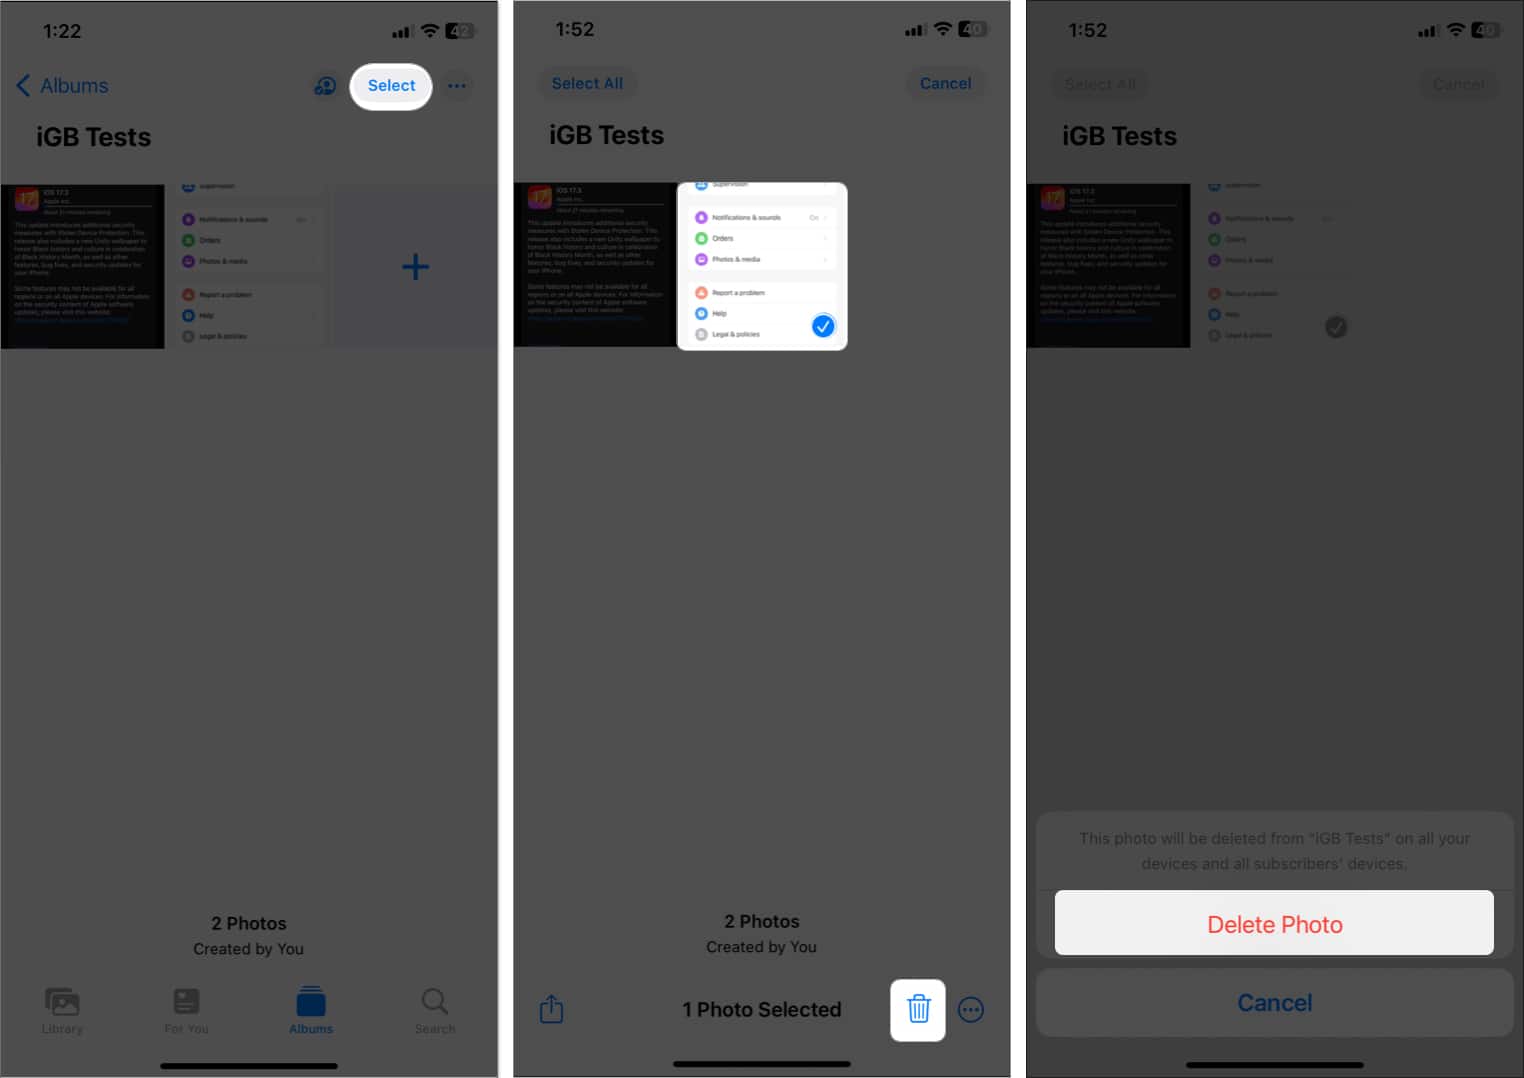
Delete photos and videos from a Shared Album
If you’re the creator of a shared album, you can delete any photos, videos, and comments added by any subscriber. But other members can only delete files and comments uploaded from their end.
- Open a shared album and tap Select at the top right.
- Select the images and videos and hit Delete (dustbin icon).
- Tap Delete Photo to confirm the removal.
Note: Anything you delete will be permanently removed across the shared album from your and your subscribers’ devices. However, files that you or other subscribers have saved or downloaded to your library won’t be affected.
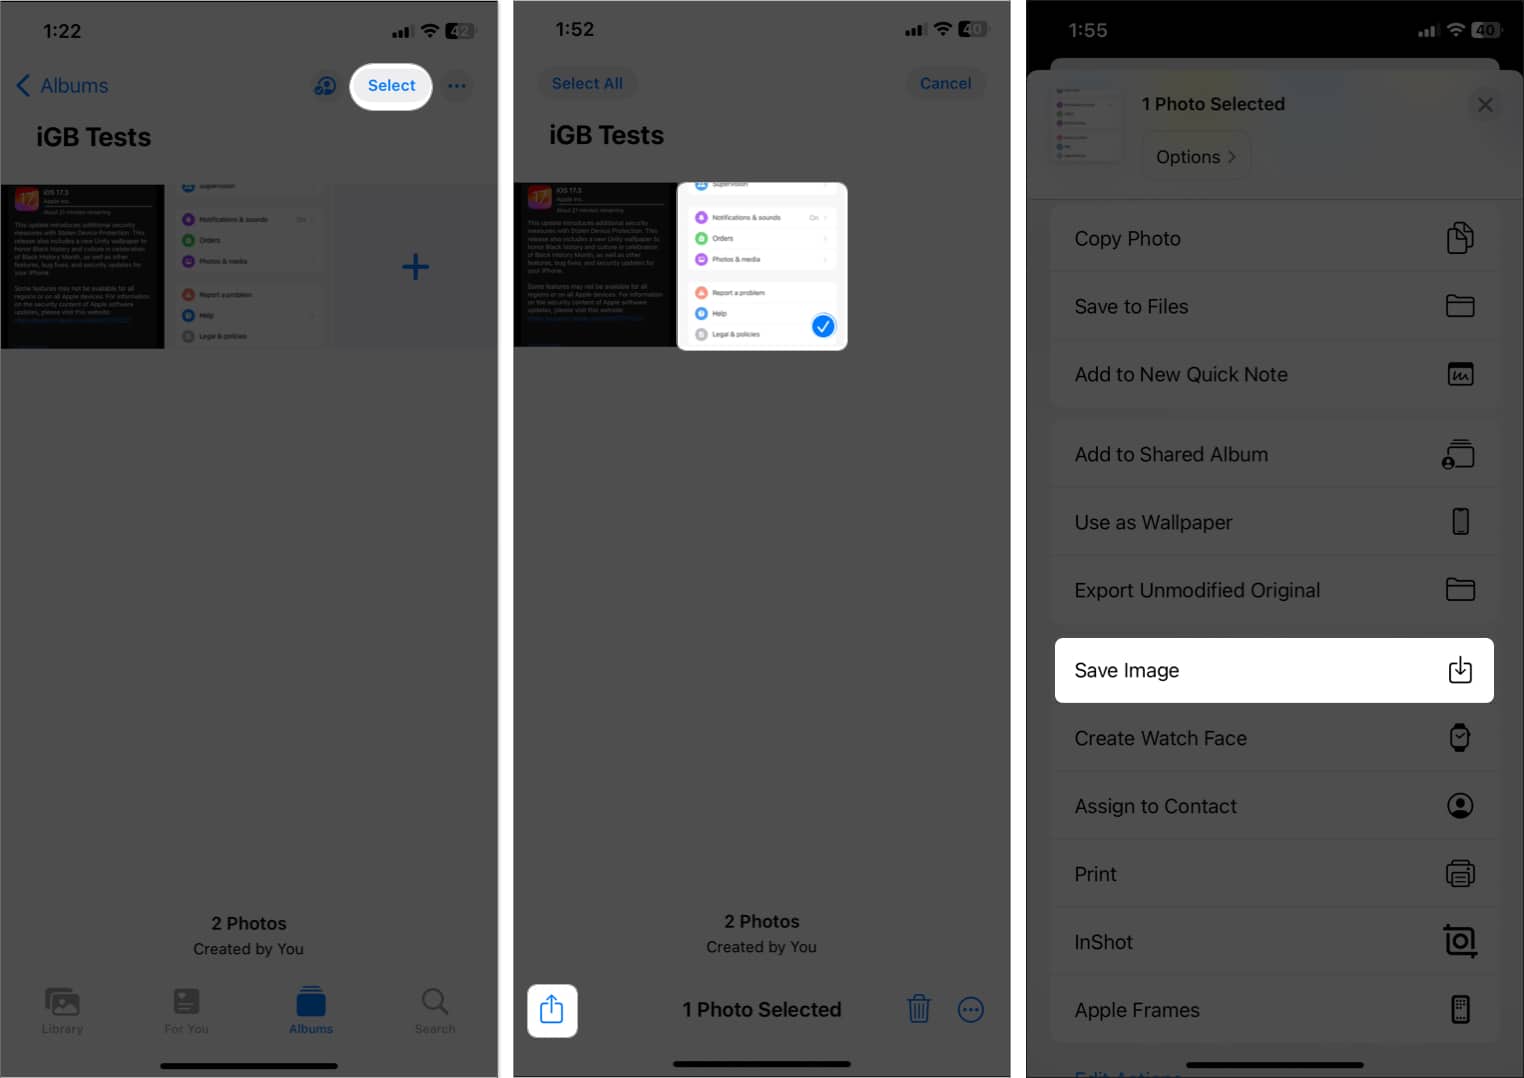
Save photos and videos from a Shared Album
When other subscribers add photos and videos to your shared album, you can save them in your photo library. Later, if they delete any photo or video, you can still view them in your photo library.
- Access the shared album → Open individual photos or videos or tap Select to choose multiple.
- Tap the Share button.
- Select Save Image or Save Video.

Turn notifications on or off
Don’t want to be disturbed every time someone adds or removes photos, videos, or comments in your Shared Album? Here’s how:
- Open the shared album → People icon.
- Toggle off the Notifications.
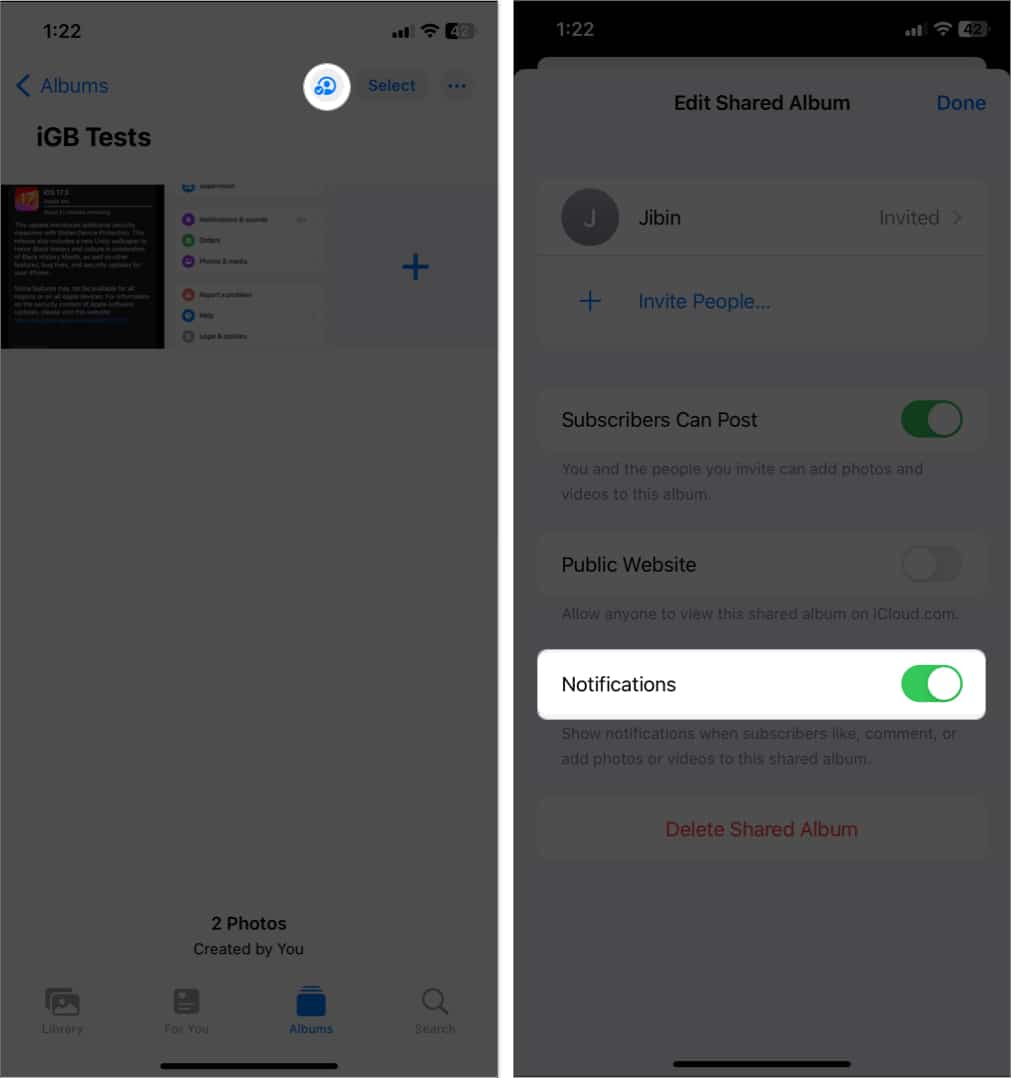
Alternatively, you can tap the three-dot icon→ Shared Album Details → Toggle on/off the Notifications.
Manage viewing options of a Shared Album
You can customize the viewing layout of your Shared Albums for better browsing experience.
- Open the shared album → Tap three-dot icon.
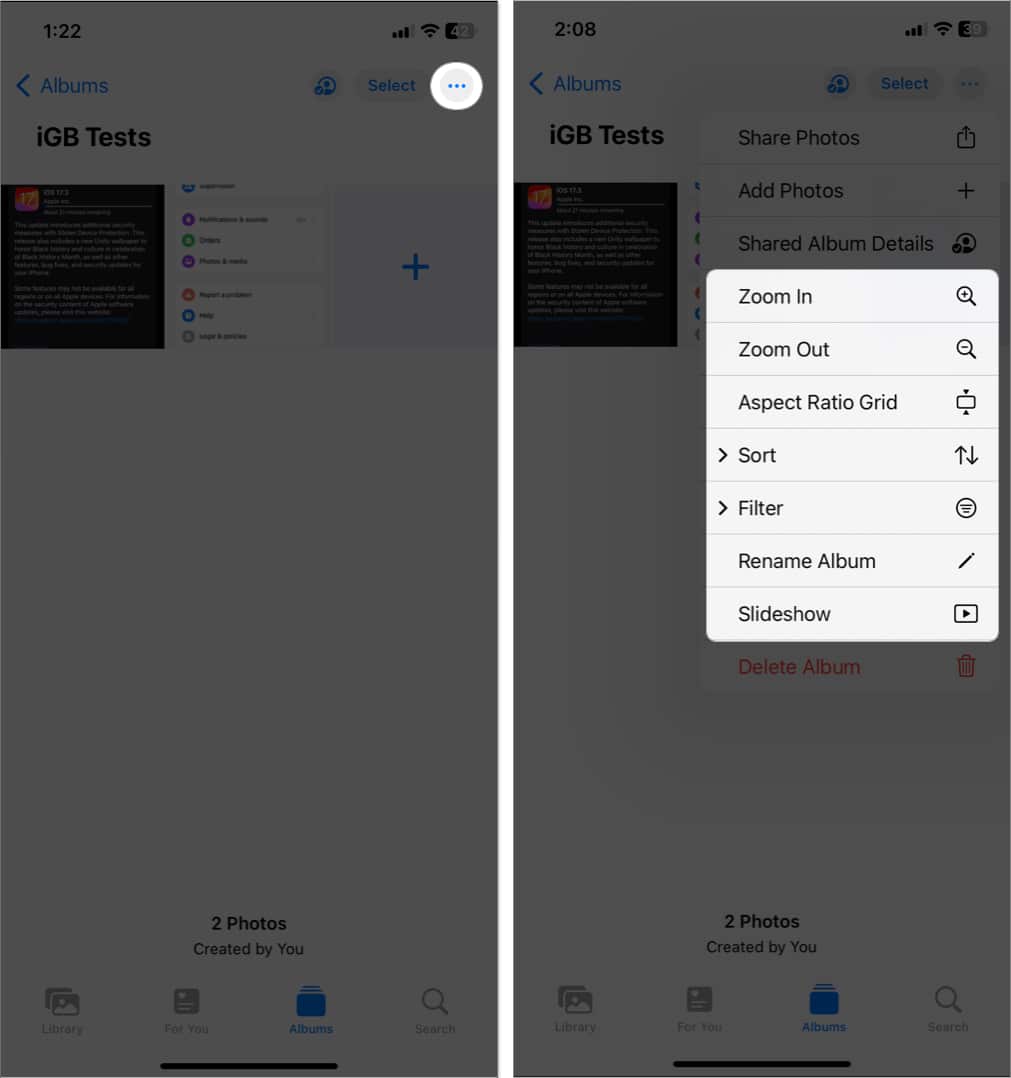
- Here you can:
- Zoom In
- Zoom Out
- Aspect Ratio Grid
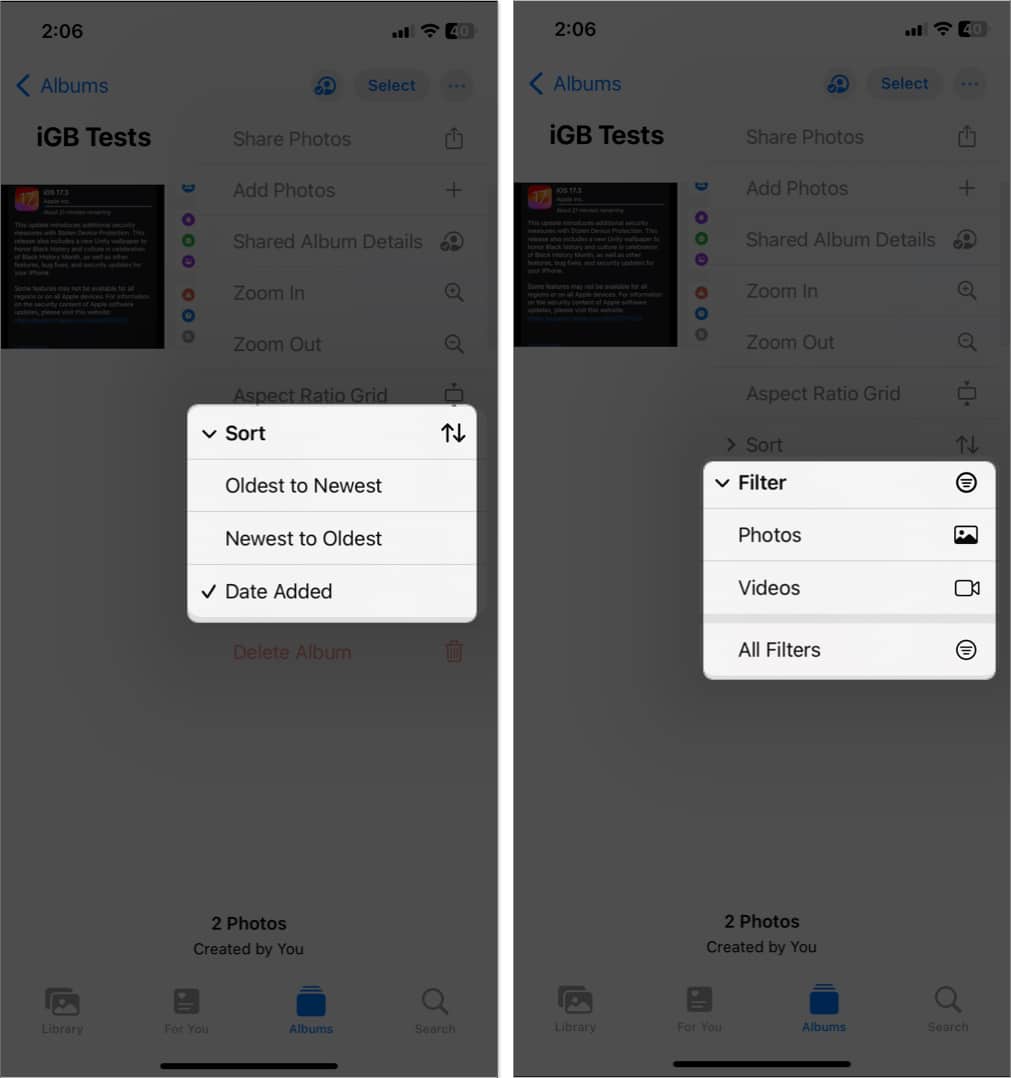
- Sort – As per Date Added, Oldest to Newest, or Newest to Oldest
- Filter – View all or just photos or videos.
- Slideshow: Create a video out of your shared photos

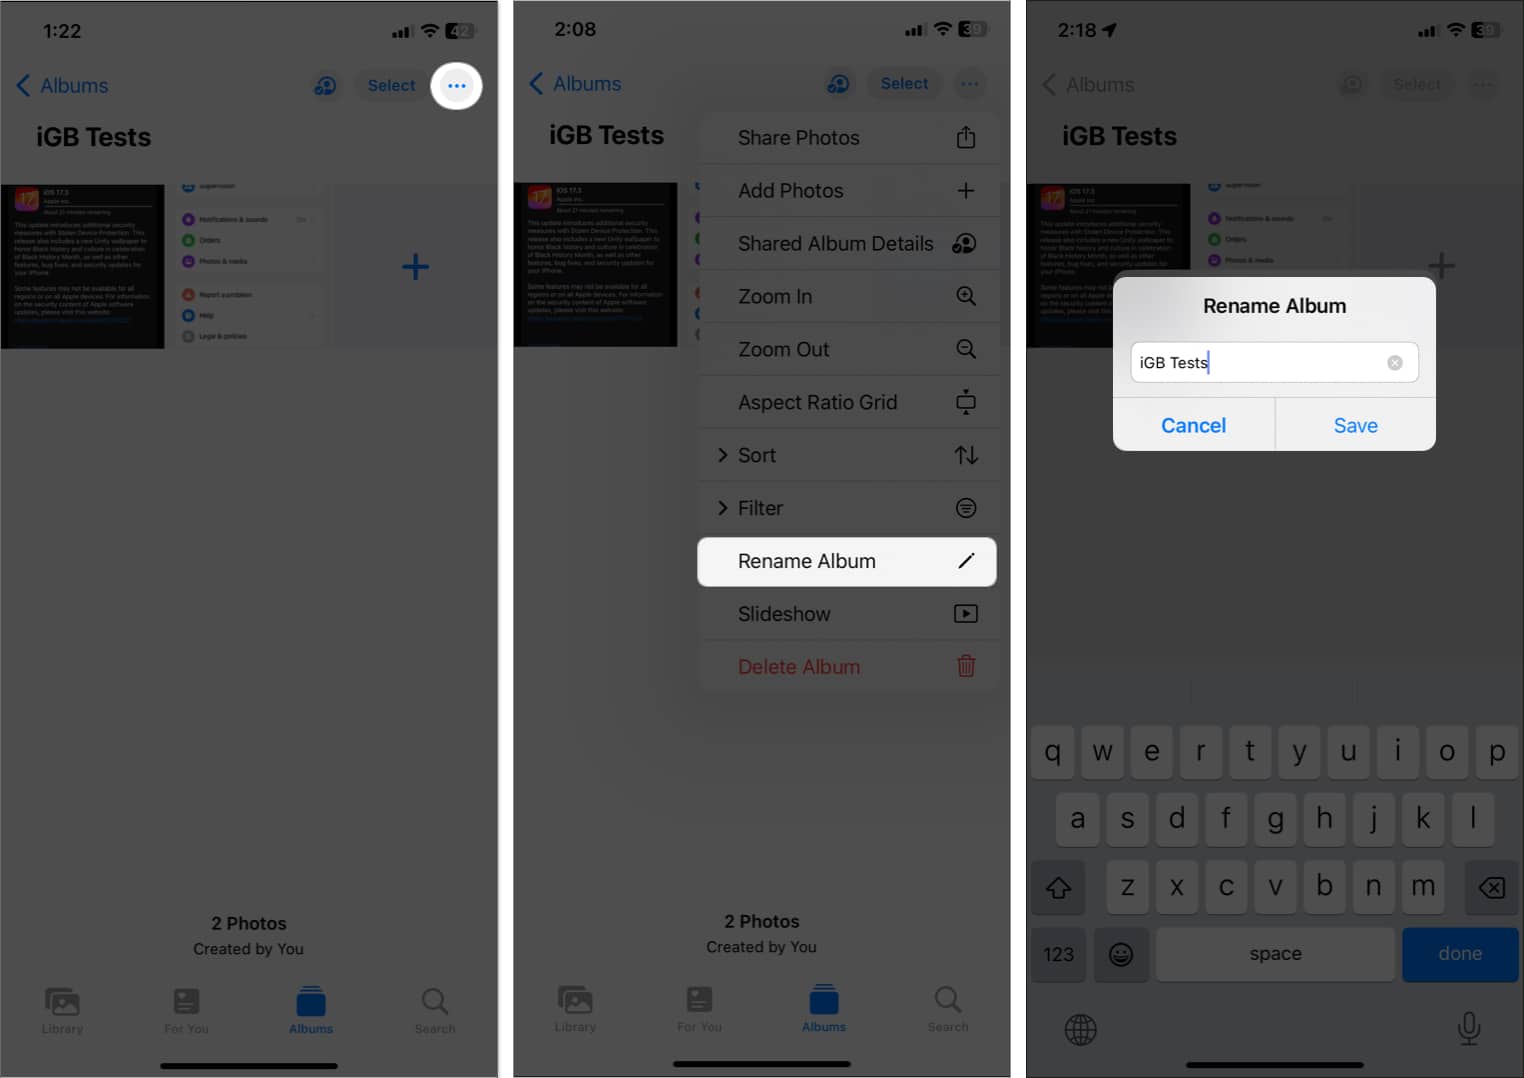
Rename a Shared Album
There are two ways to do so:
- In the shared album, tap the three-dot icon → Rename Album → Type the new name → Save.
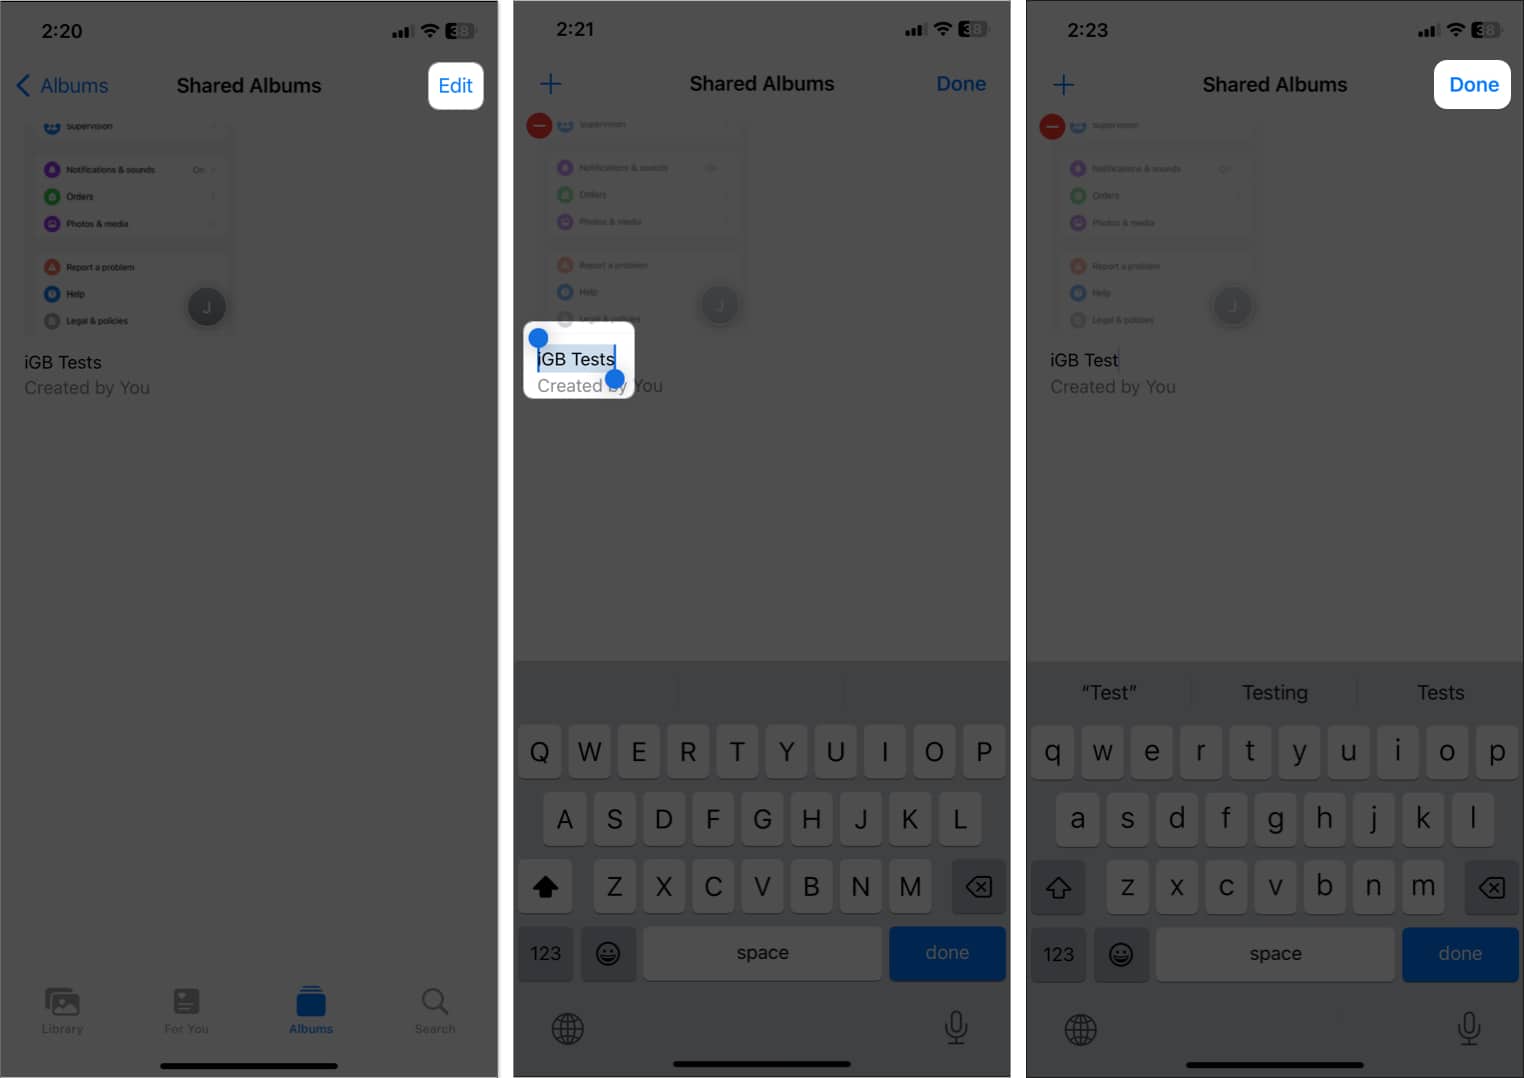
- In the Albums tab → Shared Albums → See All → Tap Edit → Tap the album name → Enter a new one → Done.


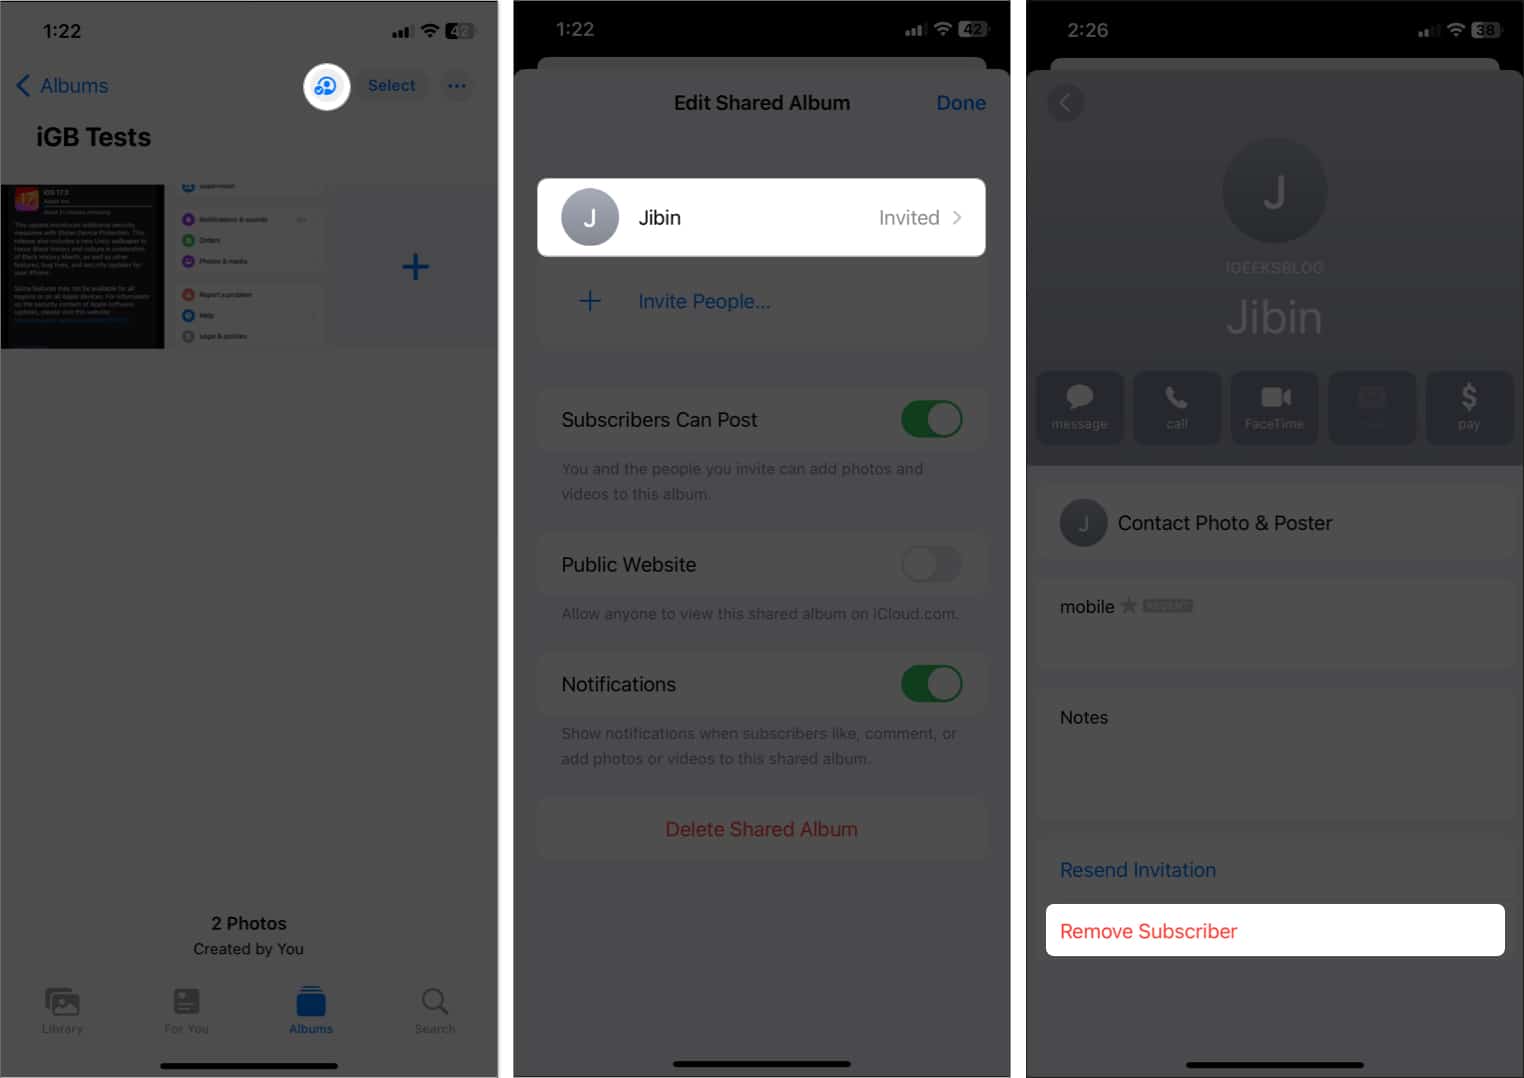
How to remove a subscriber from the Shared Album
Notably, only the album’s creator or owner has the right to remove someone from the shared list.
- In the shared album → People icon.
- Tap the contact you want to remove.
- Hit Remove Subscriber.
Delete a Shared Album on iPhone and iPad
As a creator of the shared album, you can delete the album. While others can choose to unsubscribe from it. You can accomplish this in three ways:
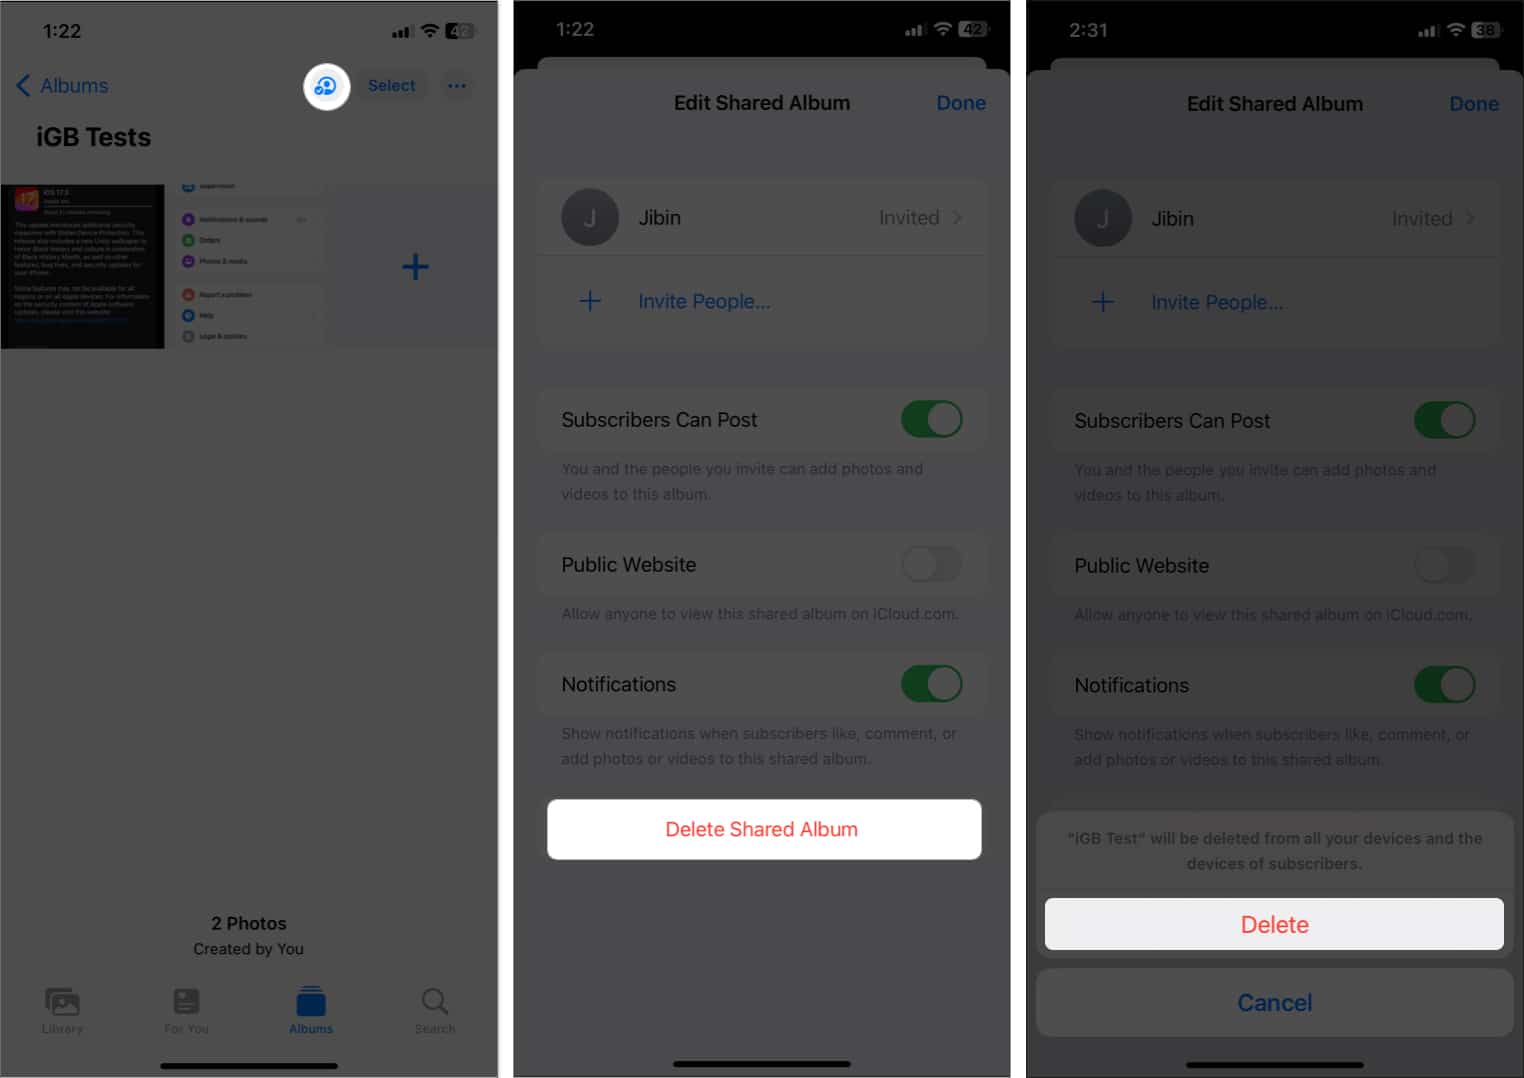
Method 1
- Access the Shared Album → People icon.
- Tap Delete Shared Album from the bottom.
- Hit Delete to confirm the action.
If you are a member of a Shared Album, you will see the Unsubscribe option instead of Delete.
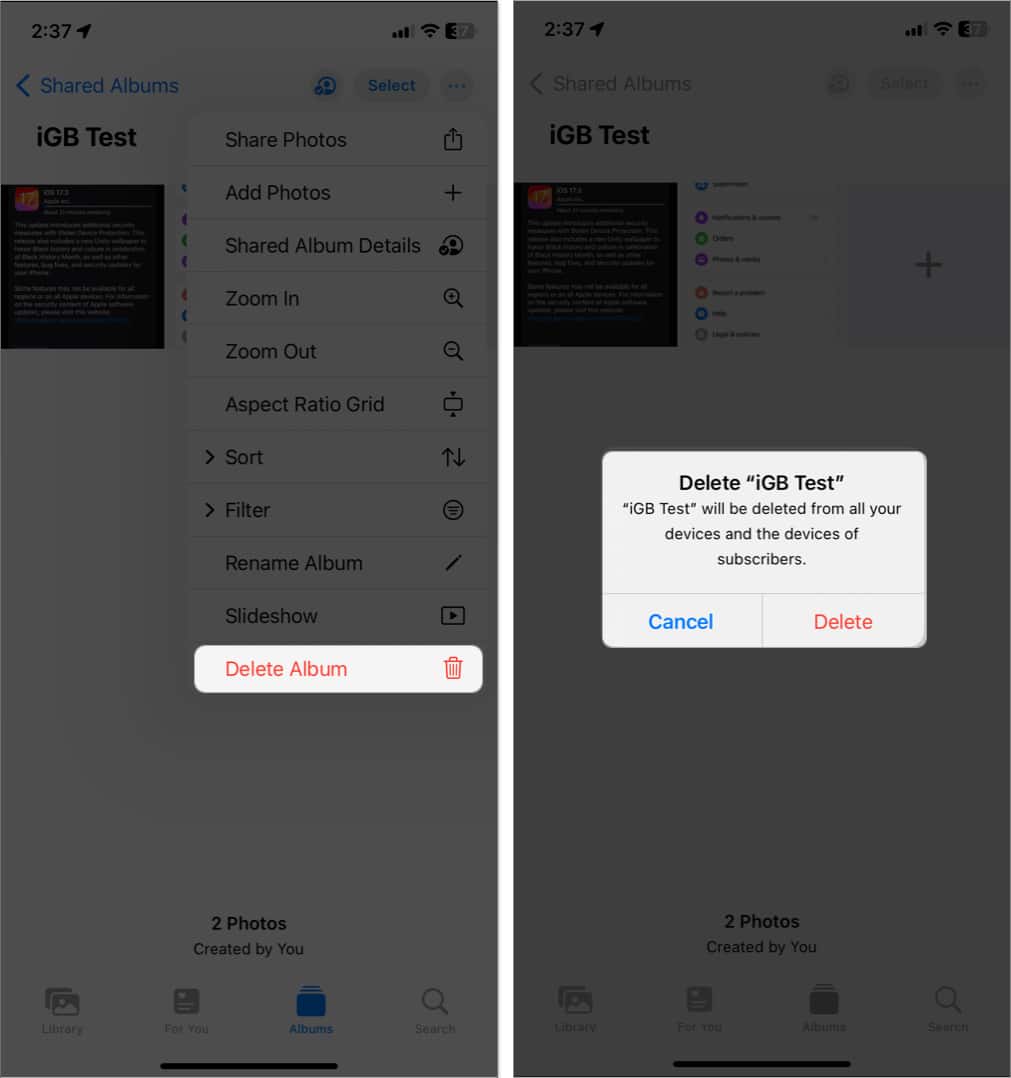
Method 2
- Tap the three-dots icon in the Shared Album.
- Select Delete Album → Tap Delete.
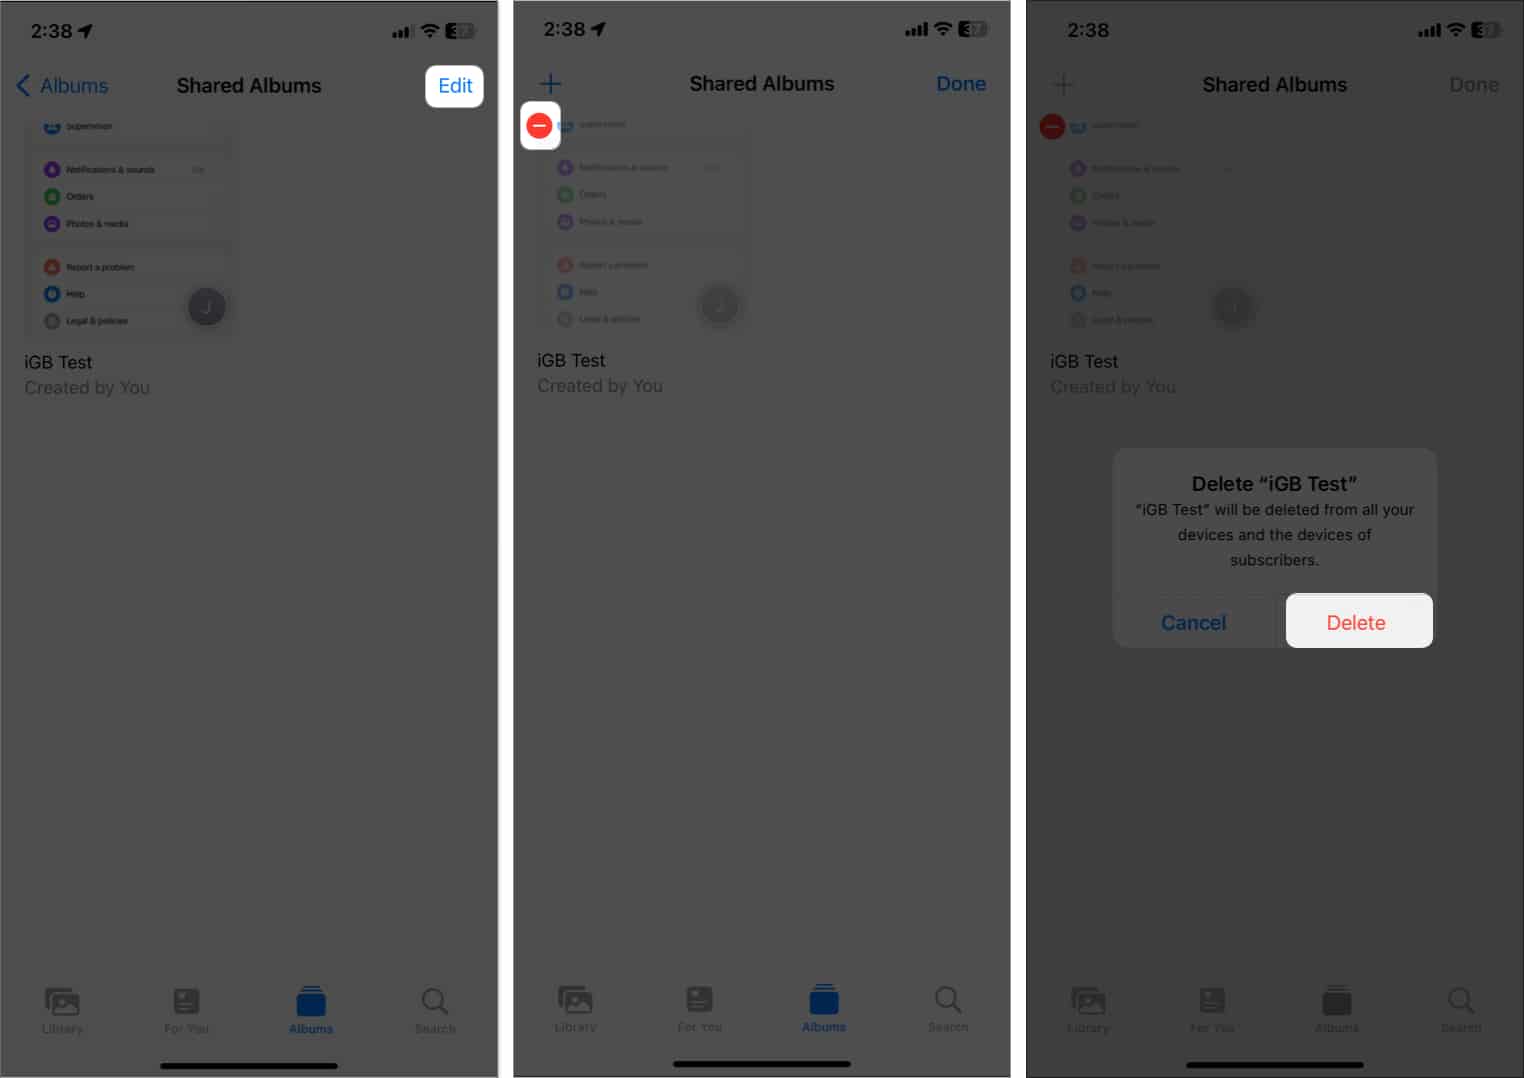
Method 3
- Go to the Albums tab → Shared Albums → See All.
- Tap Edit → Tap minus icon → Delete.
The album will be deleted and removed from all your iOS devices connected with the same Apple ID and the subscriber’s device. It will also delete all the photos in the album, so ensure you save them before going ahead.
When you add photos and videos to a Shared album, they don’t occupy your iCloud storage. Also, photos uploaded by others won’t be saved to your iPhone’s local storage space. Therefore, unless you save photos from a Shared Album, your iPhone storage will not be used.
If you disable Shared Albums on your iPhone, all shared photos and videos will be removed from the device. However, you can access those shared albums from other Apple devices logged in with the same Apple ID. When you activate the feature again on your iPhone, the shared albums will return.
Signing off…
Shared Albums is an excellent feature for securely exchanging photos and videos on your iOS device. After trying it, you may want to stop using the social media app to share pictures with your friends and family.
What do you think about it? Let us know in the comment section below.
Author
🗣️ Our site is supported by our readers like you. When you purchase through our links, we earn a small commission. Read Disclaimer.