With every new update, Apple adds more features to the Safari browser on Mac. Unfortunately, sometimes, these updates may bring unexpected guests, like bugs, that can affect the browser. So, let’s look at solutions to fix Safari not working on Mac after the update.
Why is Safari not working on my Mac?
Before getting into the fixes, here’s a look at the major culprits behind the Safari not working on Mac issue.
- Software glitches that came with macOS update.
- The website you are trying to access is down for maintenance or other issues.
- Your Mac might not have a stable internet connection.
- Heavy accumulation of cookies or cache.
- Viruses from plugins or extensions.
How to fix Safari not working on Mac
Here are some effective troubleshooting steps to fix Safari if it’s not working on your Mac.
1. Reload the webpage
Since Safari is not loading webpages on Mac after the update, you can start fixing it by reloading the webpage you are currently on. To reload: Press Cmd (⌘) + R.
Also, to ensure the problem is not with one particular website, try accessing another web page on Safari.
Alternatively, click View from the menu bar and select Reload Page. If neither is working, ensure you have a stable internet connection and look at other fixes.
2. Force Quit Safari
If Safari is frozen or not loading, try to force quit the app and see if that helps.
Once done, reopen the app, and it will automatically continue from where you left off.
3. Check and Reset Network Settings
If some bugs have fiddled with the default settings, even that may stop Safari from working.
To solve that, you can reset the network settings on your Mac and see if you are still facing the issue.
4. Turn off VPN
If you are using a VPN on your Mac, it might stop you from accessing geo-restricted websites. So, it would be wise to turn off the VPN and re-check if you can access the desired website in Safari.
Go to Apple menu → System Settings → Pick VPN in the sidebar → Toggle off VPN.
If you are using a third-party VPN app for your Mac, you might need to open the app and disconnect the service.
Then, retry using Safari. If this doesn’t fix the issue, proceed towards other fixes.
5. Try using a Private window
As mentioned before, the problem might be with certain websites. Interestingly, you can access some of the websites flawlessly when opened in a private window.
To open a private window in Safari, use Cmd (⌘) + Shift + N.
6. Give your Mac a quick restart
With a quick Mac restart, you might be able to solve the Safari not working issue.
Click Apple menu → Restart → Click Restart again to confirm.
7. Delete Safari History, Cache, and Cookies
Have you ever wished to erase some memories in life to start afresh?
While it’s not entirely possible in life, you can clear cache, history, and cookies on Safari on Mac. This will help load your web pages quickly.
That’s not all. You can further clear other unwanted files from Safari using Finder. Here’s how:
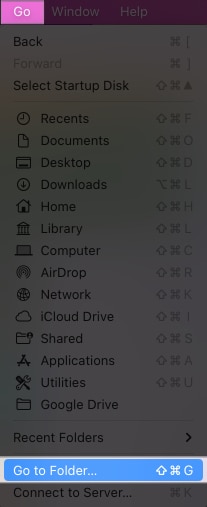
- Open Finder → click the Go option from the menu bar.
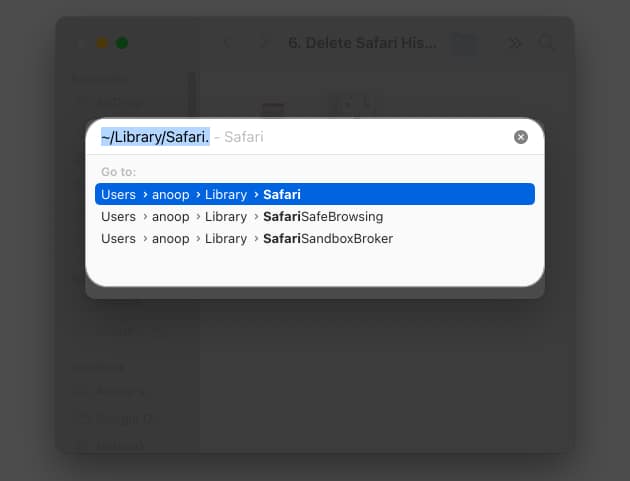
- Choose Go to Folder.
- Now enter/paste the following:
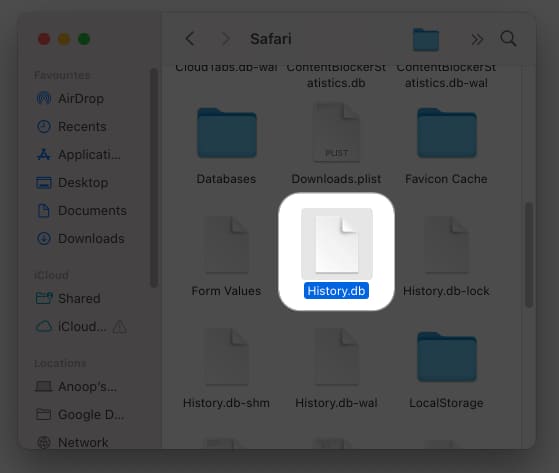
~/Library/Safari. - Now, delete the files History.db and LastSession.plist.
You can use this to clean up the corrupted Safari PLIST files and database. Don’t worry; Safari will eventually regenerate these files. Clearing these files will also remove what’s making Safari not work on Mac after the update.
8. Disable Safari Extensions
While you downloaded them to improve your browsing experience, some corrupted extensions might be the reason Safari does not work on your Mac after the macOS Sonoma update.
- Launch Safari → click Safari in the menu bar → go to Settings.
- Click Extensions → disable extensions by unchecking them.
- To uninstall these extensions, press delete.
9. Enable JavaScript
This is a solution that often goes under the radar. Certain websites need JavaScript to load properly.
To enable it, go to Safari Settings → Security → Check Enable JavaScript.
10. Disable iCloud Private Relay
Enabling iCloud Private Relay can mask your IP address and make it hard for you to access certain websites.
If you trust the website, try disabling Private Relay and accessing it again.
To do so, go to Apple menu → Click System Settings → Pick your Apple ID → Select iCloud → Click Private Relay → Toggle off Private Relay.
11. Delete Preference files
As one can guess, Safari’s preference files contain information regarding all the settings and changes you have made in the browser. It might be why Safari is not working on Mac after the update. To solve that, you can simply clear it:
- Quit Safari if it’s running.
- Launch Finder.
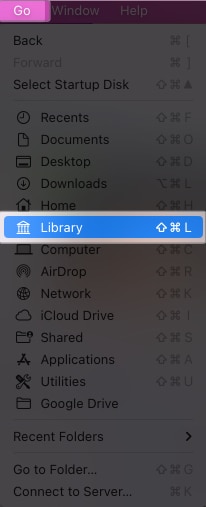
- Hold the Option key and hit the Go menu.
- Choose Library.
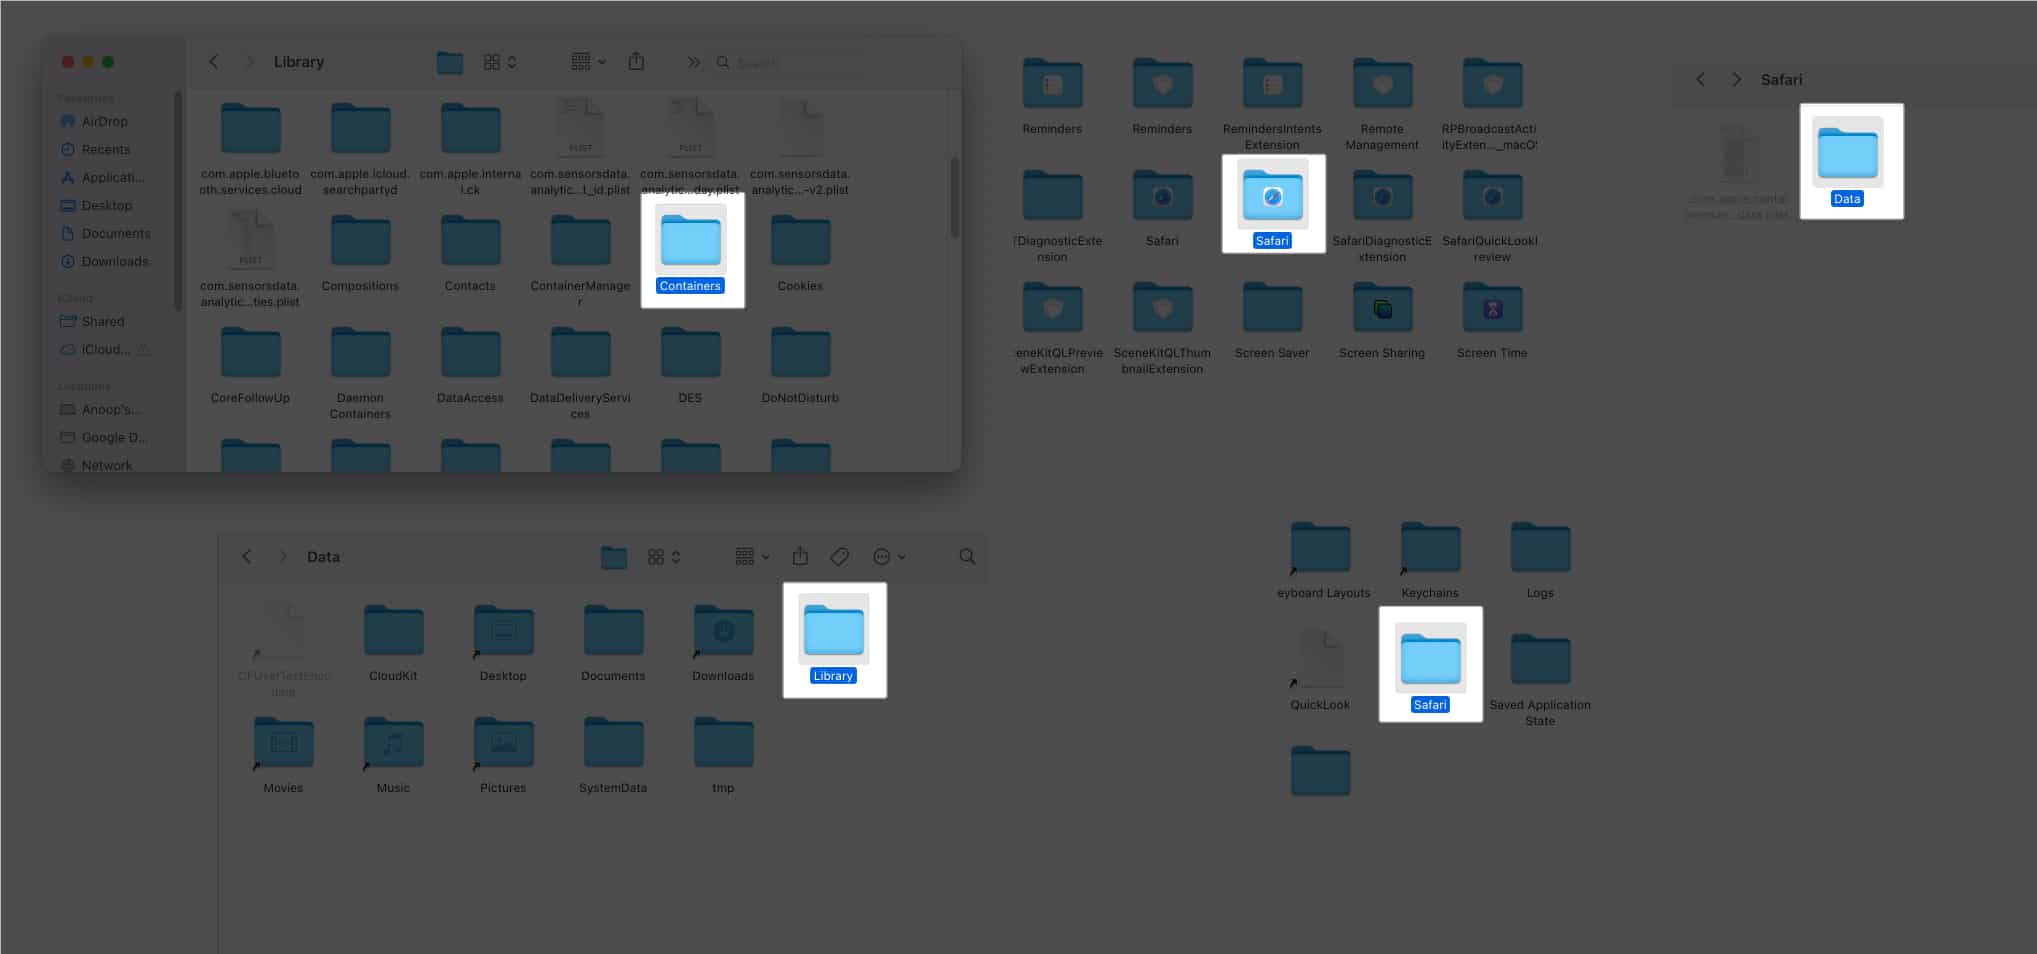
You can also use Shift + Command + L - Navigate to Containers → Safari → Data → Library → Safari.
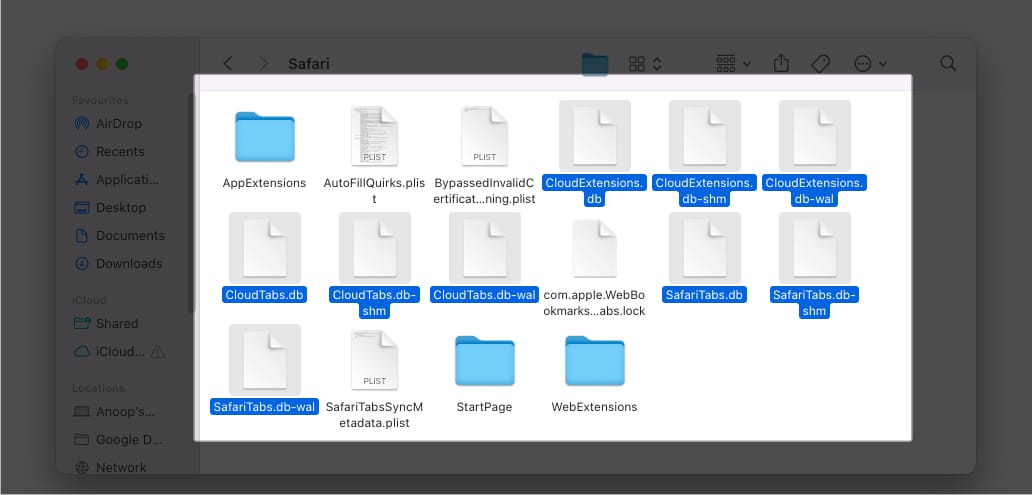
Even if you see multiple Safari files, only one will have the proper path. - Delete all the files that end with the following extensions:
- db
- db-shm
- db-wal
12. Flush your DNS cache on Mac
Sometimes, adding multiple Domain Name Systems (DNS) can cause issues with Safari.
So, clear the DNS cache and see if the issue is solved.
13. Login using Safe mode
Have you ever heard of playing it safe? While it is close to impossible in life, it’s possible in macOS with Safe Mode. With this, you can prevent Safari from freezing.
14. Update macOS
Suppose the underlying issue is indeed a result of the glitches that came with a macOS update you downloaded. Apple will surely release another update to fix such bugs.
So, update macOS as soon as the next version is available.
Happy browsing with Safari
With this tutorial, I hope these solutions could help you save Safari from not working on MacBook Air or other Macs after the update.
If none of the solutions are helpful, the last resort is to contact Apple Support and see if they can help you look at the issue.
If you still have any doubts or suggestions, do let me know in the comments.
More interesting reads:



Leave a Reply