

If you have ever searched for something on X (formerly Twitter), clicked a post, and found yourself facing a “This media may contain sensitive material” warning, then you are not alone. The frustrating part is that X makes this sound more complicated than it really is.
I went looking for the setting that actually controls sensitive media, expecting to find one obvious switch. Instead, there are two controls that matter: one for media in your X feed and another for sensitive content in search results.
So if you are trying to see sensitive content on X (Twitter), including NSFW, adult, graphic, violent, or other sensitive media that X has placed behind a warning, here is the setup that matters. I have shared the steps for iPhone, Android, and browser.
Before you start: What X calls “sensitive content”
First, a quick clarification: sensitive content on X doesn’t always mean violence or NSFW material.
X automatically applies sensitive-media labels to material that some users may reasonably prefer not to encounter unexpectedly. That can include things such as:
- Graphic Content: Posts showing excessive violence, death, medical procedures, or abuse involving people or animals.
- Gratuitous Gore: Extremely graphic scenes like mutilation, torture, or corpses, way beyond typical horror.
- Adult Nudity & Sexual Behavior: Consensual sexual acts or nudity (real or animated) meant for arousal.
- Violent Sexual Conduct: Any sexual act involving violence or non-consent, real or simulated.
- Sensitive Topics: Mentions of suicide, self-harm, or abuse that aren’t graphic but are emotionally heavy.
- Emotionally Charged Content: Posts about political conflicts, global issues, or divisive topics likely to spark fights.
Note:
Content involving sexual violence, bestiality, or necrophilia is never allowed on X, not even with sensitive content settings enabled.
X’s policies specifically allow some consensually produced adult content when it is appropriately marked as sensitive. But remember that turning on sensitive content does not mean X suddenly removes its other rules.
You are changing what your account is willing to display. You are not disabling the platform’s content policies. And that is the first mistake I see people make: they assume there is one universal “show everything” button.
Who can actually view sensitive content on X?
This is where things get important. Changing your settings does not guarantee that every piece of sensitive or adult content will become visible.
X restricts certain adult content for users who are under 18 or who have not provided a birth date on their profile when signing up. So, if you are over 18 and still cannot see sensitive posts, do not immediately assume the account is broken.
Check these things first:
- Is your date of birth on your X profile?
- Is sensitive media enabled in your media settings?
- Is X’s safe search filtering sensitive posts?
- Are you using the iOS app, where some sensitive-content behavior differs from the web?
- Is the specific post restricted for another reason?
That last point is important. A sensitive-content setting cannot override an age restriction, deleted post, protected account, suspended account, or content that X has removed. In other words, the setting gives you permission to see eligible sensitive media; it does not make unavailable posts magically reappear.
The main fix: Turn on sensitive media on feed and search results
This is the part that actually solved the problem for me.
I found two settings worth checking. The first controls sensitive media displayed in posts. It controls whether you see a warning blur over potentially sensitive media. The second controls Safe Search, which can hide sensitive content from your search results entirely.
If you only change the first one, you can still wonder why sensitive posts are missing from search. That is because feed visibility and search filtering are not the same thing.
On iPhone and iPad
Here’s the annoying part: iPhone and iPad users need to use the X/Twitter website rather than the iOS app to change this preference.
- Launch Safari or any other browser on your iPhone and go to x.com.
- Tap Sign in and use the credentials to log into your account.
- Now, tap your profile picture at the top, then scroll down and select Settings and privacy.
- Then go to Privacy and safety and tap the Content you see option.
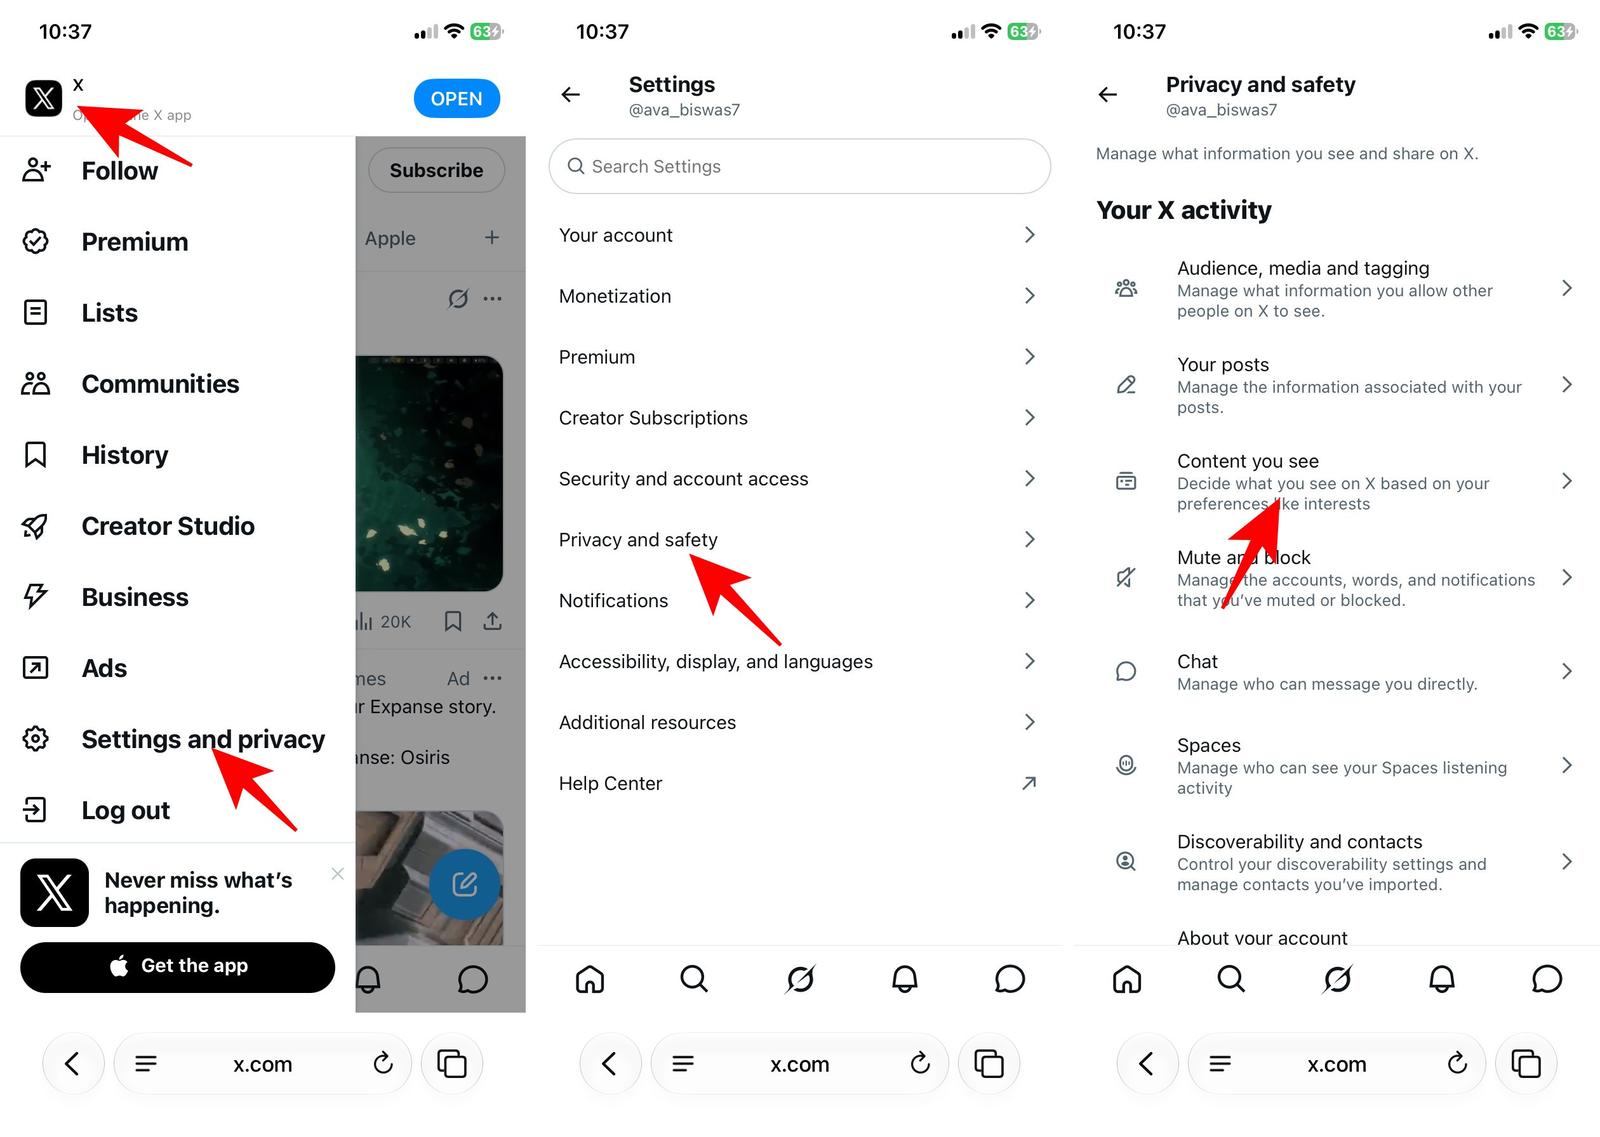
- Check the box next to Display media that may contain sensitive content. It will remove the X/Twitter sensitive content warning from your feed.
- Next, select Search settings and untick the Hide sensitive content box.
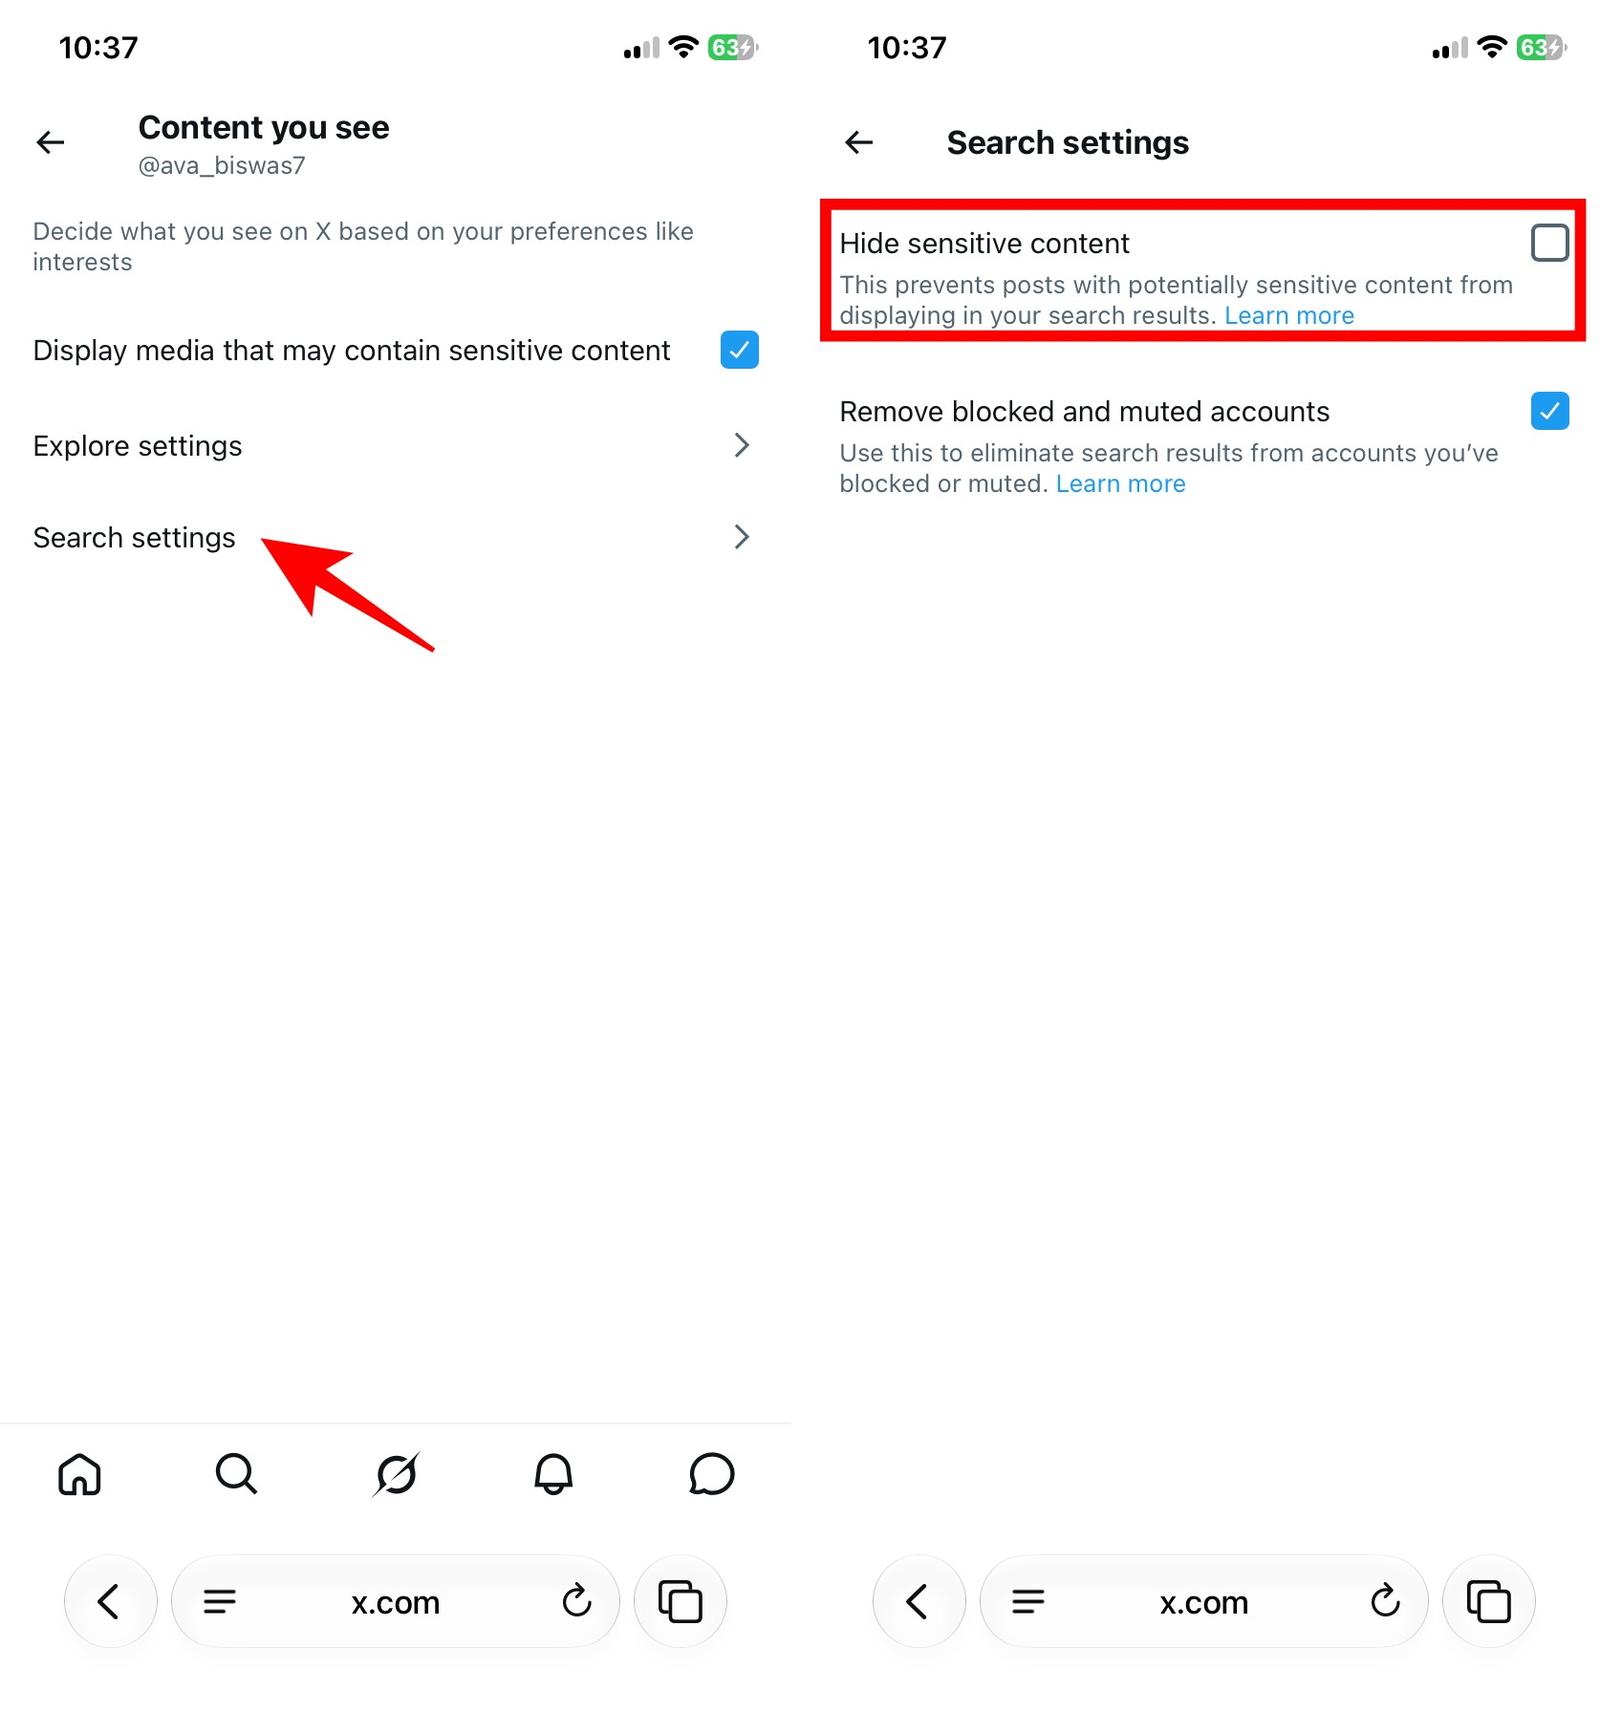
While testing the feature, I noticed that some sensitive posts behind an interstitial still can’t be clicked through in the iOS app, even though the sensitive-media preference is managed on the website. So, you need to use the web version to access content that the iOS app doesn’t show.
On Android
The good news is that the X app on Android offers sensitive content settings. Follow these steps below:
- Open the X app and tap your profile picture.
- Select Settings and privacy on the left sidebar.
- Tap Privacy and safety from the menu.
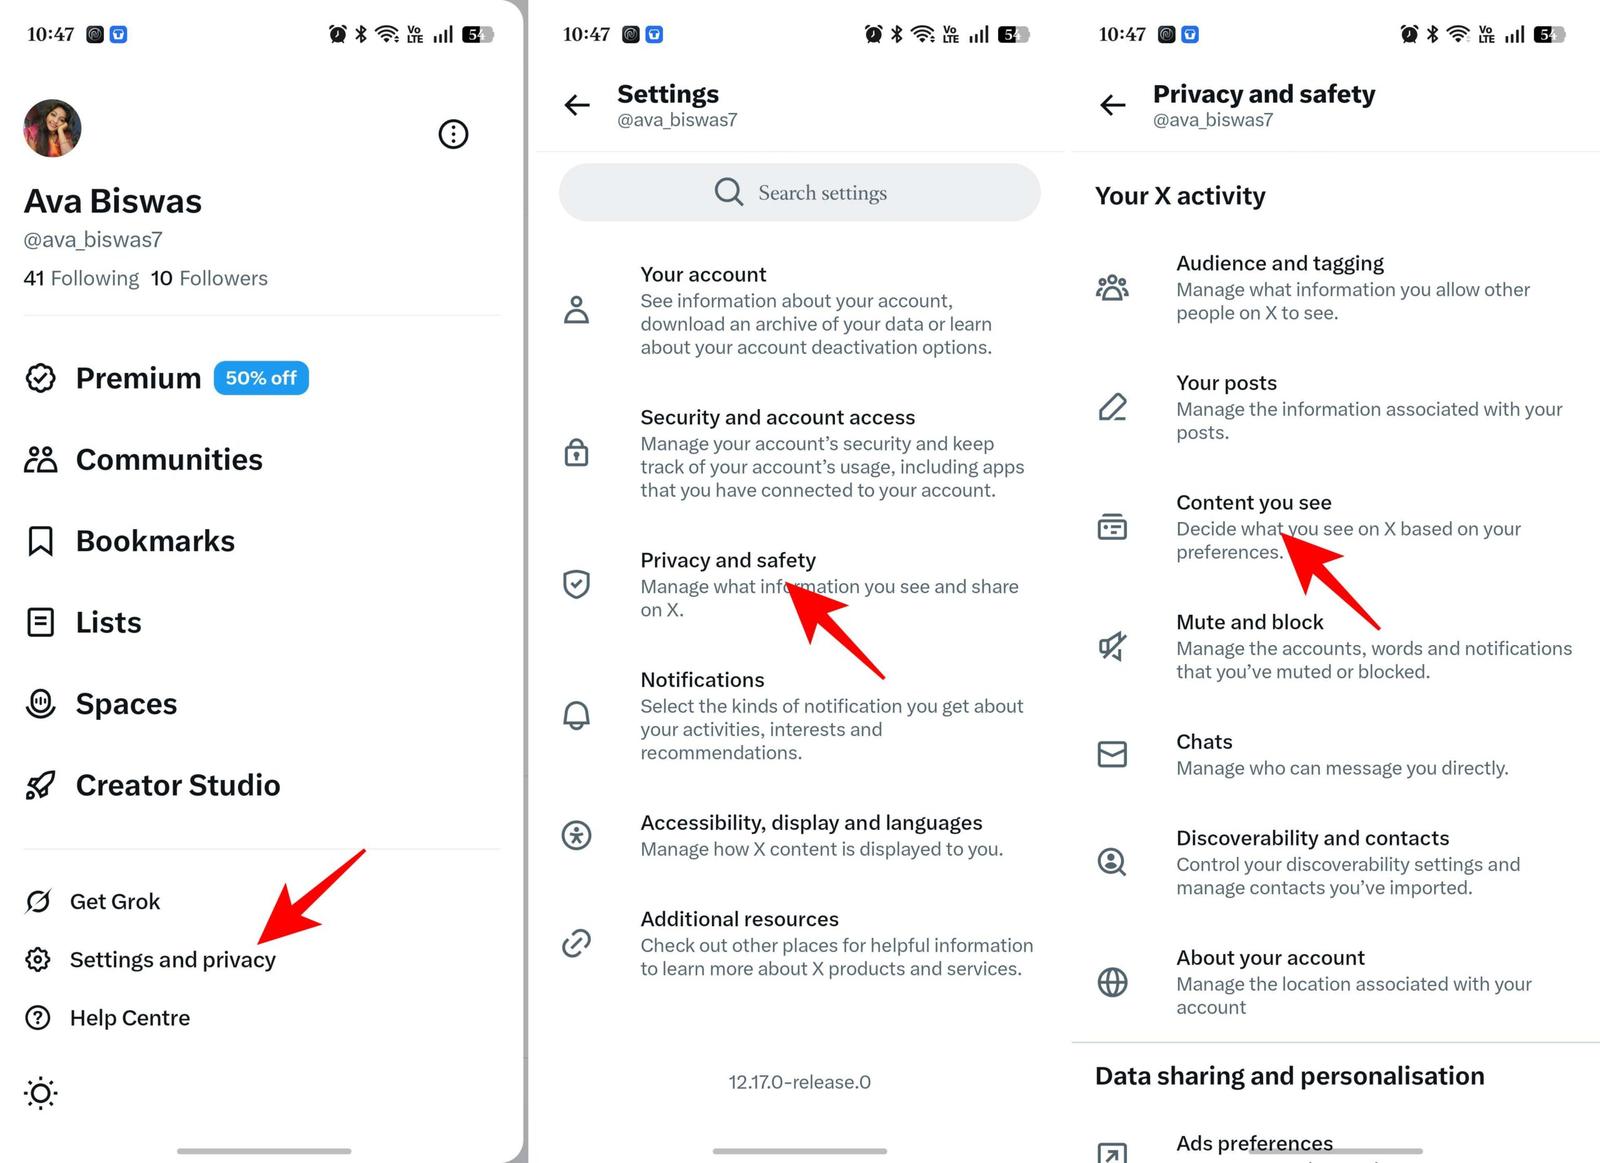
- Go to Content you see and select Sensitive media.
- Tick the box for Display media that may contain sensitive content.
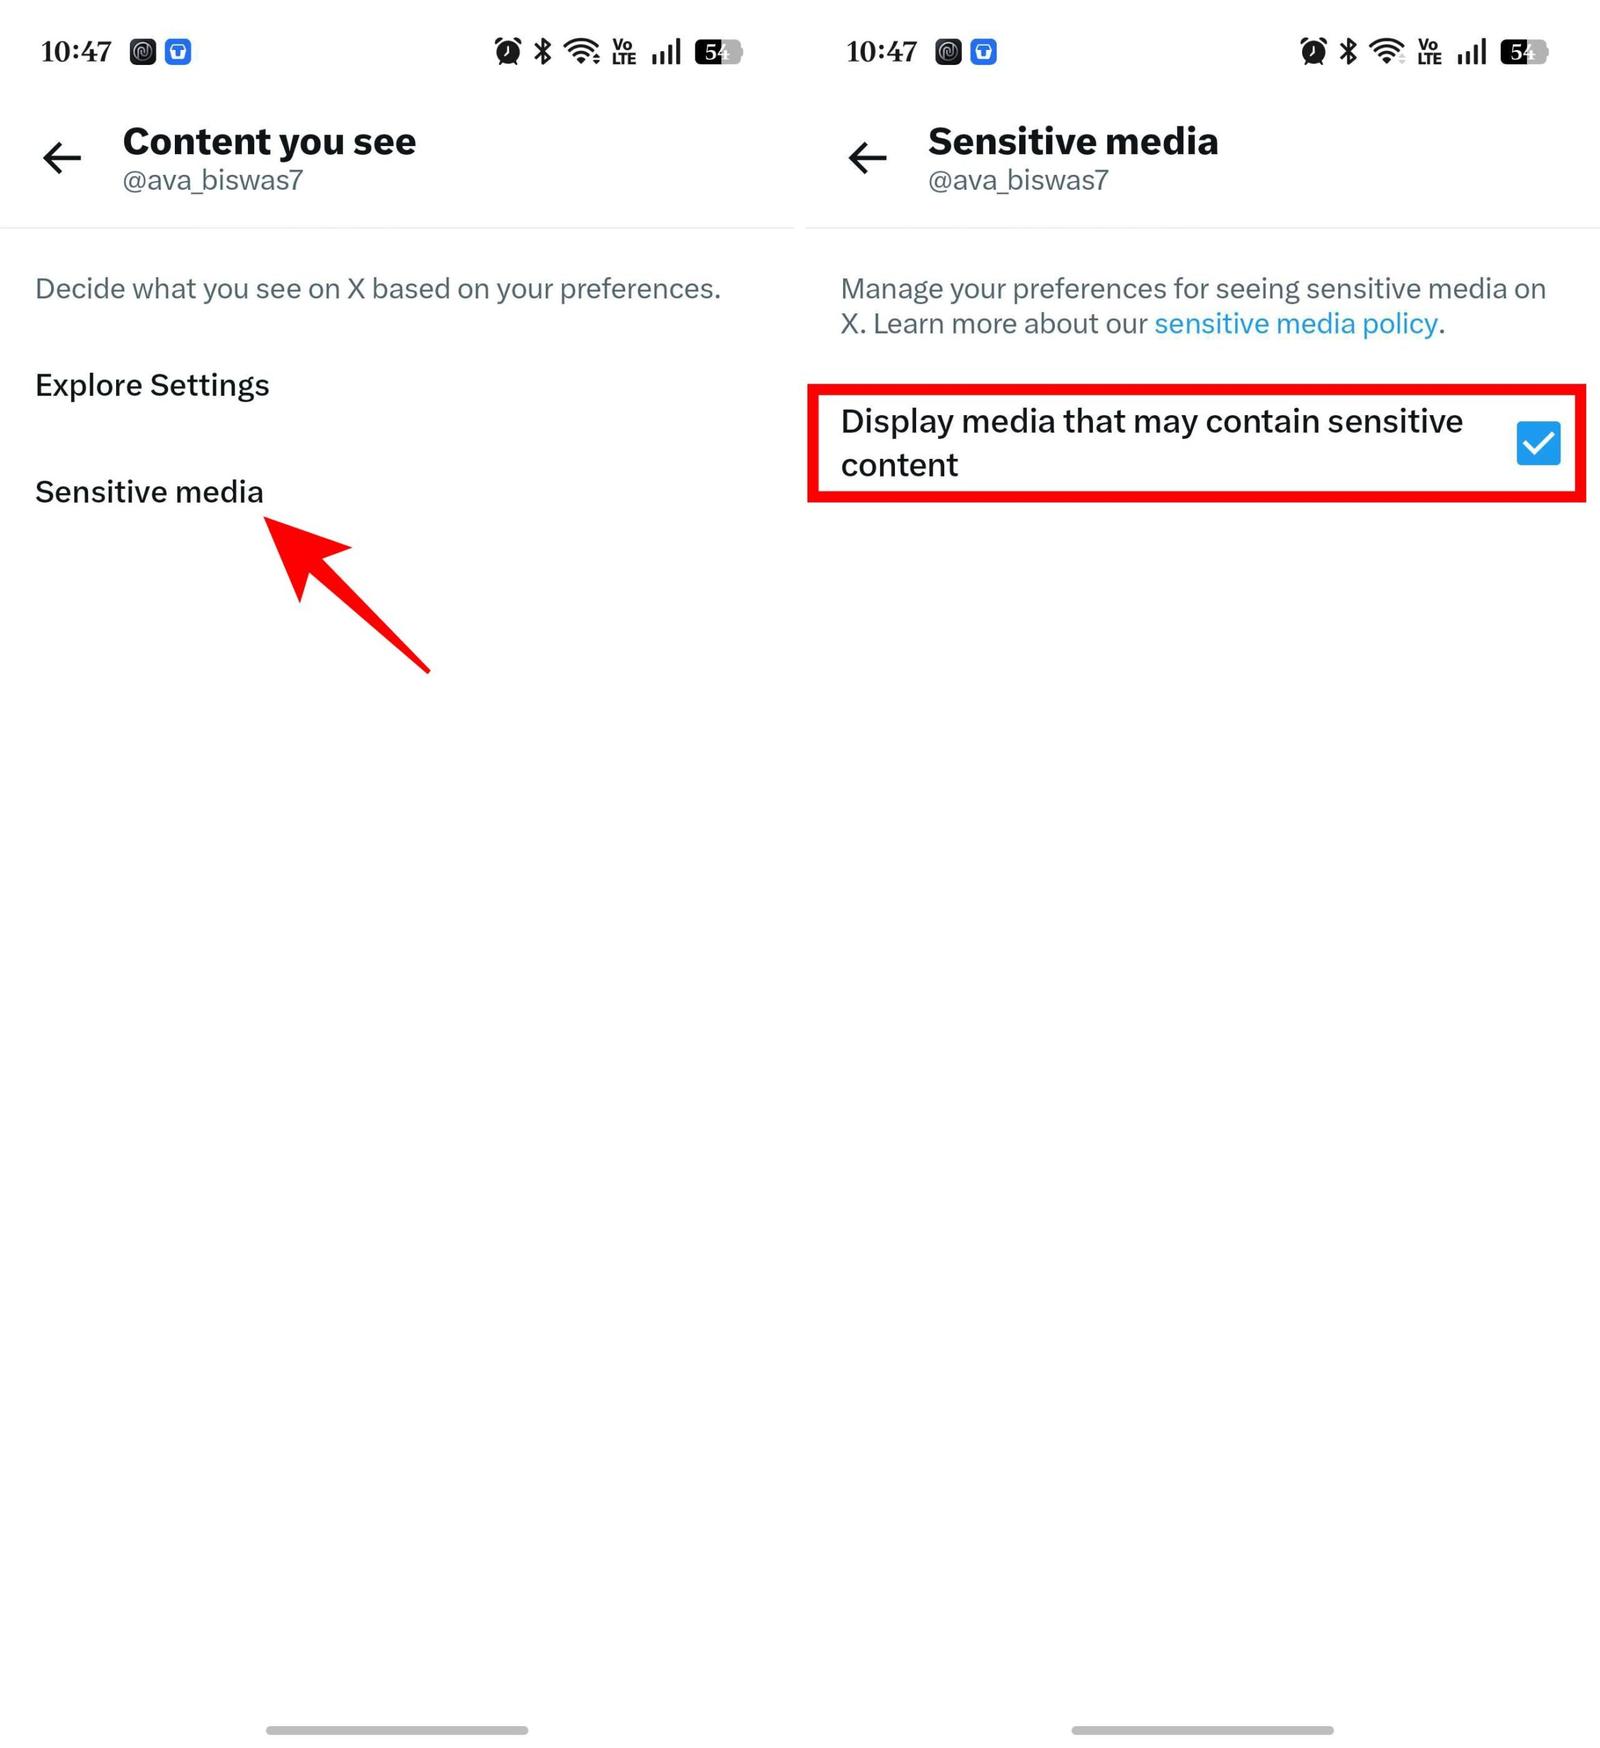
However, it doesn’t include the Safe Search settings. You need to go to the X website to disable the filter on your account.
On the web (Mac and PC)
I prefer the web version as it includes all the relevant settings in one place. And once I change the settings, it syncs my choices across the platforms.
- Log in to your account on X.com.
- Click More (three-dot button) and select Settings and privacy
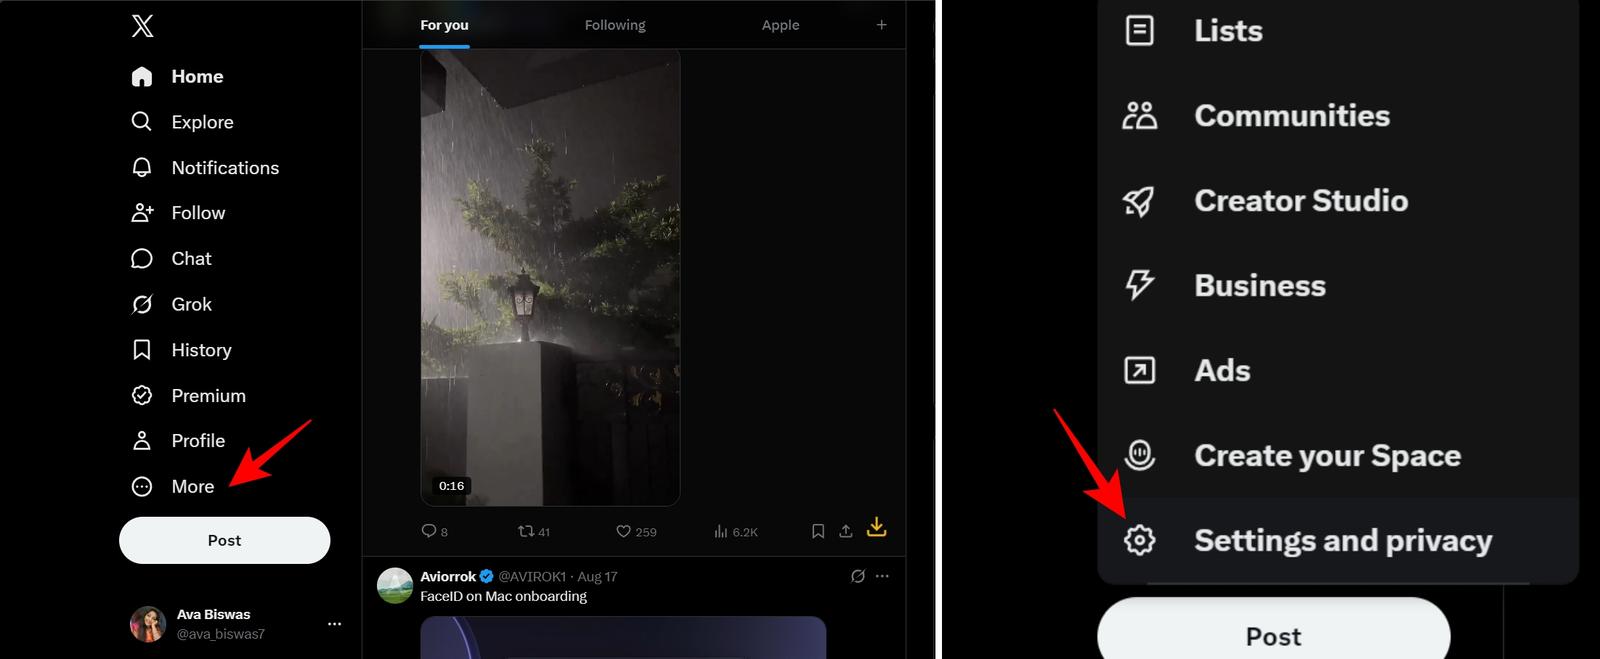
- Now, click Privacy and safety on the left side, then go to Content you see.
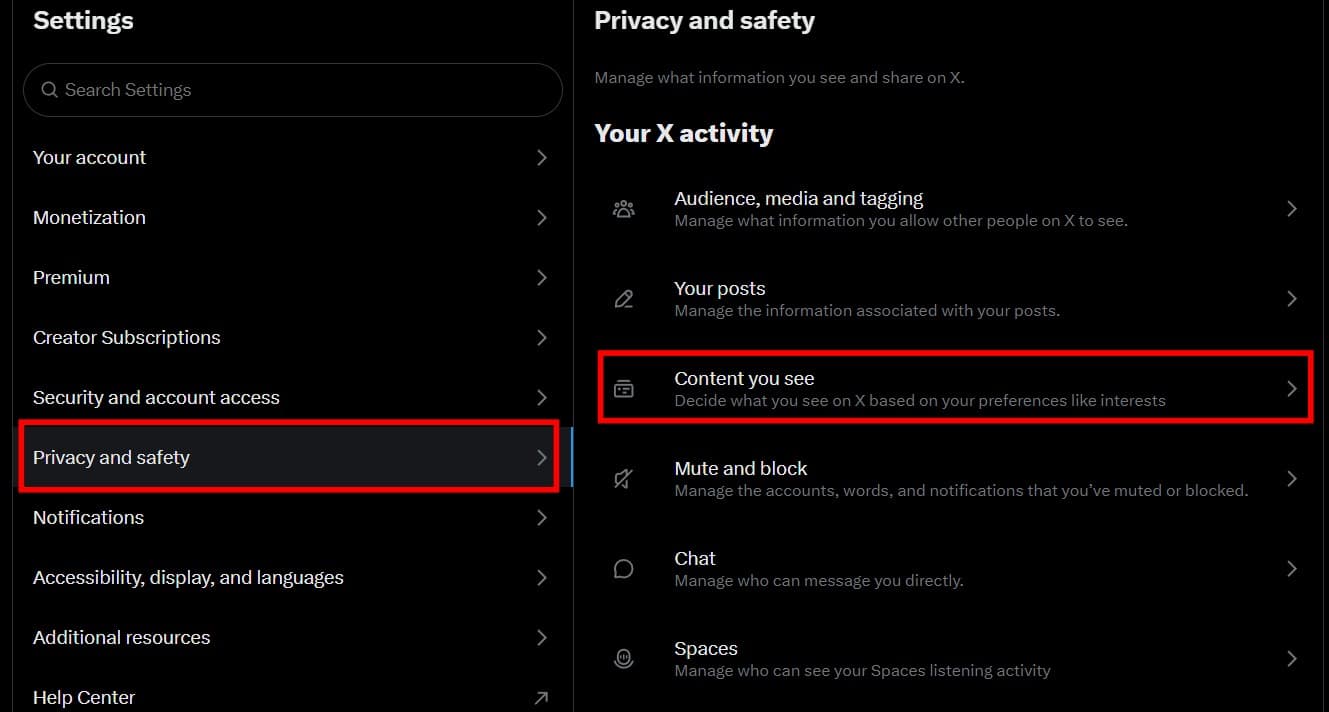
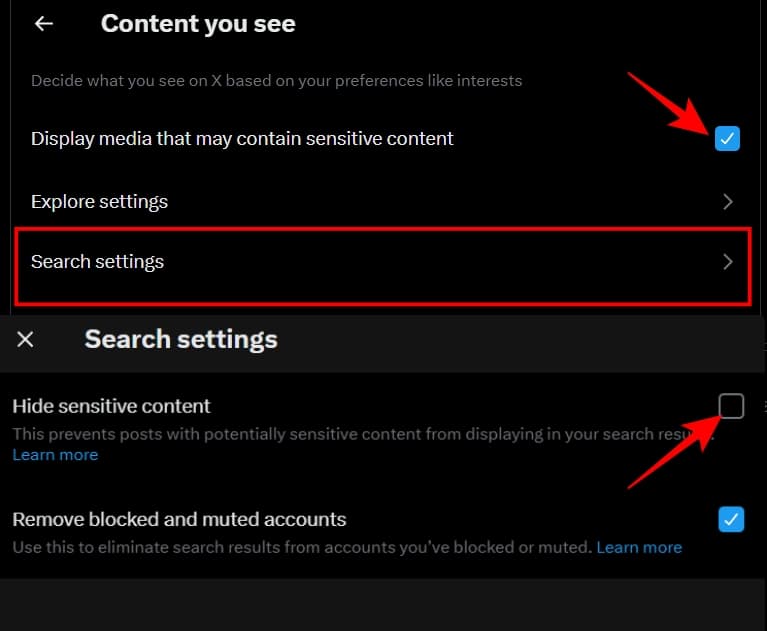
- Select the box for Display media that may contain sensitive content.
- Then click Search settings and uncheck Hide sensitive content to enable it.
What the setting does and what it doesn’t do
Turning on the sensitive-media preference tells X that you are willing to see media that it has identified as potentially sensitive rather than automatically hiding it behind the default warning.
X describes these controls as a way for users to decide whether they want to see warnings over potentially sensitive media. Disabling Hide sensitive content in Search settings also allows potentially sensitive posts to be included in search results.
It does not:
- Make deleted posts visible
- Bypass private/protected accounts
- Override age restrictions
- Guarantee every sensitive post appears in search
- Remove X’s content rules
- Make prohibited content available
X explicitly notes that search results are filtered for quality and relevance, and that not every post will necessarily appear in search. That’s why I would not describe this as a “show everything” setting.
How to mark your own posts as sensitive on X (Twitter)
If you’re looking for the sensitive content rules on X because you post such media yourself, the process is slightly different. X provides a setting called Mark media you post as containing material that may be sensitive
- On the X web version, go to Settings and privacy > Privacy and safety.
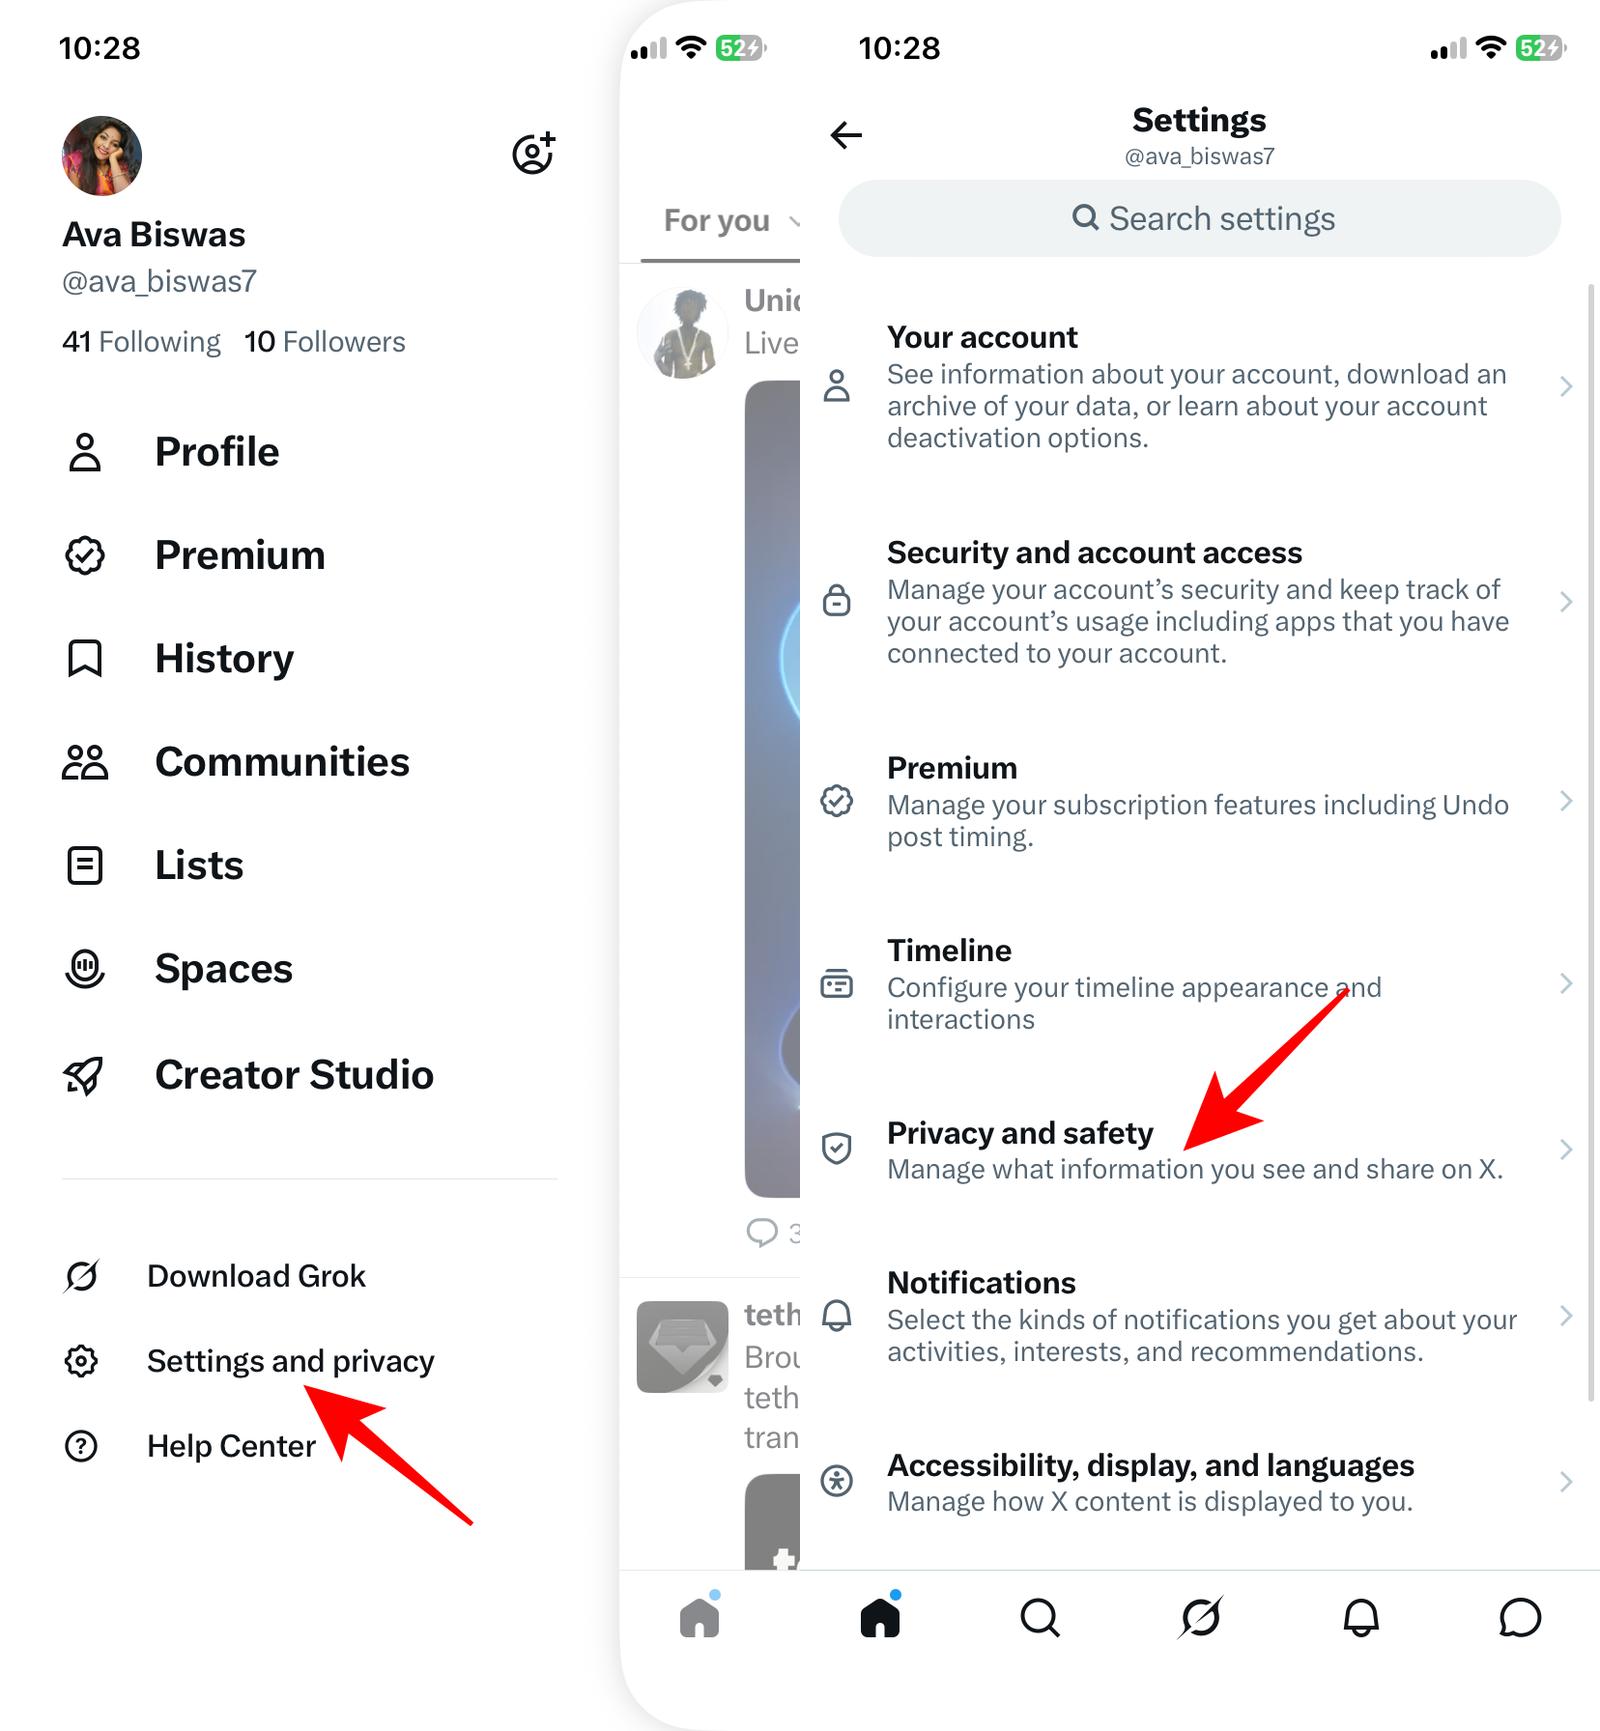
- Select Your posts from the menu, and you will find the sensitive-media option.
- Turn this ON if you regularly post graphic, mature, or potentially sensitive material.
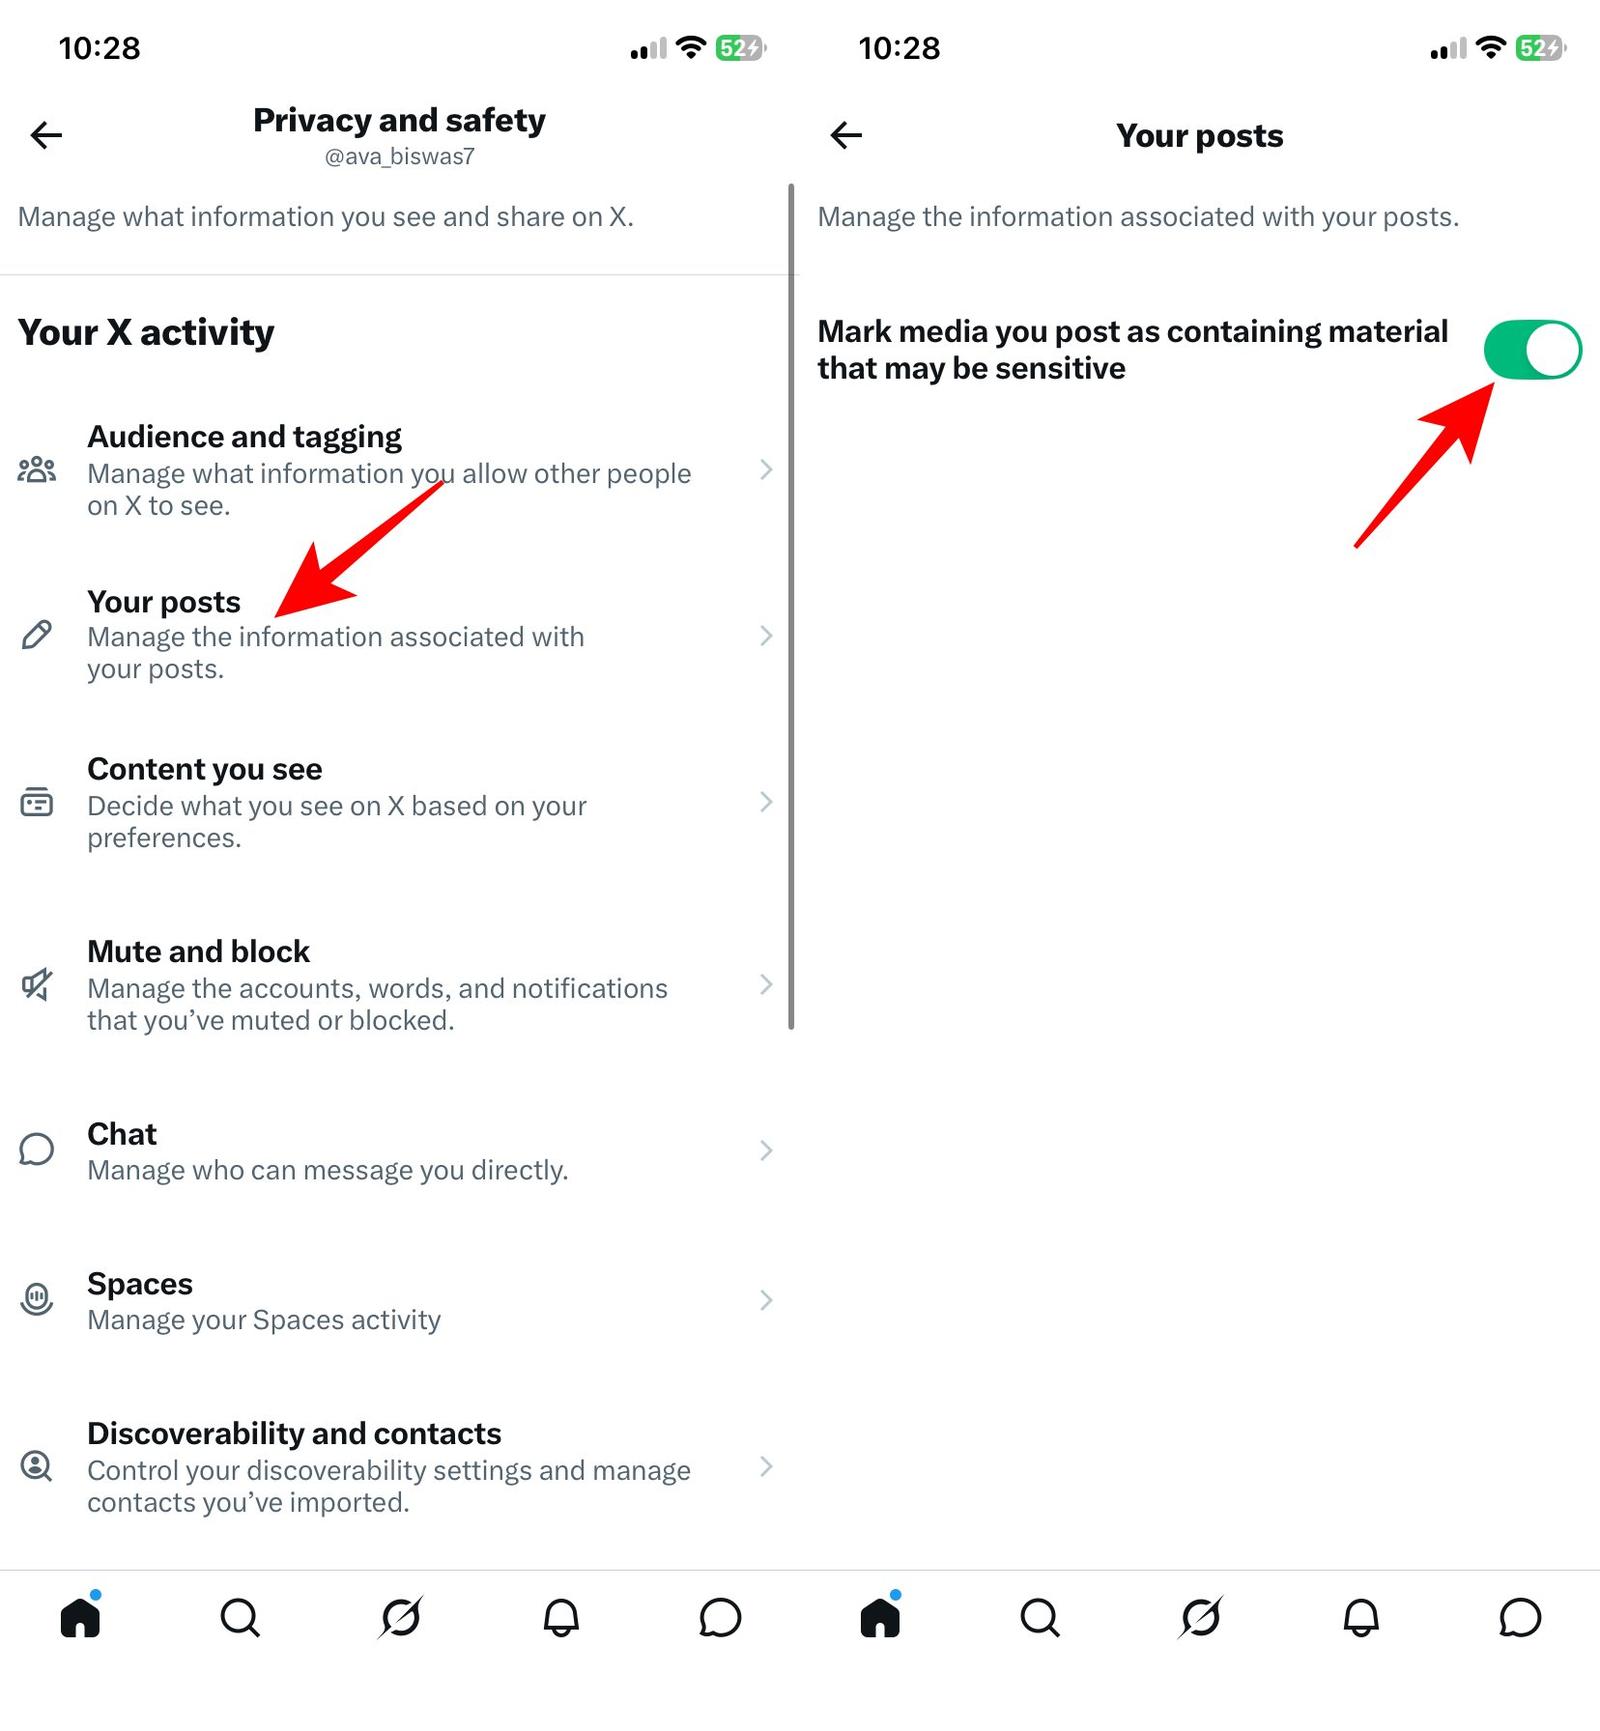
When I enabled it, people visiting my profile saw a notice indicating that my account may include potentially sensitive content. If your posts are generally safe-for-work, leave this OFF to ensure your content remains visible without warnings.
You can also mark individual photos and videos when attaching them to a post. This option is available across Android, iOS, and the web.
- Start a new post and attach an image or video.
- Tap on the attached media.
- Select the paintbrush or edit icon.
- Then use these steps according to your device:
- On iPhone: Tap the three-dot icon > Content settings and toggle on Nudity, Violence, or Sensitive. Tap Done to save.
- On Android: Tap the three-dot icon > Content settings and toggle on Adult content, Graphic violence, or Other.
- On web: Move to the flag icon and choose the appropriate tag: Nudity, Violence, or Sensitive.
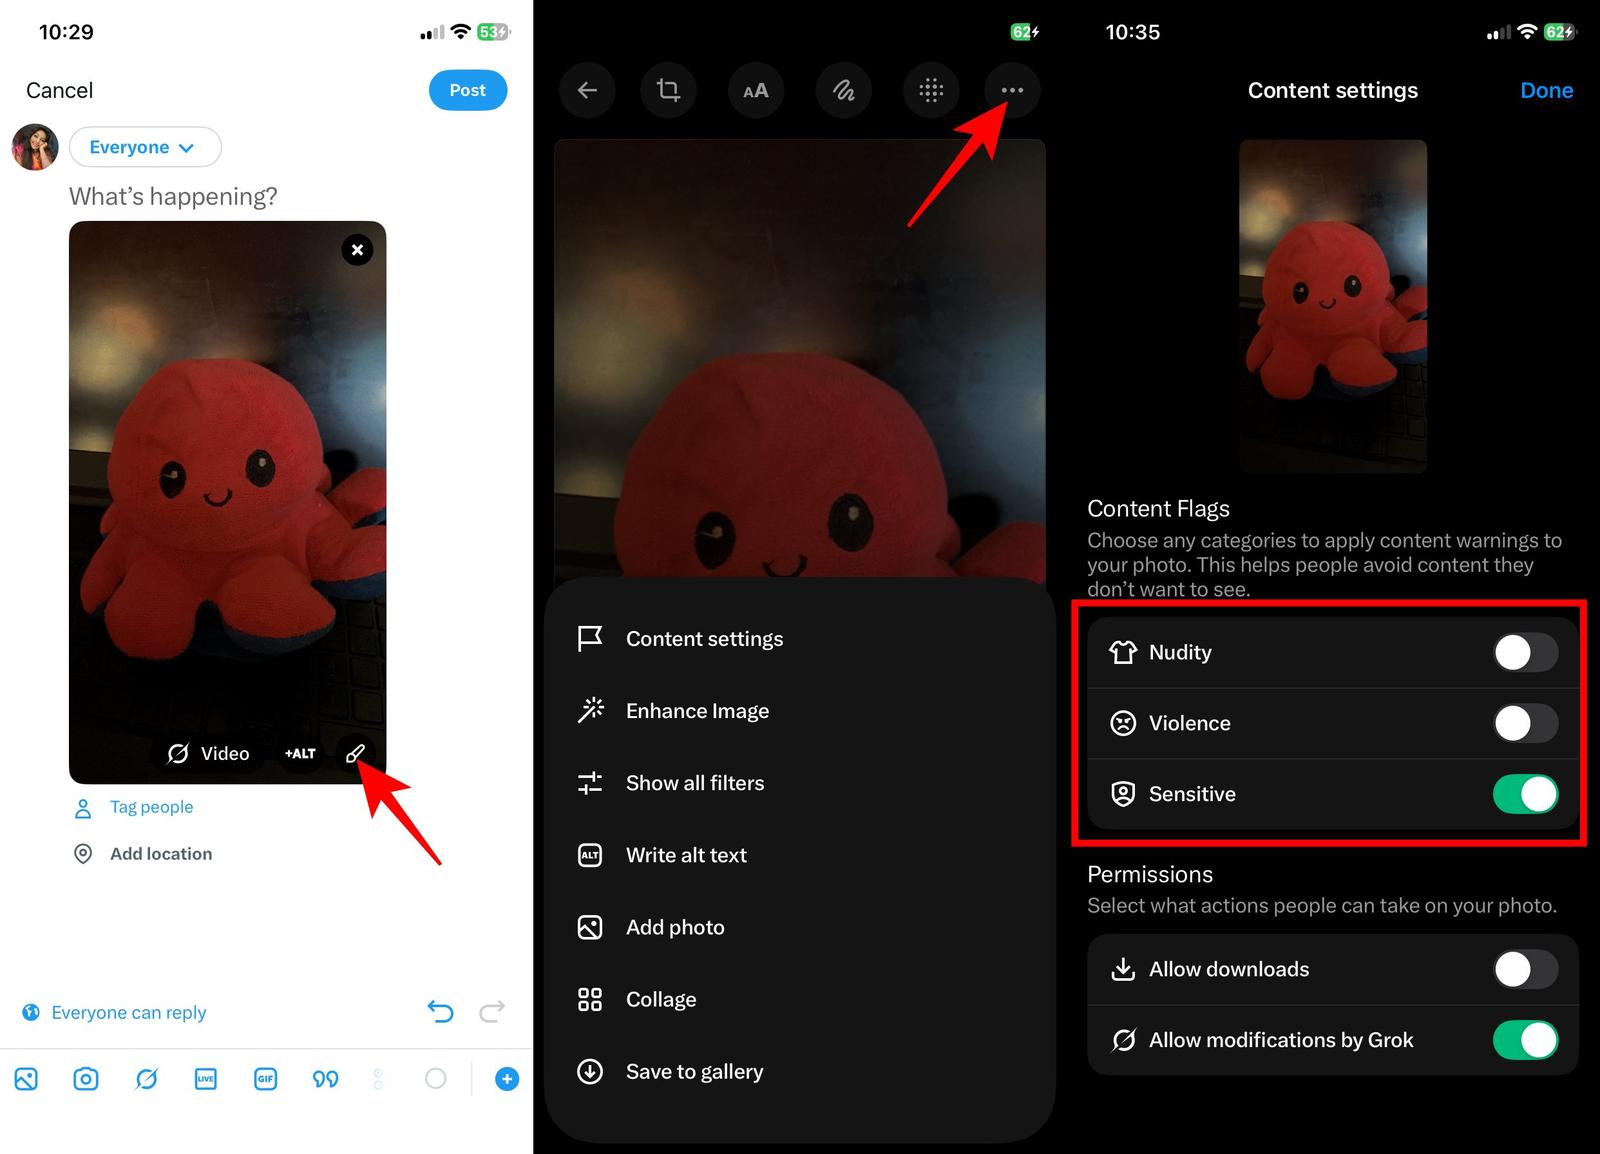
This lets you tag specific content without affecting your entire account. When in doubt, it’s safer to flag it—it helps avoid moderation issues. Keep in mind that marking content as sensitive may reduce its visibility. Some people might not see it, depending on their settings.
Sensitive content warning still appearing? Try these fixes
If you enabled the setting and nothing changed, work through these in order.
- Check your birthday: If you are trying to access adult content, make sure your X account has an accurate date of birth. X restricts adult content for users under 18 and for accounts without a listed birth date.
- Check Safe Search separately: When sensitive posts appear normally on profiles or in your feed but disappear when you search, make sure Hide sensitive content is disabled.
- Try X.com instead of the app: The web version can be the easiest way to find sensitive media control settings that are unavailable in the app.
- Give the setting a little time: X notes that some search-setting changes may take several minutes to take effect. So if you switch the setting and immediately test it, don’t assume it failed.
- Remember that some posts are simply unavailable: A post may have been deleted, an account may be protected or suspended, or X may have restricted the content for another policy reason. No sensitive-content toggle can override that.
I advise being cautious about accessing sensitive material because it may trigger emotional distress or impact your mental well-being. In addition, interacting with posts that do not comply with X’s guidelines could result in account restrictions.
Wrapping up
There you go. Getting your sensitive content settings unlocked isn’t that complicated once you know the little-known requirements. I get it if you’re curious or just want more control over what shows up in your feed; same here. Just keep in mind it’s a bit of a wild ride once it’s all turned on.
Also, if you use X on multiple devices, it is also worth checking the settings on each one instead of assuming everything has synced correctly. Once those are sorted, you should have a much easier time finding the content you’re looking for.
Also read: