The Reminders app has seen significant improvements with iOS 13 and later versions. Earlier, it was a simple application with basic functionalities. But it now has robust features that let you add subtasks, images, and more! Besides, you can also print reminders and sort them accordingly.
Let us get right in and show you how to use the Reminders app on your iPhone or iPad.
- How to create a reminder on iPhone or iPad
- Use quick toolbar to add notifications and more to reminder
- How to group Reminders using tags in iOS 15
- How to create subtasks in Reminders on iPhone or iPad
- Complete a reminder
- How to create a new reminders list on iPhone or iPad
- How to move a reminder to a different list
- Print reminders list in iOS 14.5 upward on iPhone
- How to sort reminders in iOS 14 and later
- View your reminders in smart lists
- Hide or show smart lists in reminders in iOS 15
- How to search for reminders
- How to share a reminders list
- Assign a reminder in a shared list
- Organize lists into groups in Reminders on iOS 15
- How to delete a reminder
Things to consider before you begin:
Make sure iCloud Reminders is set up to sync everything across all your Apple devices. Here’s how:
- On iPhone and iPad: Open Settings → your name at the top → iCloud → toggle on Reminders, if not already.
- On Mac: Open System Preferences → Apple ID → iCloud → check the box for Reminders.
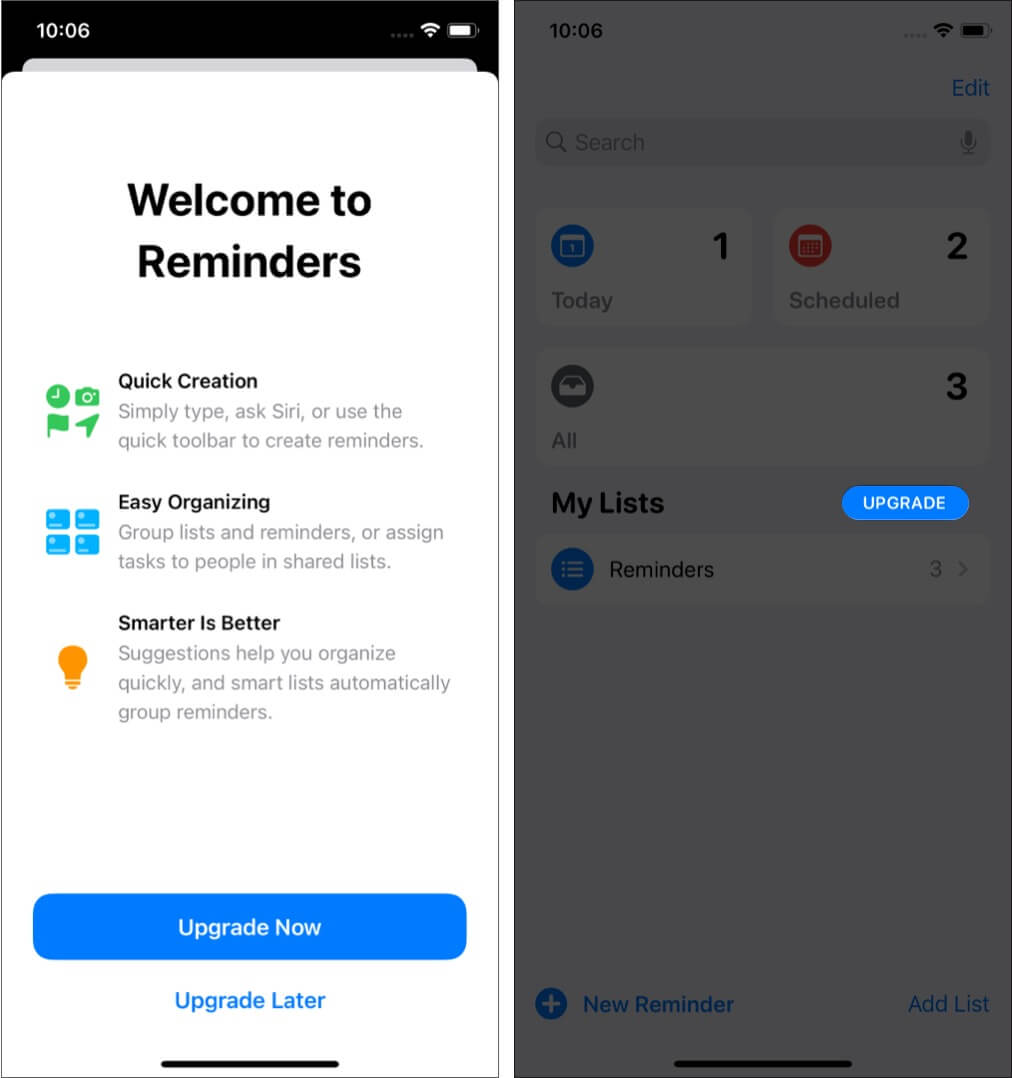
- Upgrade: If you see an option to upgrade your reminders, do that after reading this important information on Apple’s official support page.
How to create a reminder on iPhone or iPad
So before we go further, let me show you how to create a reminder. To start:
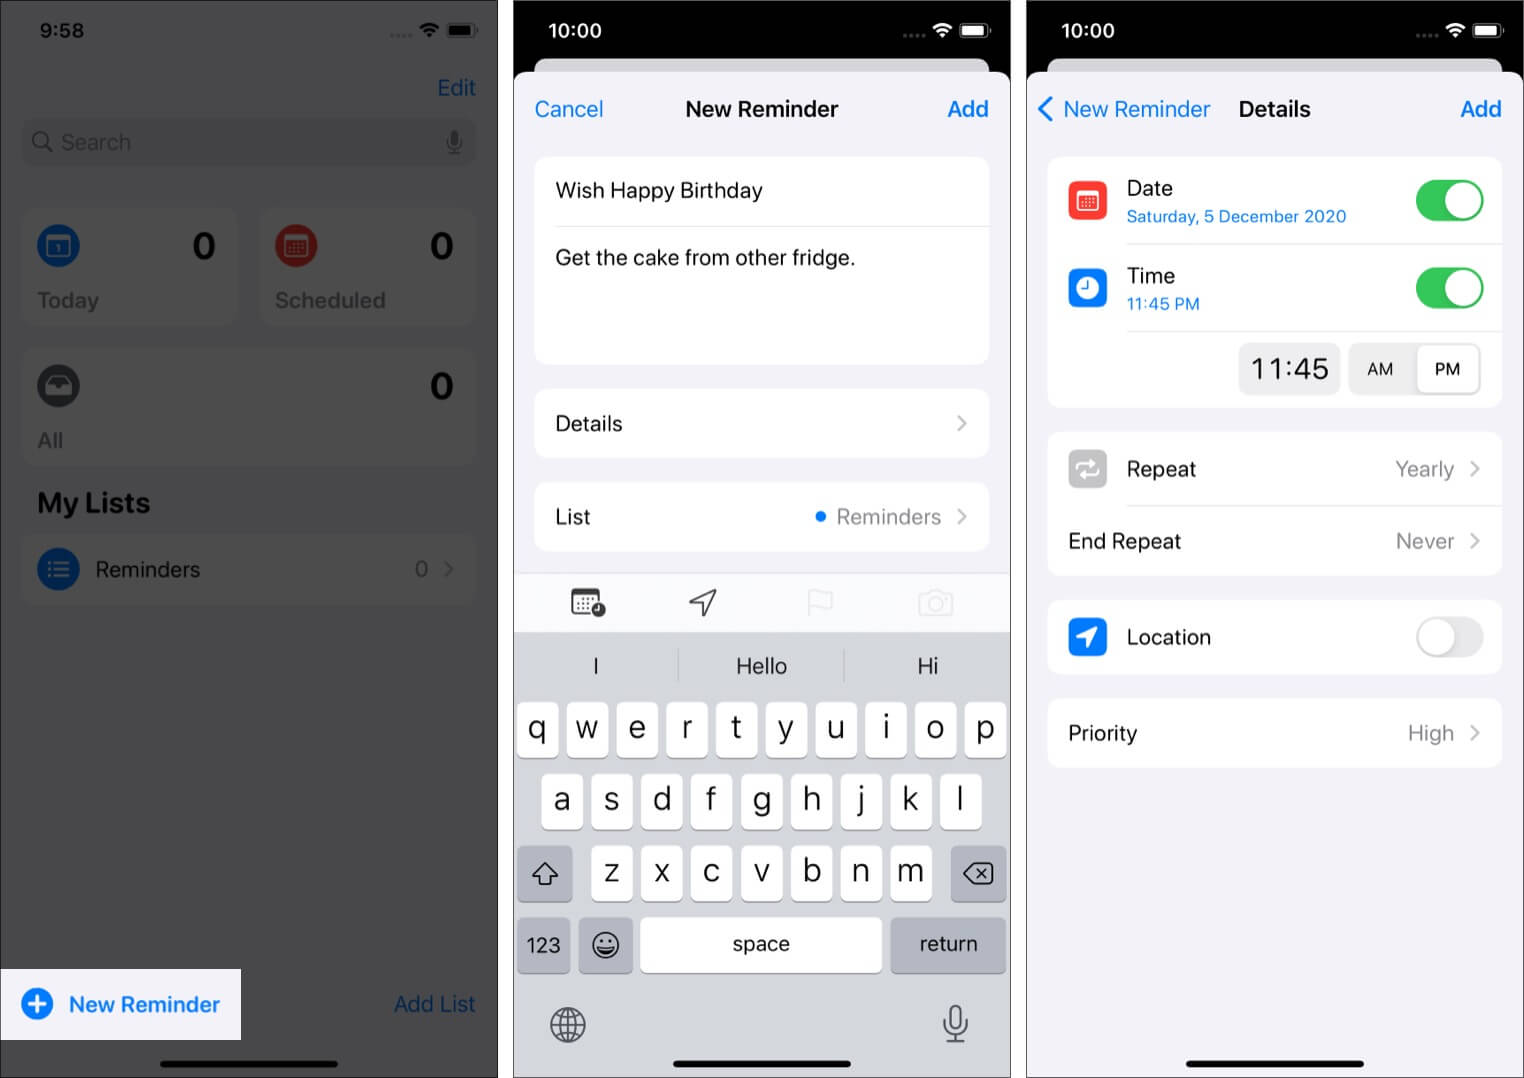
- Open Reminders and tap + New Reminder at the bottom left.
- Next, give it a title, like, Wish Happy Birthday.
In Notes, you can add a little something, like Get the cake first. - Tap Details.
According to your needs, set a Date, Time, Location, etc. We will talk more about all these in the headings below. - Finally, tap Add.
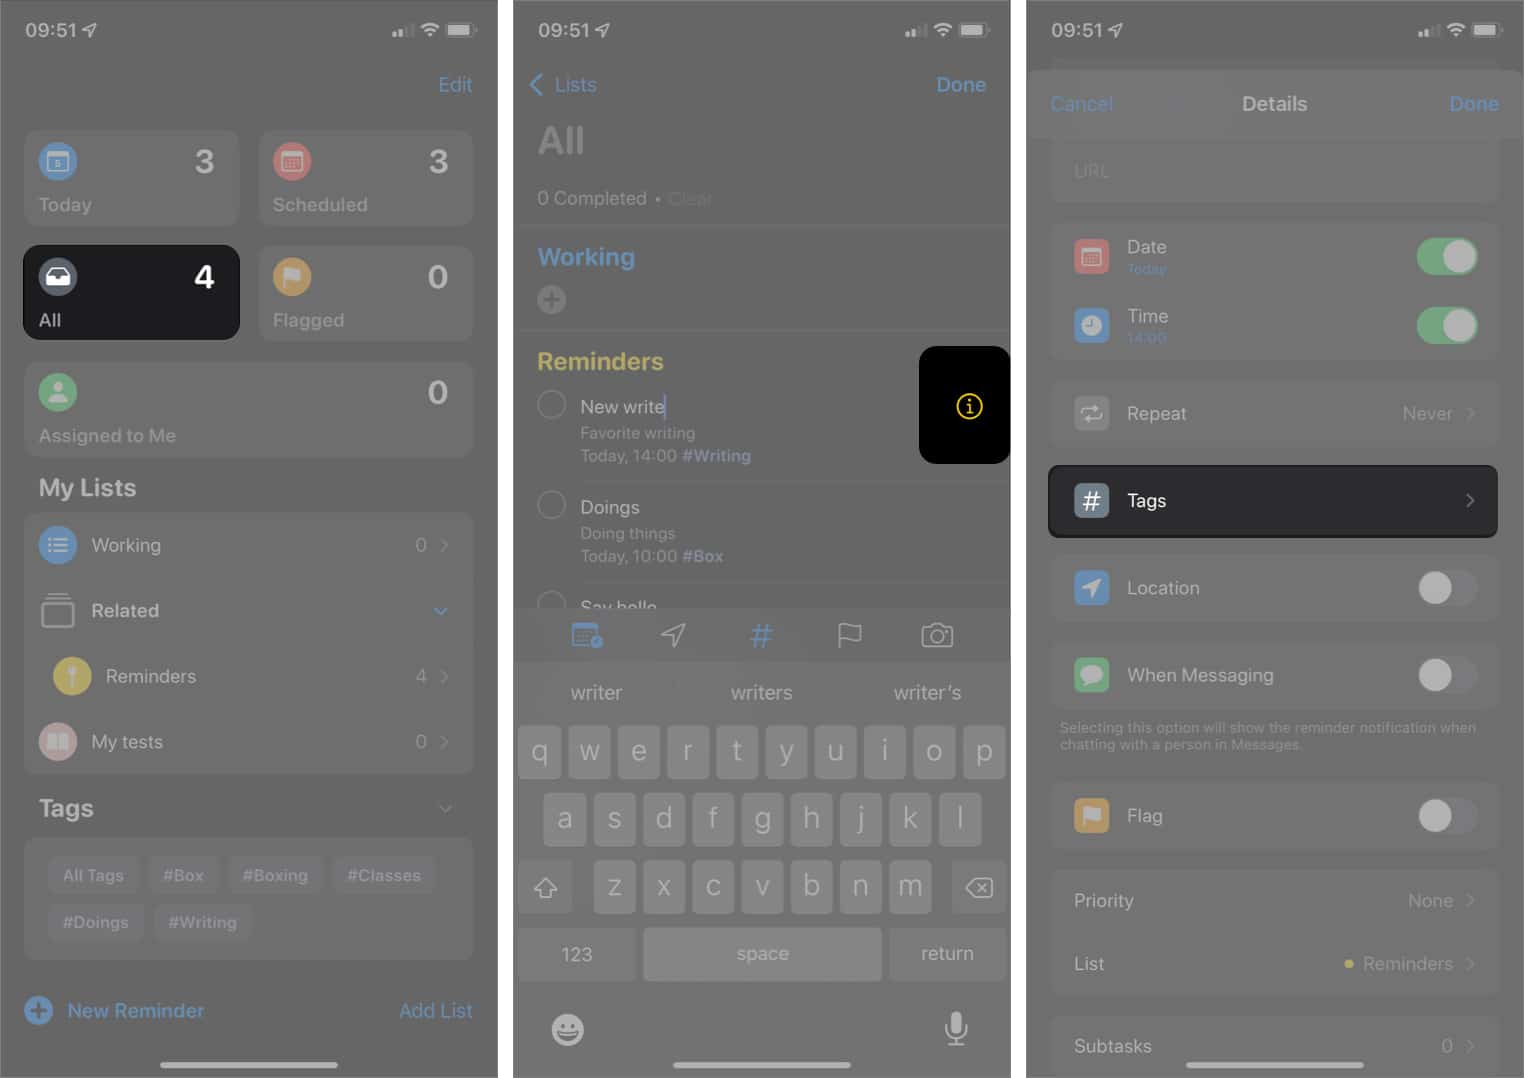
Note: If you didn’t add details to a reminder while creating it, you could still do so after. Go to the Reminders app home screen → tap All → select the reminder and tap the (i) icon to add details like the date, time, notes, location, and more.
Create a reminder with Siri
by long-pressing the Right Side button on iPhone with Face ID. On models with the Home button, long-press it. You can also use “Hey Siri” if you have already set it up.
Once Siri is on screen, you can say something like, “Remind me to take my medicines.” To add time and date to your request, you can say, “Remind me to take my medicines on January 12 at 9 pm.” Next, you’ll hear Siri reply with “done!” You can use Siri to add reminders as you desire.
Note: Unfortunately, Siri doesn’t say out due reminders by default. Instead, you’ll get a regular notification beep when a reminder is due.
Create a reminder from another app
Using the iOS Share Sheet, you can create reminders from other apps.
- While inside another app, tap the share icon to see the Share Sheet.
- Tap the Reminders icon.
- Add title, notes, details, etc., if needed.
- Finally, tap Add.
Note: To add a reminder from the Notes app, tap the three dots icon from the top, tap Send a Copy, and choose Reminders.
Use quick toolbar to add notifications and more to reminder
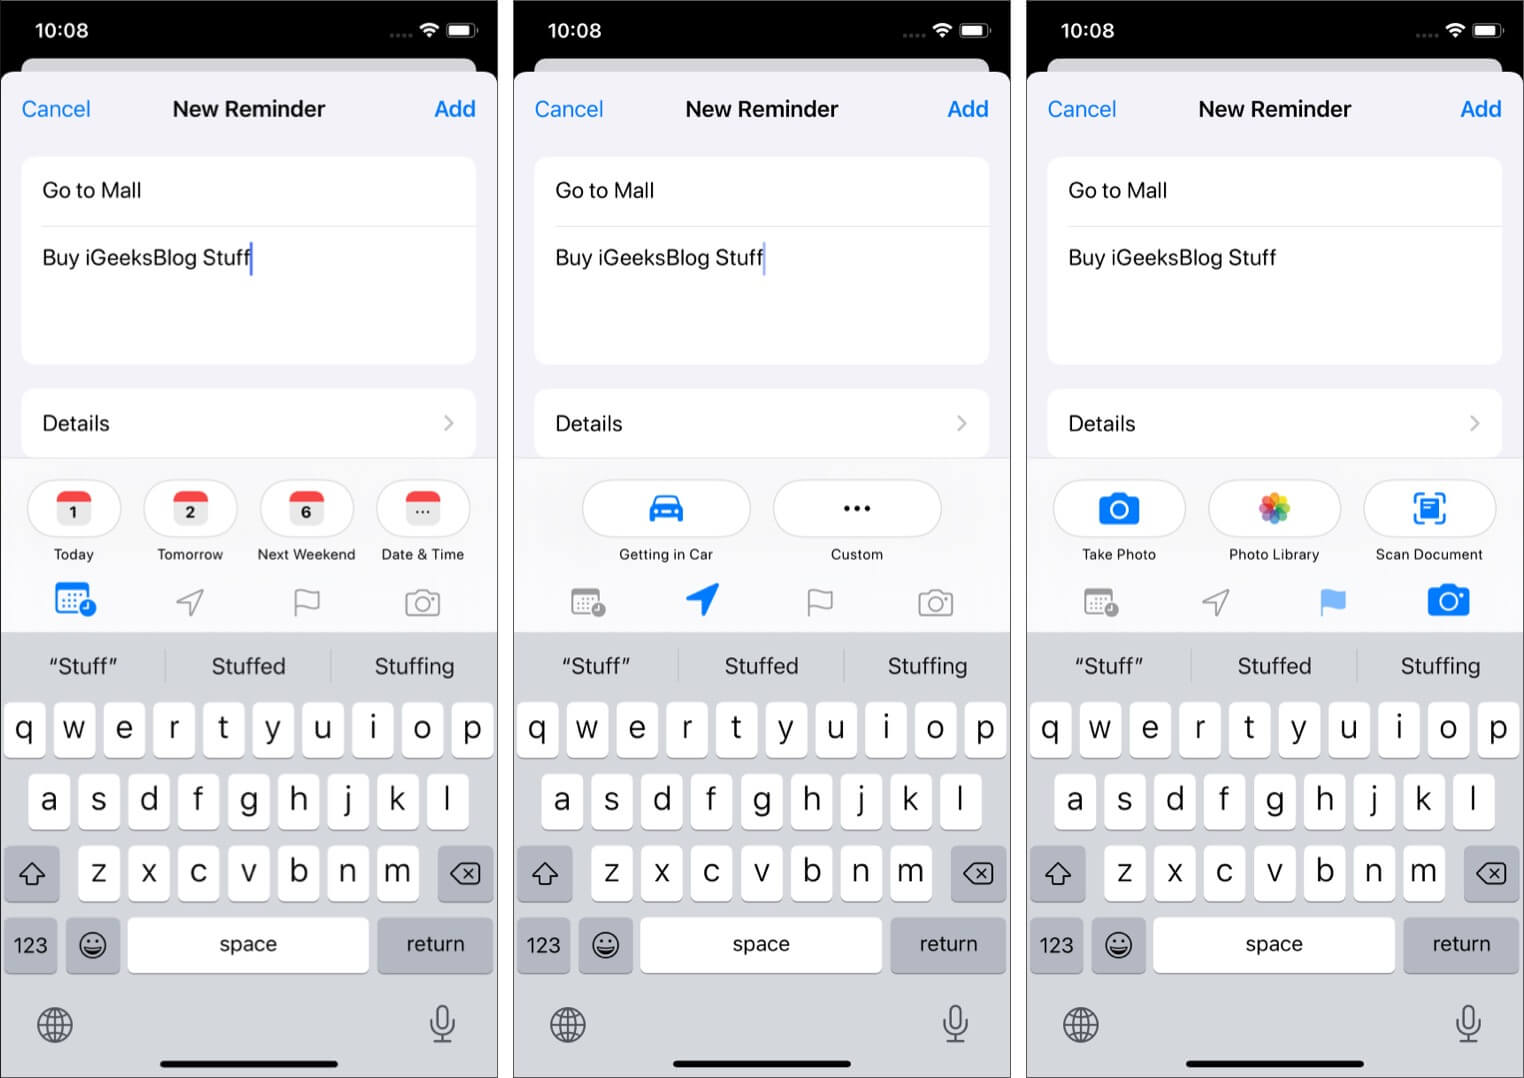
When you add a reminder, you will see a quick Toolbar that simplifies the process (at the top of the keypad).
Note: You may not see it if you use a third-party keyboard app like SwiftKey.
However, here are further details you can add to a reminder:
- Date and time: Setting the exact date and time is the key to any reminder. Here, you can customize the date and time for your reminder by tapping either.
- Add a location: Tap the icon that looks like an arrowhead. Chose an option or tap on Custom and search for an address.
- Flag a reminder: Here, select the flag icon to mark a reminder as essential. You’ll find all flagged reminders in the smart list section on the app’s home screen.
- Add an attachment: Tap the gallery icon. From here, you can add media to the reminder. Choose an existing image from Photo Library, or scan a document.
- Assign a reminder: For this, you will have to start by making a shared list. Once done, tap the assignment button to assign the reminder to the person you want.
- Use smart suggestions: By learning from the reminders you created, the app may suggest a date, time, and location for similar reminders.
How to group Reminders using tags in iOS 15
Tags help you to organize tasks using keywords in the Reminders app. For instance, you can tag some reminders under the “#coding” category, put some under “#Writing #Coding,” and so on. This is different from organizing tasks into lists in that you can file a reminder under more than one tag.
Let’s see how to arrange tasks using tags. In the reminders app:
- If you’ve created reminders already:
- Tap All to see all previously created reminders.
- Select the reminder and tap the (i) symbol to its right to edit it.
- If you don’t already have a reminder:
- Follow the steps in the first section to create one.
- From here, select Tags.
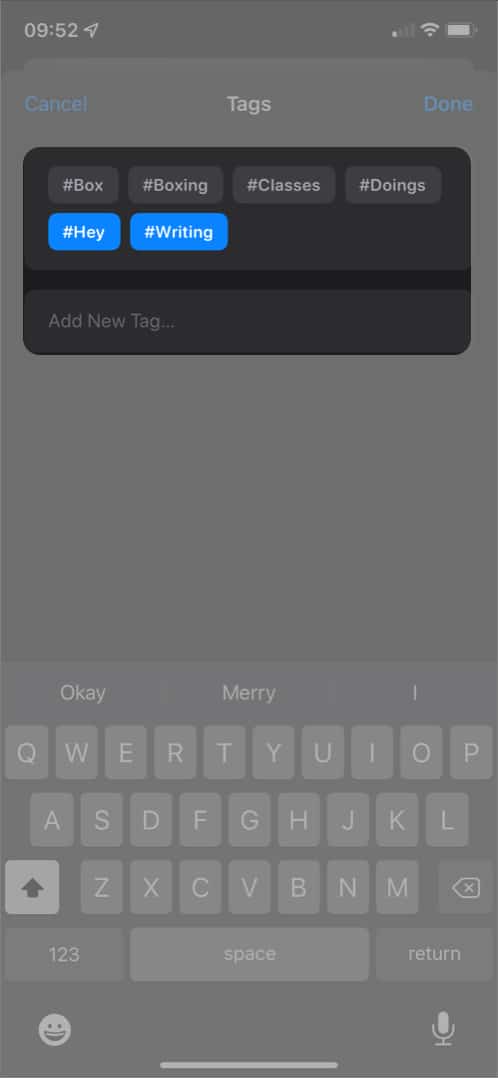
- Tap the Add New Tag field and name your tag. Say, “Cooking,” for instance.
Press Return on your keypad to add it to your tag list.
To associate a task with more tags, repeat the process above for each of them. - Tap Done at the top right when satisfied.
File a task under an existing tag
To put a reminder under an existing tag:
- Select the task from the reminders list and tap the (i) symbol to its right.
- Choose Tags.
- Tap a named tag at the top of the Add New Tag field to file your reminder under it.
You can select more than one tag for a task if you like. - Once satisfied, tap Done at the top right.
Your reminder is now under the selected tag(s).
View the tasks under a tag
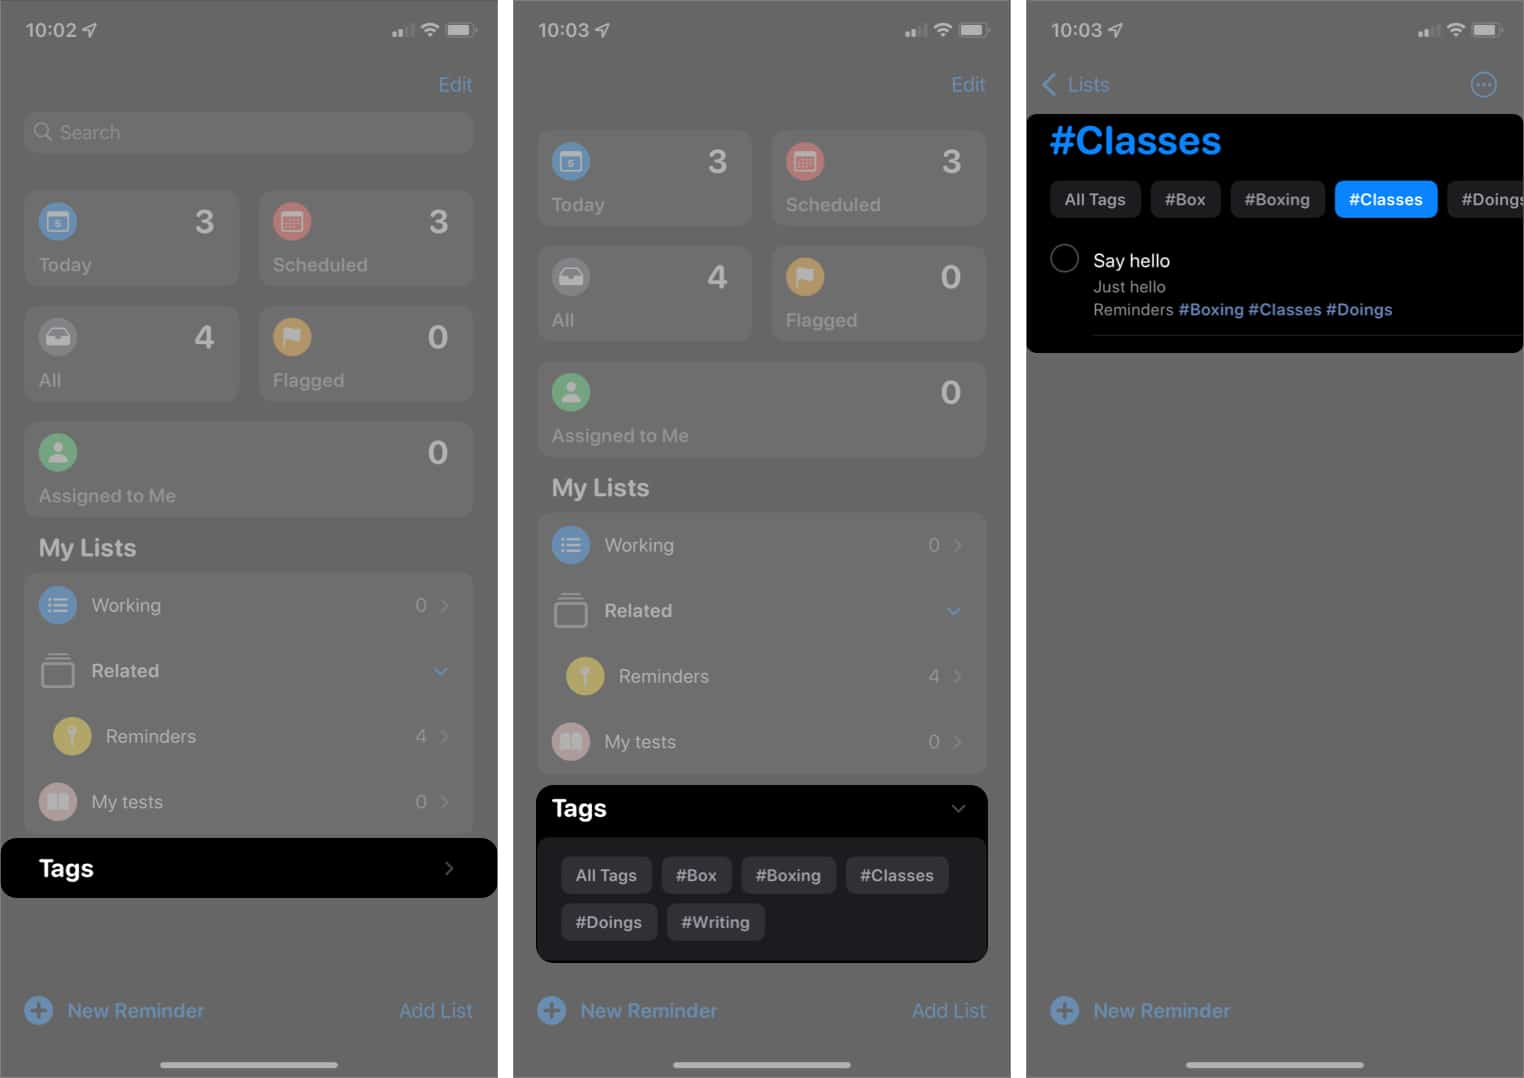
Once you start creating tags, you’ll see a new Tag section automatically added to the Reminders app’s home screen. This is a list of all tags you’ve previously created.
To view all tasks under a tag:
- Tap Tags to expand the dropdown if you can’t see the tag list already.
- Next, select a tag name to view the tasks filed under it.
For instance, to view all reminders under the writing category, you’ll tap #Writing.
How to create subtasks in Reminders on iPhone or iPad
Subtasks are valuable as they let you stash reminders under a parent reminder. For example, if the parent reminder is “Monthly Grocery Shopping.” Its sub-reminders can be toothpaste, tissue paper, soap, dog food, and so on.
Here are the different ways to create subtasks in the Reminders app:
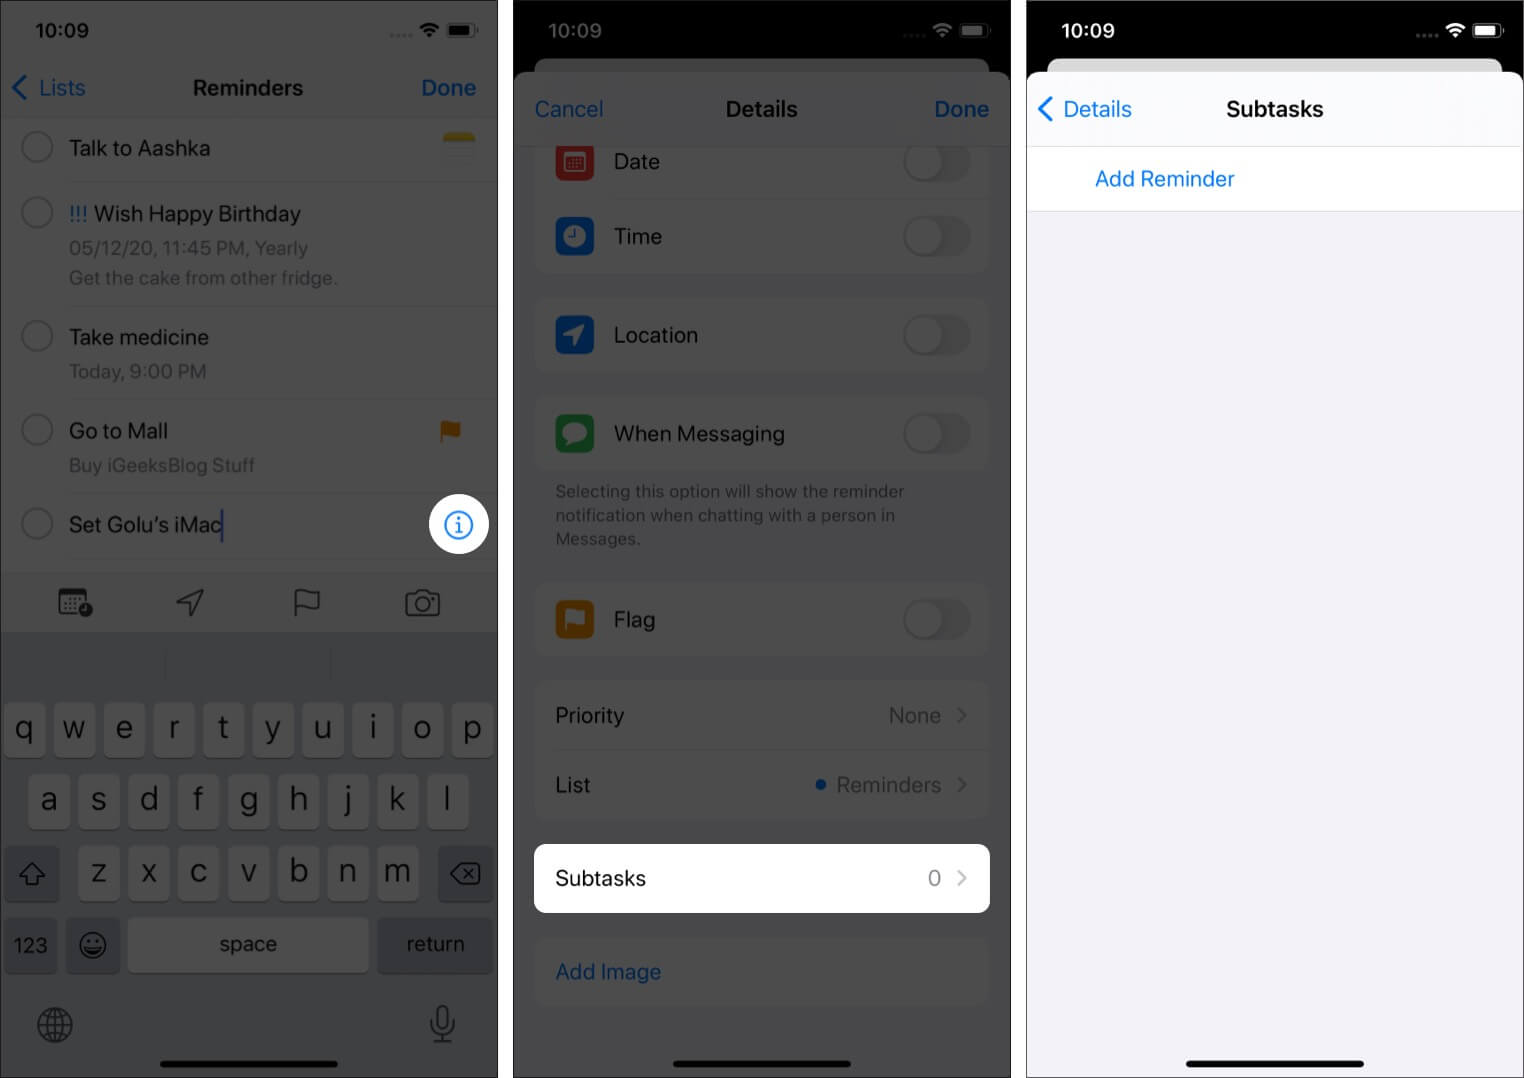
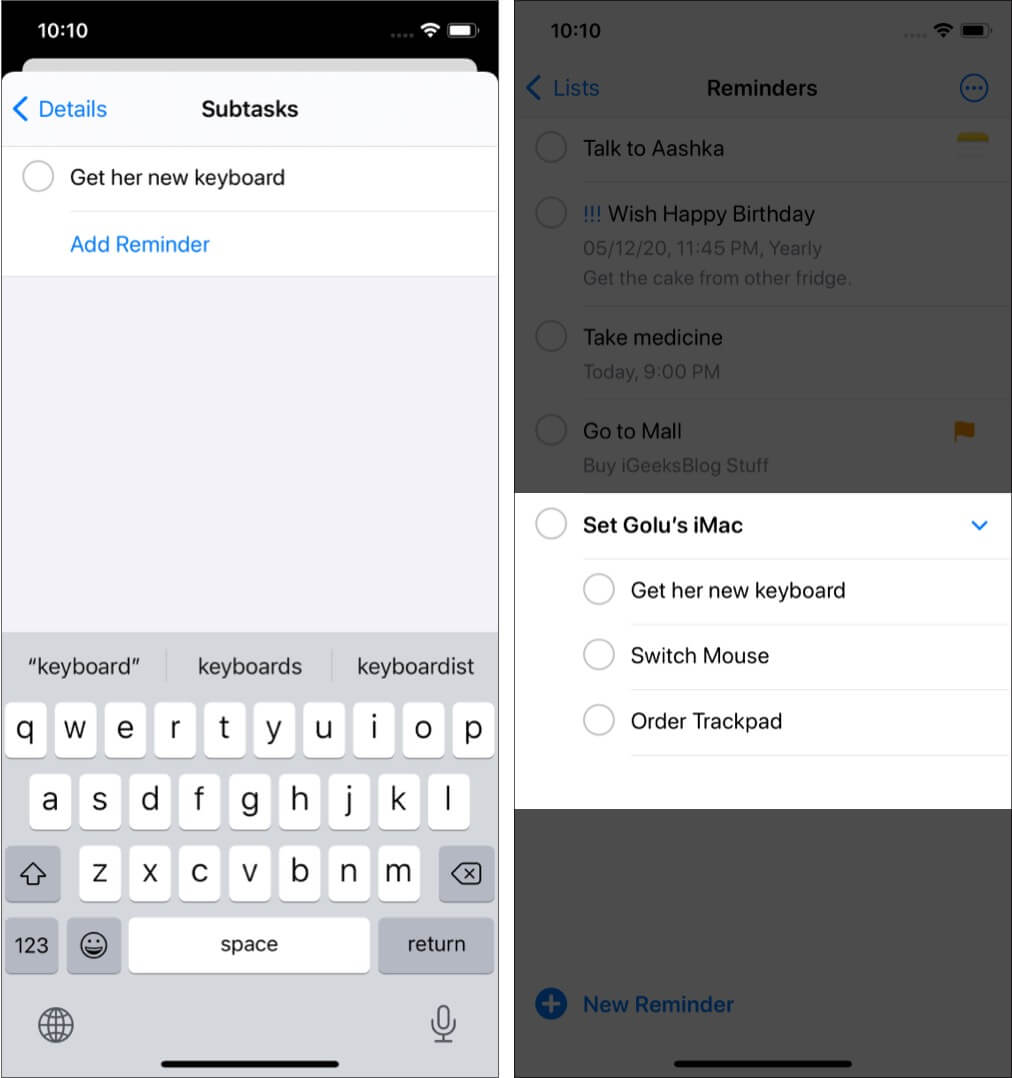
- Method 1: Tap (i) while adding a new reminder. Or tap an existing one to see the (i) button. Next, tap Subtasks → Add Reminder.
Once finish adding subtasks, tap <Details to go back. Then finally tap Done.
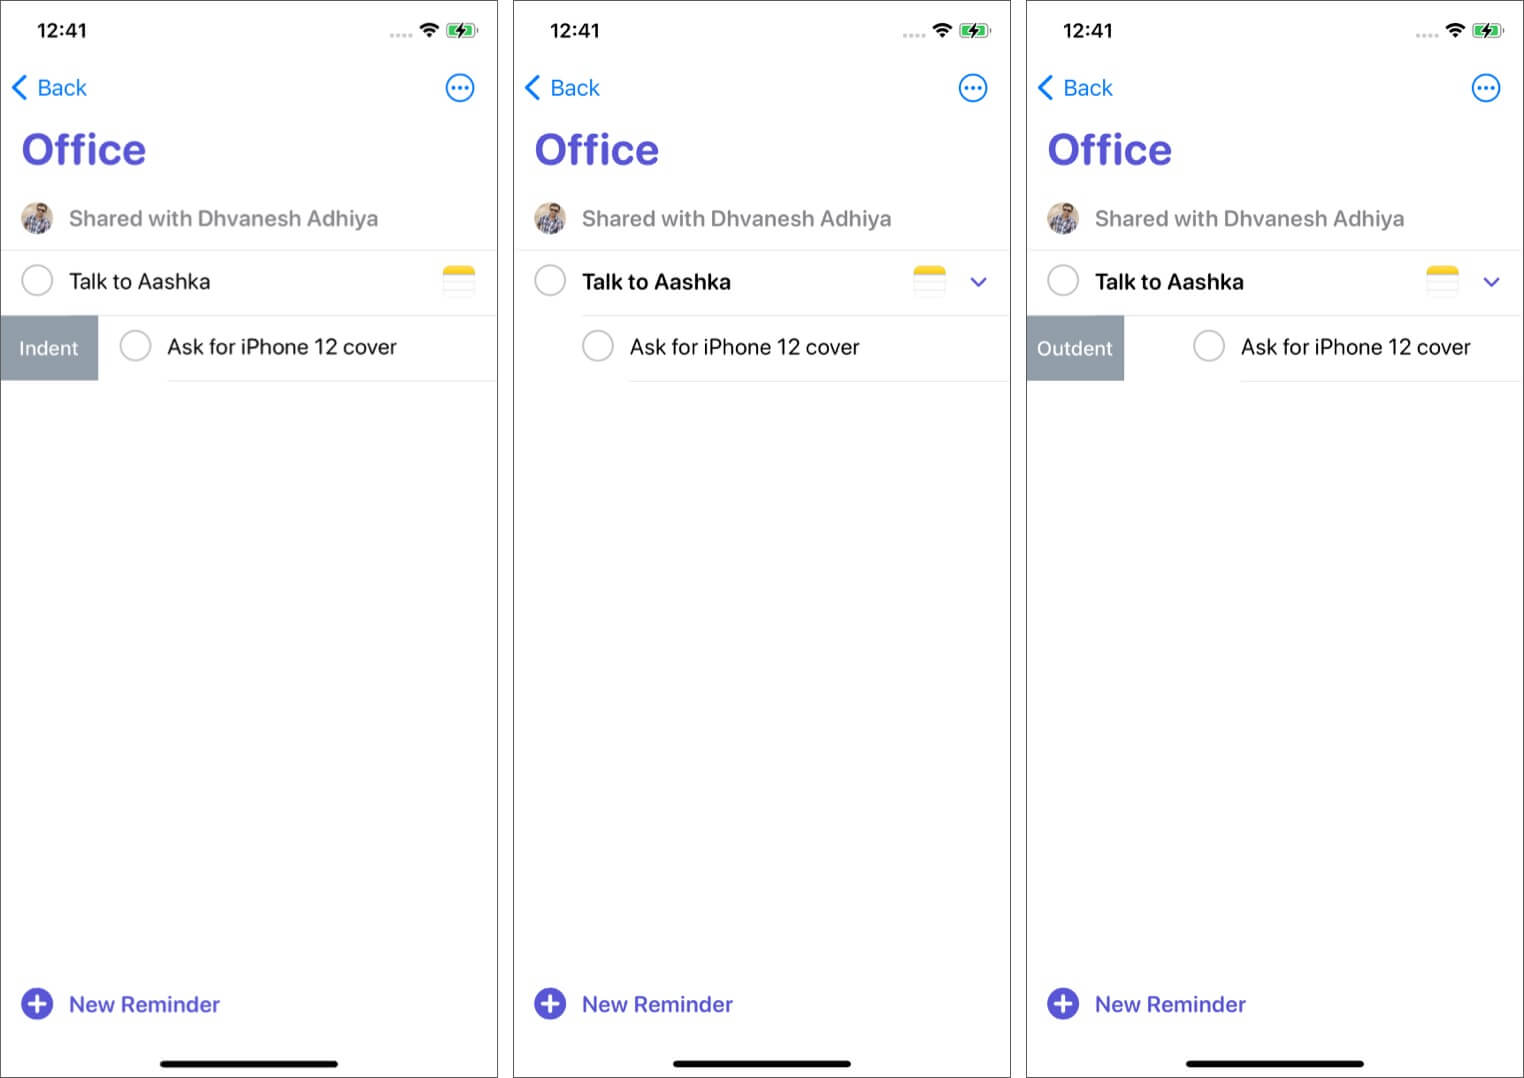
- Method 2: Long-tap an existing reminder and swipe it to the right. Then select Indent. This reminder becomes a subtask of the reminder above it. Similarly, to remove the subtask, long-tap and swipe it to the right corner of the screen. Then select Outdent.
- Method 3: Touch and hold a reminder and drag it over the other. The dragged reminder will become a subtask of the other.
Complete a reminder
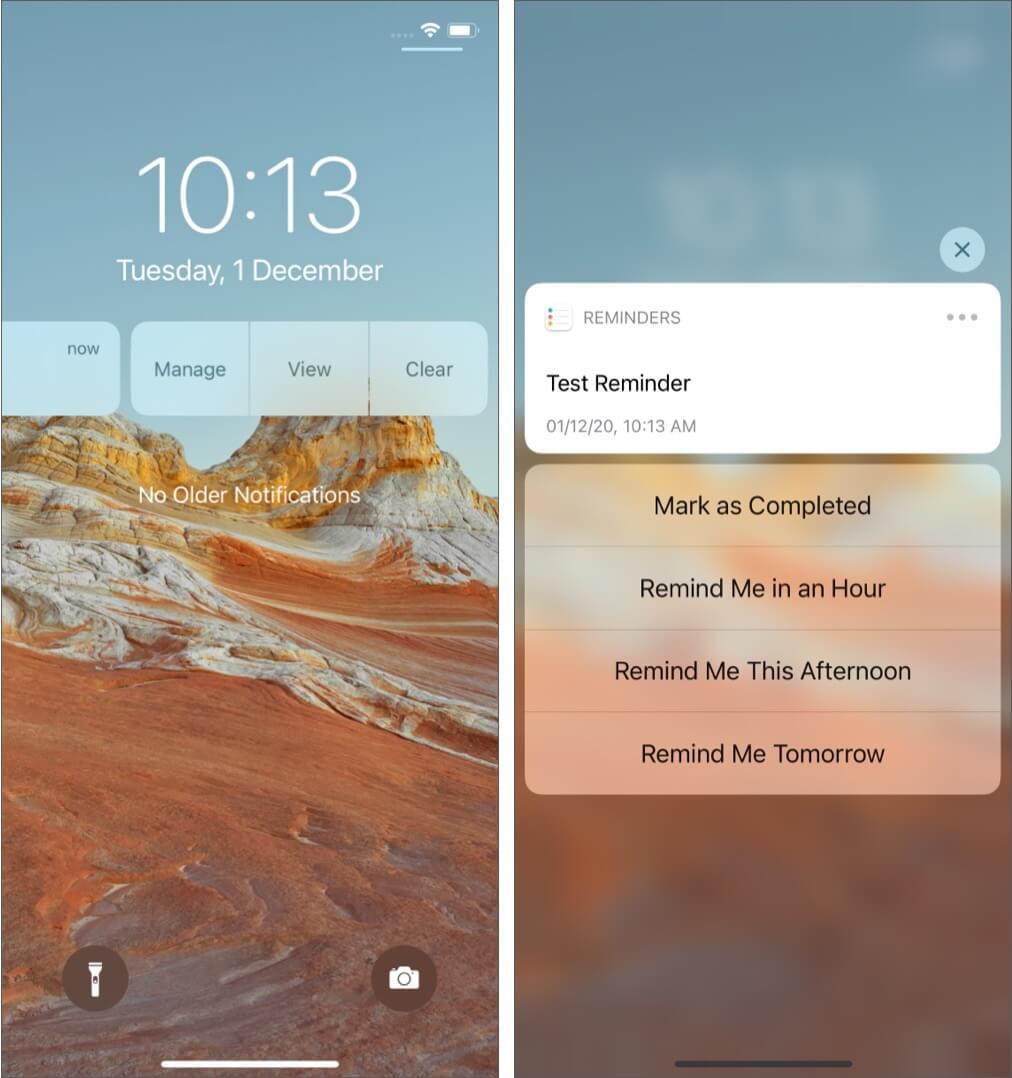
- You can complete a reminder from the Notification Center. For this, press the notification or swipe right to left, tap View → Mark as Completed.
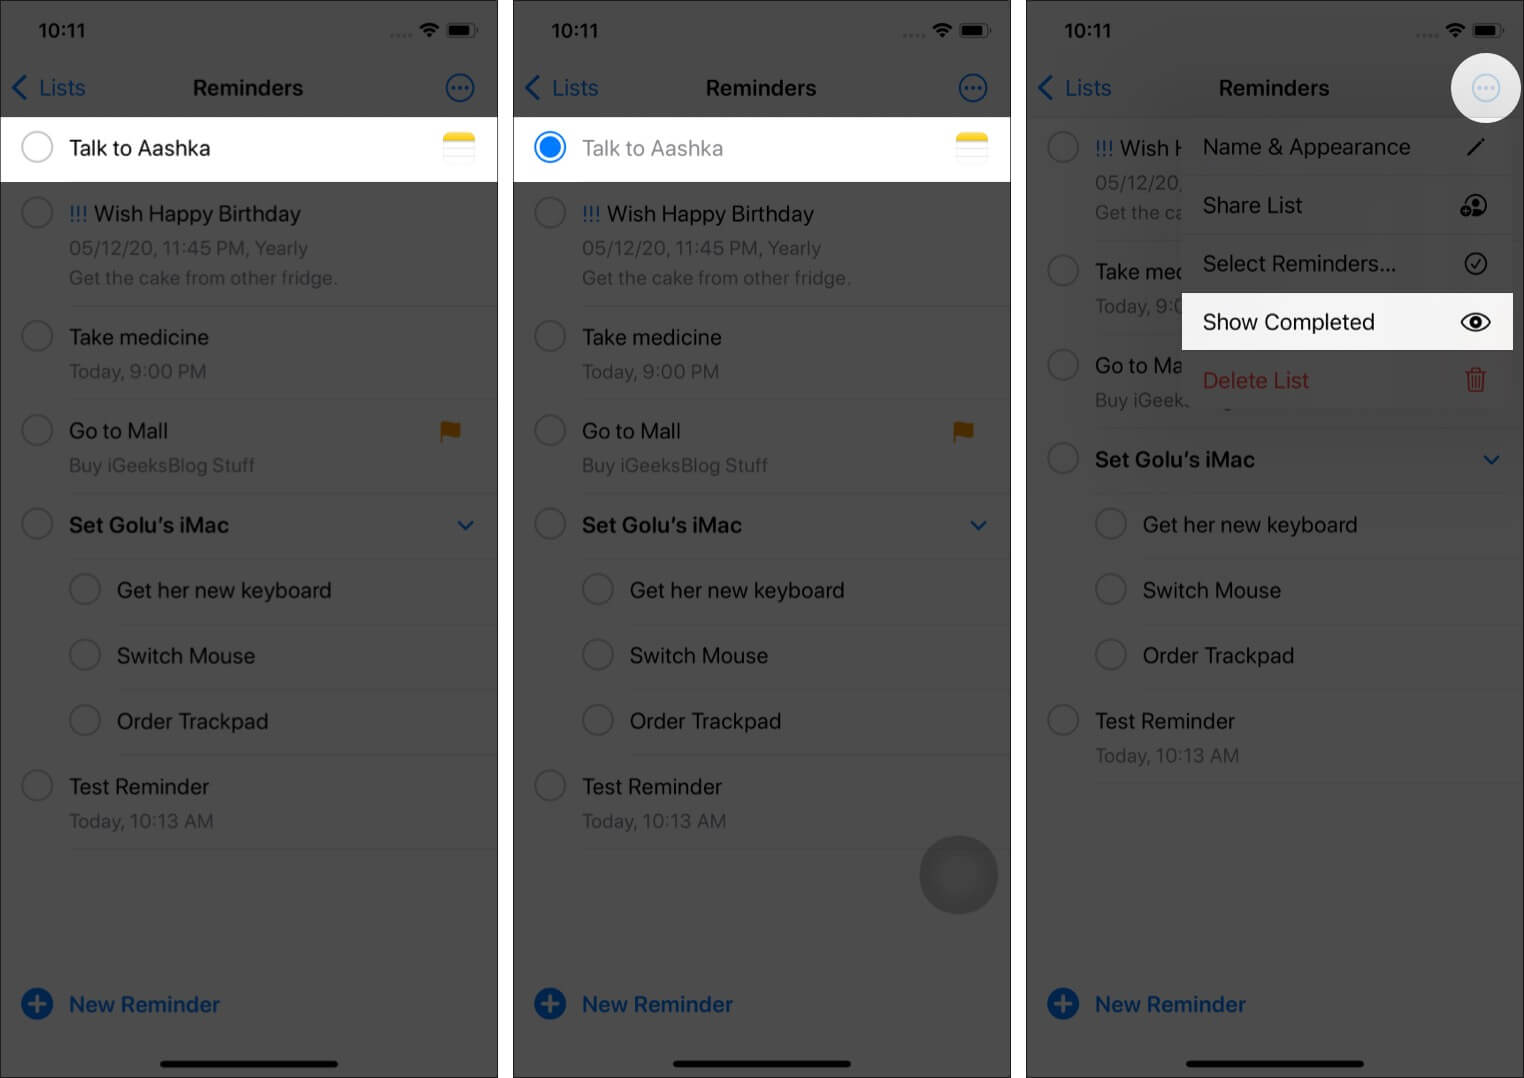
- Alternatively: Inside the app, you can tap the circle to the left of a reminder.
To see completed reminders, tap the three horizontal dots at the top right → choose Show Completed.
How to create a new reminders list on iPhone or iPad
Reminder lists are an excellent way to organize your tasks. It’s handy for quick access to related reminders and doesn’t leave them cluttered.
To create reminder lists:
- Open the Reminders app and tap Add List.
- Give it the desired name and choose a preferred color and icon. Finally, tap Done at the top right.
To rename or edit the color and icon of an existing list, swipe left to right and tap the info icon (i). You may also tap the list → tap the three horizontal dots at the top right → choose Show List Info to edit it.
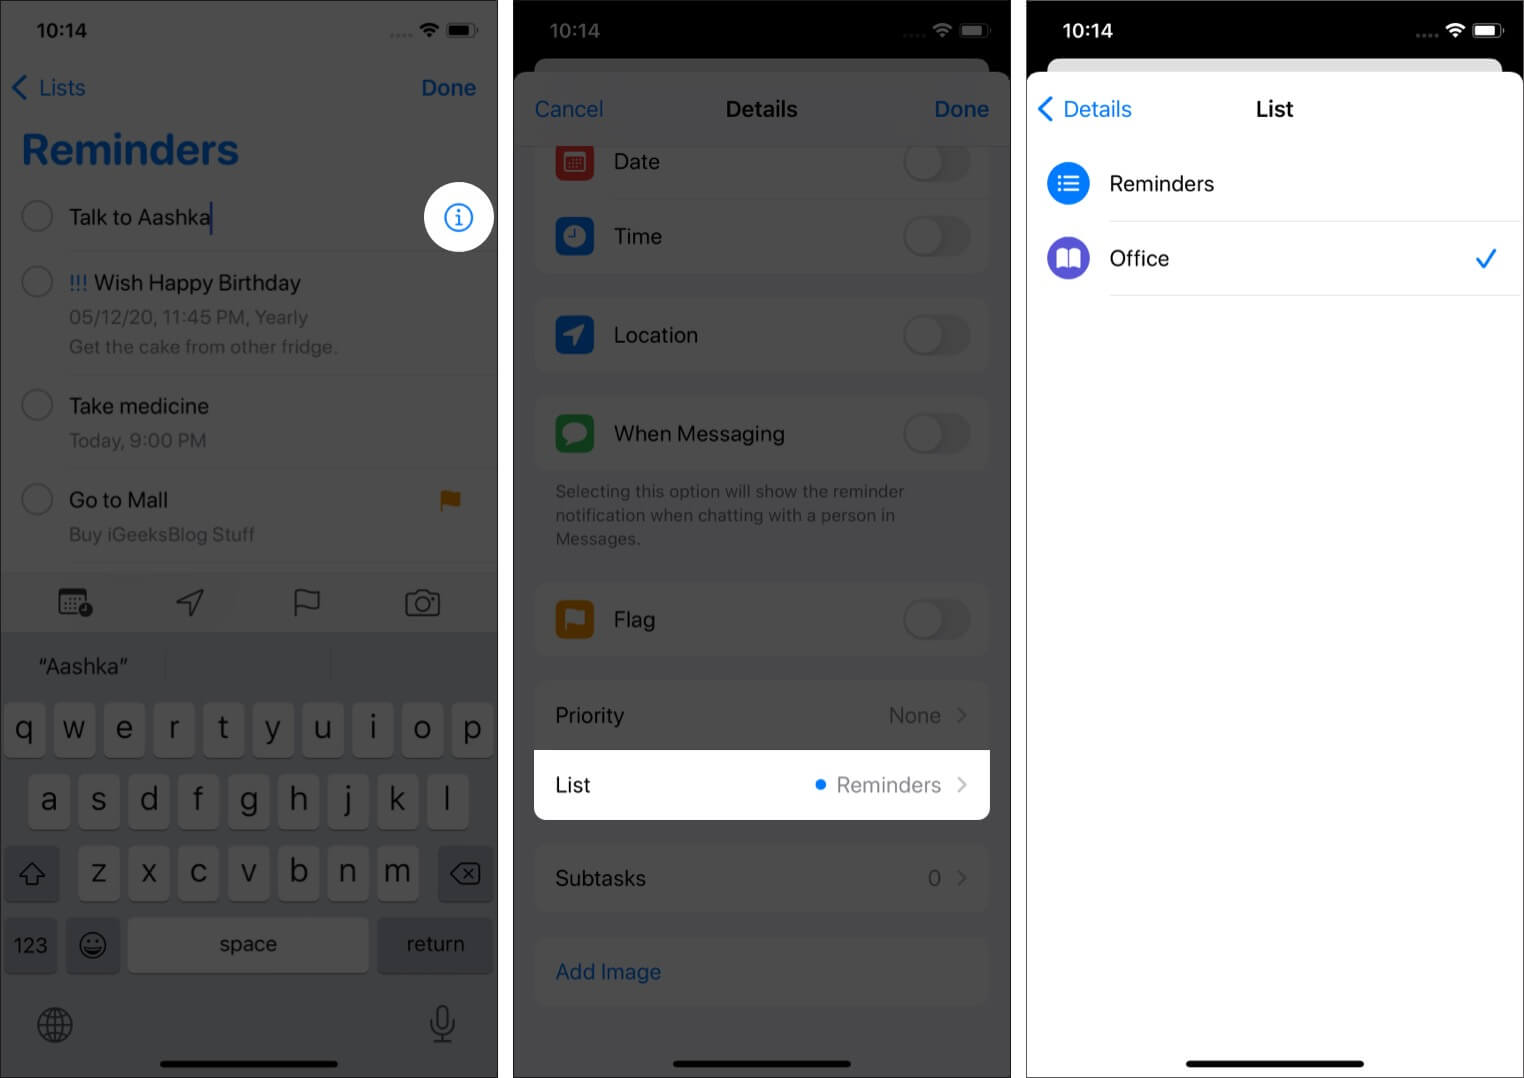
Move a reminder to a different list
- Tap an existing reminder and then tap (i).
- Scroll down and tap List. Now, choose a different list.
Pro Tip: You can also drag and drop to move a reminder. Touch and hold a reminder until it lifts a bit. Now, with another finger, tap <Lists to go back. Drop the reminder on the desired list.
Print reminders list in iOS 14.5 upward on iPhone
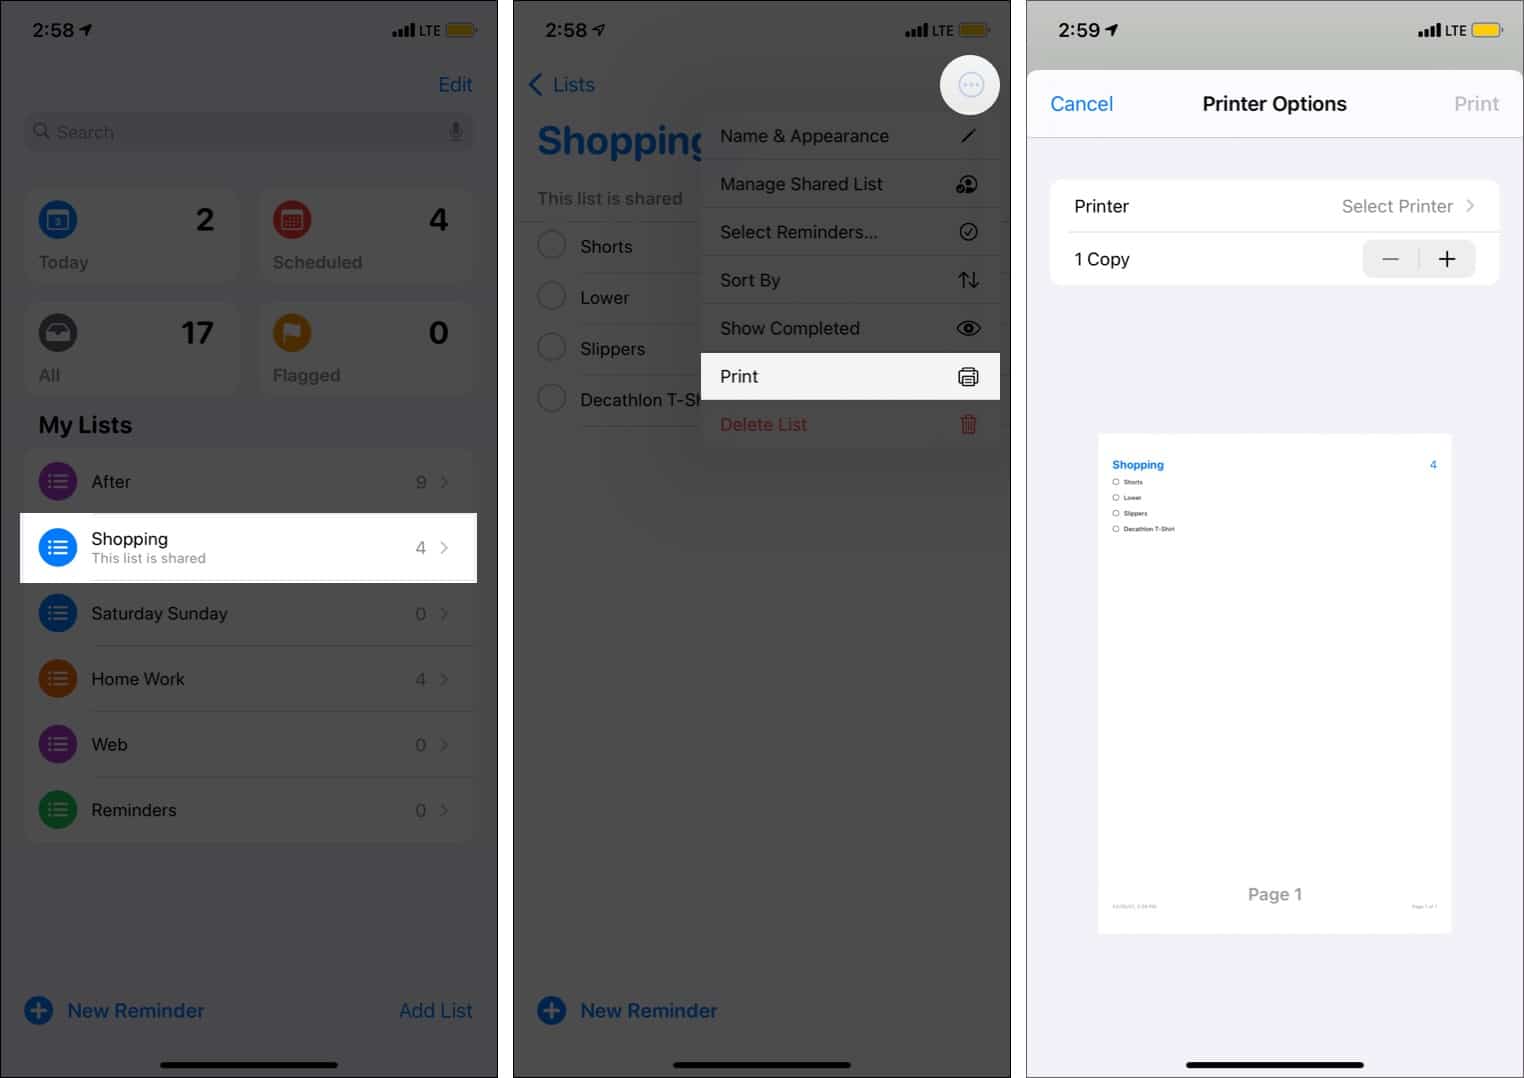
Have a long reminder list that you wish to print out for ease? On iOS 14.5 and later, you can do this from within the app. Here is how:
- Inside the Reminders app, tap a list from ‘My Lists.’
- Tap the ‘three dots inside a circle’ icon at the top right.
- Tap Print.
- Select the printer and the number of copies.
- Finally, tap Print.
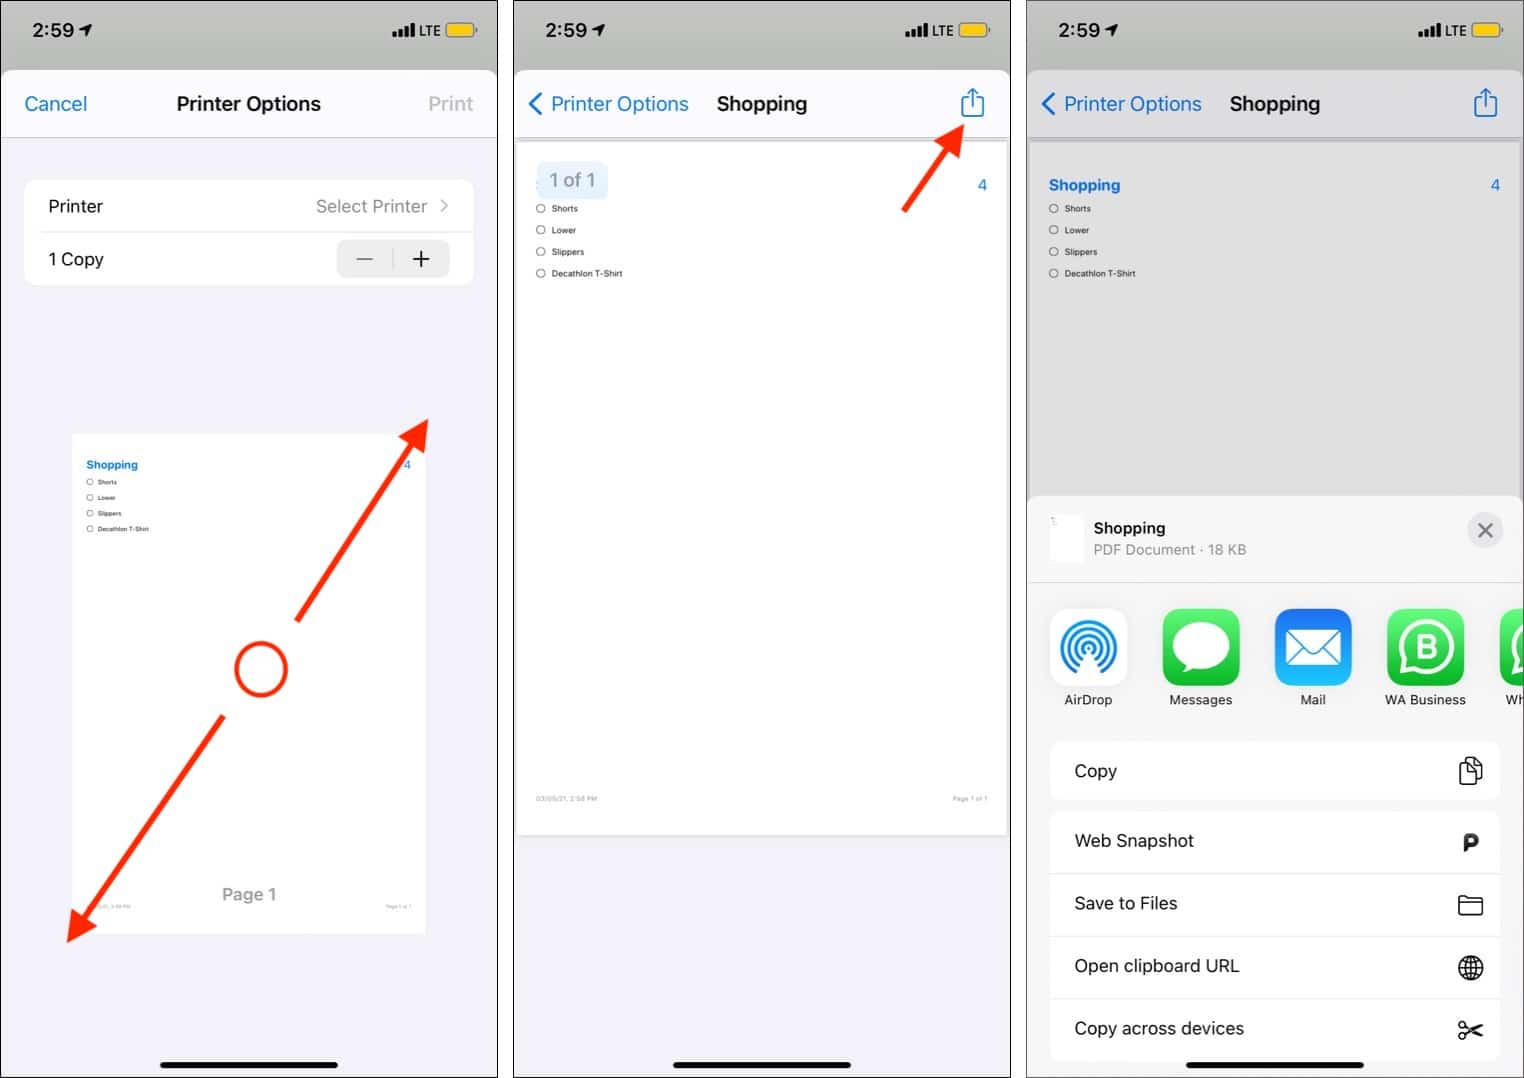
Tip: Wish to save the reminders as a PDF? After step 3:
- Pinch out the reminders thumbnail.
- Tap the share icon and choose Save to Files. Open the Files app, and you will see the PDF there.
- You may also share the PDF over WhatsApp or other similar apps.
How to sort reminders in iOS 14 and later
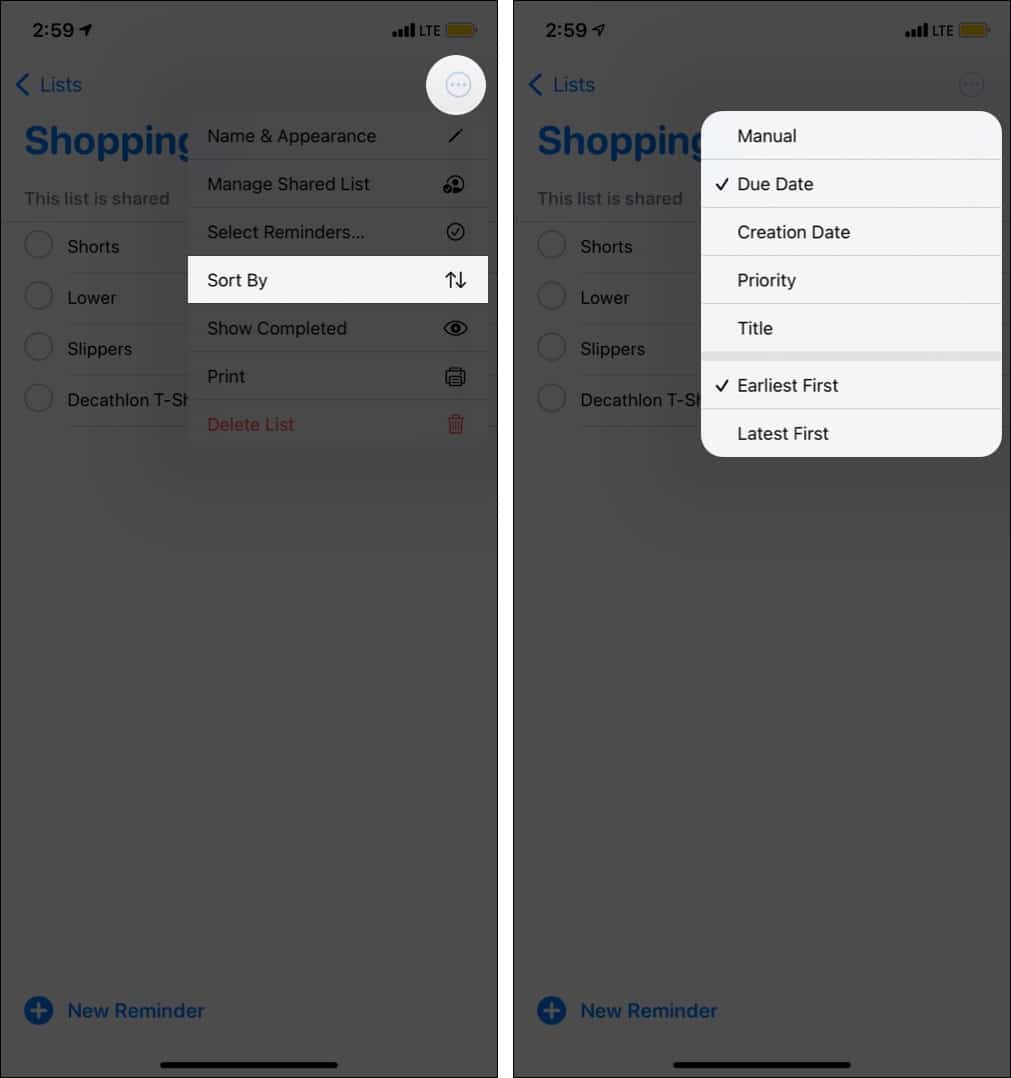
You can sort reminders according to the due date, creation date, priority, or title. Here’s how:
- Open the Reminders app and go to a list under “My Lists.”
- Tap the ‘three dots inside a circle’ icon and choose Sort By.
- Select the desired option to sort your reminders.
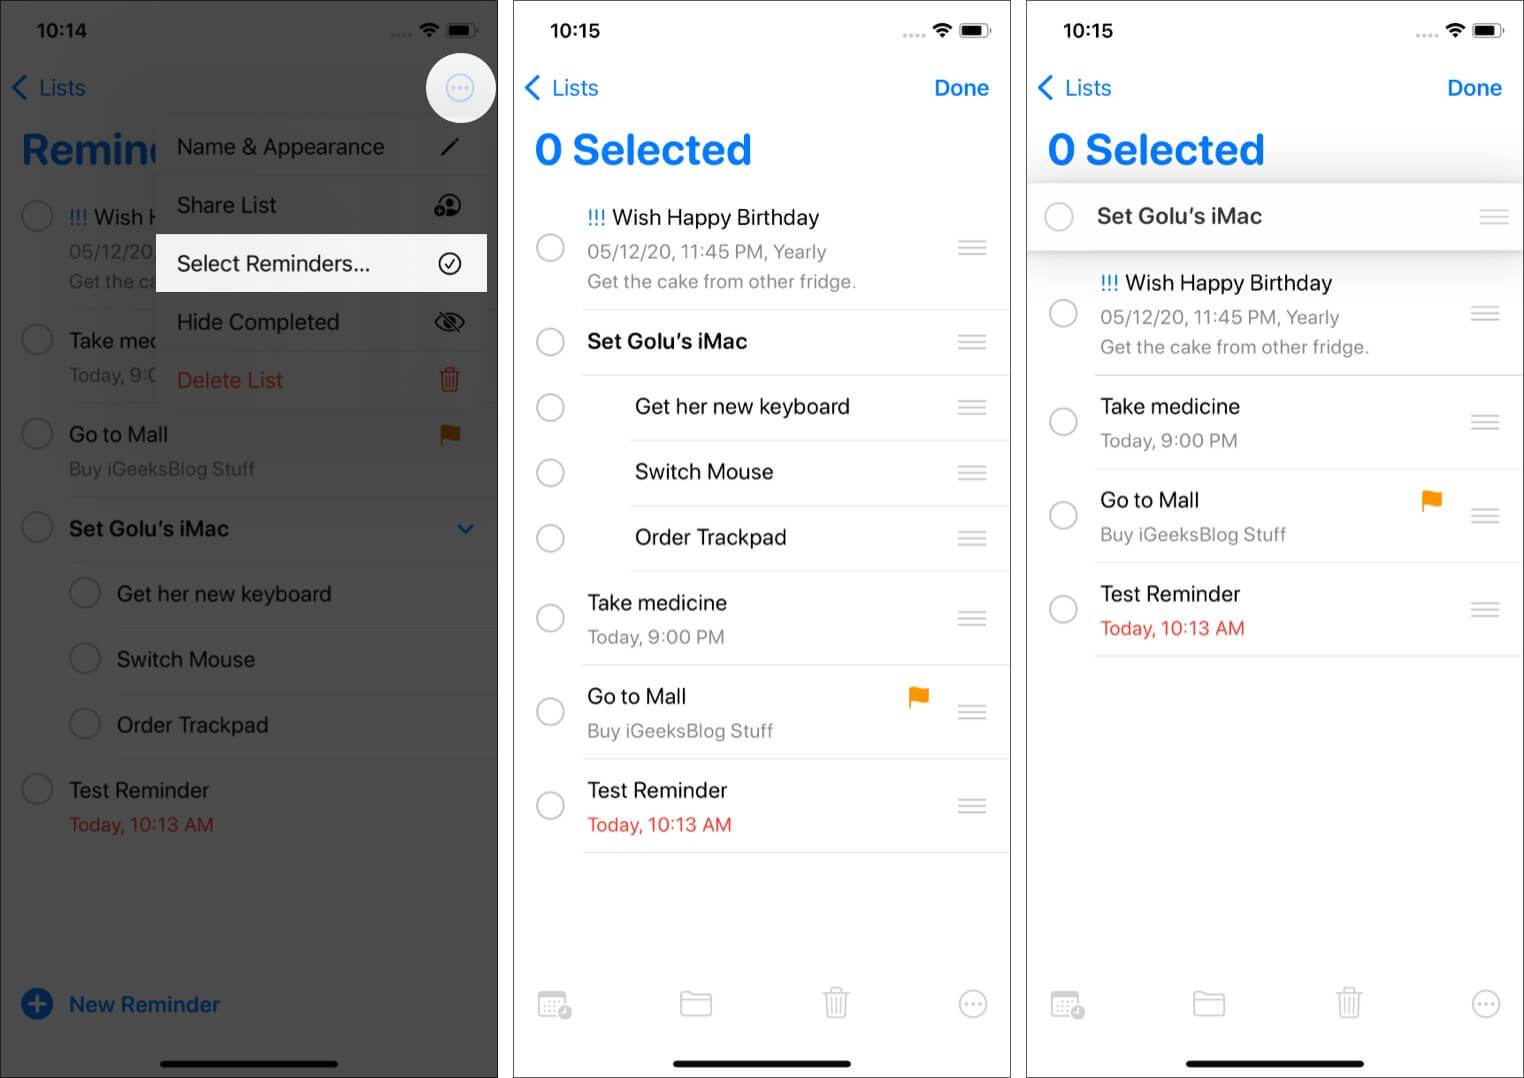
Pro Tip: You may also change the order of reminders by dragging them up or down.
- When you are on the screen with all reminders, tap the three horizontal dots at the top right → Select Reminders.
- Touch the hamburger icon (three small lines) and drag it up or down.
Note: You can also drag and drop directly, but take care not to make subtasks accidentally.
View your reminders in smart lists
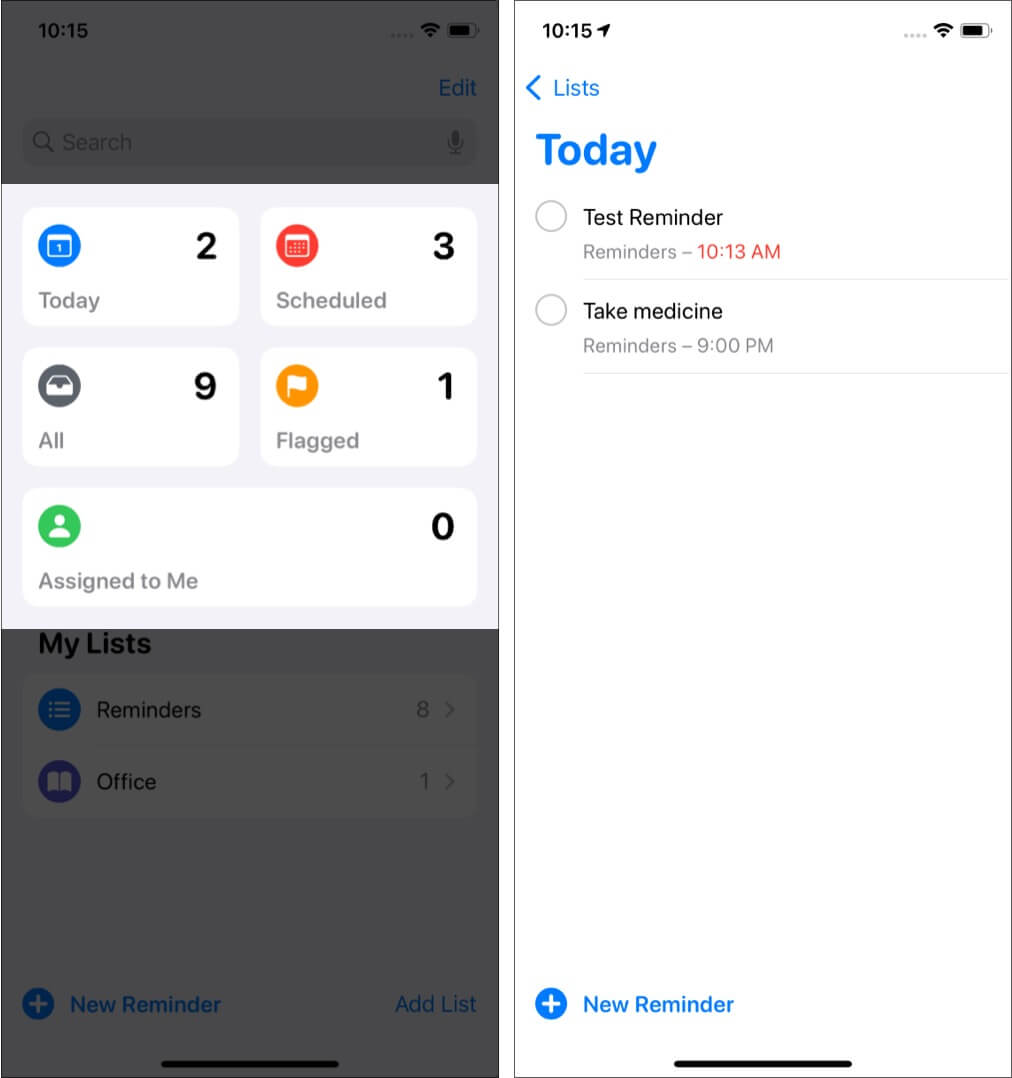
Upon opening the Reminders app, you will see rectangles tabs on the top like Today, Scheduled, Flagged, All, Assigned to Me, etc. Tap one to see the reminders.
Smart lists automatically appear on the Reminders app home screen. Most of the names like All, Today, and Scheduled are self-explanatory. The flagged one, for instance, has all the most important reminders you have “flagged.” The Assigned to Me smart list has all reminders that others have assigned to you.
Note: You may also see a smart list named Siri Suggestions. It has suggested reminders that the app thinks you should create based on your email and messages.
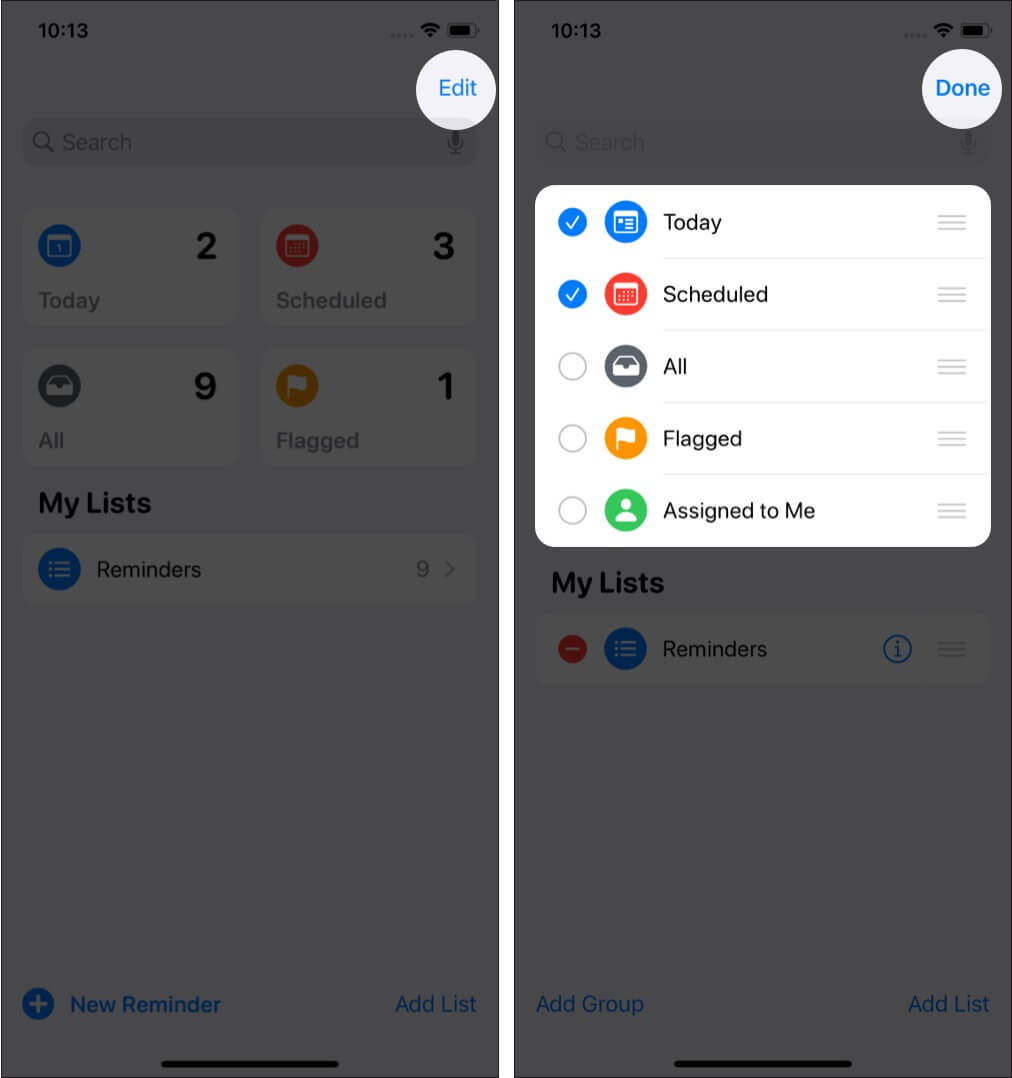
Hide or show smart lists in Reminders in iOS 15
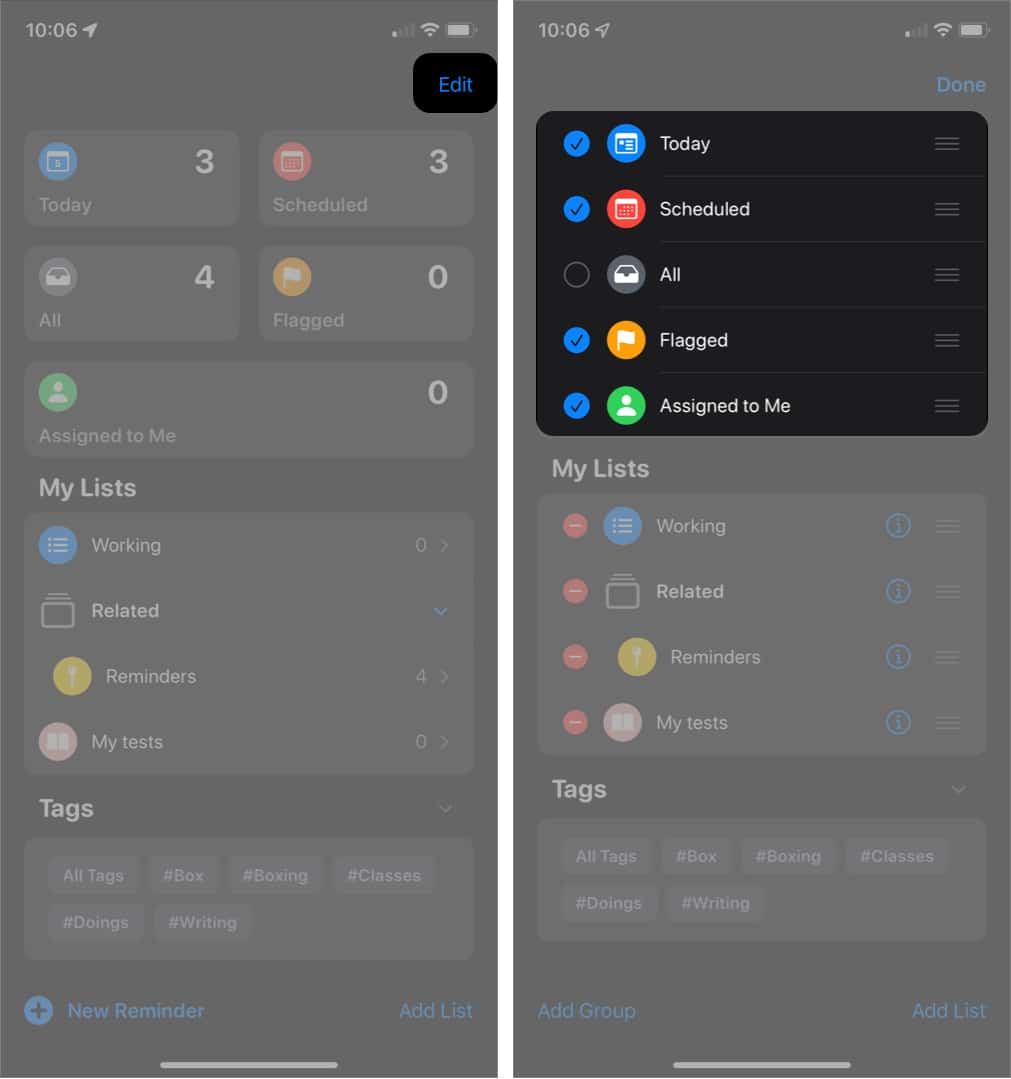
However, you can choose to show or hide a smart list. So when you hide a list, it doesn’t appear on the Reminders home screen anymore. Similarly, you can make a hidden list visible.
That’s easy. Once you open the Reminders app:
- Tap Edit at the top-right.
- To hide a smart list:
- Untick the blue checkmark to its left.
- To make a hidden list visible:
- Tick the checkmark to its left to select it.
- Tap Done at the top right when done.
How to search for reminders
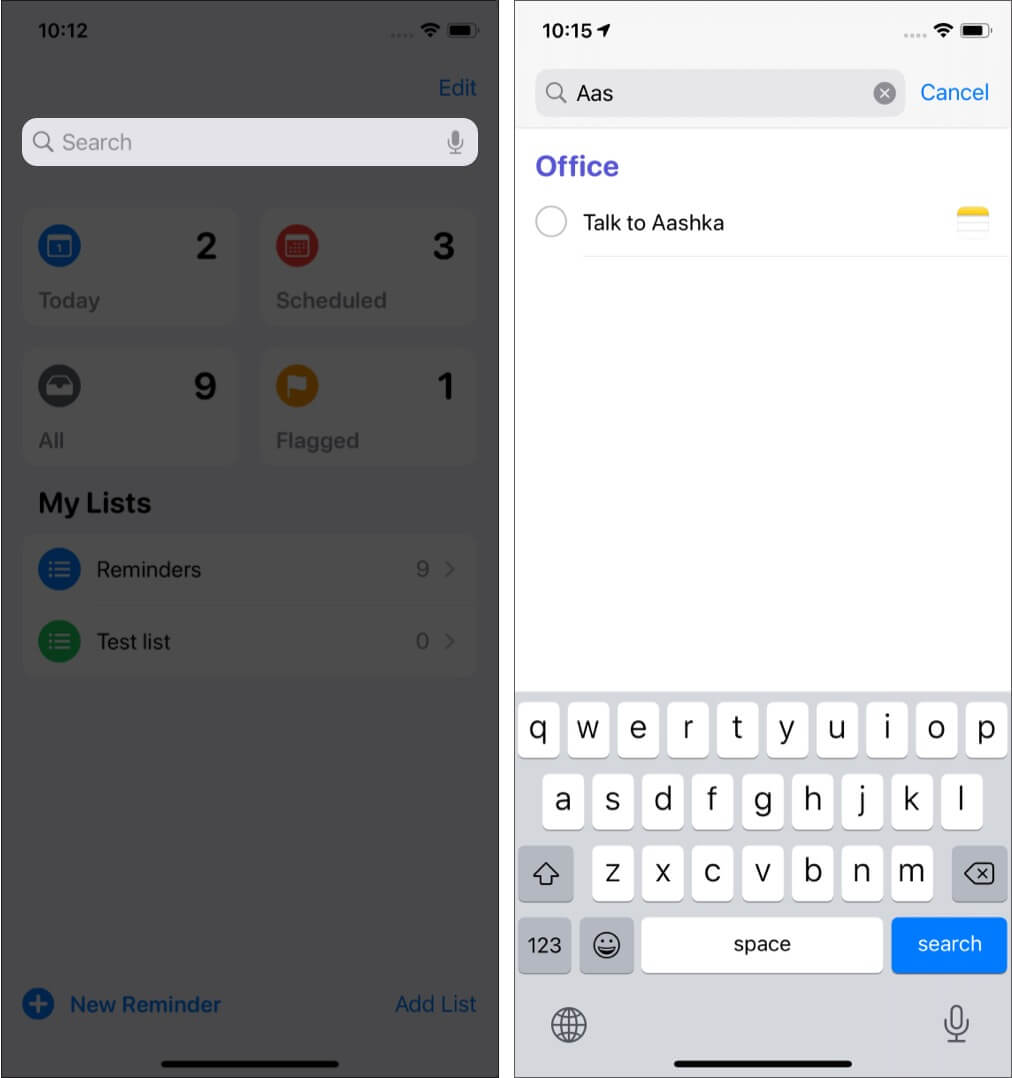
When you open the Reminders app, there is a search bar at the top. Type the reminder name to look for it. Also, when you select a reminder, tap the (i) icon to make changes.
Share a reminders list
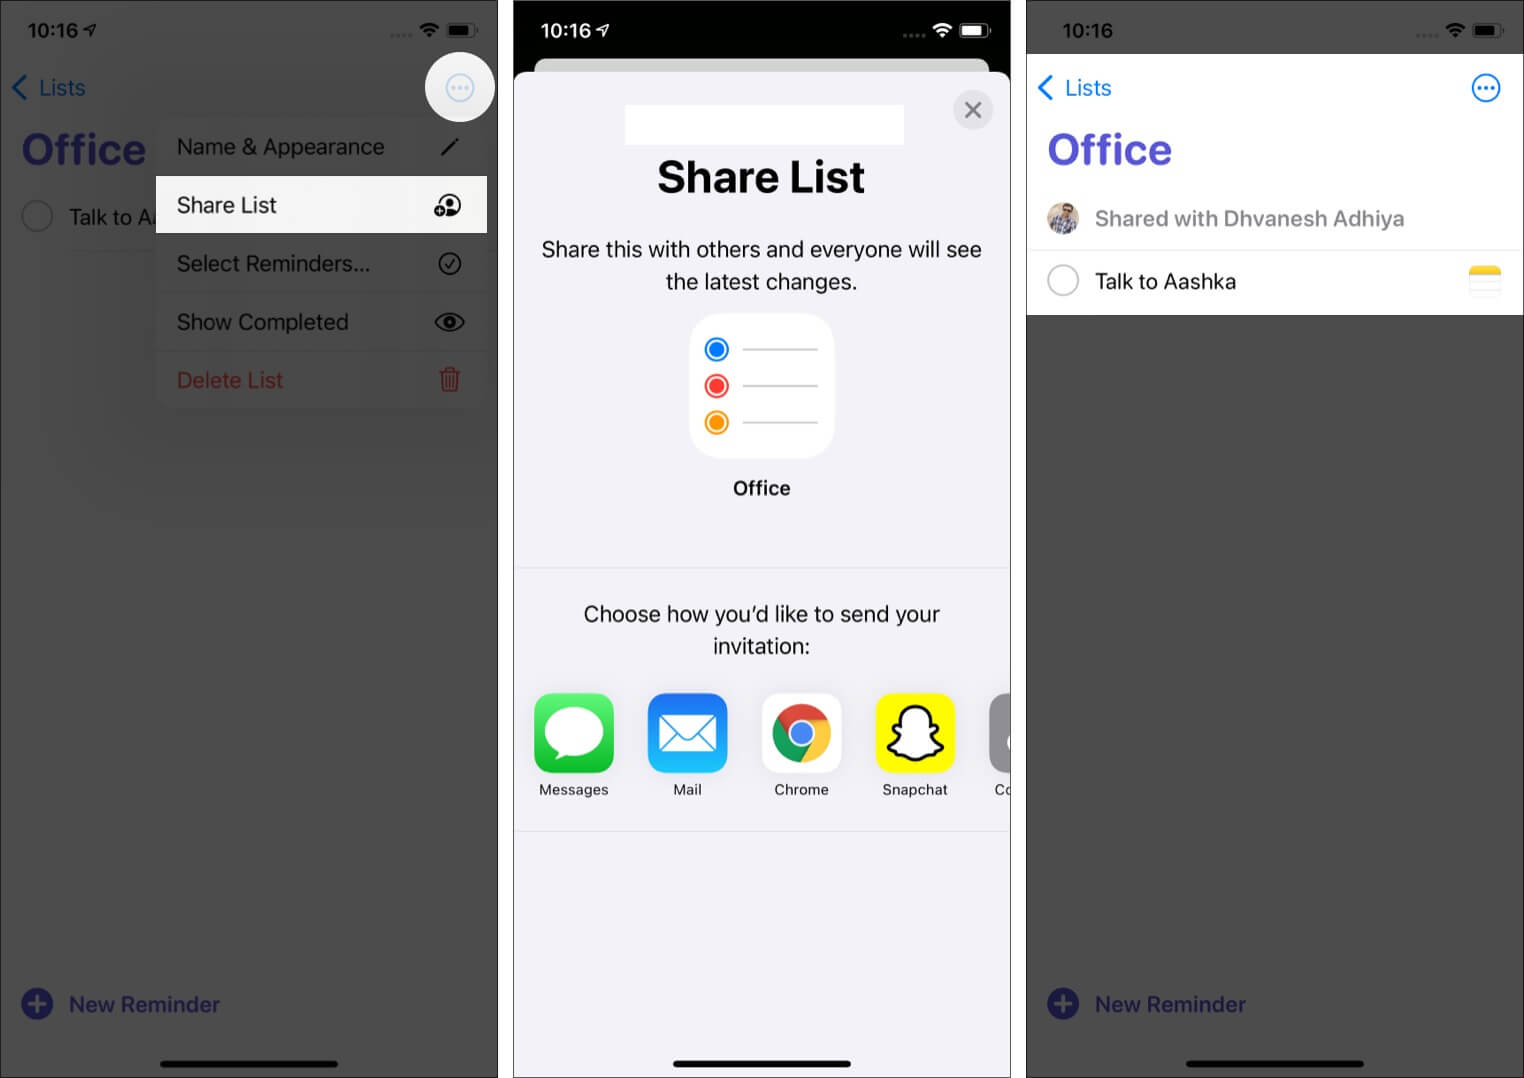
- Launch the Reminders app and tap the desired list.
- Tap the More button → Share List.
- Now, use the desired app (like Messages, Email, Slack, WhatsApp, etc.) to send one or multiple people the invitation.
- Once they accept, they can view, add, delete, or mark reminders as completed.
Note: Recipients of a shared list must be running a similar iOS version with your device. Else, it won’t work on their side.
Assign a reminder in a shared list
You can assign reminders to different people. Let us assume you are going camping, and you have reminders lists. You can now allocate a reminder, say bring a blanket to one friend, take a stove to another, and so on.
Here’s how to assign reminders.
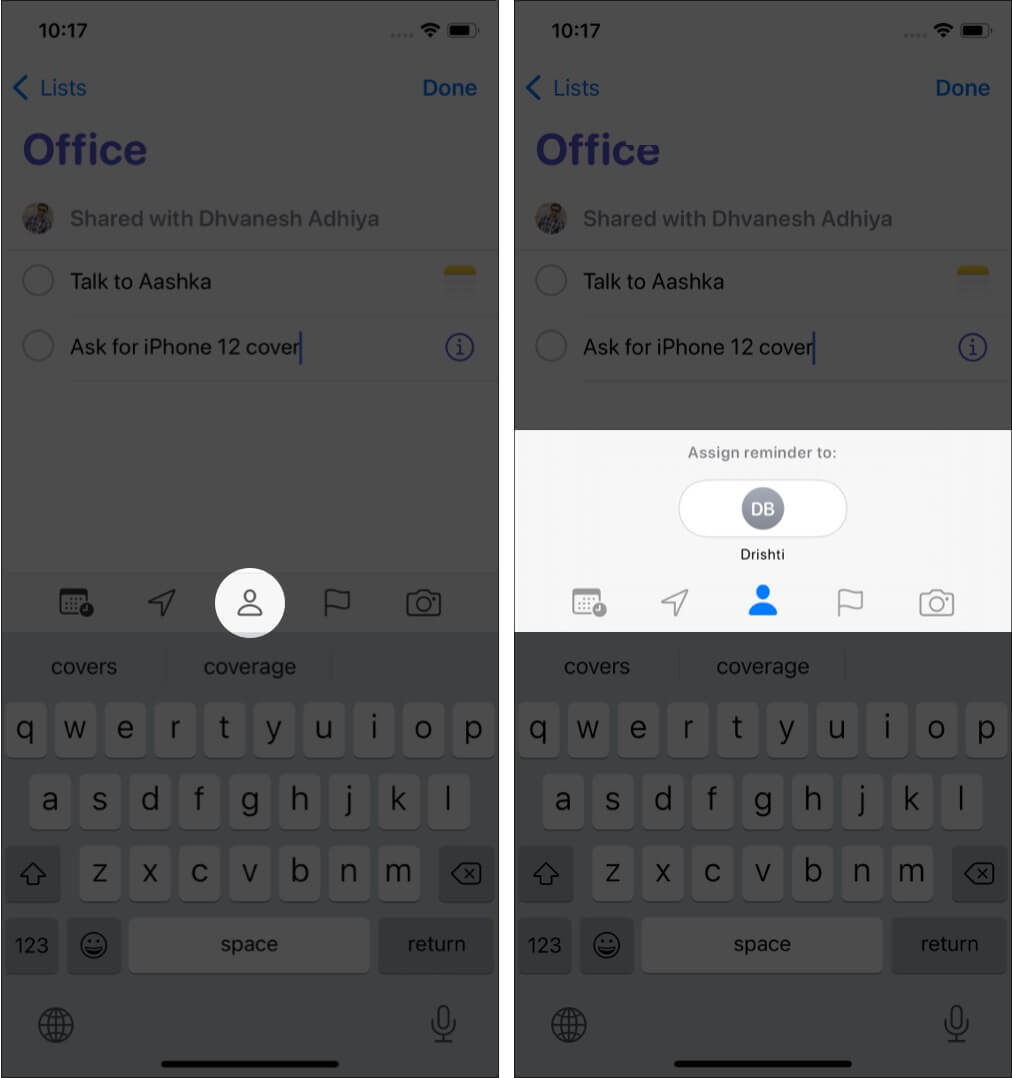
- Inside a shared reminder list (see how to make one above), tap a reminder.
- Tap the assignment button (person icon) above the default iOS keyboard.
- Now, select a person and tap Done.
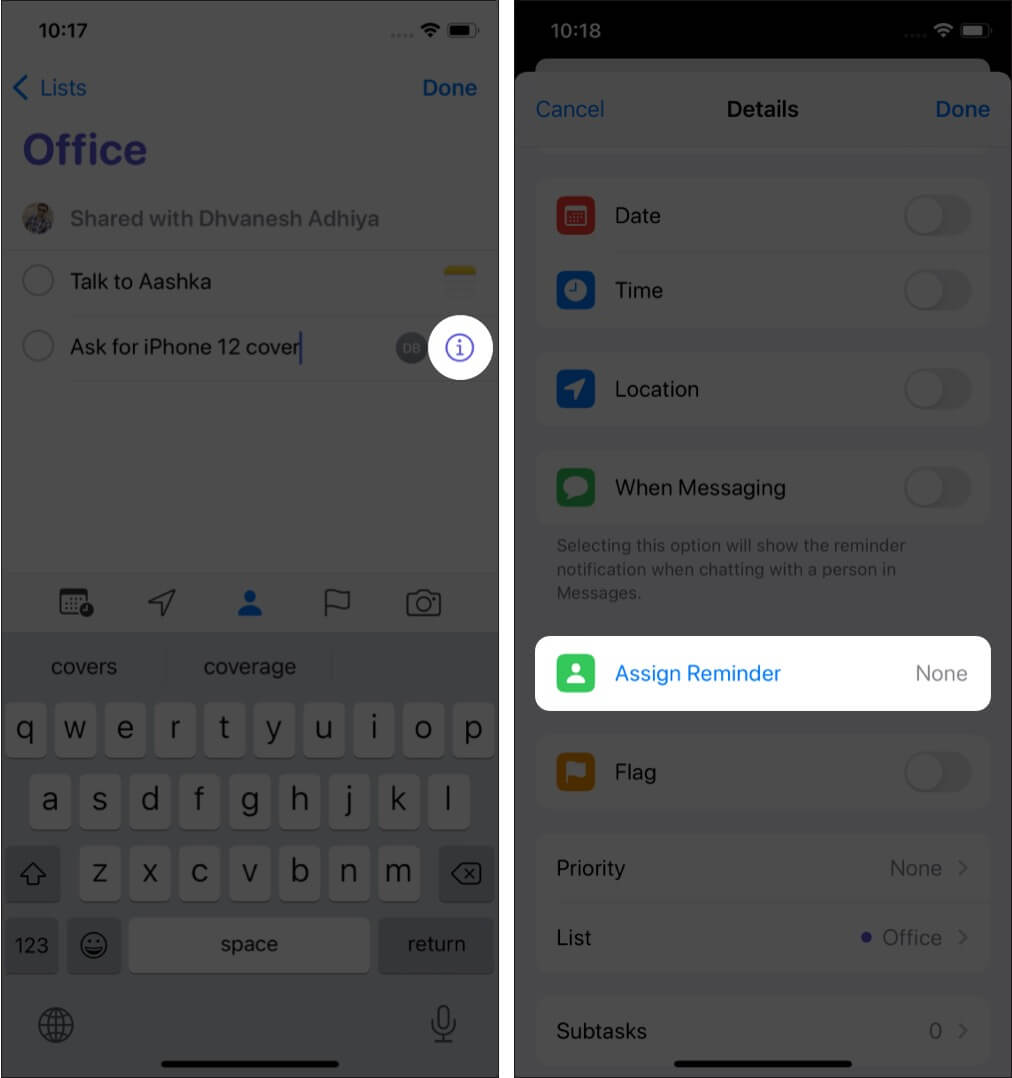
Note: If you use a third-party keyboard, it may prevent you from seeing the assignment button. In this case, tap the reminder → tap (i) → select Assign Reminder.
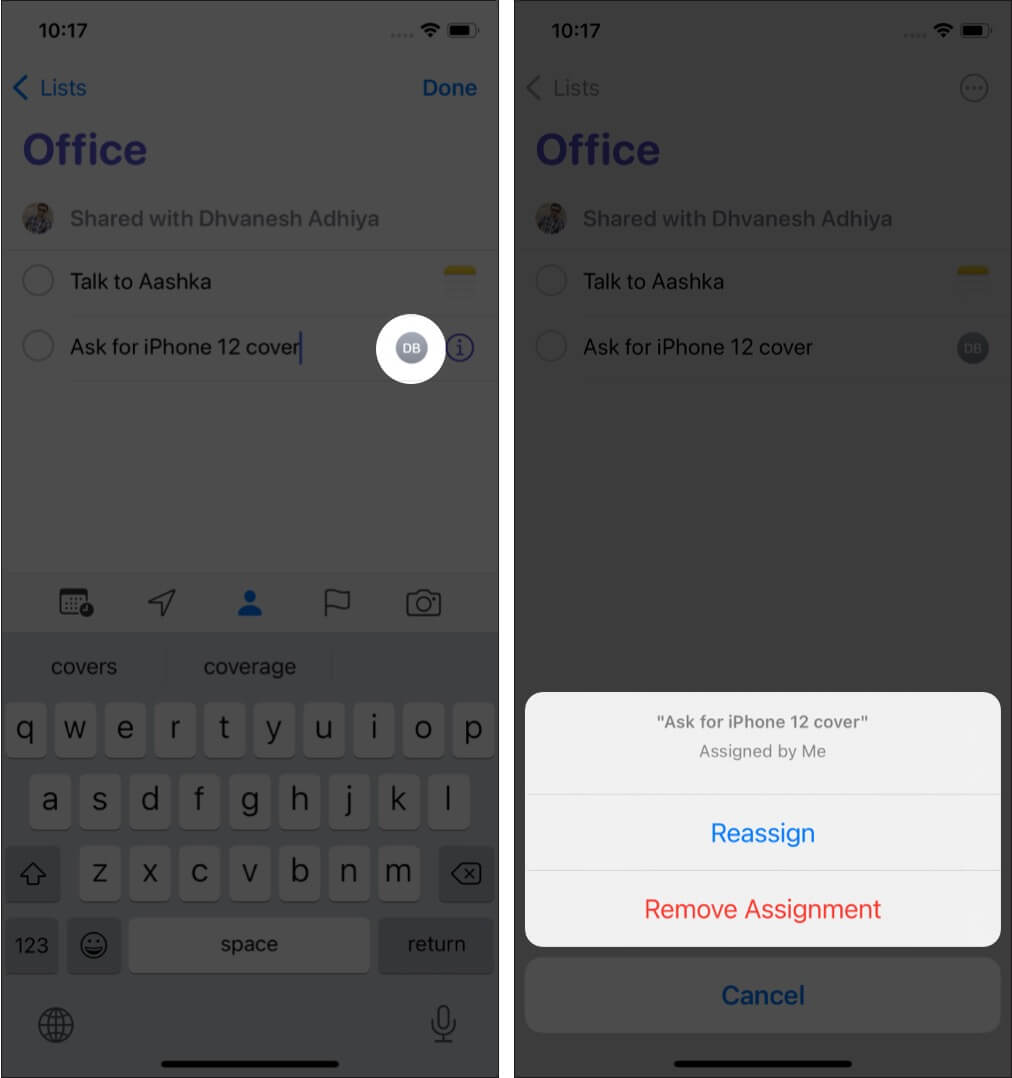
To remove an assignee or reassign them a reminder, tap their profile picture next to the reminder.
Organize lists into groups in Reminders in iOS 15
For organization, you can also arrange your reminder lists into different groups. This can be handy if you want to prioritize some lists over others or your lists are becoming complex and related.
To do so, open the Reminders app:
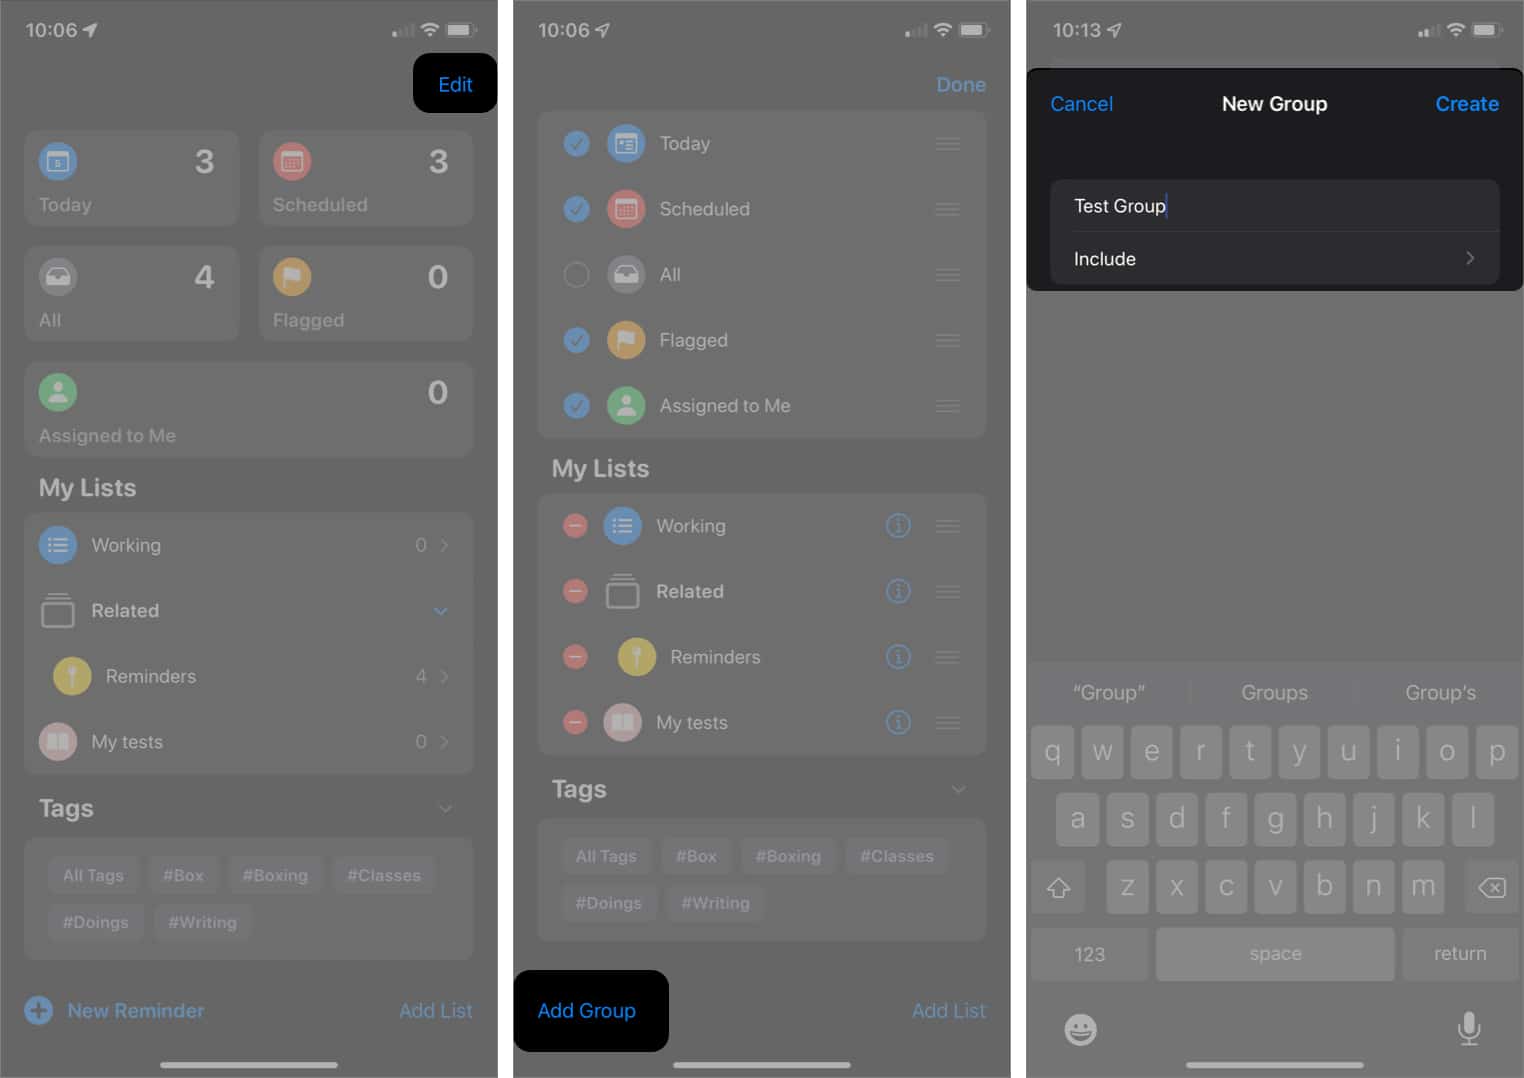
- Tap Edit at the top right.
- Select Add Group at the bottom left.
- Type a name for this particular Group.
- Next, tap Include.
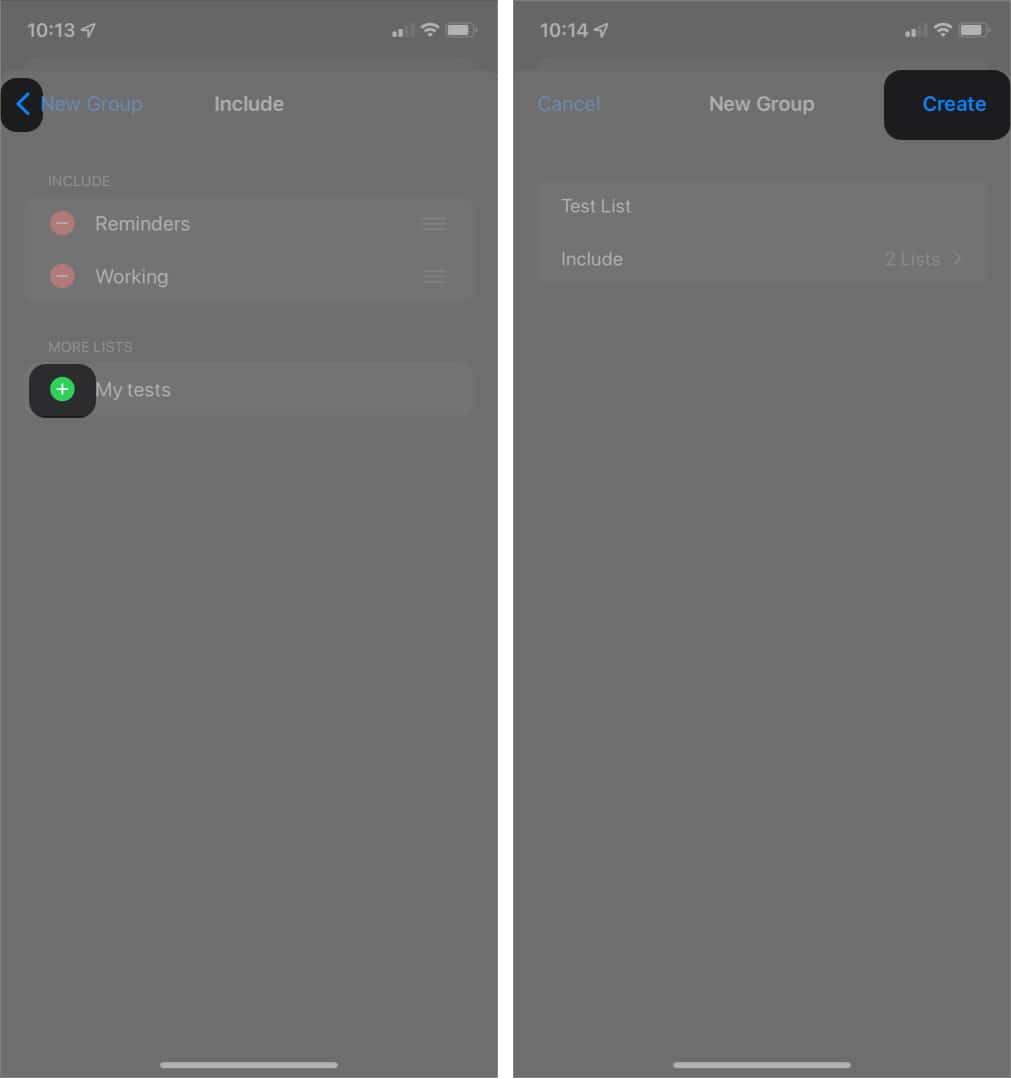
- Select the (+) icon to the left of a List to add it to the newly created Group.
- Tap the back arrow at the top left to go back.
- Select Create at the top right to add the newly created Group.
How to delete a reminder
- Open the Reminders app and go to the desired reminder.
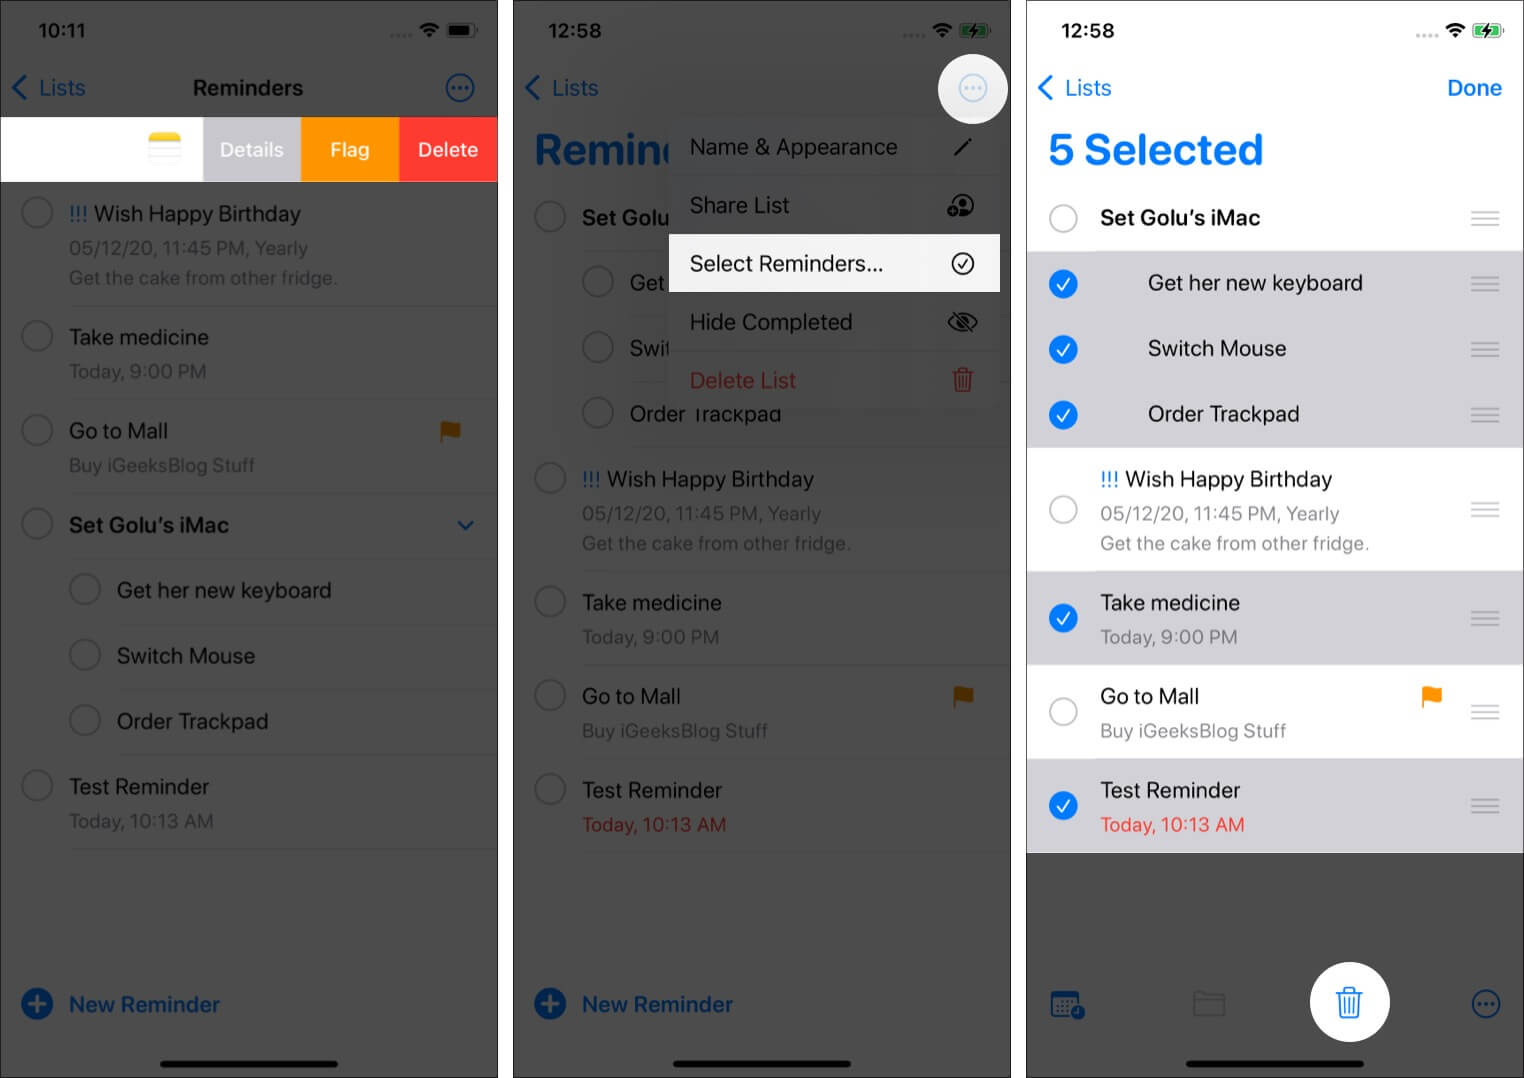
- Long-press the reminder and swipe it to the left corner → Select Delete.
- To delete multiple reminders at once:
- Tap the three horizontal dots at the top right → Select Reminders → select the desired entries → tap the trash icon
- Tap the three horizontal dots at the top right → Select Reminders → select the desired entries → tap the trash icon
Permanently delete completed tasks
To remove all completed tasks from the Reminders app permanently:
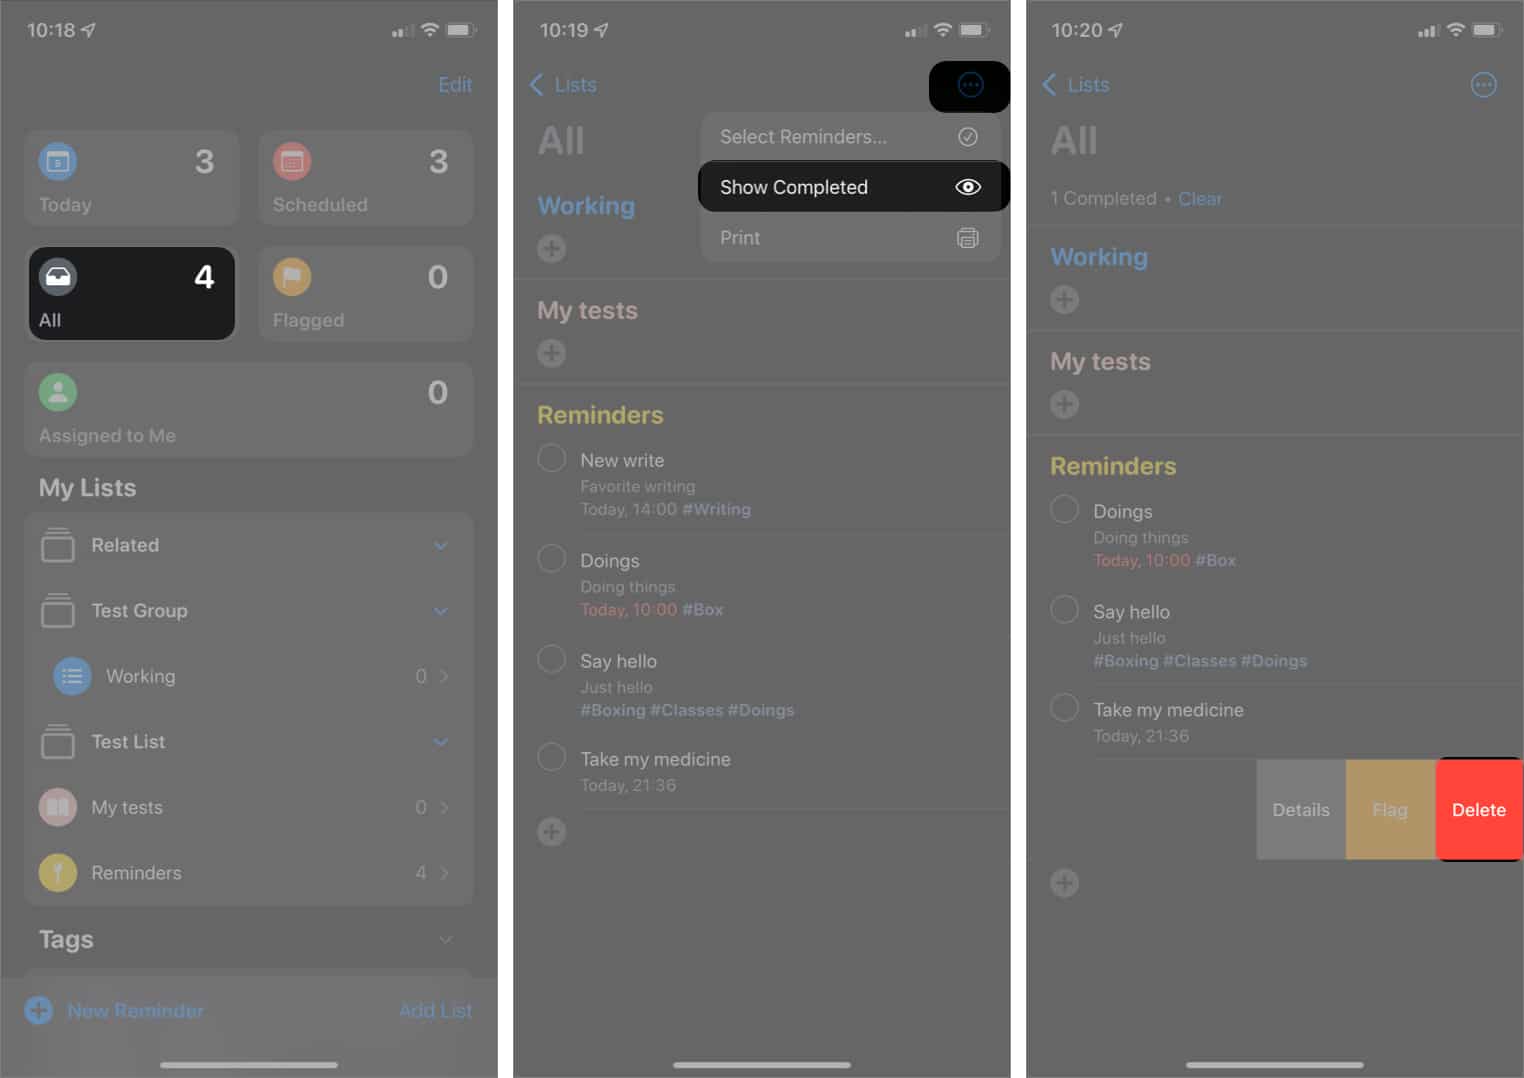
- Select All from Reminders app home screen.
- Tap the three horizontal dots at the top-right.
- Choose Show Completed.
- Long-tap the ticked reminder and swipe it to the left corner → select Delete.
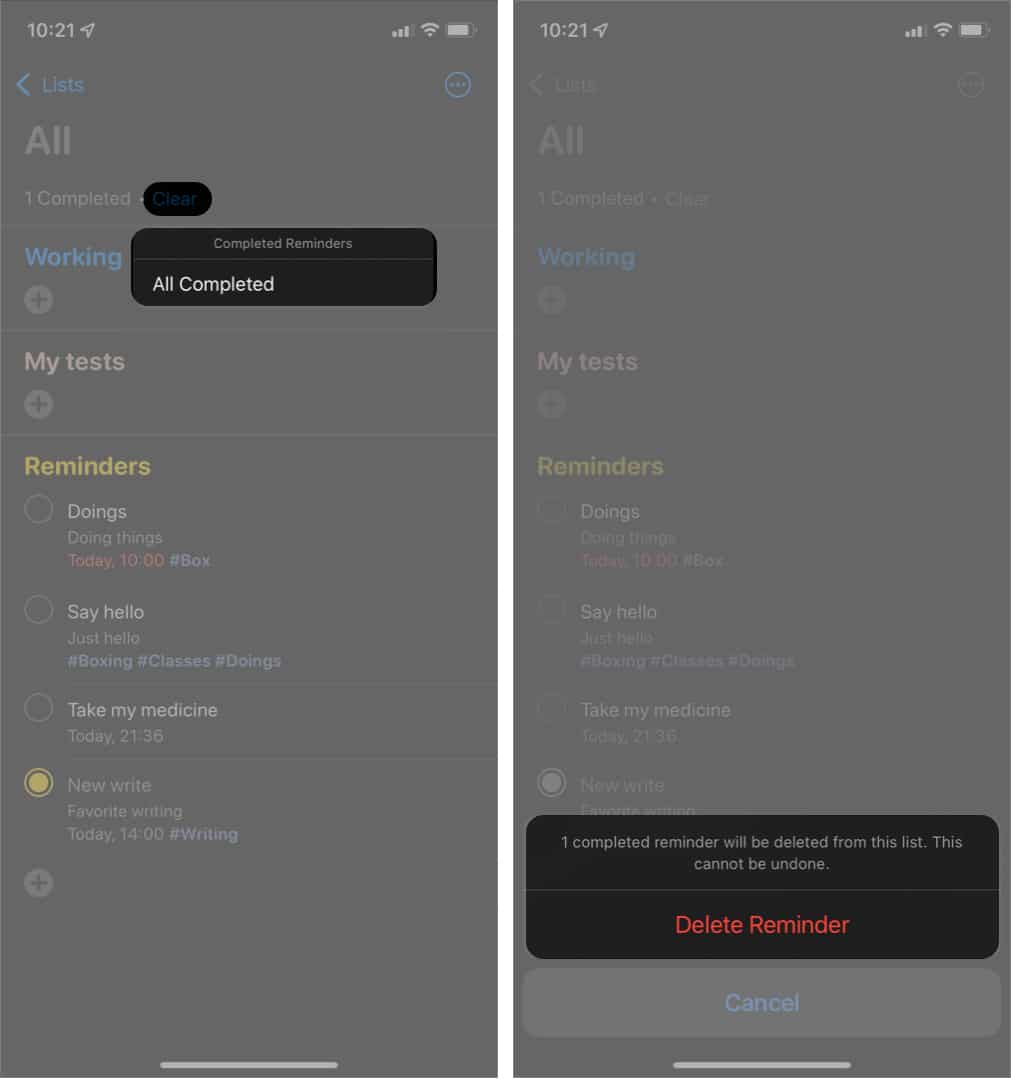
- To delete all completed reminders at once:
- Tap Clear at the top left (directly under All).
- Select All Completed.
- Next, tap delete Reminder to remove completed reminders permanently.
Delete a reminder list
- Launch the Reminders app on your iPhone or iPad.
- From under My Lists, swipe right to left on a list.
- Tap the red trash icon.
- Alternatively: Tap a list → three horizontal dots at the top right → choose Delete List.
- Important: Deleting a reminder list also erases all the reminders inside it.
Note: You can not delete Smart Lists (shown on top). But you can hide them all. For this, tap Edit → uncheck the boxes → tap Done.
Ready to use the Reminders app like a pro!
I hope now you know how to use the Reminders app on iPhone and iPad and make the most of it. I find this inbuilt app suitable, feature-rich, and easy to use. What is your take? Let us know in the comments below.
You will enjoy reading next:

 Once finish adding subtasks, tap <Details to go back. Then finally tap Done.


Leave a Reply