Whether you’re a student, a business professional, or someone who frequently delivers presentations, the Presenter Overlay on macOS Sonoma offers you a seamless way to captivate your audience and present your visual content with flair. In this guide, I’ll show you how to effectively use the new Presenter Overlay feature on macOS Sonoma.
- What is Presenter Overlay?
- How to use Presenter Overlay in macOS 14 Sonoma
- Customizations available in Presenter Overlay
- What are the benefits of using Presenter Overlay?
What is Presenter Overlay?

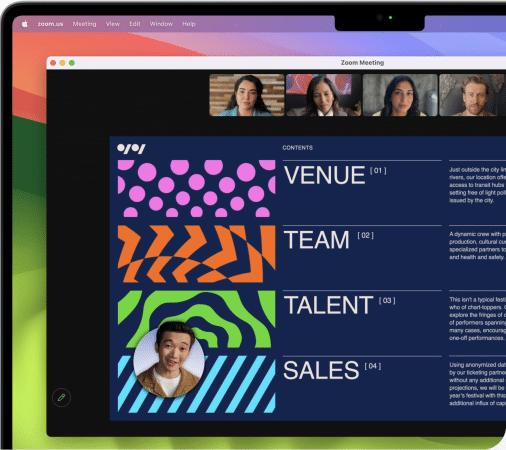
Presenter Overlay is a cool new feature rolled out with macOS Sonoma that lets you be seen on video calls even when you’re presenting your screen. It puts a small floating picture of you on the screen so that you can move around. Additionally, the Presenter Overlay feature works seamlessly with other third-party apps.
Before proceeding, you must ensure that you meet the requirements listed below.
- Your Mac must run macOS Sonoma or later.
- You need a video calling app that supports Presenter Overlay, such as FaceTime, Zoom, and so on.
How to use Presenter Overlay in macOS 14 Sonoma
As of writing this article, you can easily use Presenter Overlay on FaceTime and Zoom, and the steps for both are outlined below.
Use Presenter Overlay with FaceTime
- Launch Spotlight (command + spacebar).
- Type FaceTime in the search bar → Open the FaceTime app.
- Start a new FaceTime call or join an ongoing call.
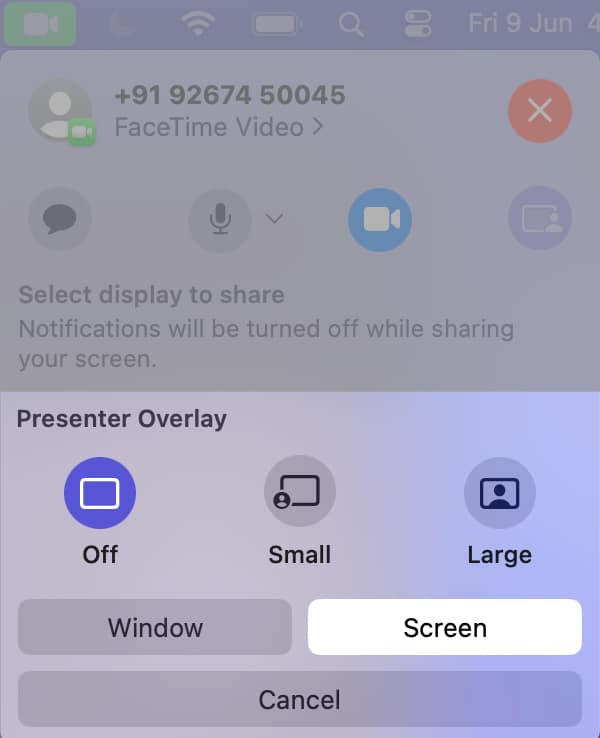
- Click on the Share Screen icon.
- Choose whether to share a specific Window or your entire Screen.
- Decide whether you want the Presenter Overlay to be Small or Large.
If the attendee is using an iPhone, they’ll see a Join Screen Sharing pop-up and must tap Open to start viewing.
Well done! You have successfully shared your screen in FaceTime and started Presenter Overlay.
Using Zoom and other third-party apps
- Launch the Zoom app.
- Start a new call or join an ongoing call.
- Share your Mac screen by selecting the Screen Share icon.
- Locate the Presenter Overlay feature.
You can access it in Advance → Slides as Virtual Background in the Zoom app. - Click Share.
Now, you can see your floating screen in the bottom right corner of the screen. Moreover, the steps are almost similar for every other video calling app as well.
Customizations available in Presenter Overlay
- Background: You can choose a background color or image for a presenter overlay.
- Position: Drag and drop your presenter overlay to where you want it to appear on the screen.
- Size and position: The overlay’s size is adjustable and can be placed at any location on your screen with a simple drag and drop.
- Effects: Pick from a variety of effects and add them to the overlay’s background.
What are the benefits of using Presenter Overlay?
With Presenter Overlay, you can captivate your audience and deliver a more effective presentation. Some of the advantages of using it are listed below.
- Stay engaged with your audience: This feature aids in maintaining audience engagement by keeping you present and involved in the conversation. This is particularly crucial when giving presentations because you need to be able to connect with your audience and respond to their questions.
- Make your presentations more engaging: Presenter Overlay makes your presentations more interesting as it enables you to move around freely and make gestures during your presentations. This can assist you in emphasizing important points and improving the visual appeal of your presentations.
- Improve collaboration: Collaboration can be enhanced by facilitating idea sharing and discussion using Presenter Overlay. It can also assist you in staying on task and ensuring that everyone is in agreement when working on a project with others.
Upgrade your presentation game!
With the rollout of Presenter Overlay with macOS Sonoma, you can now seamlessly combine your content and delivery to elevate your presentations to the next level. The feature makes it simple to present your slides while keeping eye contact with your audience, which improves engagement and connection. Learn more about such exciting features of macOS Sonoma below.
Read more:


Leave a Reply