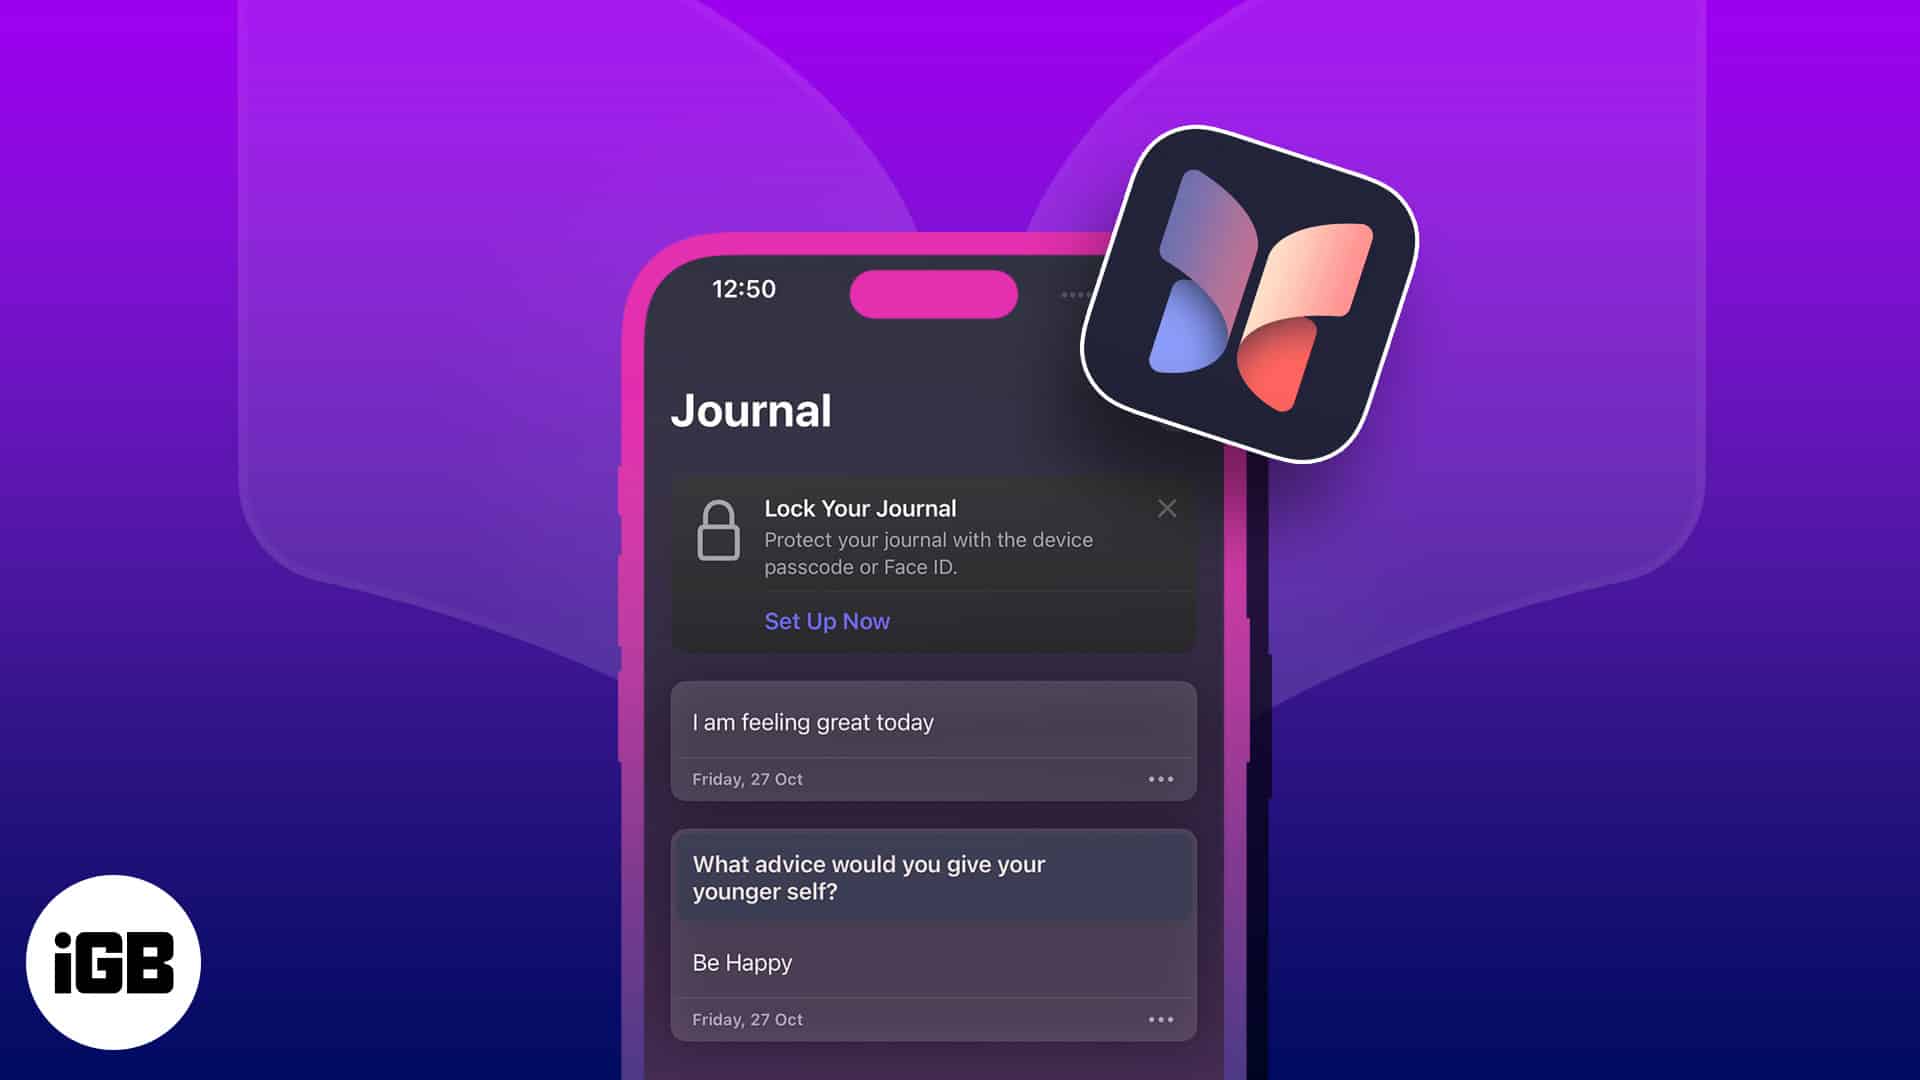
Journaling is a simple yet powerful way to reflect, organize your thoughts, and boost mental well-being. Apple’s Journal app makes it fun and intuitive to capture your daily moments—whether it’s a quick note, a meaningful photo, or a snapshot of your state of mind.
Now available across iPhone, iPad, and Mac, and enhanced with Apple Intelligence and iCloud syncing, this app makes journaling smarter than ever. In this guide, you’ll learn how to use the Journal app step by step, explore its best features, and discover why it belongs in your daily routine.
Table of Contents
- What Is Apple's Journal App?
- Top Features of Apple's Journal App
- Getting Started with the Journal App
- How to Create a Journal Entry
- How to View, Edit, and Organize Journal Entries
- How to Delete and Recover Journal Entries
- How to Use Journal Suggestions
- How to Record Your State of Mind
- How to Use Insights to Track Progress
- Set Journaling Reminders
- Customize Journal Settings
- Tips for Better Journaling
- Troubleshooting: Journal App Not Working?
- Reflect on Memories with Apple Journal
What Is Apple’s Journal App?
Apple’s Journal app is a free, built-in journaling tool introduced with iOS 17.2 and expanded across iPadOS 26 and macOS 26. It helps you document your thoughts, emotions, and experiences—like a digital diary, but smarter.
It supports adding text, photos, videos, audio recordings, and even location tags to enrich entries. Plus, Apple Intelligence provides journaling suggestions based on your device activity (such as workouts, places, or music), making it easier to start writing—even when you’re unsure of what to say.
Top Features of Apple’s Journal App
Here’s what makes the Journal app a powerful tool for personal growth and mental wellness:
- Text & Storytelling: Write anything from quick reflections to long-form entries.
- Media Integration: Add photos, videos, voice notes, and locations to give context to your moments.
- Smart Suggestions: Apple Intelligence offers thoughtful prompts based on your recent activity.
- Privacy Protection: Lock your entries with Face ID, Touch ID, or a passcode.
- Insights Dashboard: Visualize journaling habits with word counts, streaks, and activity graphs.
- Multi-Journal Support: Create separate journals for work, fitness, travel, or anything else.
- Apple Pencil Integration: Handwrite or doodle entries with Apple Pencil on iPad.
- Map View: Browse entries based on tagged locations.
With iCloud syncing, your entries stay secure and accessible across all your Apple devices.
Getting Started with the Journal App
Ready to start journaling? The Journal app is simple to set up and use across your Apple devices. Let’s dive in.
Compatibility
To use the Journal app, ensure your devices run the following OS versions:
- iPhone: iOS 17.2 or later
- iPad: iPadOS 26
- Mac: macOS 26
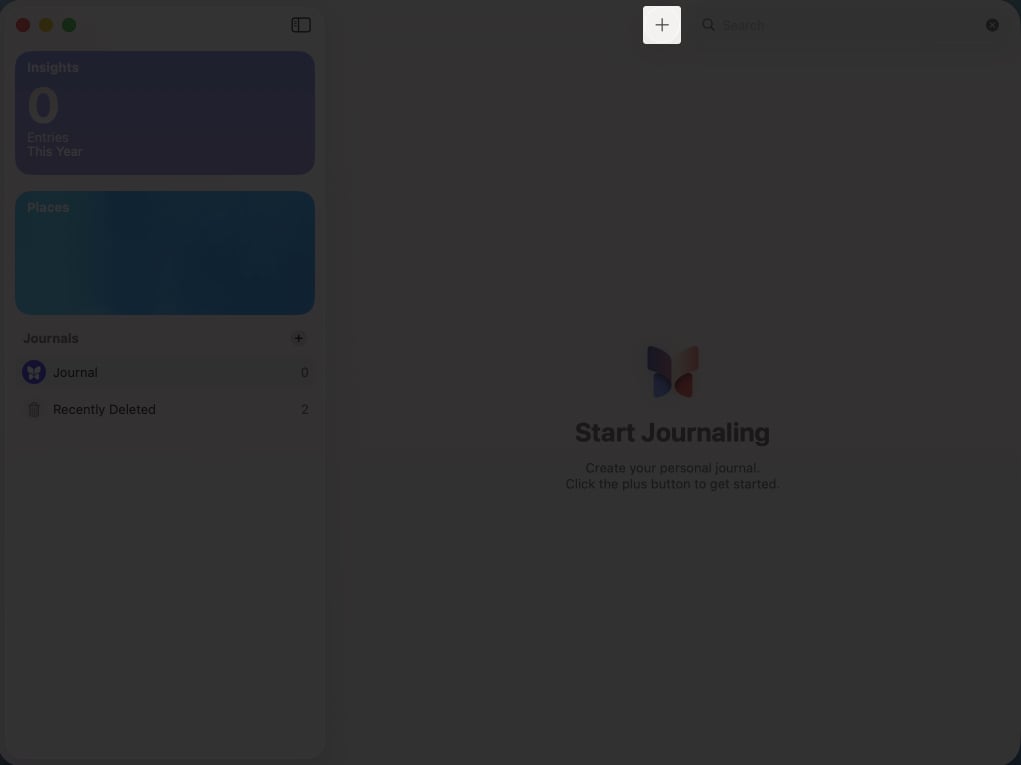
How to Set Up the Journal App
- Look for the Journal app on your iPhone or iPad’s Home screen or in your Mac’s Applications folder. Or you can download it from the App Store.
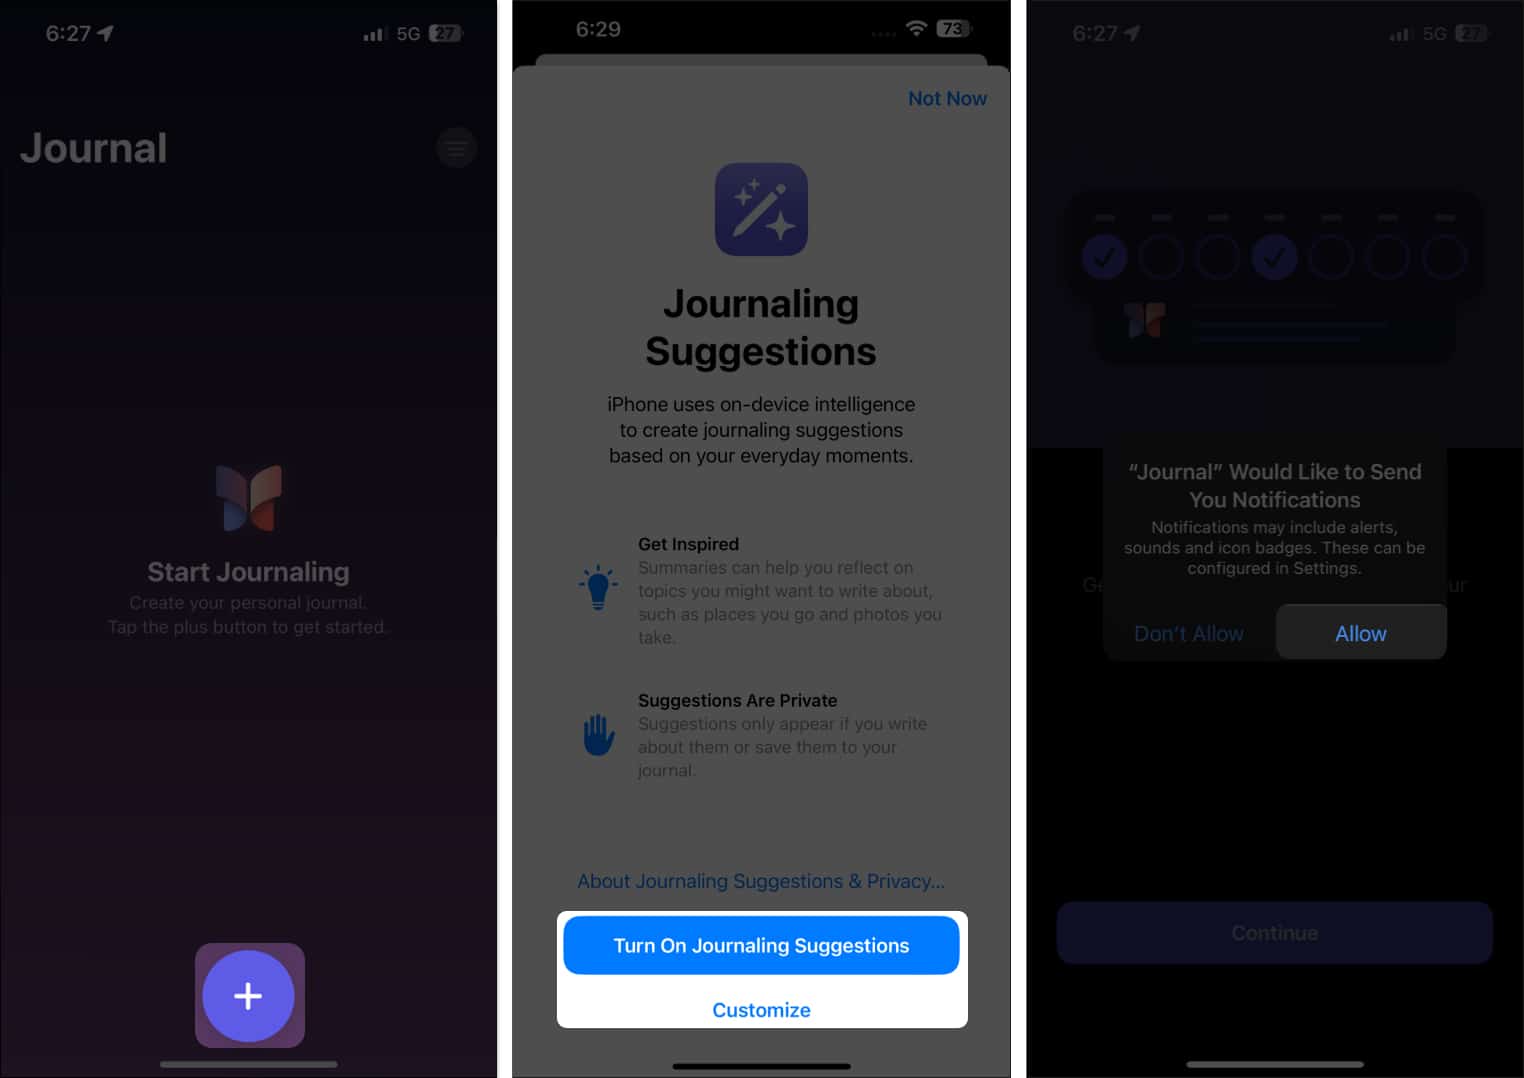
- Launch the Journal app. The first time you open it, you’ll see a welcome screen explaining how it works. Select Continue.
- Tap the + icon > Turn On Journaling Suggestions to receive personalized prompts based on your device activity, such as photos or workouts. You can disable this later if you prefer.
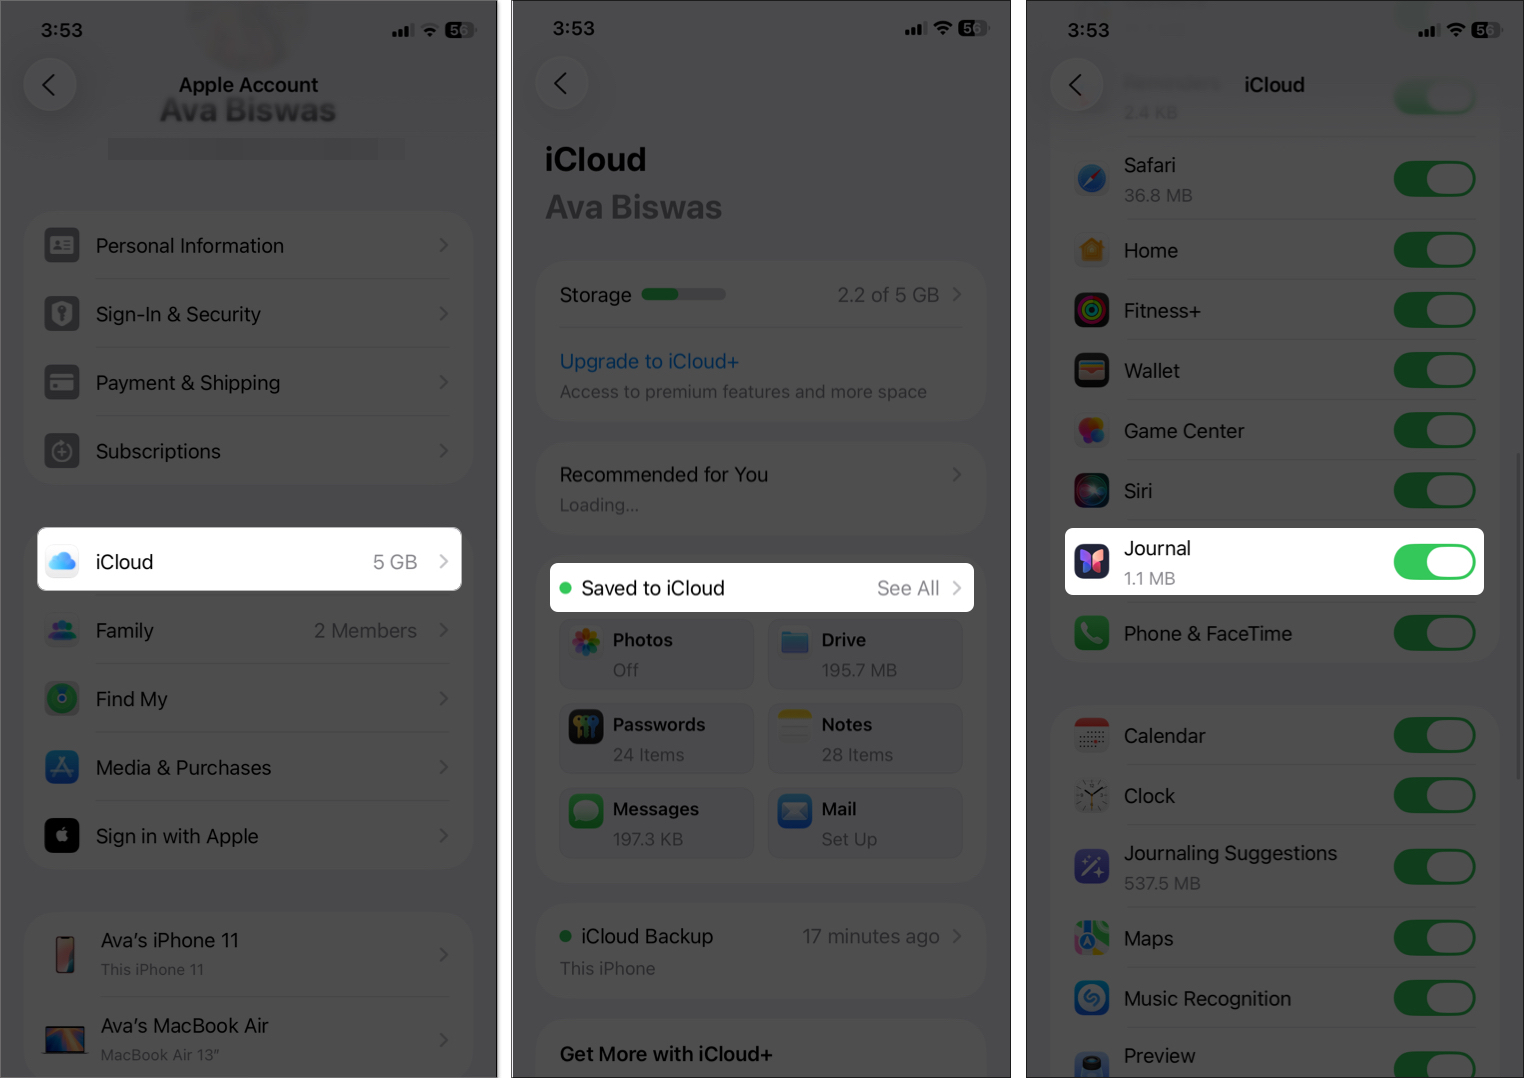
- Go to Settings > [Your Name] > iCloud > See All and toggle on Journal to back up entries and sync them across your devices.
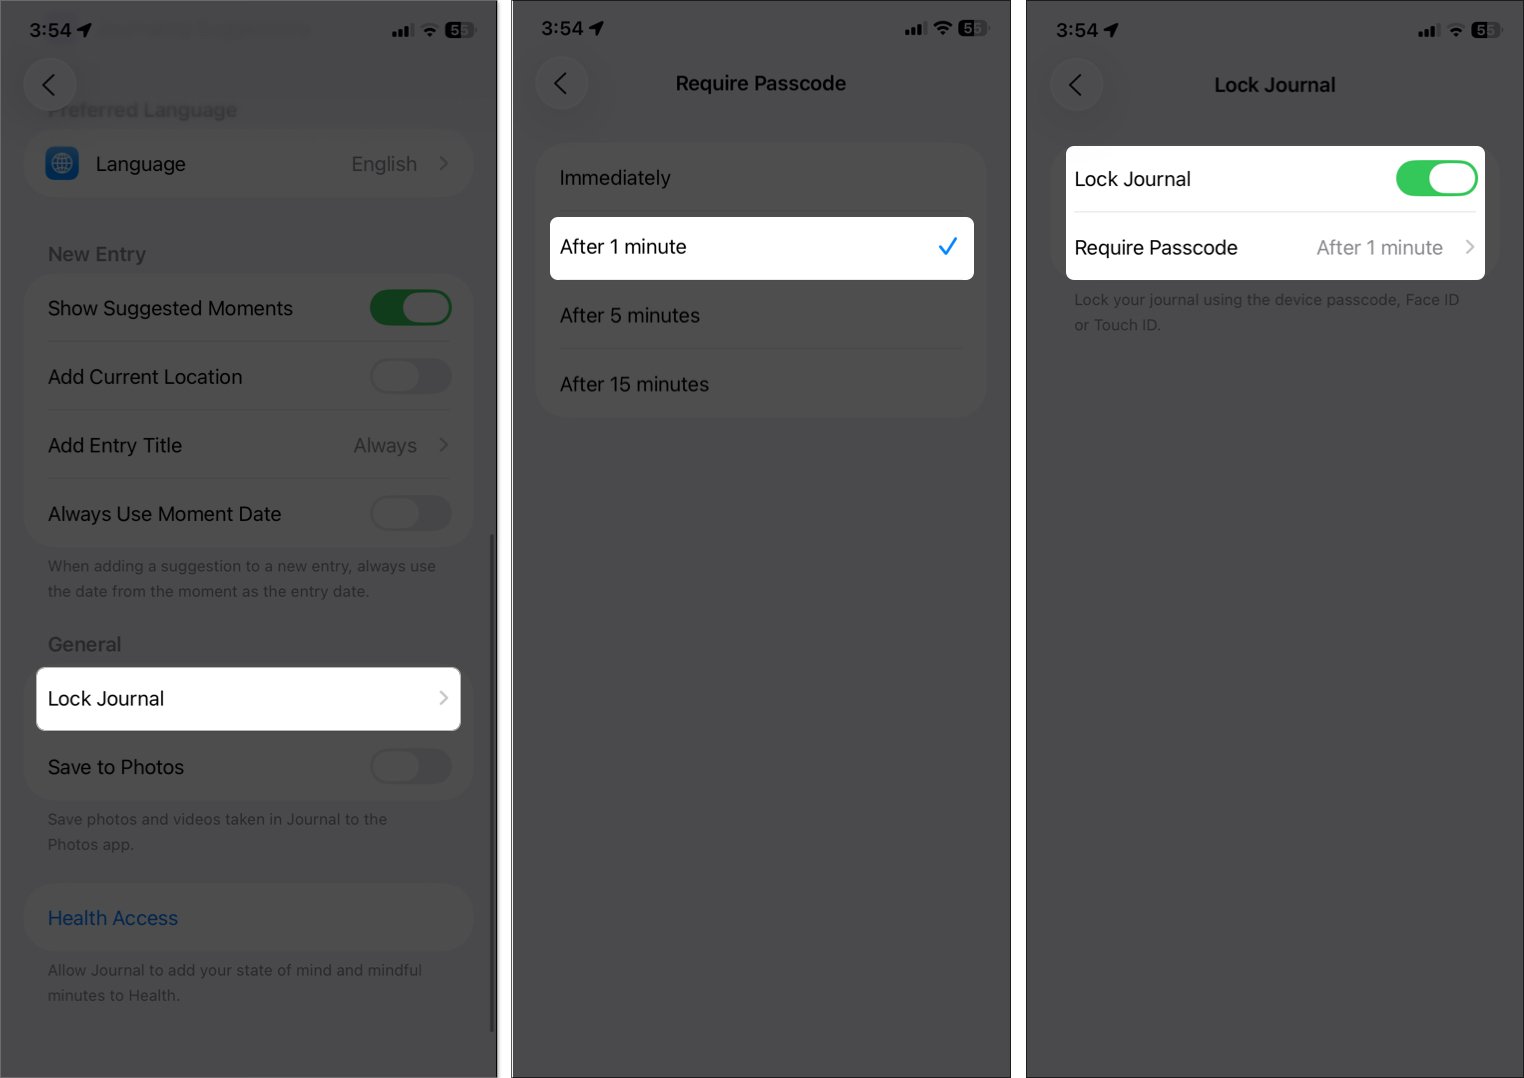
- For privacy, go to Settings > Apps > Journal > Lock Journal. Enter your device passcode and toggle on Lock Journal. You can also choose when to require a passcode (immediately, after 1, 5, or 15 minutes).

Now you’re ready to begin journaling!
How to Create a Journal Entry
Creating a journal entry is simple and flexible. You can write a thought and add photos, videos, or audio to make your entries special.
On iPhone and iPad
- Open the Journal app on your iPhone or iPad.
- Tap the + button at the bottom of the screen.
- Your iPhone will start loading your journal suggestions. You may choose a prompt and write the answer.
- Alternatively, tap the text field and start writing your thoughts.

- Use the toolbar above the keyboard to add media:
- To add photos: Tap the Photos icon and allow access if prompted. Select the images and videos you want to add.
- Click a moment: Select the Camera icon and click a photo or video instantly.
- To add voice notes: Select the Voice Notes icon and tap the Record button to start recording. Hit the Stop button to add it to your journal.
- To add a location: Tap the Location icon, search, and select a place. If you have added a photo or video, you will see a Photo/Video Location tab.
- Format texts: Tap the Aa icon to make your text bold, italic, underlined, or strikethrough. You can also use different listicles.
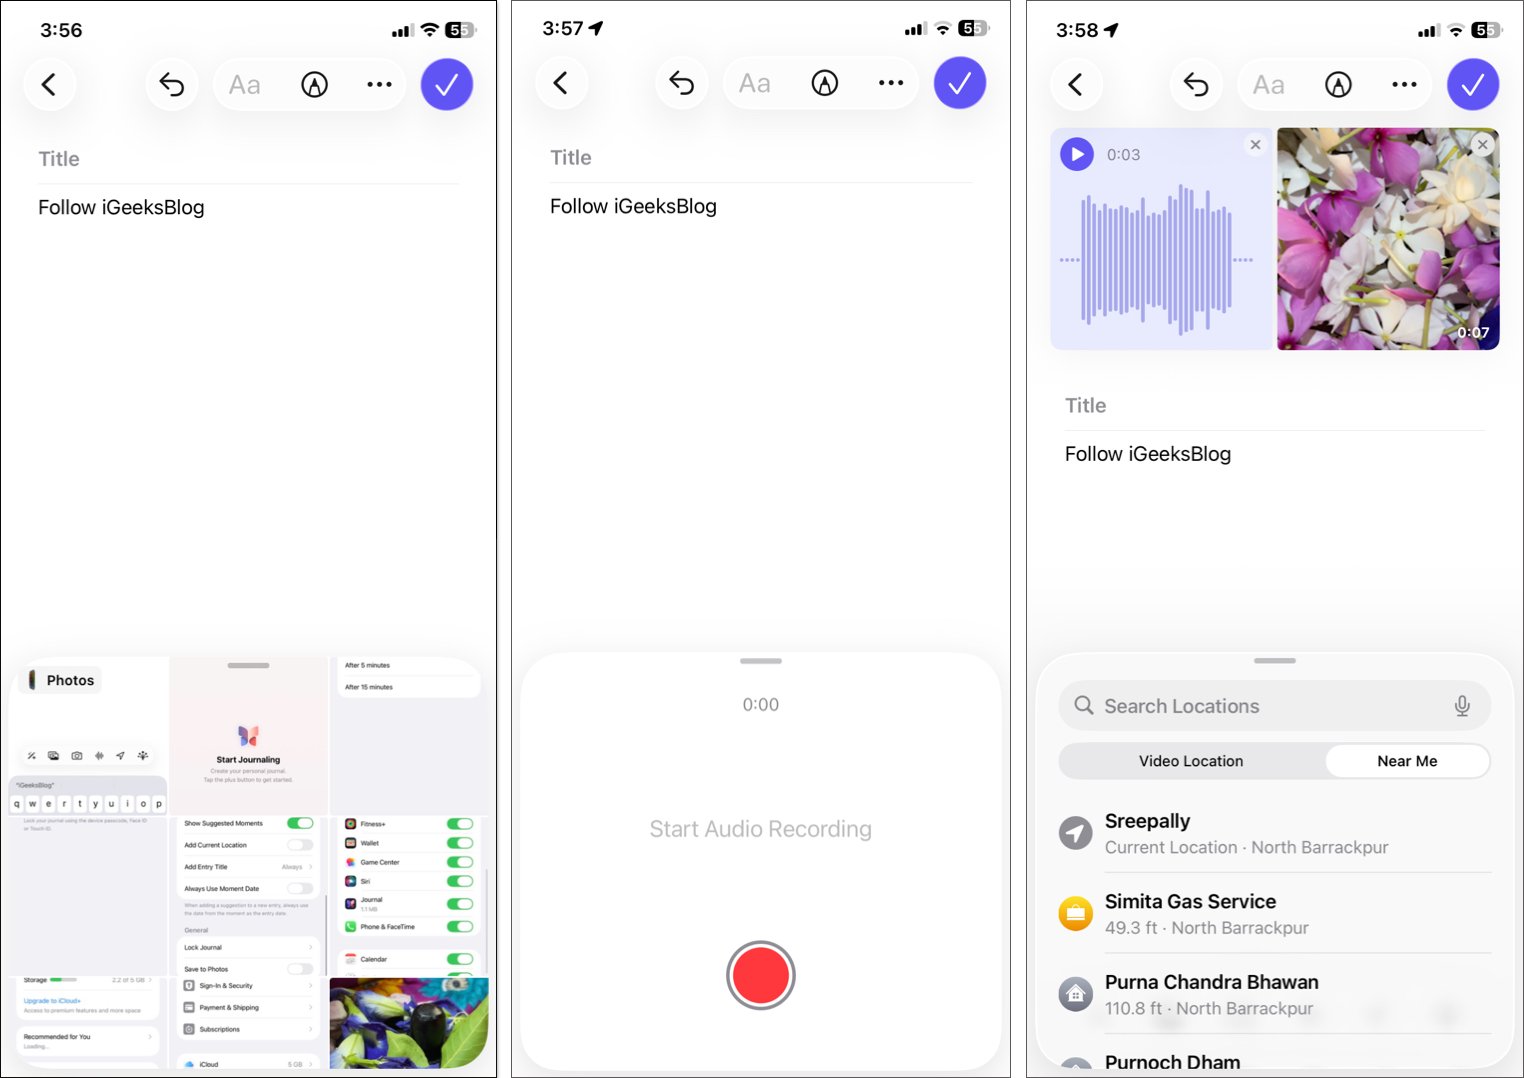


- Add shapes and stickers: Press the Markup icon at the top, tap the + button on the toolbar, and select your preferred option.
- On iPad, you can handwrite or doodle with an Apple Pencil. Tap the Markup icon at the top and select a pen style. You can also change its color.
- Tap the purple tick at the top right corner to save. Your entry is now stored and synced via iCloud.


On Mac
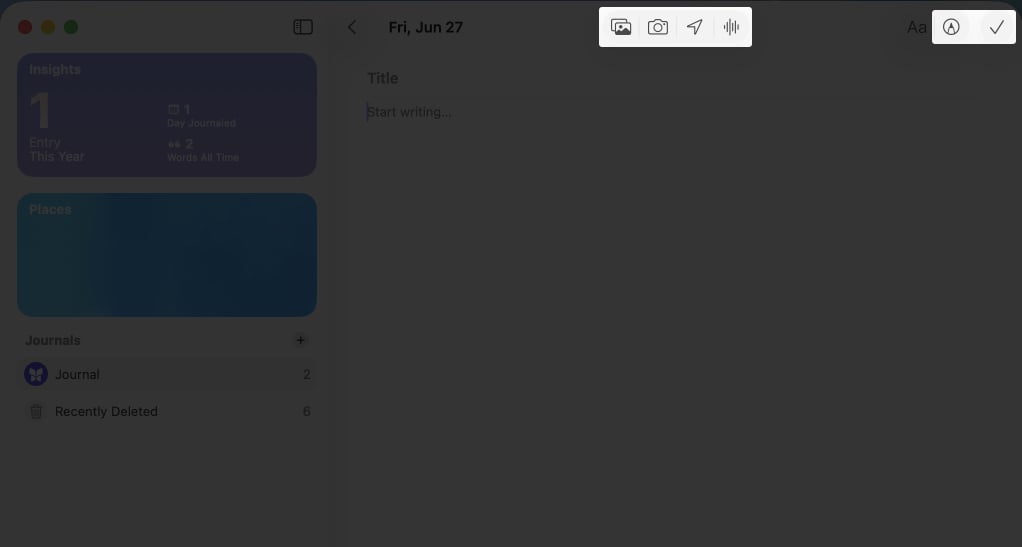
- Launch the Journal app from Spotlight search.
- Click the + button at the top.
- Type your entry and use the toolbar to add photos, videos, location, or audio.
- You can also add drawings and shapes by clicking the Markup icon.
- To use Apple Intelligence Writing Tools, click Edit in the menu bar and select Writing Tools > Show Writing Tools.
- Click the checkmark to save it. Entries sync automatically with iCloud.


How to Use Multiple Journals
Organize your thoughts by creating multiple journals:
- On iPhone or iPad, tap the back button to access the home page. On Mac, click the sidebar icon to see the options.
- Now, select the + icon above Journals.
- Enter a name, choose journal color and icon, and hit the checkmark to save it.
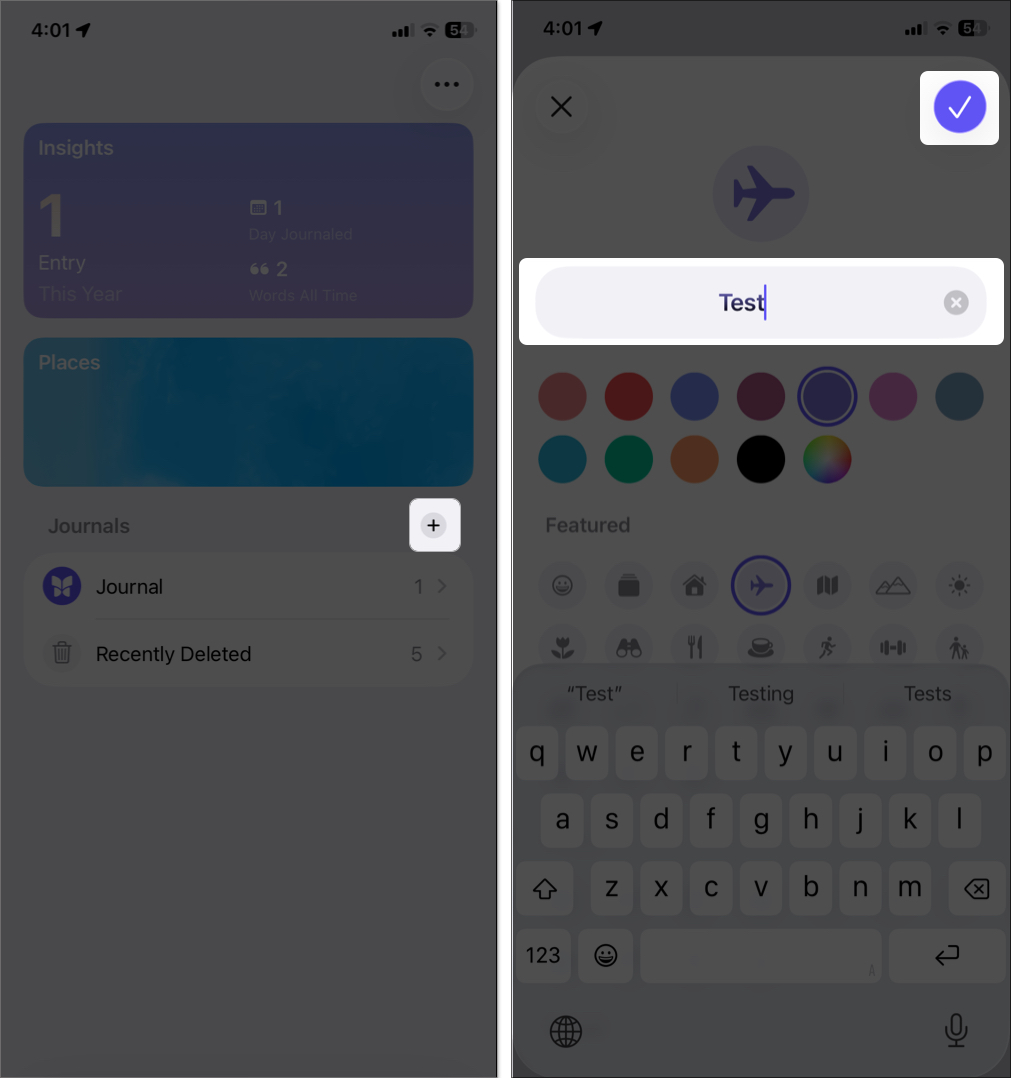

You can now switch between journals easily for personal, work, health, or travel entries.
How to View, Edit, and Organize Journal Entries
Once you’ve created entries, you can view, edit, and organize them easily. You can see all your entries when you open the Journal app.
Organize Entries
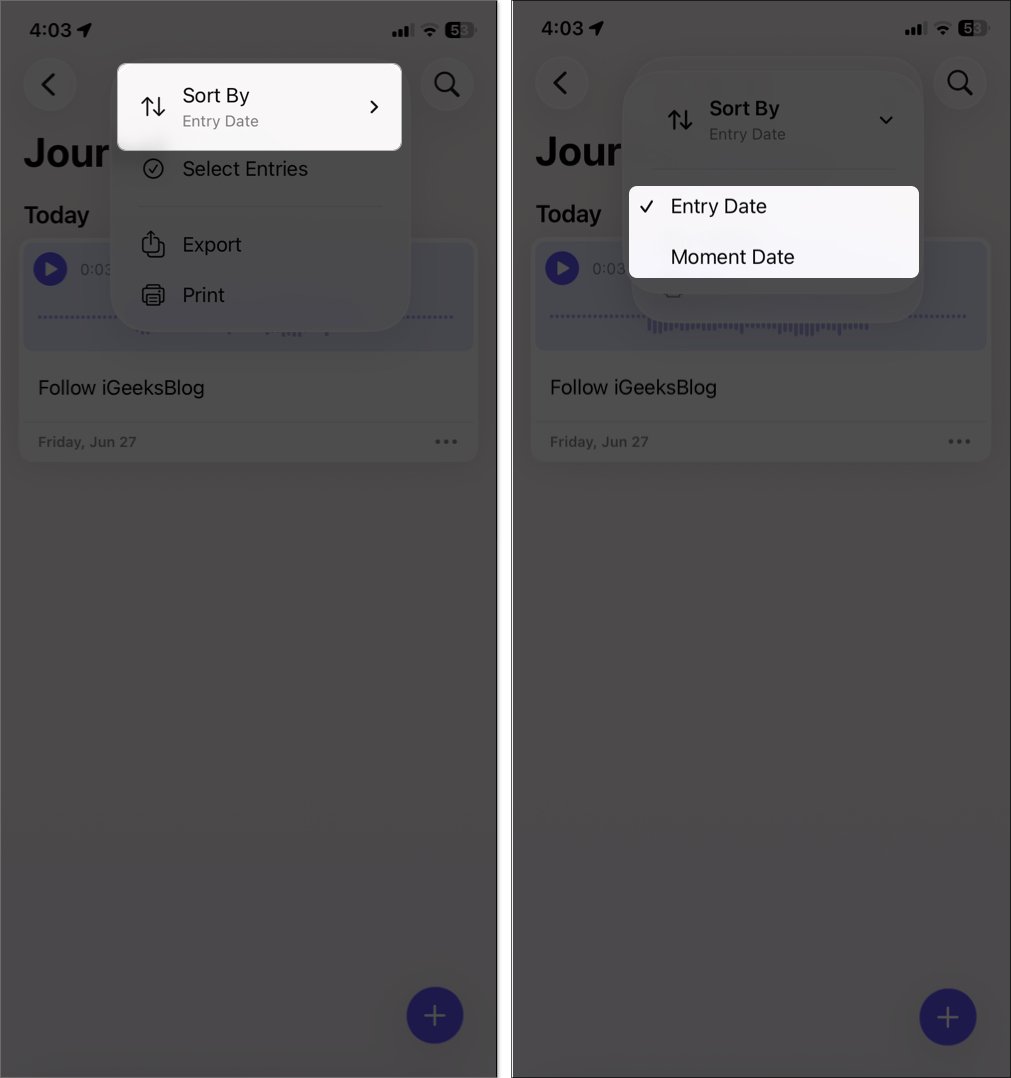
- Filter Entries: On iPhone or iPad, tap the three-dot button > Sort By. Now, choose Entry Date or Moment Date.
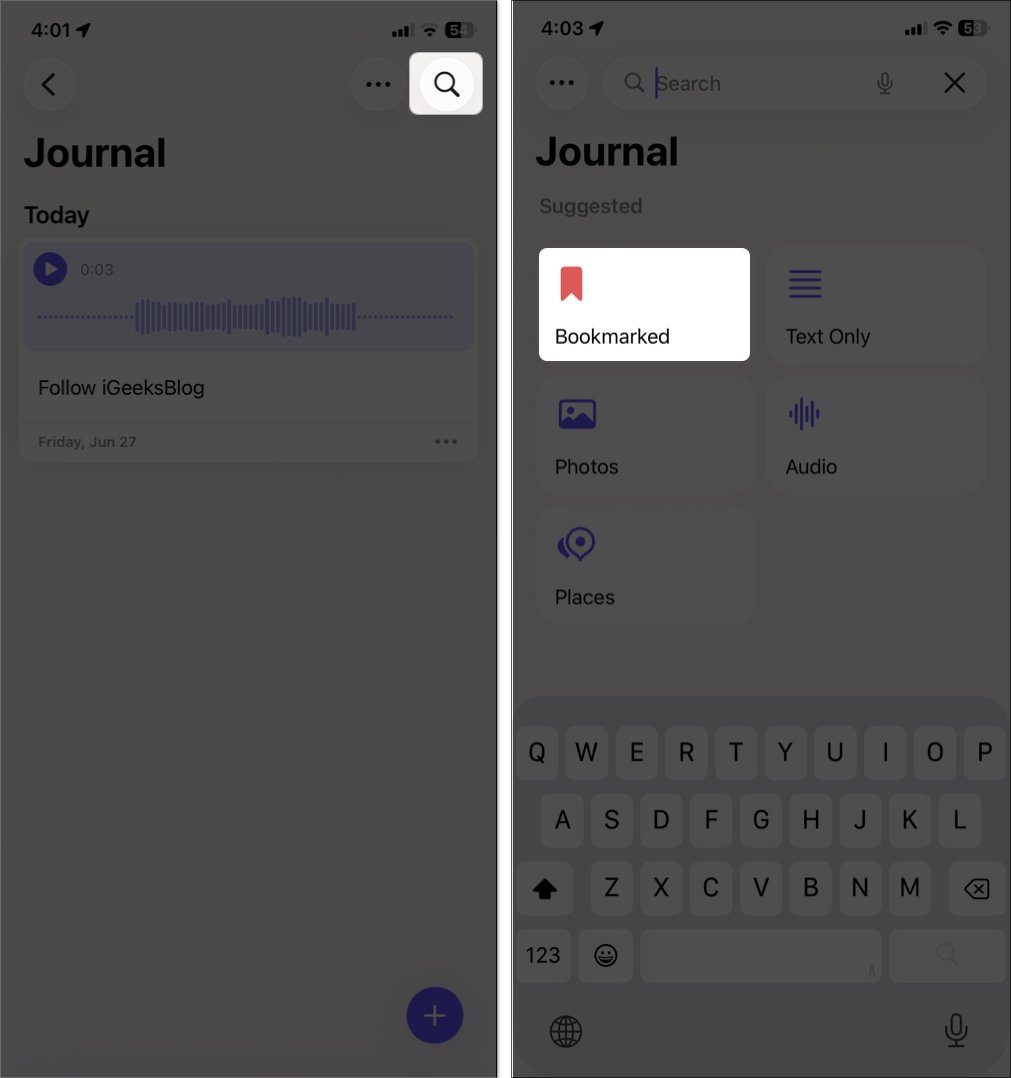
- Search: Use the search bar to find entries by Bookmarked, Text Only, Places, Drawings categories. Else, you may also enter a word or date.
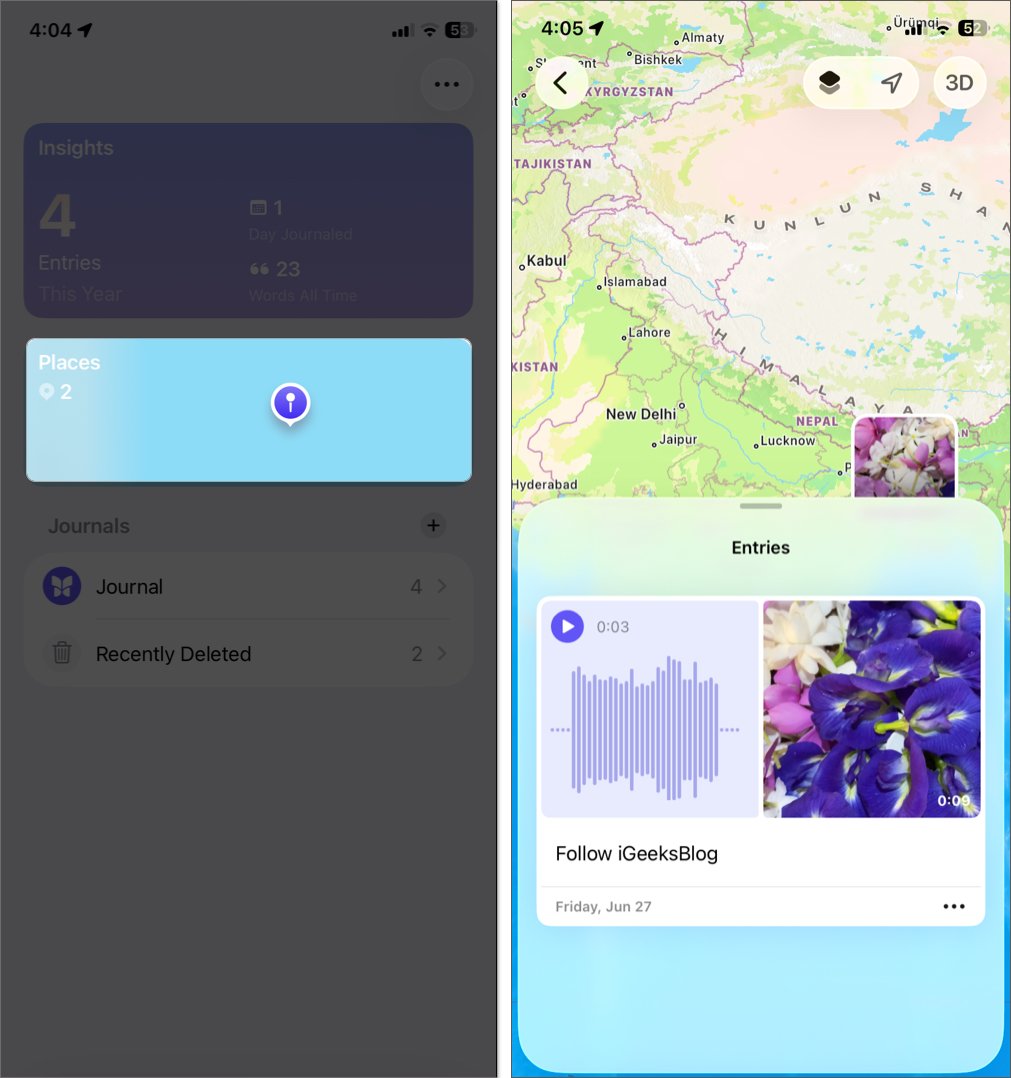
- Map View: View entries on a map based on their location tags. Go to the home page of the Journal and select Places. On Mac, you will see Places in the sidebar.


Change Journal Dates
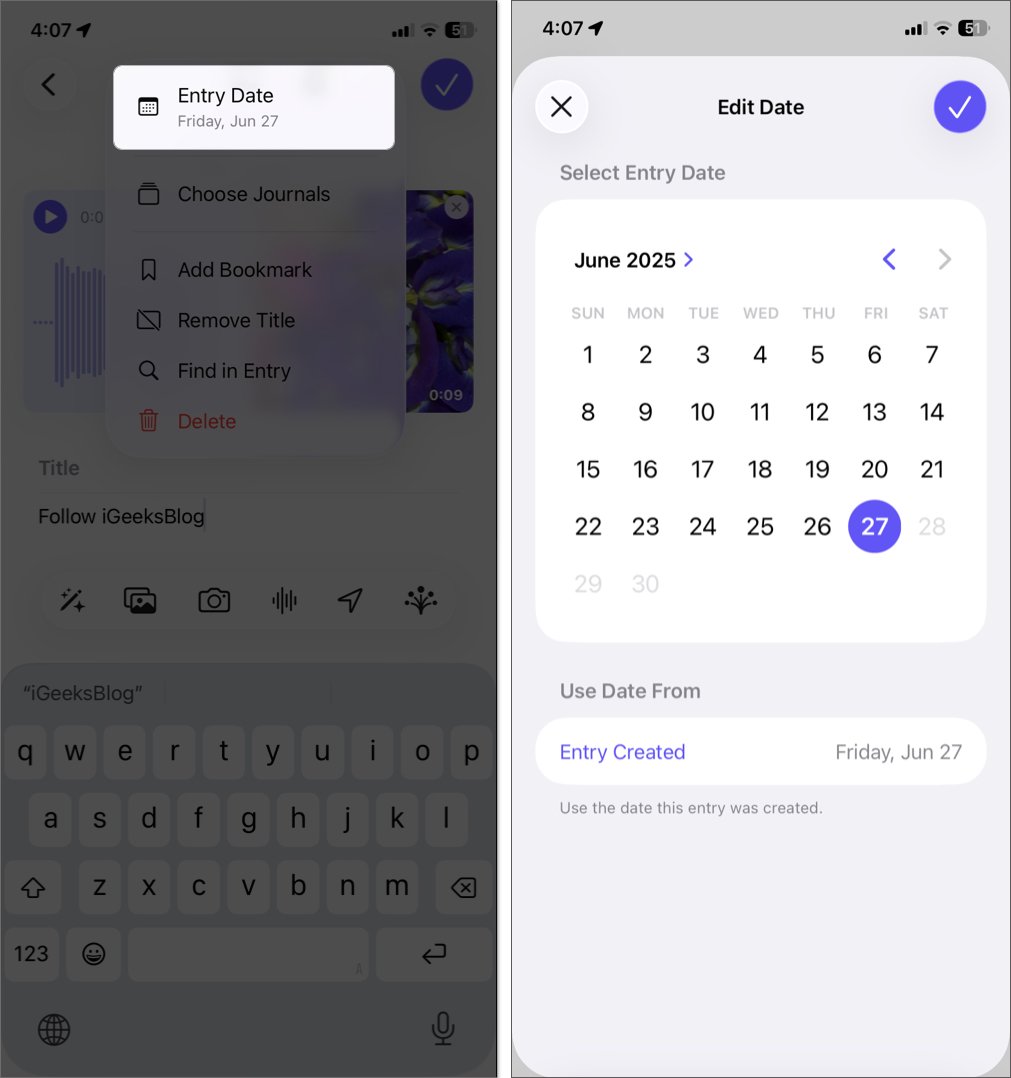
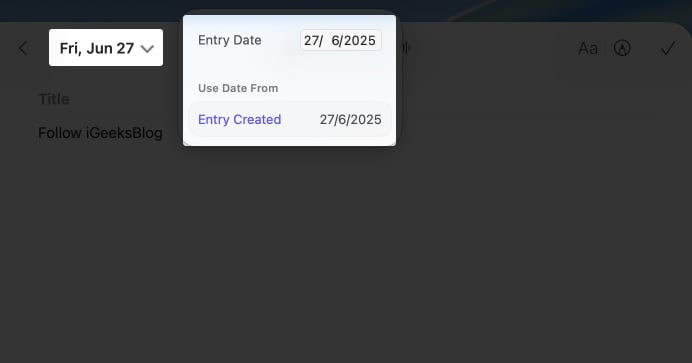
If you have added an entry for the wrong date, you can easily change it.
- Open the entry you want to change and select Edit in the top right corner.
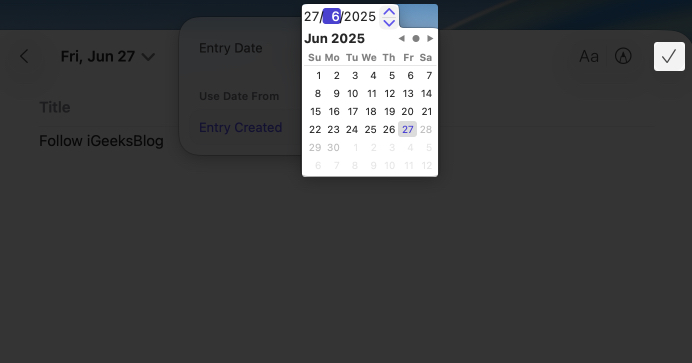
- On iPhone/iPad, tap the three-dot menu and select Entry Date.
- On Mac, click the date shown at the top and select the Entry date box.
- On iPhone/iPad, tap the three-dot menu and select Entry Date.
- Now, choose a date from the calendar shown.
- Click the checkmark to save it.


Bookmark Journals
- On iPhone or iPad: Open an entry, tap the three-dot menu and select Add Bookmark.
- On Mac: Control-click on an entry from the list and select Bookmark.
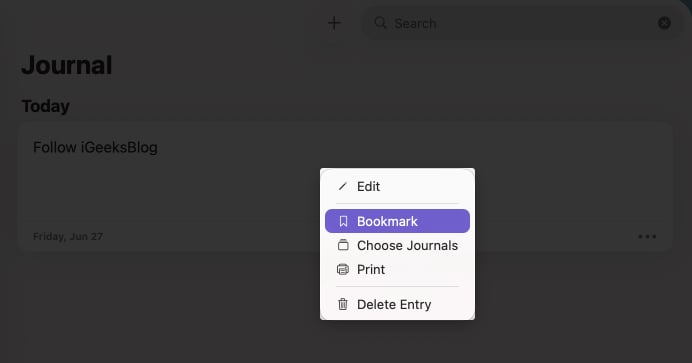

Now, you can use the search bar to view only bookmarked entries. To remove a bookmark, follow the steps above, but instead of Bookmark, select Remove Bookmark.
How to Delete and Recover Journal Entries
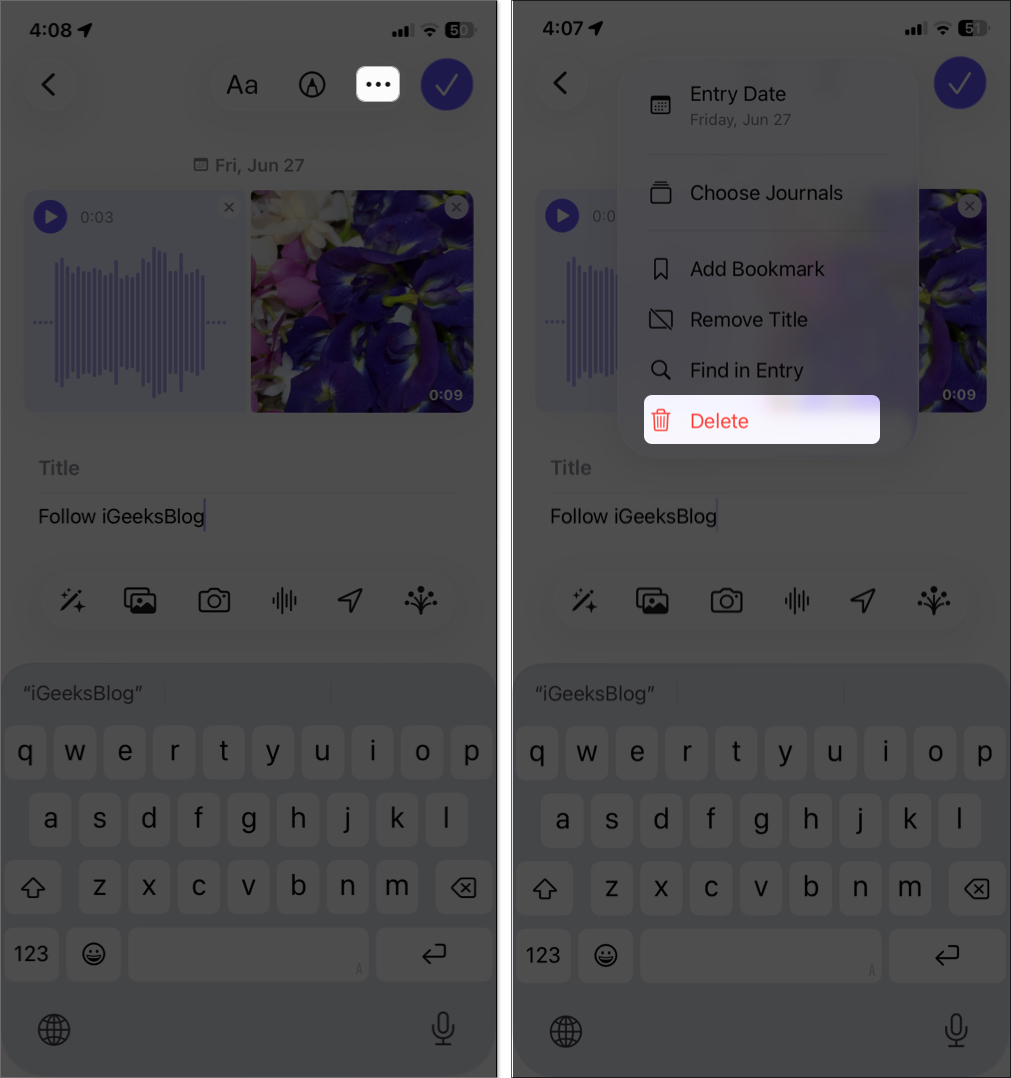
To delete an entry:
- On iPhone/iPad: Open an entry, tap the three-dot menu and select Delete.
- On Mac: Control-click an entry from the list and choose Delete Entry.
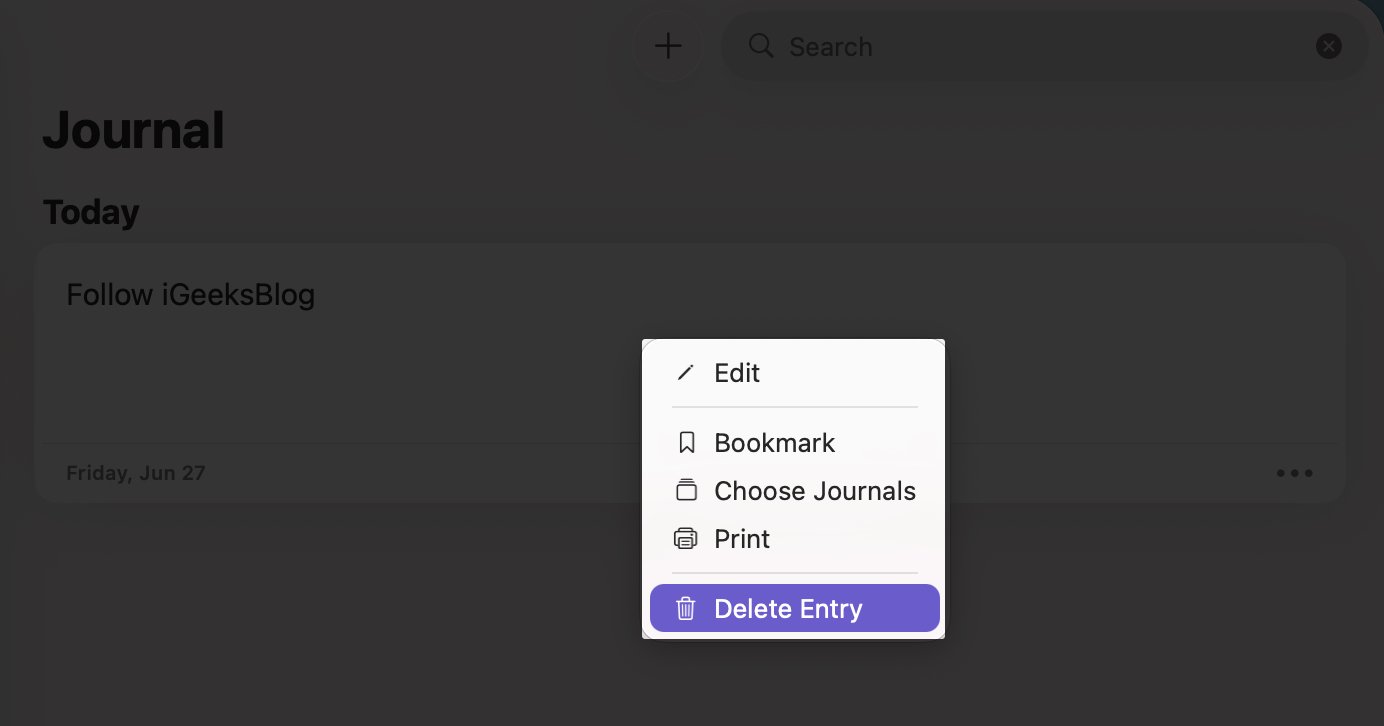


The entry is removed from all synced devices. If you have accidentally removed an entry, worry not. You can recover it from the Recently Deleted folder in the app’s home page.
How to Use Journal Suggestions
The Journal app on iPhone and iPad provides suggestions for reflecting on different memories from your past. So, you can quickly add a Journal entry about your memorable day. Here’s how to use them:
- Create a new entry from the + button and browse the Recommended or Recent tabs.
- Select a reflection prompt or a suggestion, like a group of photos, a location, or a workout, to start your entry.
- Add text or media to the suggestion and save.
You can customize suggestions in Settings > Apps > Journal > Journaling Suggestions. Now, tap Privacy & Security and select Sync This iPhone if you want to see suggestions on your iPad.
You may toggle off Photos, Contacts, or Significant Locations to exclude them from suggestions.
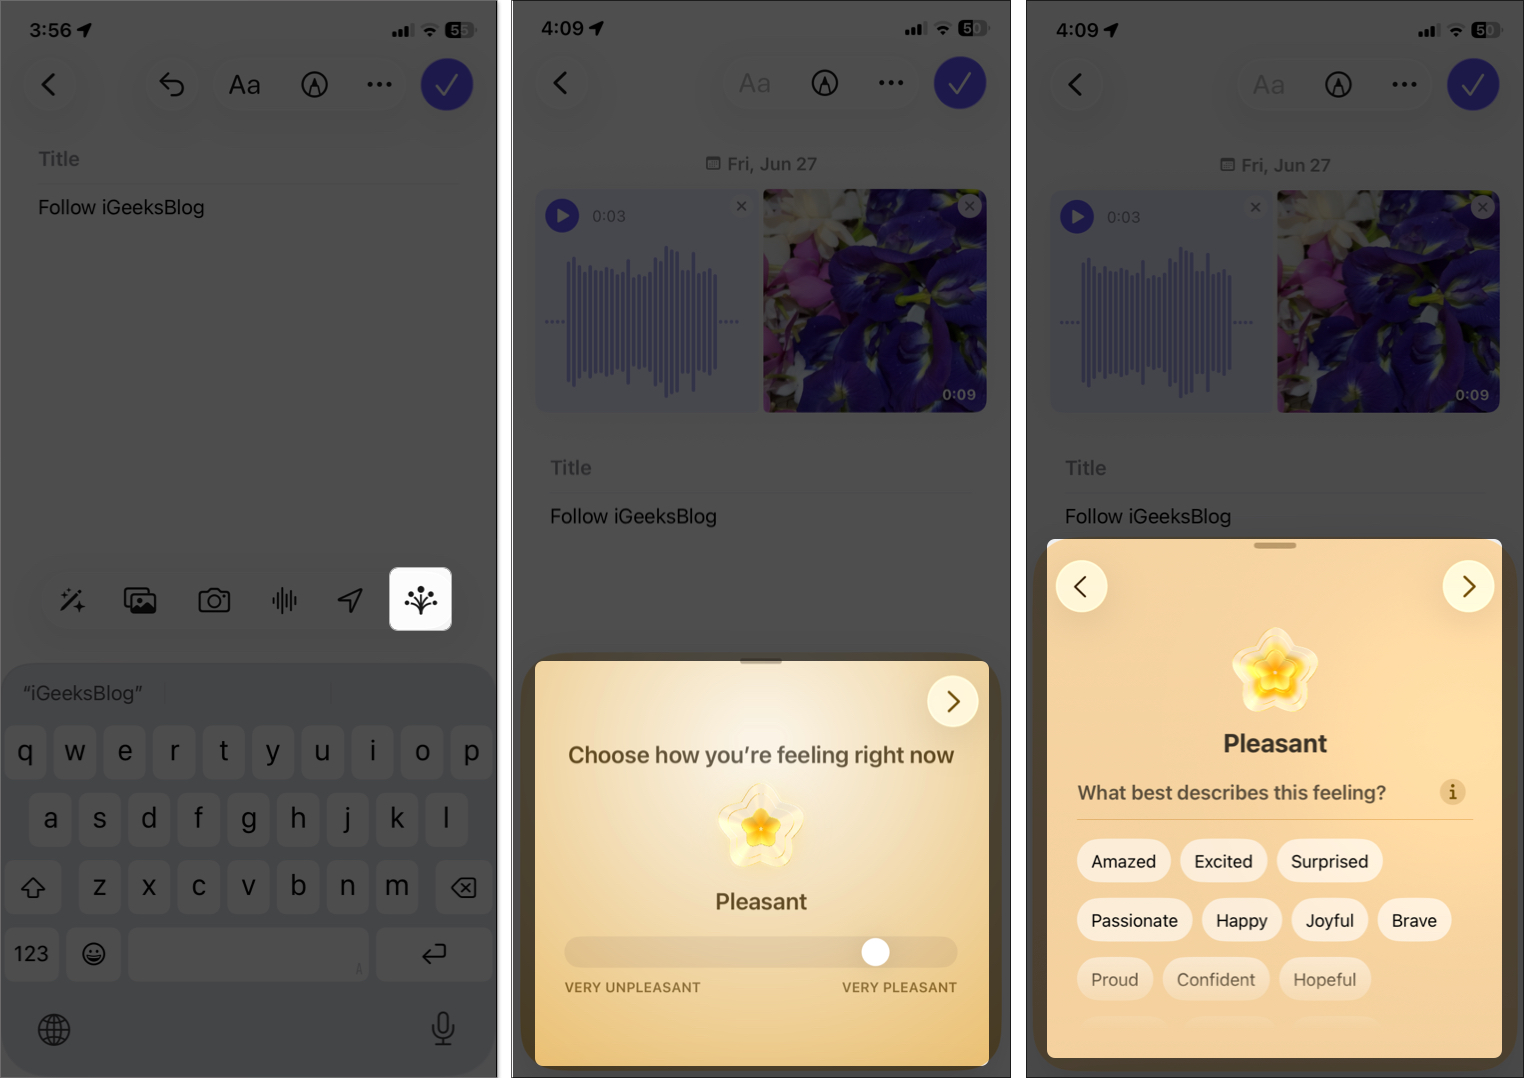
How to Record Your State of Mind
You can log moods and feelings and sync them with the Health app:
- Tap the + button to create a new entry or edit an existing one.
- Tap the tree icon (Mindfulness) on the toolbar and allow access to your health metrics.
- Slide the mood scale, select descriptive words (e.g., happy, stressed), and note what’s affecting you.
- Tap the checkmark to save it. Your mood is saved to the Health app as State of Mind.

How to Use Insights to Track Progress
The Insights view helps you track your journaling habits:
- On iPhone/iPad, tap the Insights tab on the home page. On Mac, select Insights from the sidebar.
- See your journaling streaks, word counts, journaled days with a calendar view, and number of entries. You may select each option to view details.
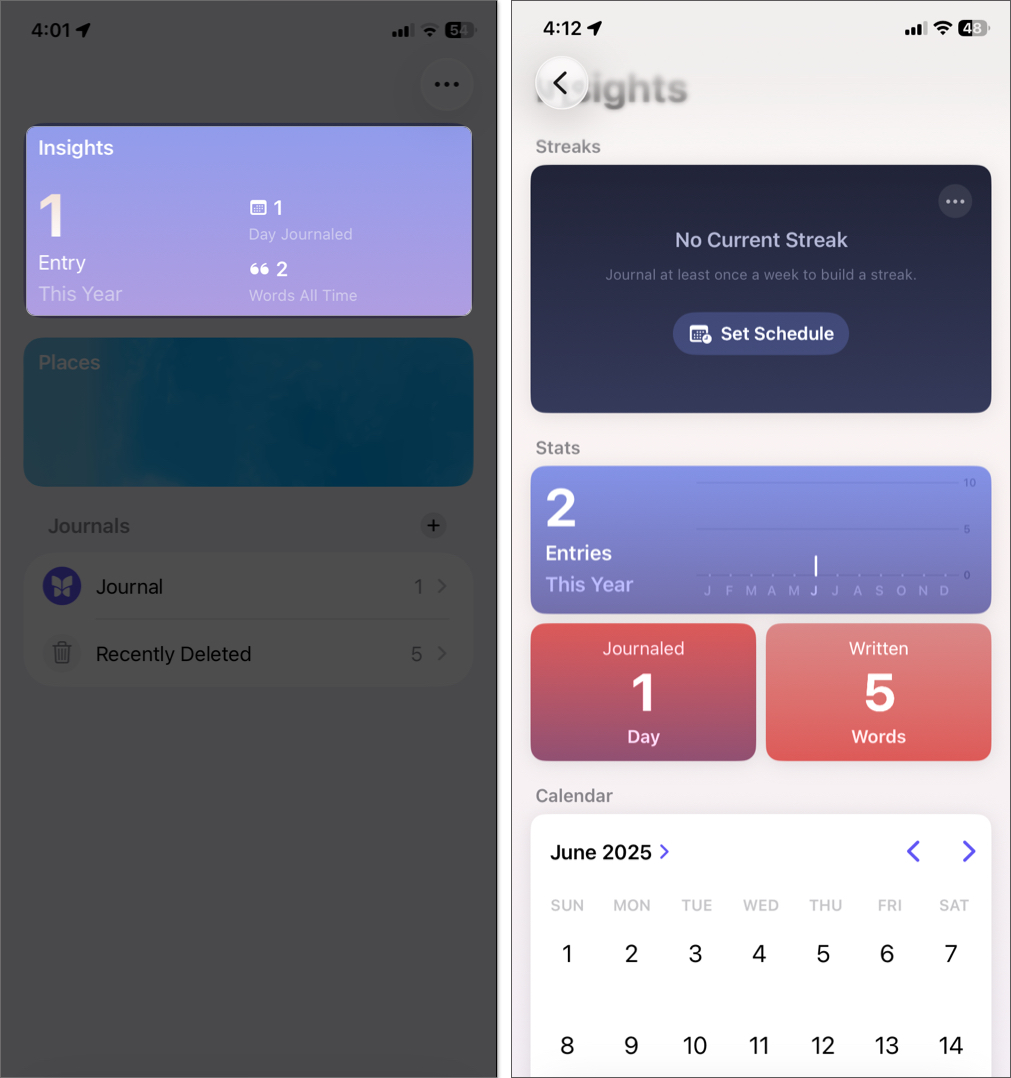
To use streaks, you need to create a schedule to help your journaling habit be consistent.
Set Journaling Reminders
Stay consistent with reminders:
On iPhone/iPad
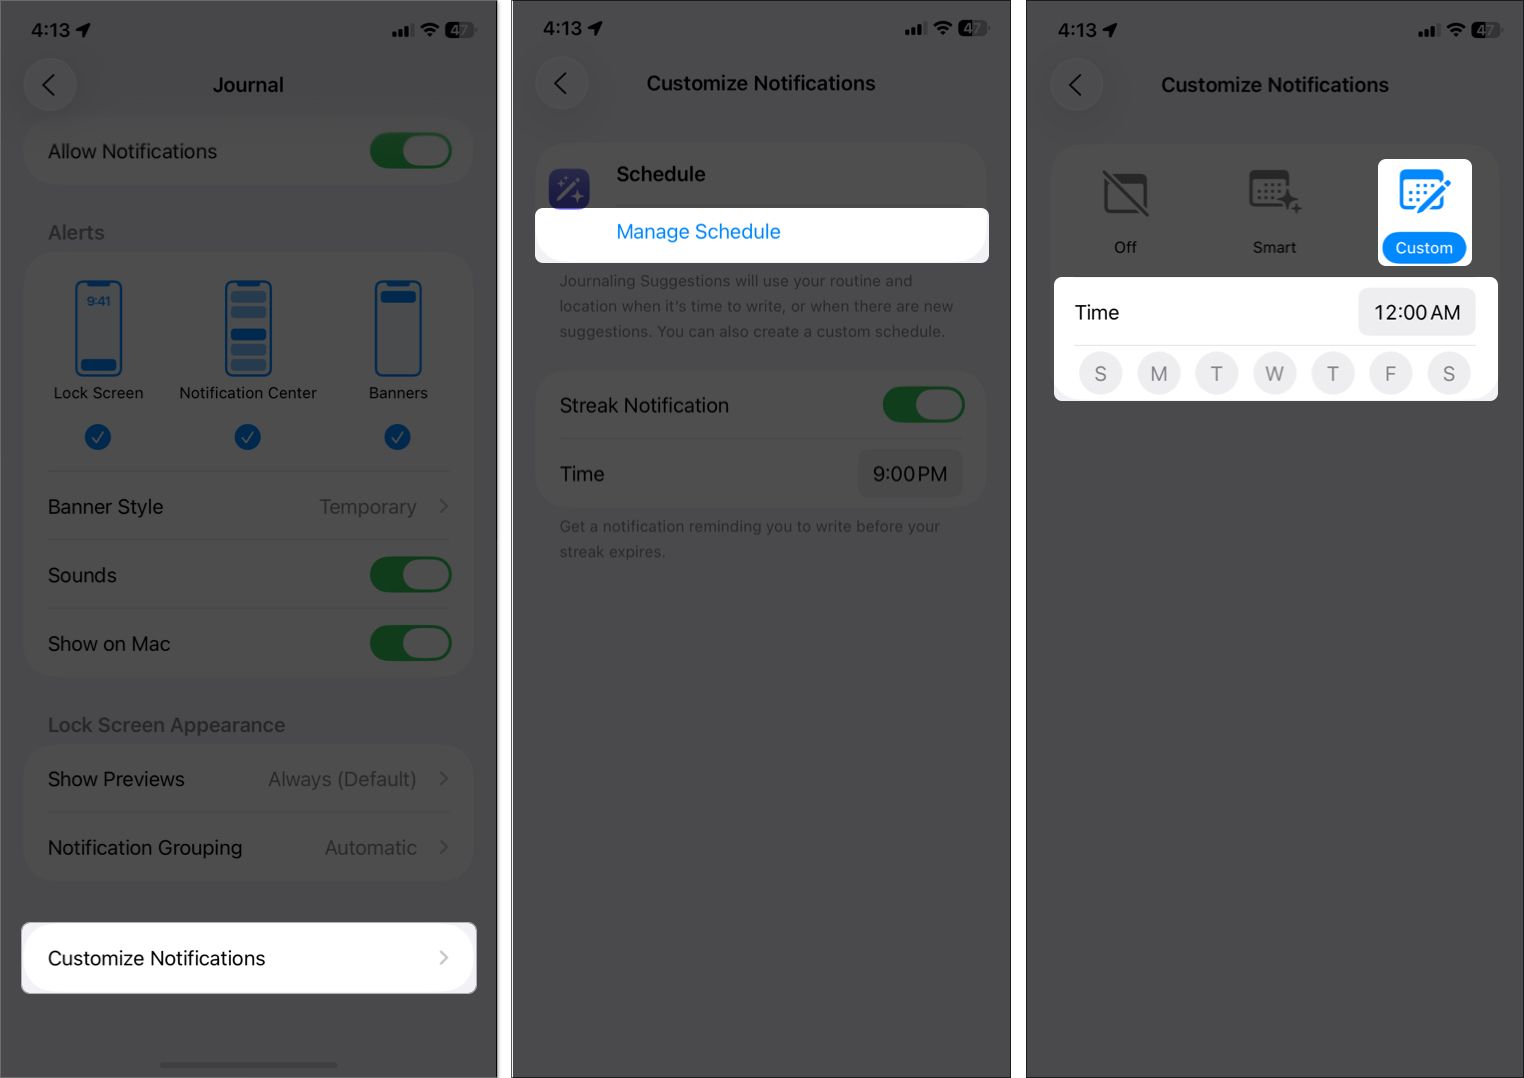
- Go to the Insights tab and select Set Schedule > Allow.
- It will redirect you to the Notification settings. Scroll and select Customize Notifications.
- Toggle on Streak Notification and select a time to continue your streak before it expires.
- Then, tap Manage Schedule > Customize Notifications.
- Select Custom to choose day and time for Journaling Suggestions notifications. I suggest using Smart to get the best out of it.
- Confirm your settings. You’ll get reminders to journal at your chosen times.

On Mac
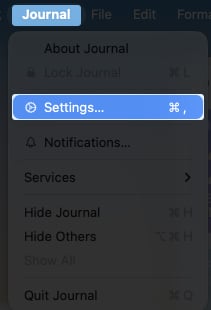
- Click Journal on the menu bar and select Settings.
- Move to Notification tab, toggle on Schedule and set days and time.
- Also, toggle on Streak Notification.


Customize Journal Settings
Customize the app to fit your style:
- Go to Settings > Apps > Journal (iPhone/iPad) or Journal on the menu bar > Settings. (Mac).
- Adjust Notifications: Turn reminders on or off.
- New Entry Defaults: Adjust settings like Show Suggested Moments, Add Entry Title, Add Current Location, etc.
- Save to Photos: If you want to keep the photos taken in the Journal app in your gallery, toggle it on.
- Lock Settings: Set how often a passcode is required for access.
- System access: Ensure Live Activities and Background App Refresh are enabled for seamless suggestions.
Tips for Better Journaling
Journaling is straightforward, but with these tips, you can make it more memorable and fun:
- Start small: One sentence is enough.
- Use prompts when you’re stuck.
- Add media for more expressive entries.
- Keep it personal—this is your private space.
- Stick to a daily schedule to build a habit.
- Use Apple Pencil for creative flair.
- Reflect with music or voice notes for added context.
Troubleshooting: Journal App Not Working?
If you face issues:
- Check Compatibility: Ensure your device is running iOS 17.2 or later, iPadOS 26 or later, or macOS 26 or later.
- Verify iCloud Sync: Go to Settings > [Your Name] > iCloud > Journal and ensure syncing is on.
- Update Software: Check for software updates in Settings > General > Software Update.
- Restart App: Close and reopen the app or restart your device.
- Check Storage: Ensure your device and iCloud have enough storage for media-heavy entries.
- Contact Support: If issues persist, visit Apple’s support website or contact their support team.
Reflect on Memories with Apple Journal
Apple’s Journal app transforms daily journaling into a beautiful, secure, and insightful experience. Whether you want to reflect on your emotions, track your habits, or simply preserve memories, this app provides you with the tools and motivation to do so.
Ready to begin? Start journaling today—and see how a few words a day can change your mindset over time.
Read More


