- Back Tap is an iPhone accessibility feature that lets you trigger actions like screenshots, flashlight, or Control Center with double or triple taps on the back.
- You can set up Back Tap in Settings by navigating to Accessibility, selecting Touch, then Back Tap, and assigning actions for Double Tap and Triple Tap.
- Back Tap supports a wide range of actions including opening the Camera, scrolling, switching apps, enabling flashlight, and more for quick device control.
- Disabling Back Tap is simple by going to the same settings menu and choosing None for both Double Tap and Triple Tap options.
- Custom shortcuts can extend Back Tap functionality since you can create automations in the Shortcuts app and assign them, allowing for highly personalized iPhone controls.
Since the iOS 14 update, your iPhone has a “Back Tap” feature under Accessibility settings. As the name suggests, Back Tap allows you to quickly perform actions like opening the Notification Center, taking a screenshot, pulling up the App Switcher, and several other helpful activities by tapping the back of your iPhone.
You can use the Back Tap feature on an iPhone 8 or newer (running iOS 14 or later). Here’s how to set up Back Tap to perform a shortcut.
What is Back Tap?
Back Tap is a multifaceted feature that lets you quickly perform actions like taking a screenshot without clicking any buttons, toggling your flashlight, or opening the Control Center with a few taps on the back of your iPhone.
It was created as an accessibility feature, giving disabled iPhone users an easier way to control their handsets. However, that’s not to say you can’t use it if you don’t have a disability. The Back Tap feature is a quick and easy way to save a few seconds every time you want to access a common iOS feature.
Follow our step-by-step instructions, and you’ll have a new mode of control in no time.
How to set up Back Tap on iPhone
- Open Settings → Tap Accessibility.
- Select Touch.
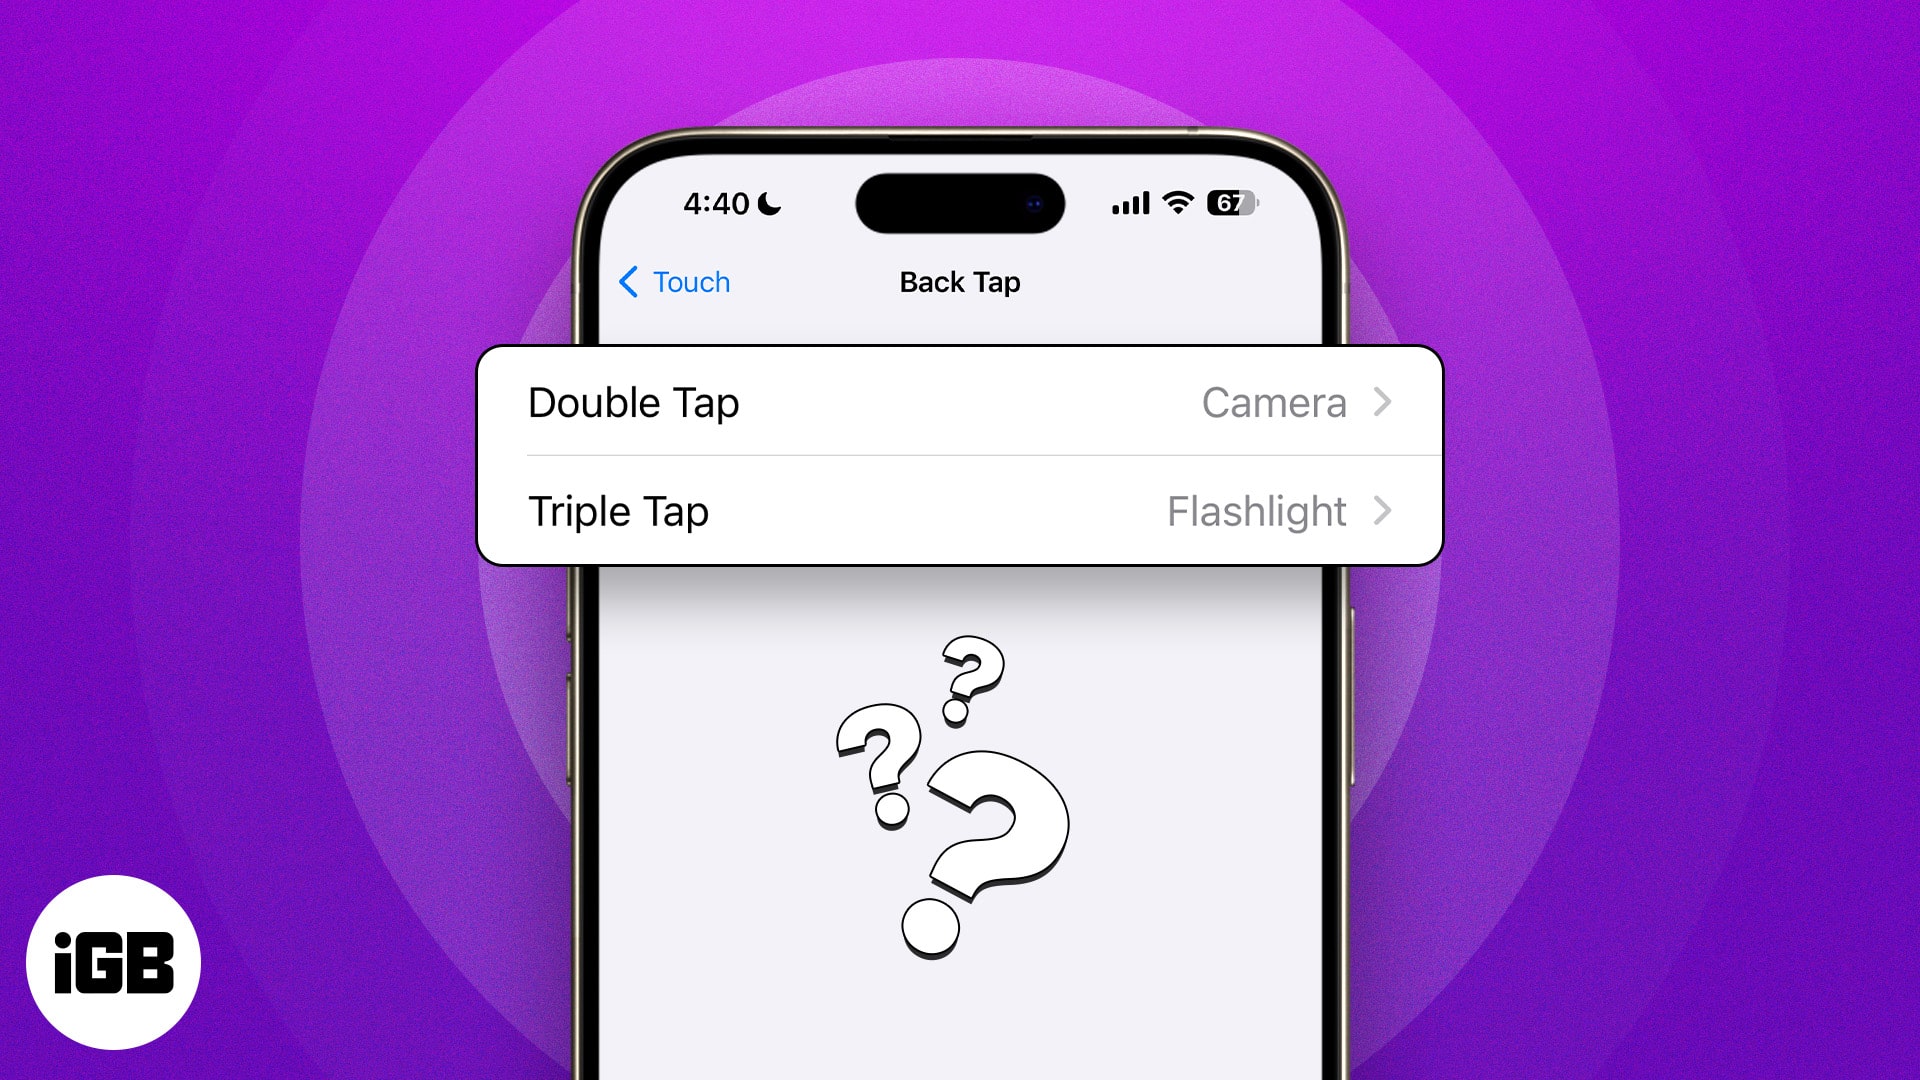
- Scroll to the bottom, then tap Back Tap.

- You’ll see options for Double Tap and Triple Tap. You can set actions for one of them or both. Select one of the options.
- Choose your preferred action, like opening the Camera or taking a screenshot. That’s it!

After you set it up, hold the device normally and tap anywhere on the iPhone’s backside. I experimented with tapping different areas of the iPhone’s back exterior. It worked everywhere. You can even tap on the camera, and the Back Tap still works!
To exit the action performed, Back-Tap again. For example, if you double-tap to bring up the App Switcher, double-tap again to exit it.
What can you do with Back Tap on your iPhone?
With Back Tap enabled, the list of actions you can perform with a few taps is pretty substantial. Some common Back Tap features allow you to:
- Assign Back Tap to a Shortcut and have it access all sorts of features
- Scroll your screen up or down
- Open the App Switcher to force close apps
- Swap to the Camera
- Open the Control Center
- Enable or disable your flashlight
- Use Back Tap as a home button
- Enable Lock Rotation or Lock Screen
- Use Back Tap to mute your iPhone
- Check the Notification Center
- Slide your screen down for reachability if you have a large screen
- Take a screenshot
- Use Back Tap to “shake” your screen to undo a message
- Pull up Siri
- Open Spotlight Search
- Turn your iPhone’s volume up or down
Accessibility features with Back Tap also enable you to:
- Active Assistive Access
- Dim flashing lights on the screen
- Enable Live Captions
- Pull up the Magnifier for hard-to-read text
- Get Hover Typing to enlarge the text box you are typing in
- Enable VoiceOver
- Zoom in and out
- Turn on Vehicle Motion Cues
- Start screen reading with Speak Screen
And much more. As you can see, Back Tap is as versatile as it is useful. You don’t need to go back and forth to enable or disable a feature from Settings.
However. there are a few reasons not to use it; you may run into accidental Back Tap activations here and there, but we think the potential benefits clearly outweigh the downfalls.
How to turn off Back Tap on iPhone
If you want to disable Back Tap on your iPhone, here’s what to do:
- Open Settings → Tap Accessibility.
- Select Touch.
- Scroll to the bottom, then tap Back Tap.
- Now, select Double Tap or Triple Tap, depending on what you’ve enabled.
- Select the first option in the list: None. After choosing None, you’ve turned off Back Tap on your iPhone.
Video: How to use iPhone Back Tap custom controls
Signing off…
Back Tap is a cool accessibility feature that offers unlimited ways to control your iPhone. Using the Shortcuts app, you can create shortcuts and launch them using double or triple tap to perform just about any action you can think of.
How do you use Back Tap? Do you know any essential tips we should keep in mind? Let us know in the comments section below!


