How to Turn Off Siri on AirPods: The Ultimate Guide for a Distraction-Free Experience
Tired of Siri interrupting your music? Here’s how to turn off Siri on your AirPods and stop accidental activations for a distraction-free experience.
- Siri runs through your iPhone or iPad, not AirPods: You can’t disable Siri directly on AirPods, but you can block its interactions to avoid random activations.
- Change AirPods controls to stop Siri triggers: Reassign press or touch gestures in AirPods settings to prevent Siri from launching during playback or calls.
- Turn off ‘Hey Siri’ to stop voice wake-ups: Disabling this option prevents Siri from activating when you say the wake phrase while using AirPods.
- Silence Siri message announcements: Turning off or customizing Announce Notifications stops Siri from reading messages aloud through your AirPods.
- Fully disable Siri for total control: Turning Siri off on your iPhone or iPad removes all AirPods voice interactions and ensures nothing triggers unexpectedly.
Siri on your AirPods lets you make calls, control your music, send messages, and more, all hands-free. While this can be incredibly convenient, Siri sometimes gets a little too eager, interrupting your favorite song just to ask what you want. The good news is that you can easily turn off Siri on your AirPods or at least stop it from being triggered accidentally.
Keep reading to learn how to turn off Siri on your AirPods and enjoy a completely distraction-free listening experience.
Can You Completely Turn Off Siri on AirPods?
Here’s the thing: Siri actually runs through your iPhone or iPad, not your AirPods. So, you can’t disable Siri on your AirPods alone. However, you can turn off the specific ways Siri interacts with them, such as voice commands, press and hold gestures, and notification announcements, to keep it silent for good.
4 Ways to Turn Off Siri on Your AirPods
Below are the different methods you can use to stop Siri from activating on your AirPods.
1. Change Your AirPods Controls
Each AirPods model has its own touch or press gestures, and one of them might be set to activate Siri by default. Here’s how you can change that:
- Connect your AirPods to your iPhone and wear at least one of them.
- Open the Settings app and tap Bluetooth.
- Here, tap the ‘i‘ button next to your AirPods.
- Next, select either Right or Left AirPods under the Press & Hold section.
- Now, select Noise Control instead of Siri.
- Go back and repeat the process for the other AirPod.
This simple change prevents Siri from popping up when you press or hold your AirPods.
2. Disable “Hey Siri” Voice Activation
Most accidental activations happen when your AirPods’ microphones pick up the phrase “Hey Siri” or something that sounds similar. Disabling this feature helps stop Siri from responding unexpectedly.
Here’s how:
- Open Settings → Siri (Apple Intelligence & Siri on Apple Intelligence-supported iPhones).
- Here, tap Talk & Type to Siri under Siri Requests.
- Next, choose the Off option.
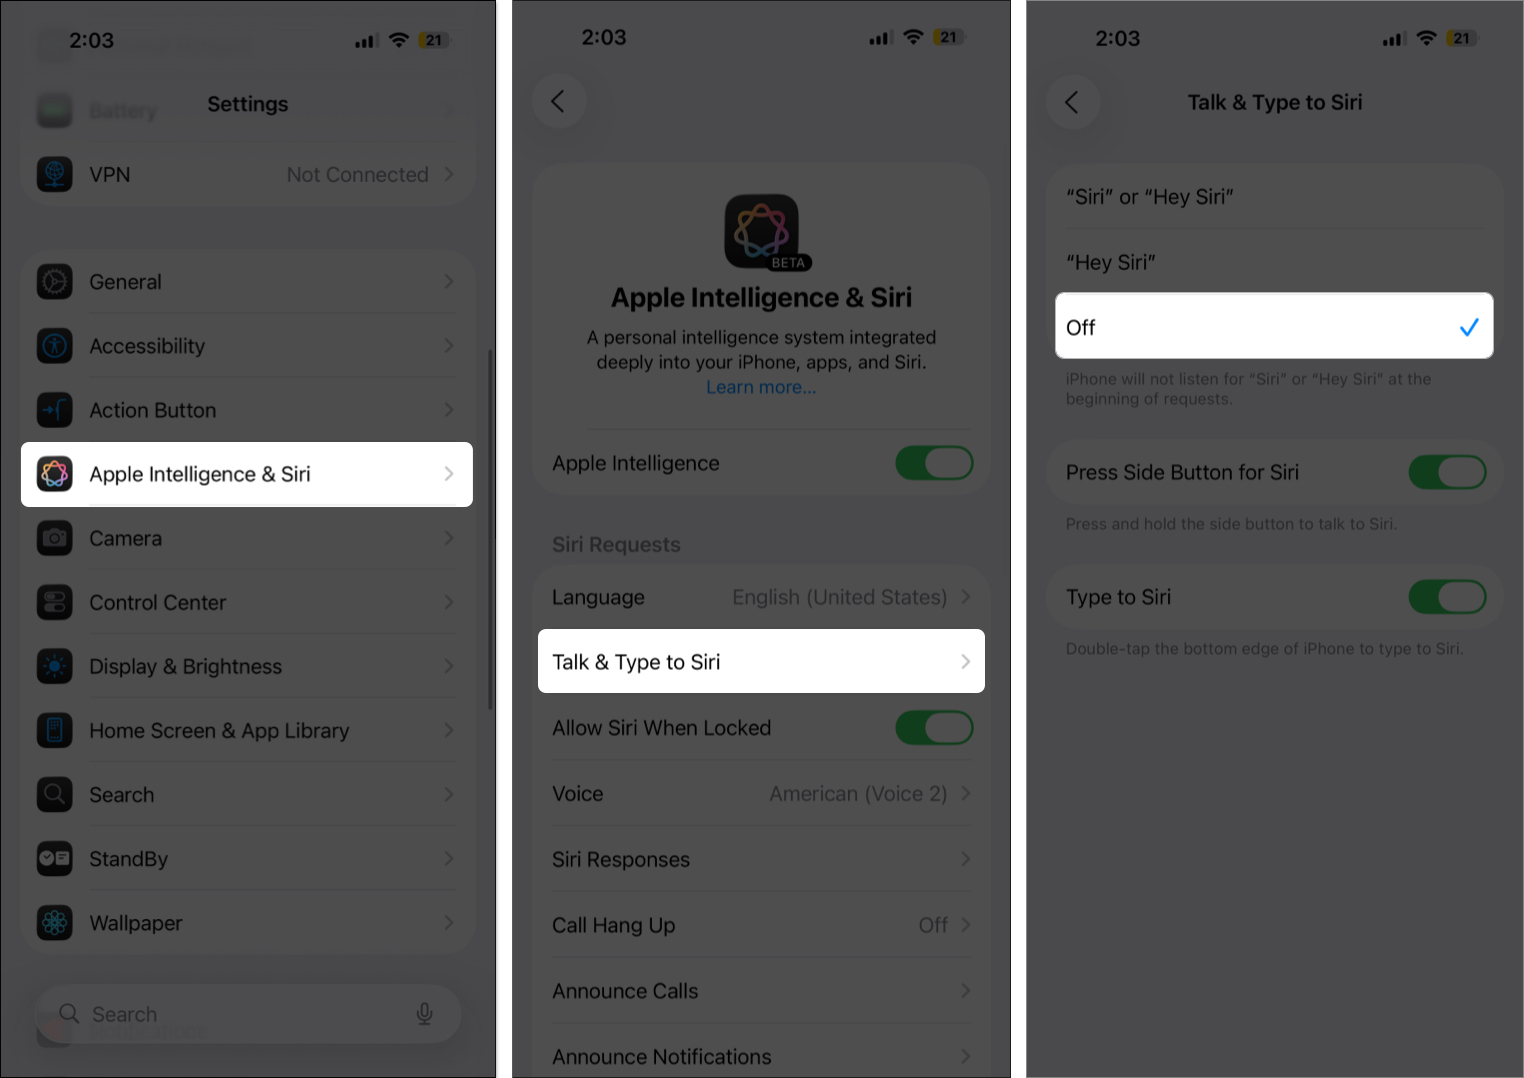
Once done, Siri will no longer respond to the “Hey Siri” command while you’re using AirPods.
3. Turn Off Siri Message Announcements
If you’ve turned on Announce Notifications, Siri will read out incoming alerts while you’re wearing AirPods. Helpful sometimes, but it can quickly become annoying. To disable it:
- Open Settings → Notifications.
- Here, locate and tap Announce Notifications under Siri.
- Toggle off Announce Notifications.
- Alternatively, you can disable Announce Notifications for specific apps instead of turning the feature off entirely.
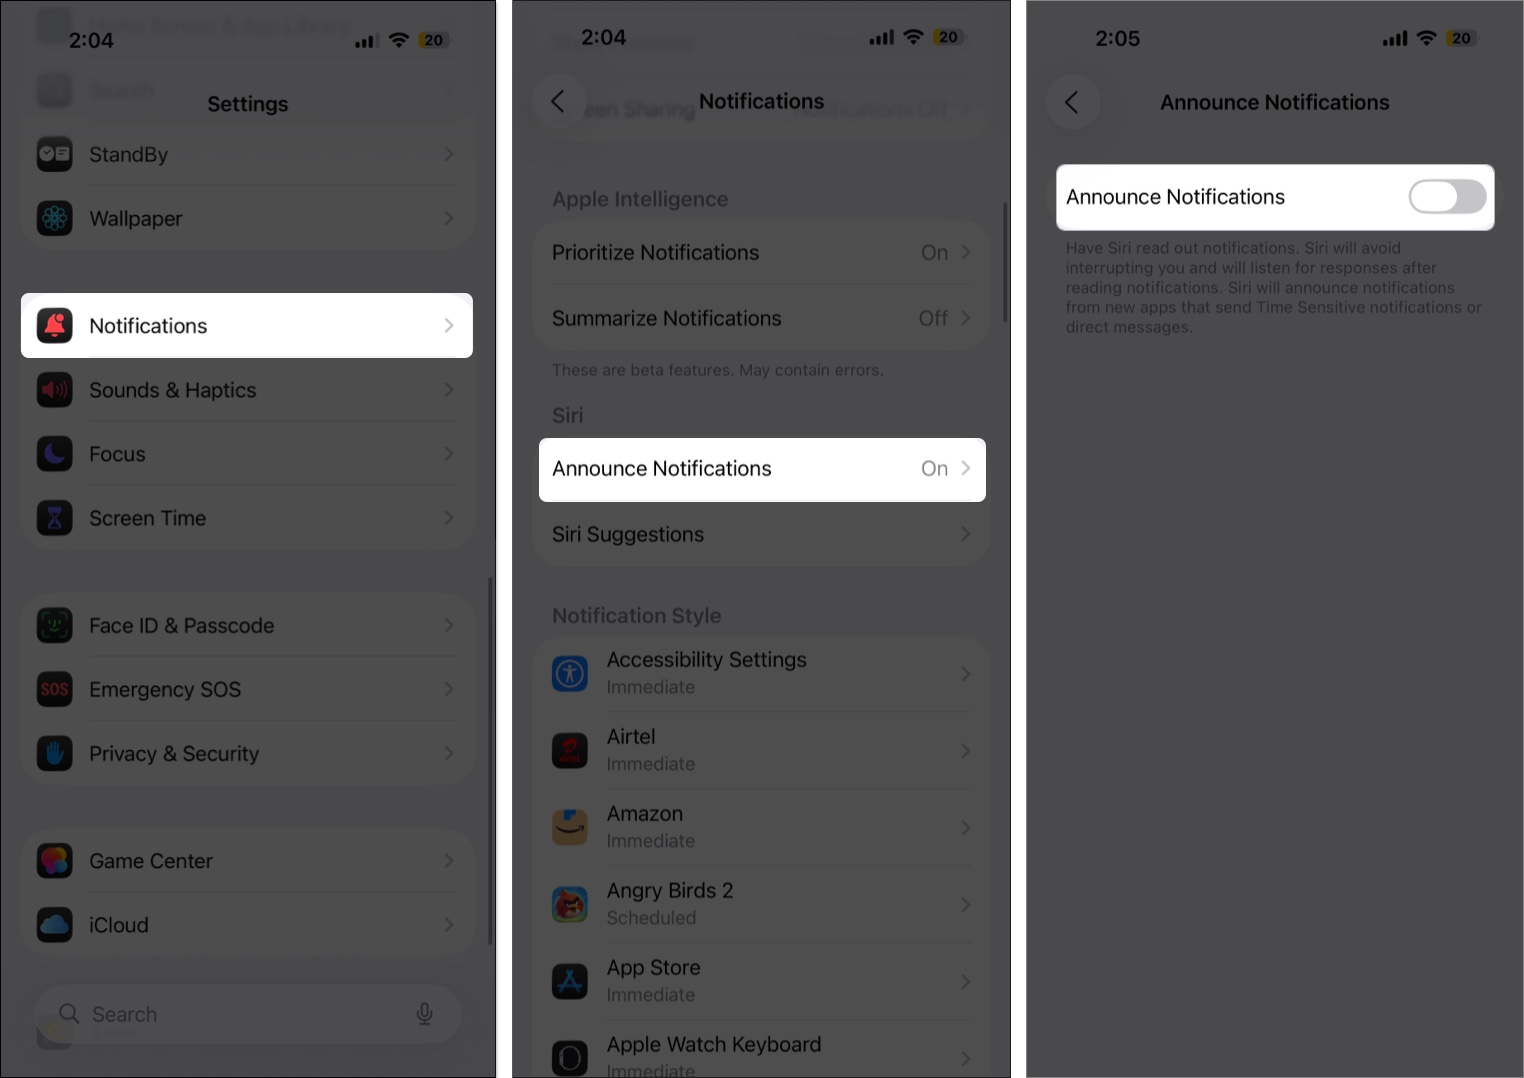
If you prefer, you can also turn off announcements for specific apps instead of disabling the feature entirely.
4. Disable Siri Entirely (Optional)
If you rarely use Siri, you can switch it off system-wide. Just note that this will disable Siri not only on your AirPods but also on your iPhone.
To do this:
- Open Settings → Siri (or Apple Intelligence & Siri).
- Here, tap Talk & Type to Siri under Siri Requests.
- Choose the Off option.
- Next, toggle off Press Side Button for Siri.
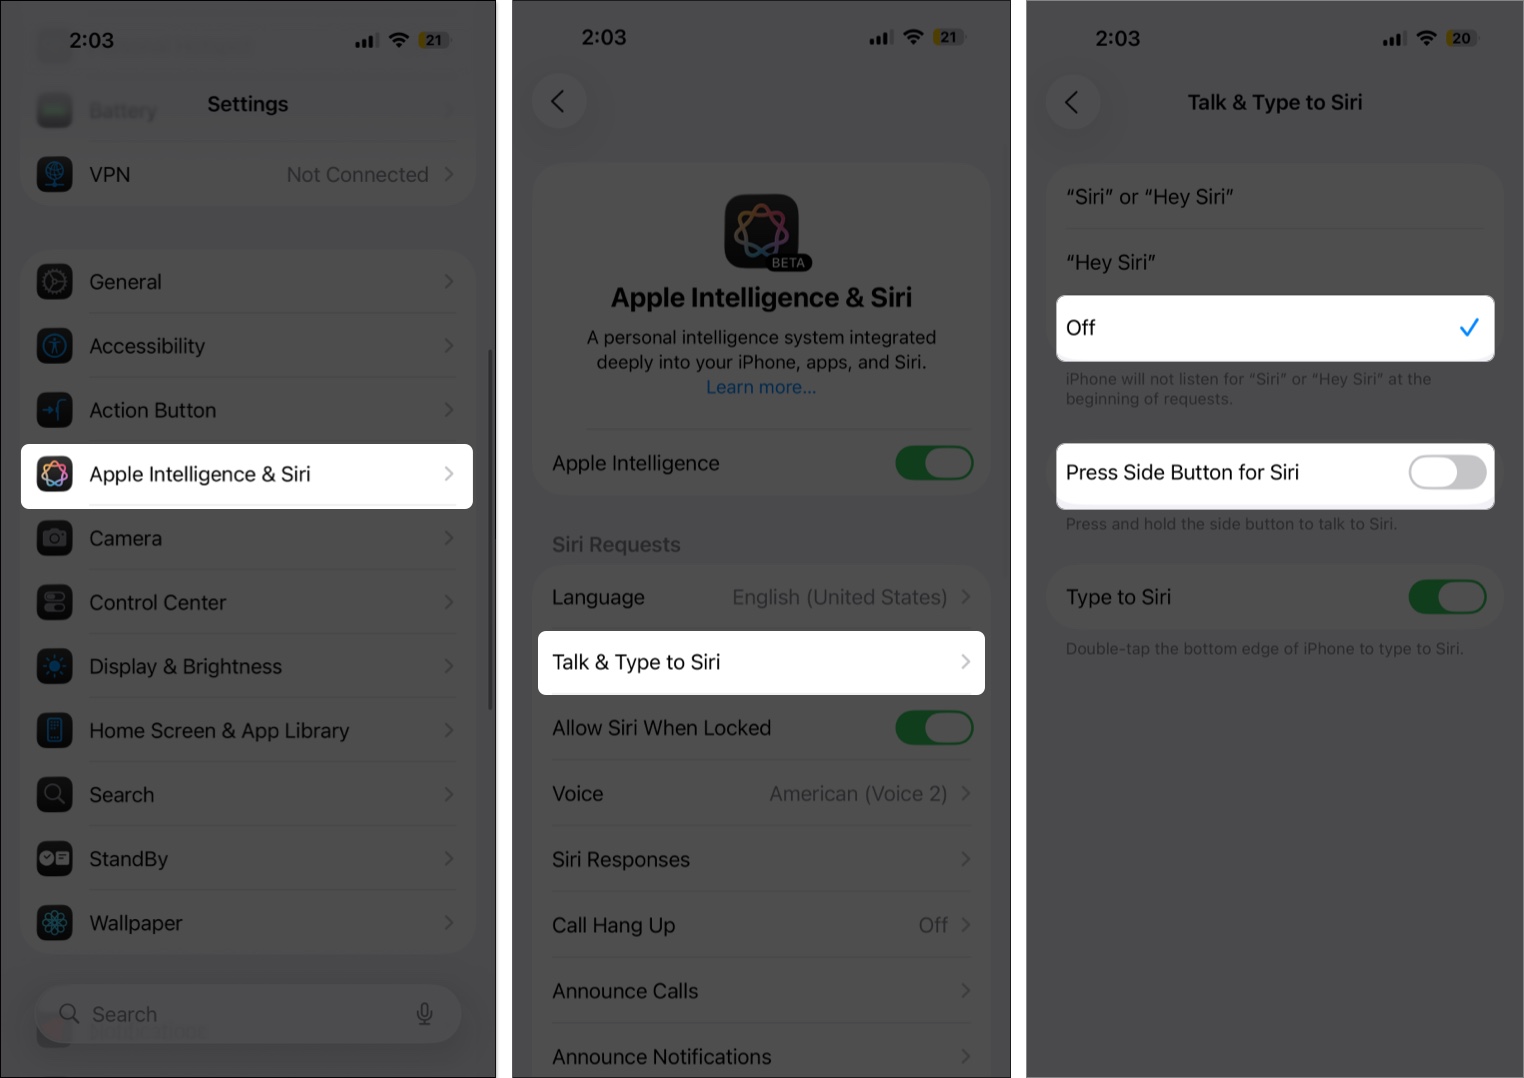
Once disabled, Siri won’t respond to voice or button commands until you turn it back on.
Why You Might Still Want to Keep Siri Enabled
Before turning Siri off completely, think about how you use it. Even if it’s not ideal for AirPods, Siri can still be useful for checking messages while driving, controlling music when your hands are full, or managing smart home devices. Instead of disabling it entirely, you might find it better to fine-tune how and when it responds.
Enjoy a Siri-Free AirPods Experience
That’s it—you now know how to turn off Siri on your AirPods or control when it activates. By adjusting these settings, you can stop unwanted interruptions and enjoy your music, podcasts, or calls in peace.
Have you tried disabling Siri on your AirPods? Share your experience or any additional tips in the comments below.
Read more:

Written by
Bhaskar SharmaBhaskar is a tech guru who turned wordsmith. Hiding his B.Tech degree in a closet, he ditched the corporate path to simplify tech for everyone. For the past 5 years, he's been dishing out how-tos, reviews, and sharp insights. But there's more! He's a witty interview champ and has been sharing his wisdom for 3 years. Furthermore, he has honed his editing skills for 1.5 years and is now delving into marketing to assist newcomers. When not jamming his fingers on those mechanical keyboards, you may find him on strings or engaging in sports. And by evening, his quotes will be appearing on your Instagram feeds.
View all posts →