Maybe you’re new to the Apple Books app or just haven’t had the time to explore its various features. To make the most out of this handy reading tool, check out these tips that’ll turn you into an Apple Books pro.
1. Set reading goals
If one of your goals is to spend more time relaxing with a good book or improving your focus, knowledge, and vocabulary through books, check out the Reading Goals feature.
With it, you can keep track of the number of books you read per year, how many minutes you read per day, and share your achievements with pals.
- To turn on reading goals, open your Settings → Select Books.
- Toggle on Reading Goals.
If you want the PDFs you read applied to your goals, turn on the Include PDFs toggle too.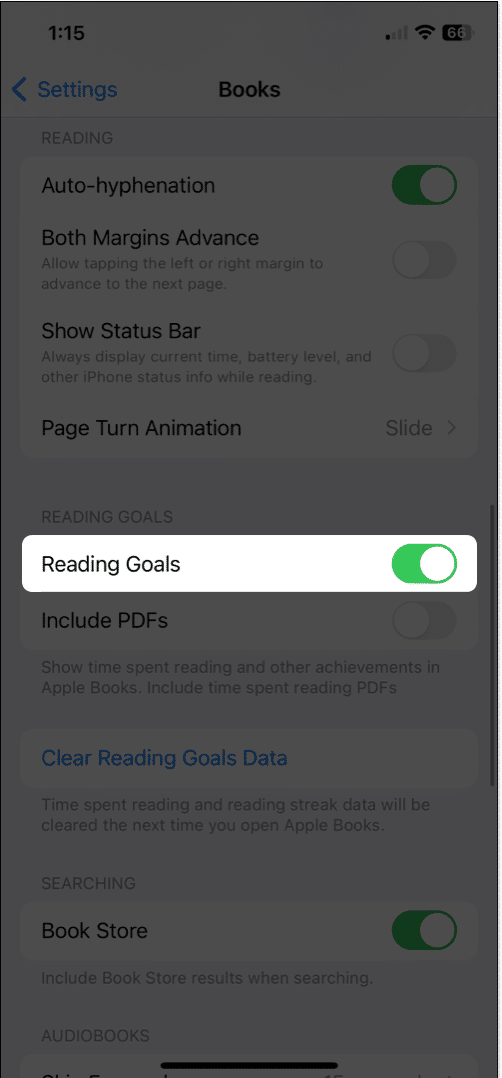
- You can then set your reading goals.
To view your reading goals:
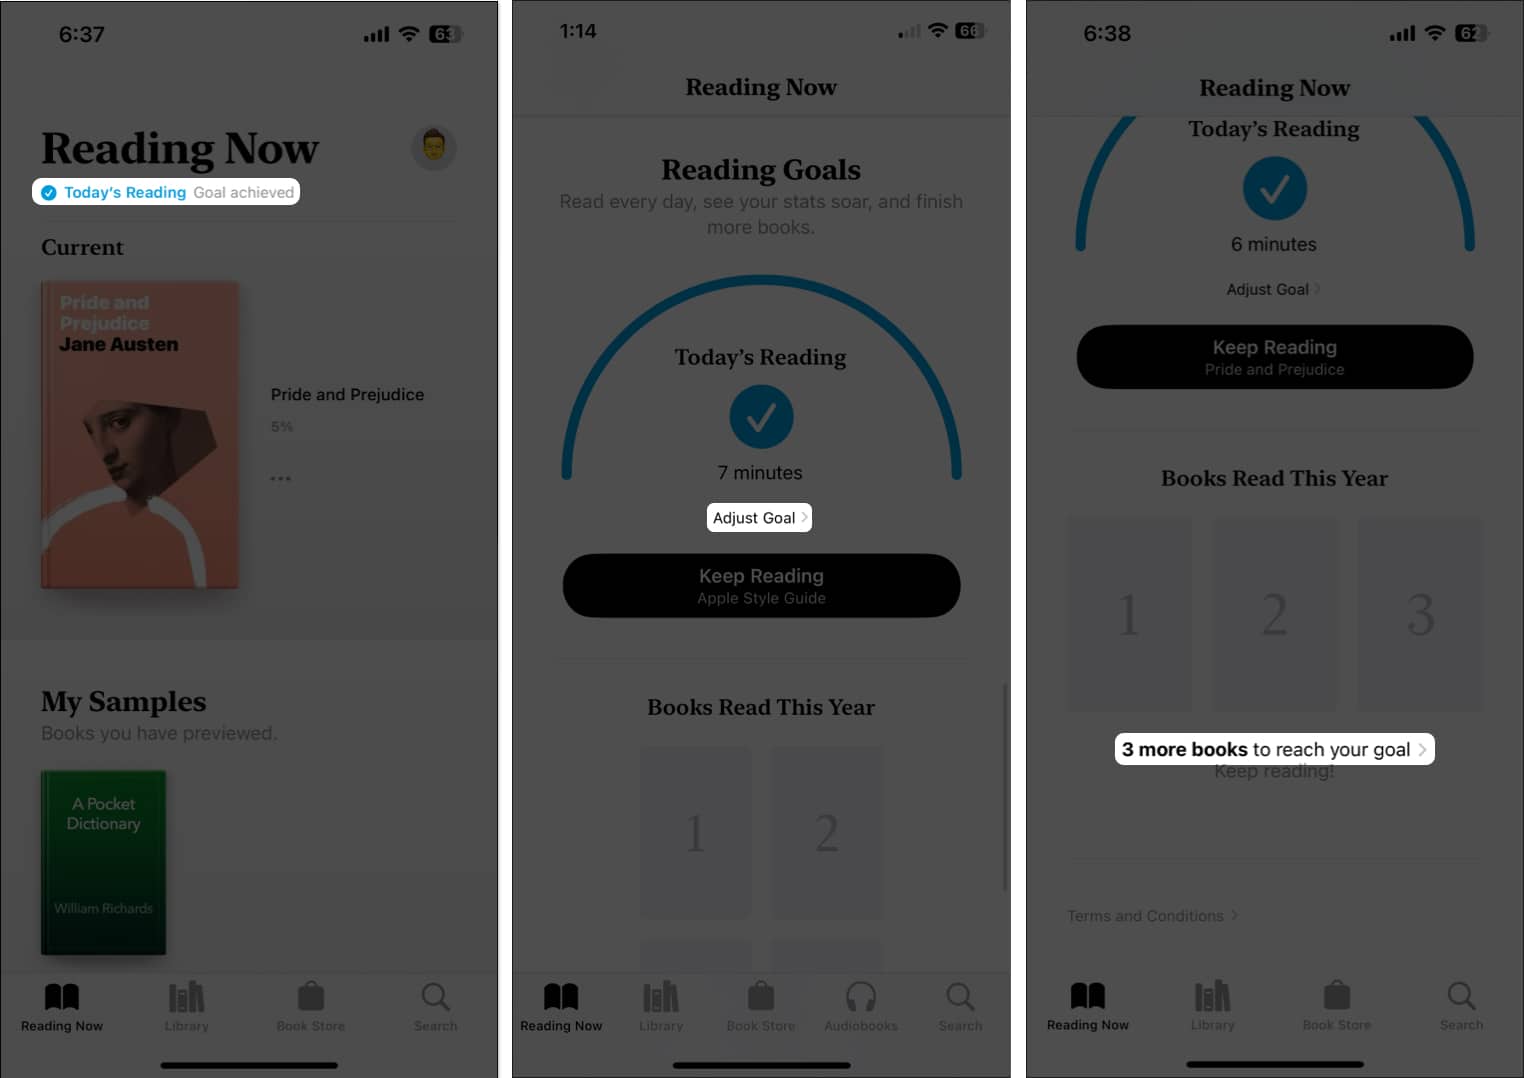
- Open the Books app → Go to the Reading Now tab.
- Scroll to the bottom until you see Reading Goals.
- You’ll see how you’re doing with your reading goals for the current day right at the top of the Reading Now tab. For full details, Reading Goals is ideal.
- To choose the number of minutes per day goal, tap the Adjust Goal arrow within the Today’s Reading section.
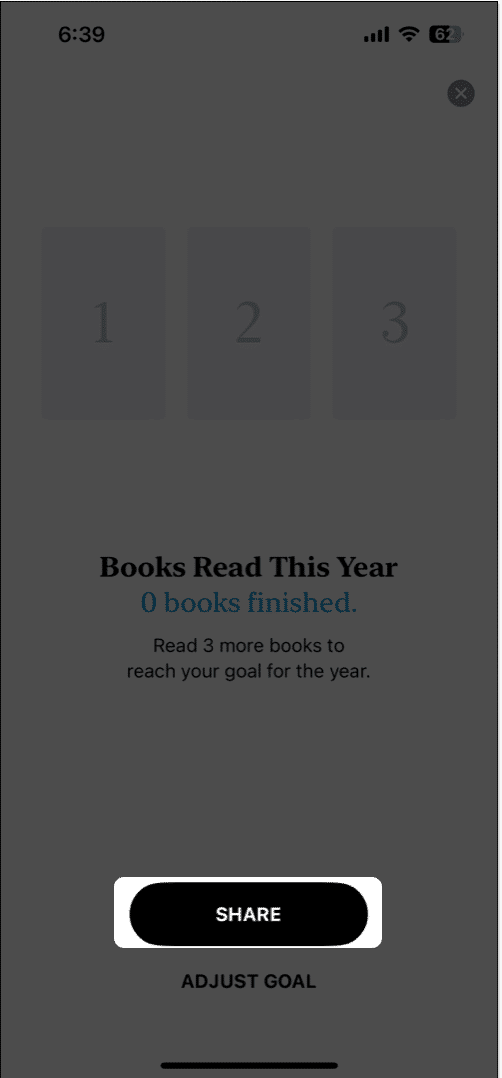
- To choose the number of books to read per year, tap the arrow in the Book Read This Year section.
- Further, you can also use the Share button for either reading minutes or the number of books to let friends know how well you’re doing.
Use the reading coach
If you need a bit of encouragement to reach your Reading Goals, you can use the Coaching feature. This provides a brief notification to motivate you to keep reading.
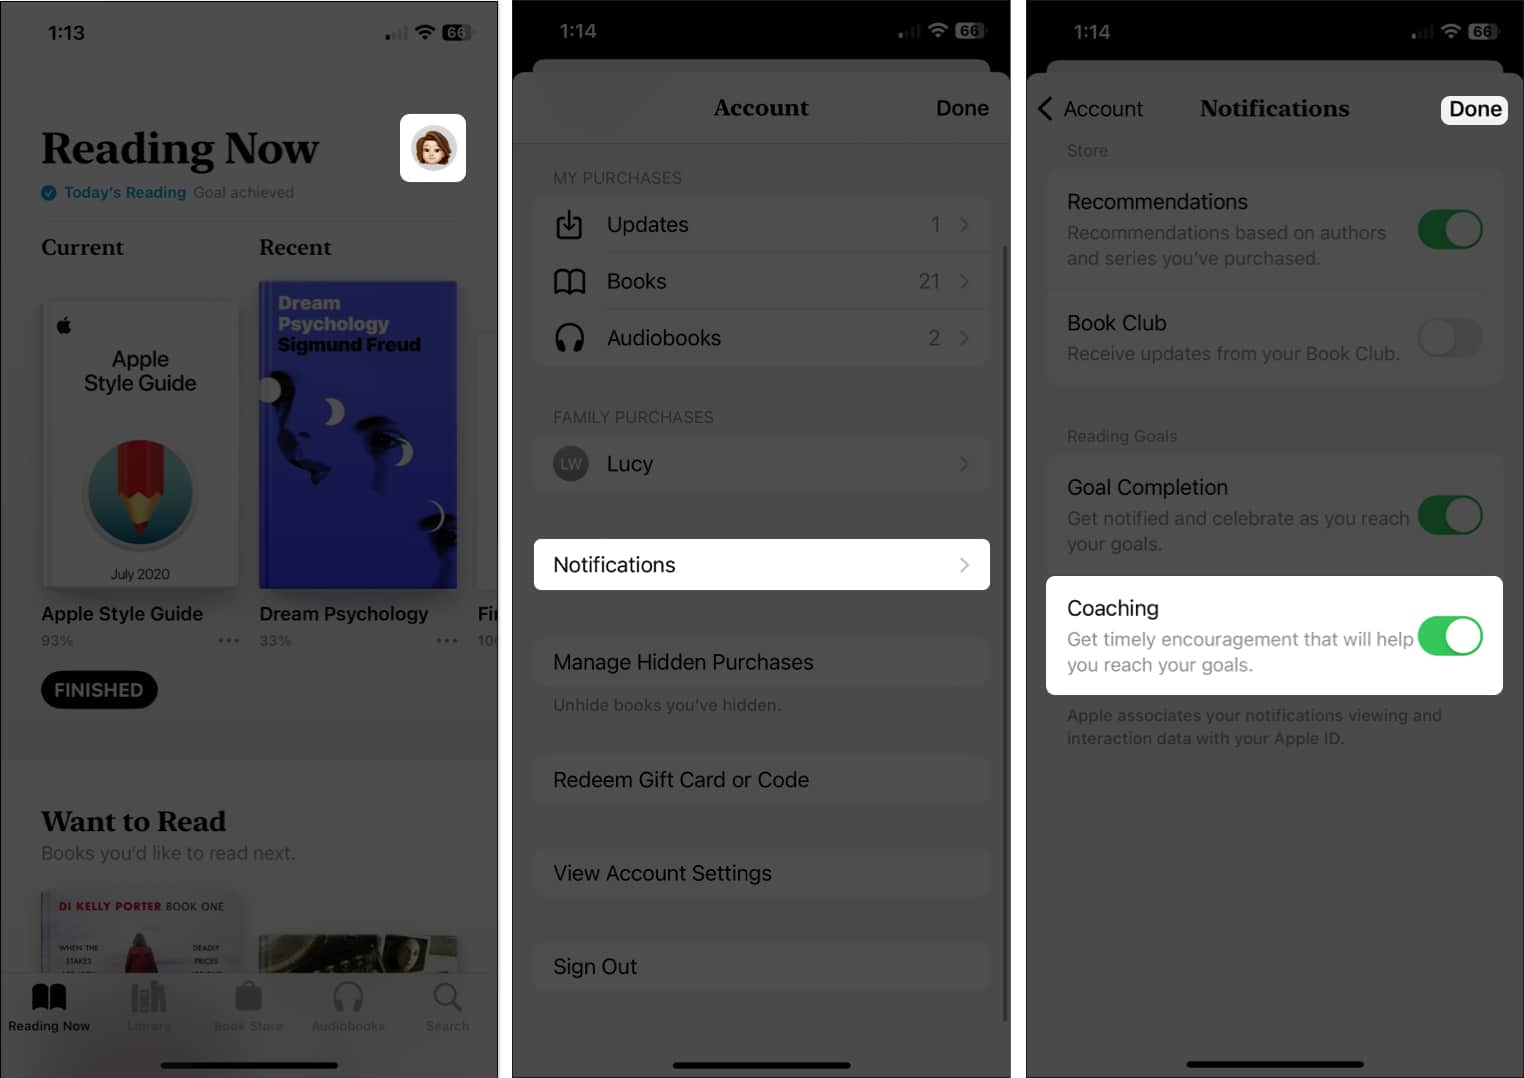
- In the Books app, go to the Reading Now tab and select your profile icon on the top right.
- Select Notifications and turn on the toggle for Coaching. You might also enable the Goal Completion toggle to receive a notification when you achieve your goals.
- Tap Done to save and return to the Account settings and Done once more to return to the Reading Now tab.
2. Highlight passages and take notes
If you use the Books app for research or reference, you can highlight portions and/or add notes to selected text. You can then see the highlights and notes on the page where you place them or view them all in the Reading Menu.
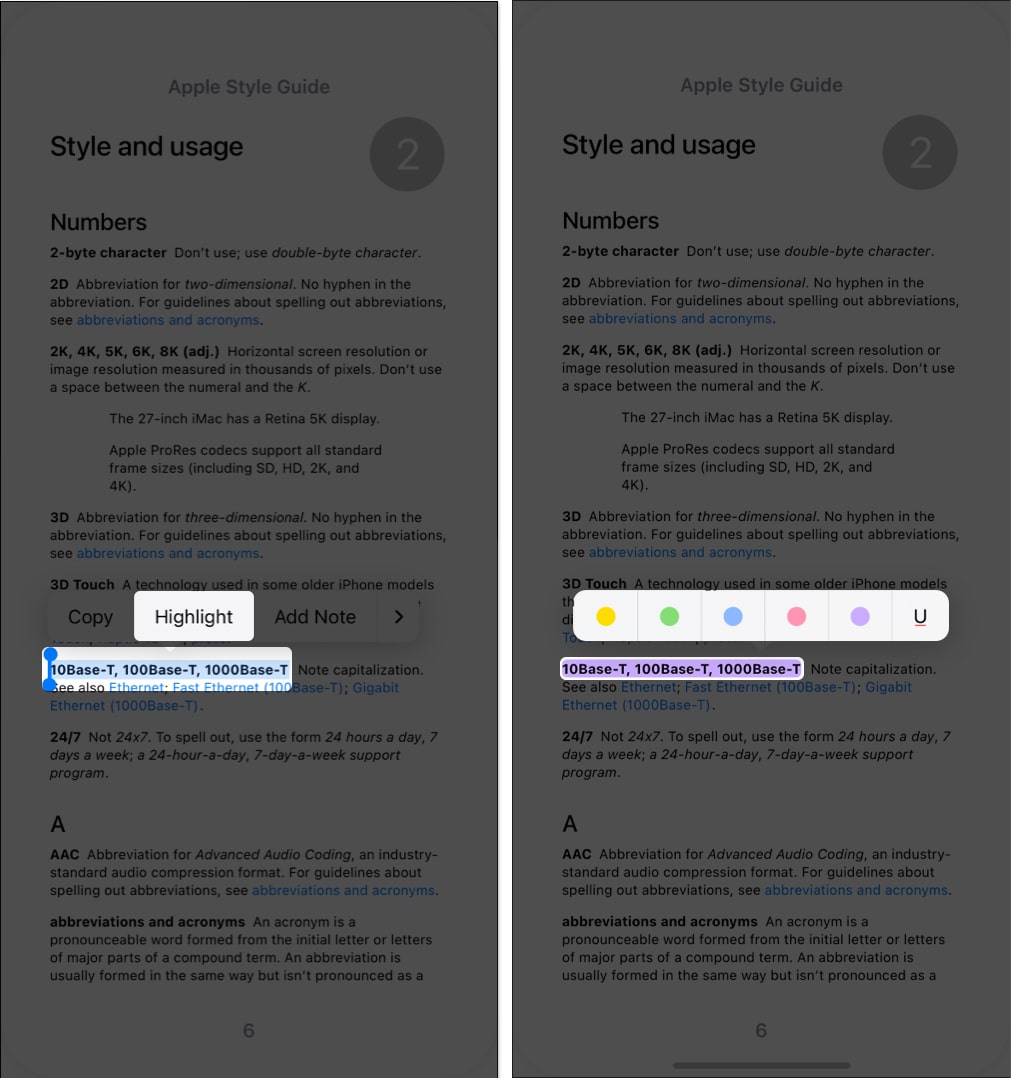
- To add a highlight: Select the text on the page → Tap Highlight in the toolbar that appears. Choose the color you want to use, or pick the underline option.
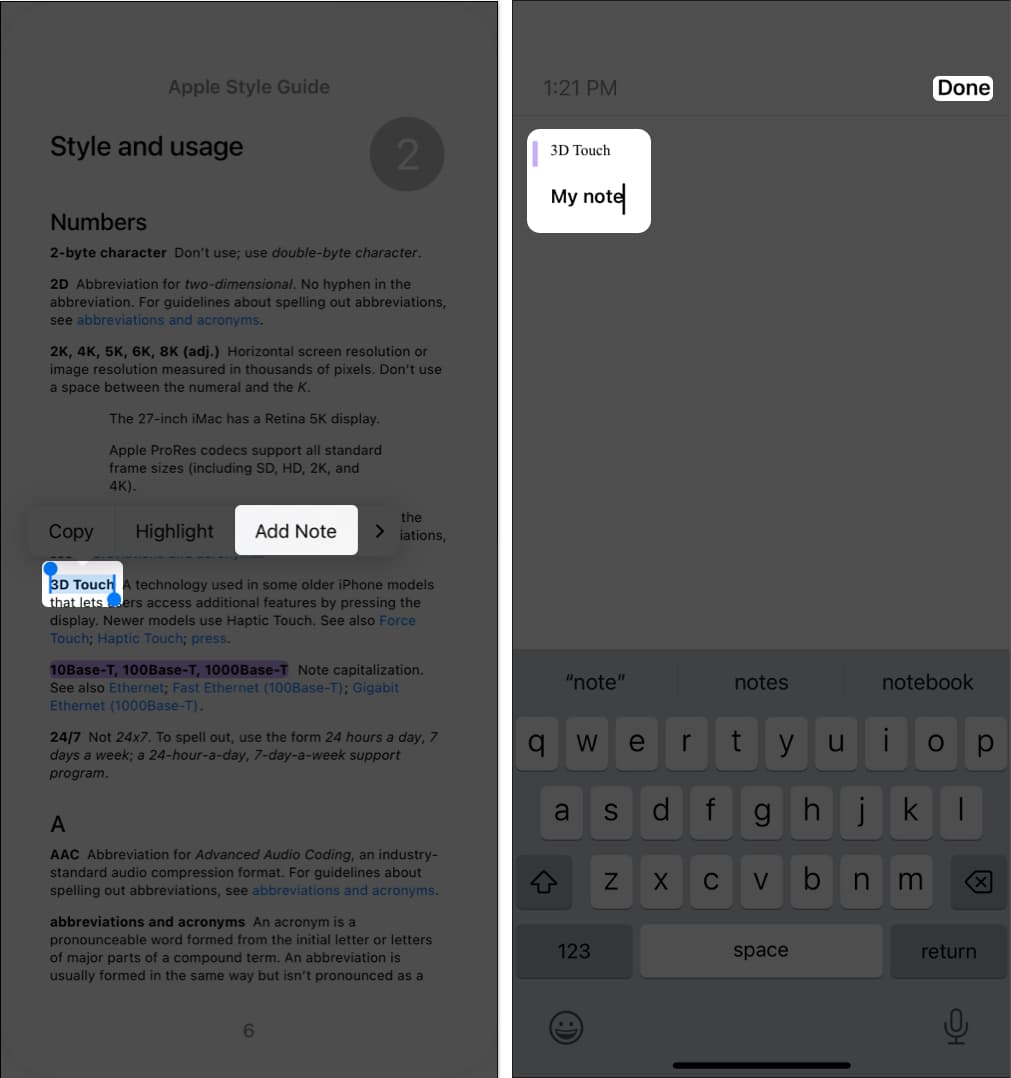
- To add a note: Select the item on the page → Tap Add Note in the toolbar. Enter your note and choose Done on the top right to save it.
You’ll see both highlights and notes in the book. Although both show highlighted text, a note also displays a small square on the side of the page which you can tap to view the note.
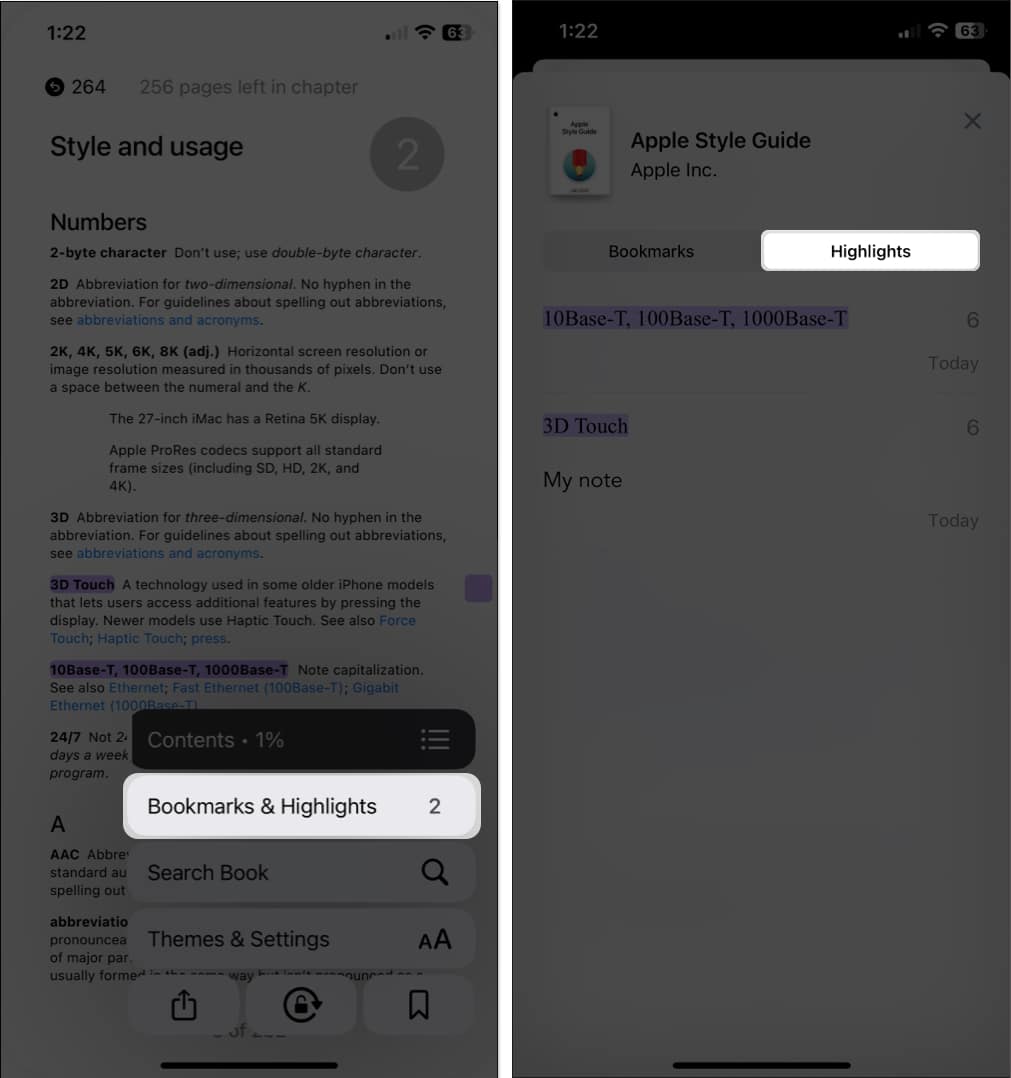
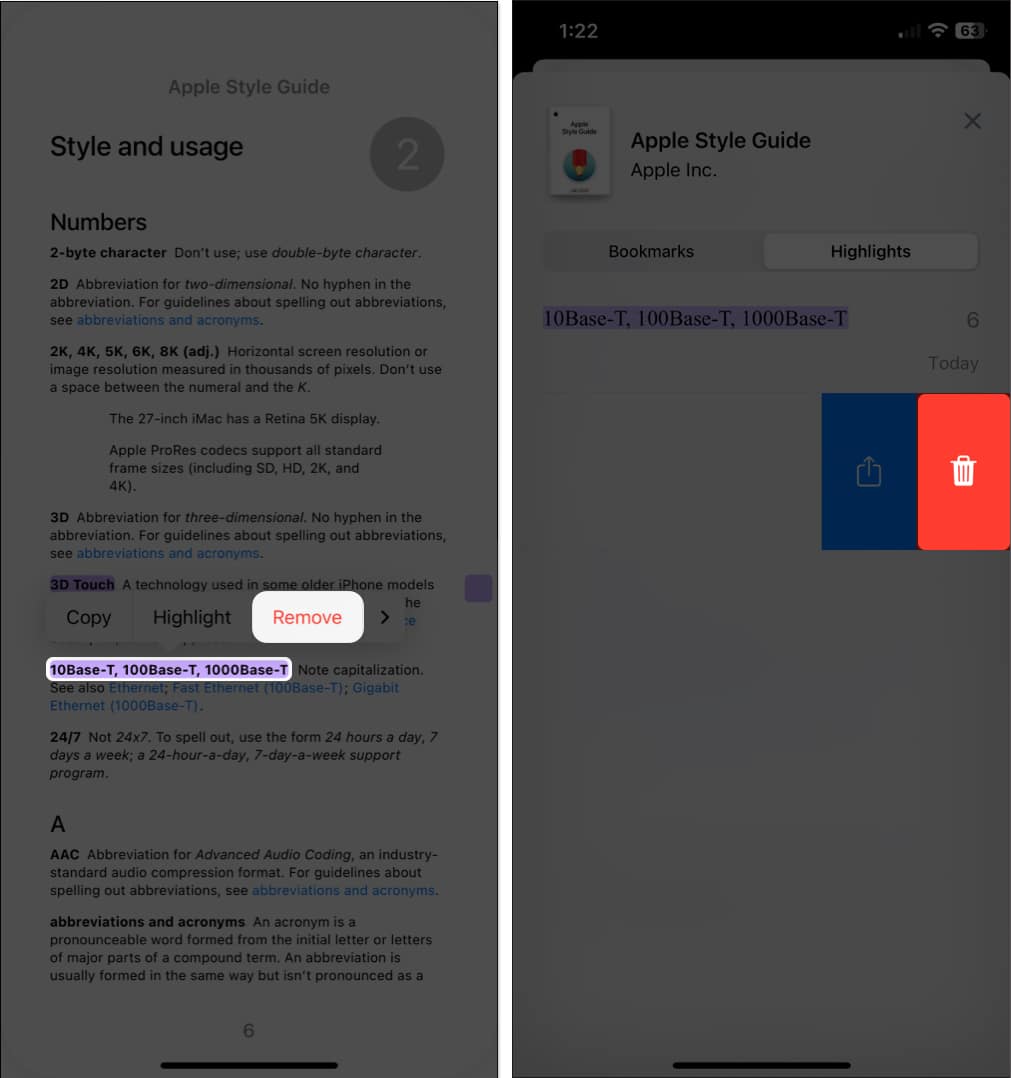
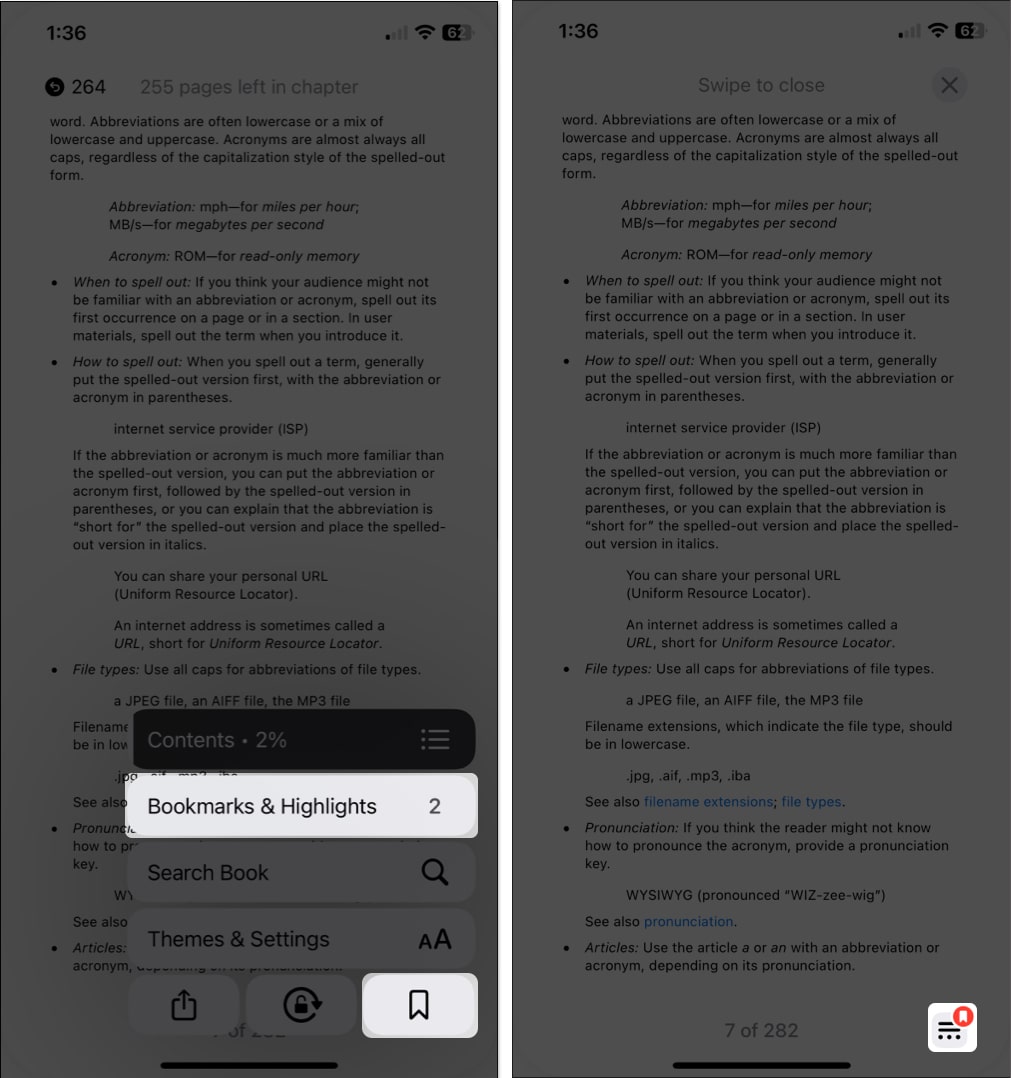
To see all highlights and notes in a book, open the Reading Menu and pick Bookmarks & Highlights. Go to the Highlights tab, and you’ll see all items listed. Tap one to go to its page in the book or swipe to share it.
To remove a highlight, do one of the following:
- Tap the text or item on the page and pick Remove in the toolbar.
- Go to Bookmarks & Highlights > Highlights in the Reading Menu and swipe it from right to left, and tap the Delete icon (trash can).
3. Use bookmarks
Just like a physical bookmark you place in a spot in your book, you can use digital Bookmarks in the Books app. You can then quickly jump to a page you bookmark.
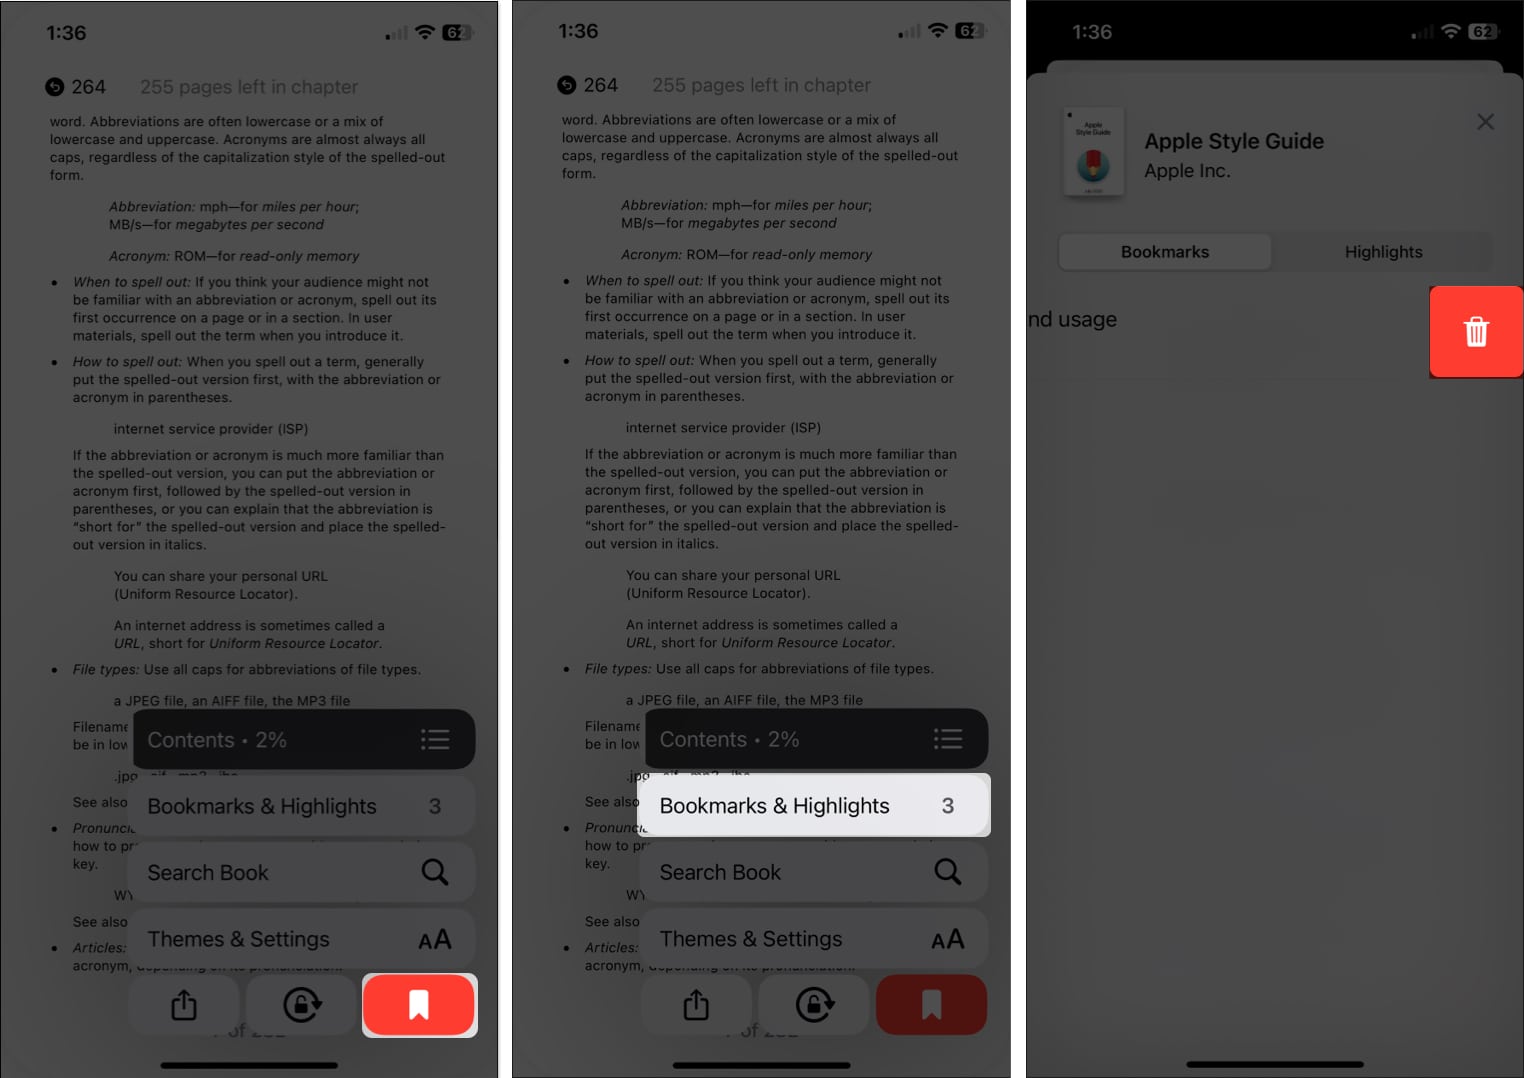
- While on the page, open the Reading Menu at the bottom right → Tap the Bookmark button.
- Now, whenever you visit that page, you’ll see the Bookmark icon display at the bottom.
- You can also view all bookmarks by opening the Reading Menu and choosing Bookmarks & Highlights. Go to the Bookmarks tab for a list of bookmarks, and tap one to go directly to the page.
To remove a bookmark, do one of the following:
- Go to the page, tap the Bookmark icon, and deselect the Bookmark button.
- Go to Bookmarks & Highlights → Bookmarks in the Reading Menu, swipe the bookmark from right to left and tap the Delete icon.
4. View your book progress
When you’re reading a lengthy book, you may want to see your progress. You can view how far you are in the chapter or the entire book as well as which page you’re on out of the total number of pages.
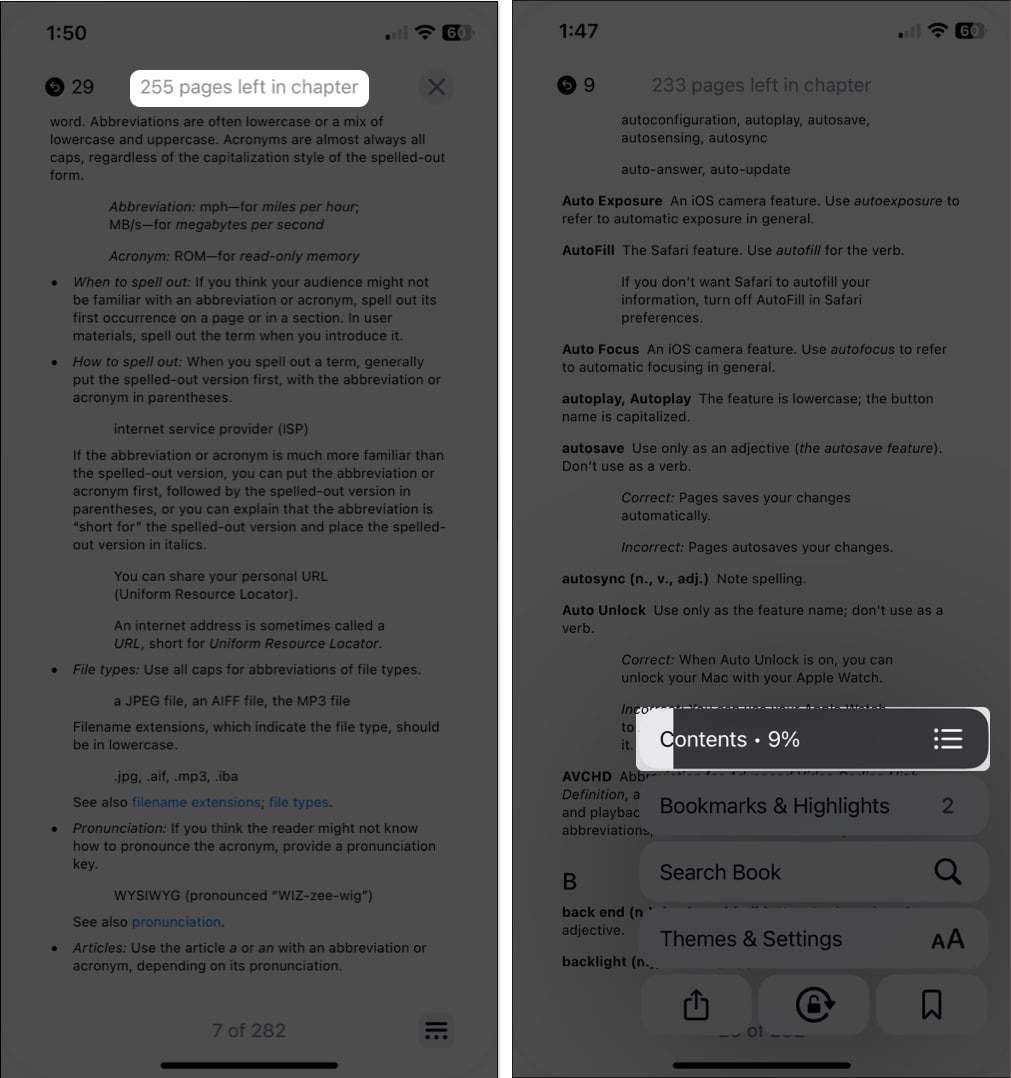
- Tap a spot in the center of the page, being careful not to tap a margin to advance or go back.
- You’ll then see the number of pages left in the chapter at the top and the page number you’re on out of the total number of pages in the book at the bottom.
You can also open the Reading Menu and see the percentage of the book you’ve read so far in the Contents section of the menu.
5. Switch between scroll and page animation
A flexible feature of the Books app you’ll like is the ability to change how you move through the pages. You can use an animation, scroll, or nothing at all.
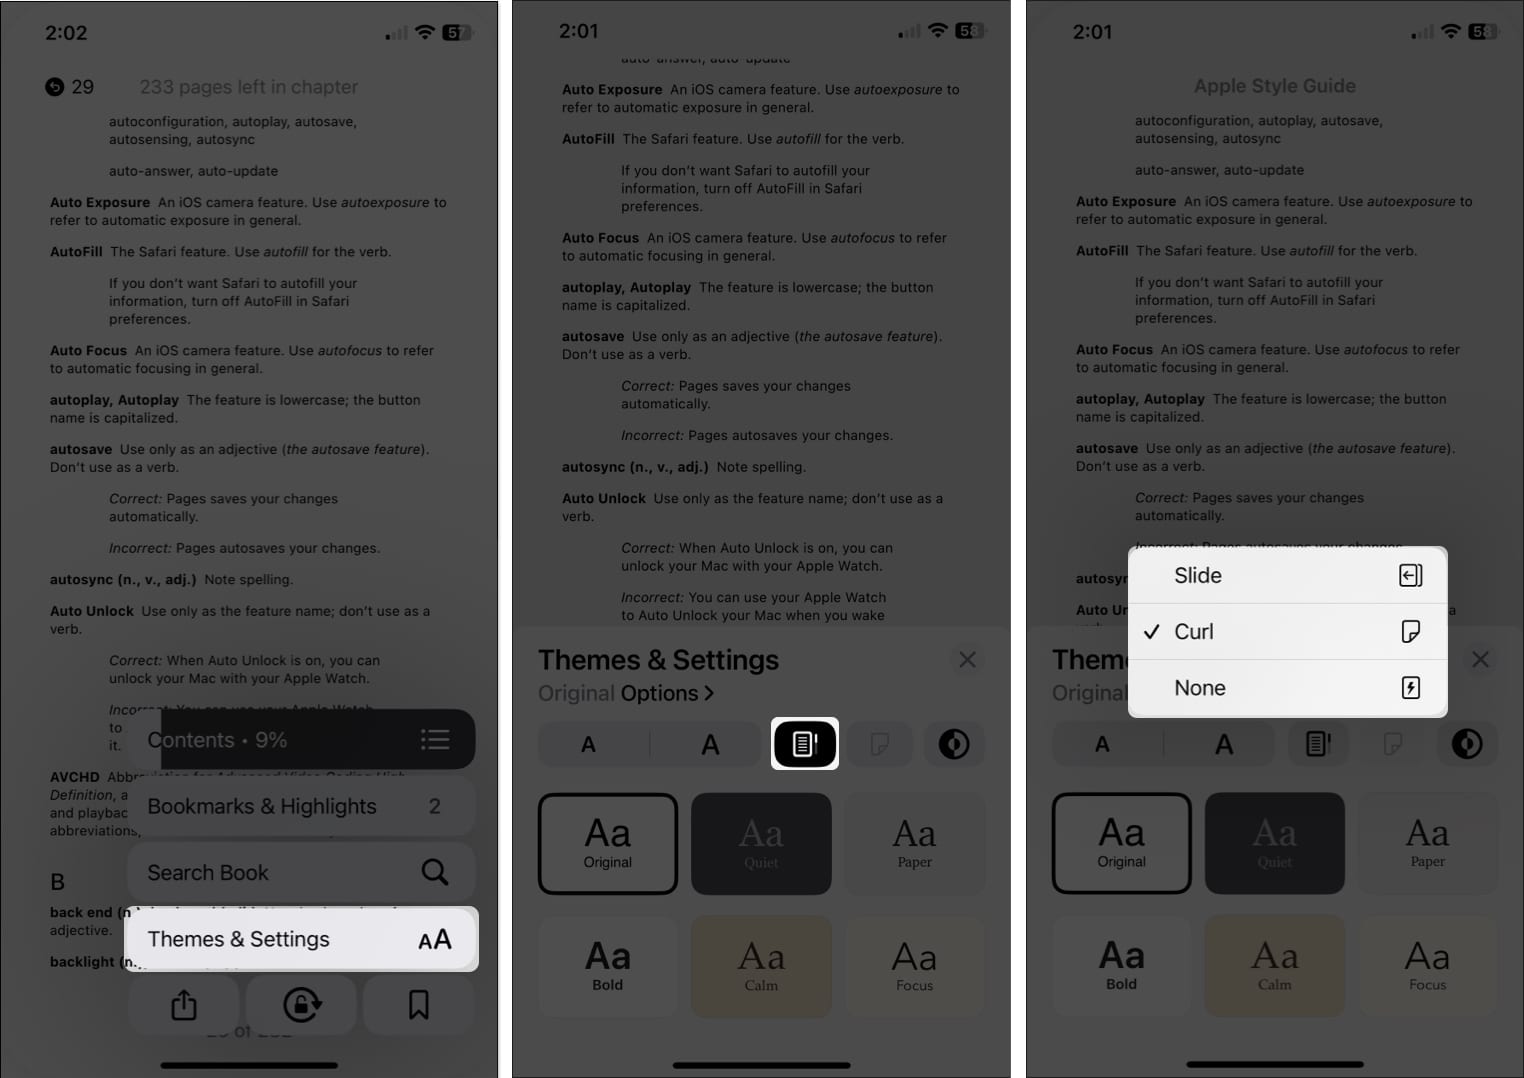
To change how to turn pages, open the Reading Menu and select Themes & Settings.
- To use the scroll style, tap the Scroll button to the right of the Font button. With this option, you scroll down through the pages similar to reading a web page.
- To use an animation, tap the Page Turning button to the right of the Scroll button. You can pick Slide, which swipes the page left or right, or Curl that resembles page turning in a physical book.
- To use no special page turning style, open the Page Turning options above and pick None. With this option, you’ll simply jump to the next page when you tap the side.
Note: You’ll also see the page-turning options in Settings → Books in the Reading section.
6. Skip to pages
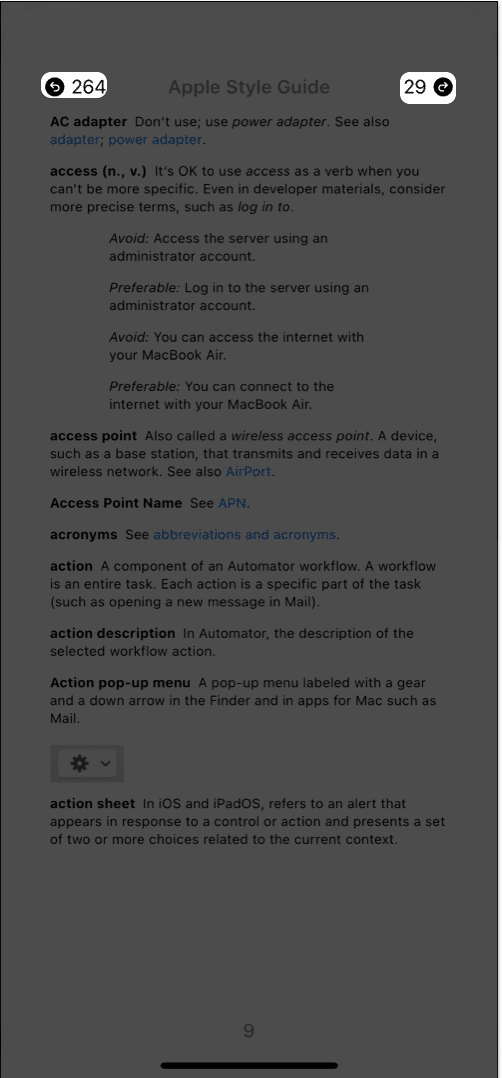
When you move about the book and use the table of contents or your bookmarks to skip around, you may want to return to the page you were reading before or after.
Conveniently, you’ll see circular icons on the top right and left with the page number(s) you visited. Simply tap on those arrows or digits to go to one of those pages.
7. Show your device Status Bar
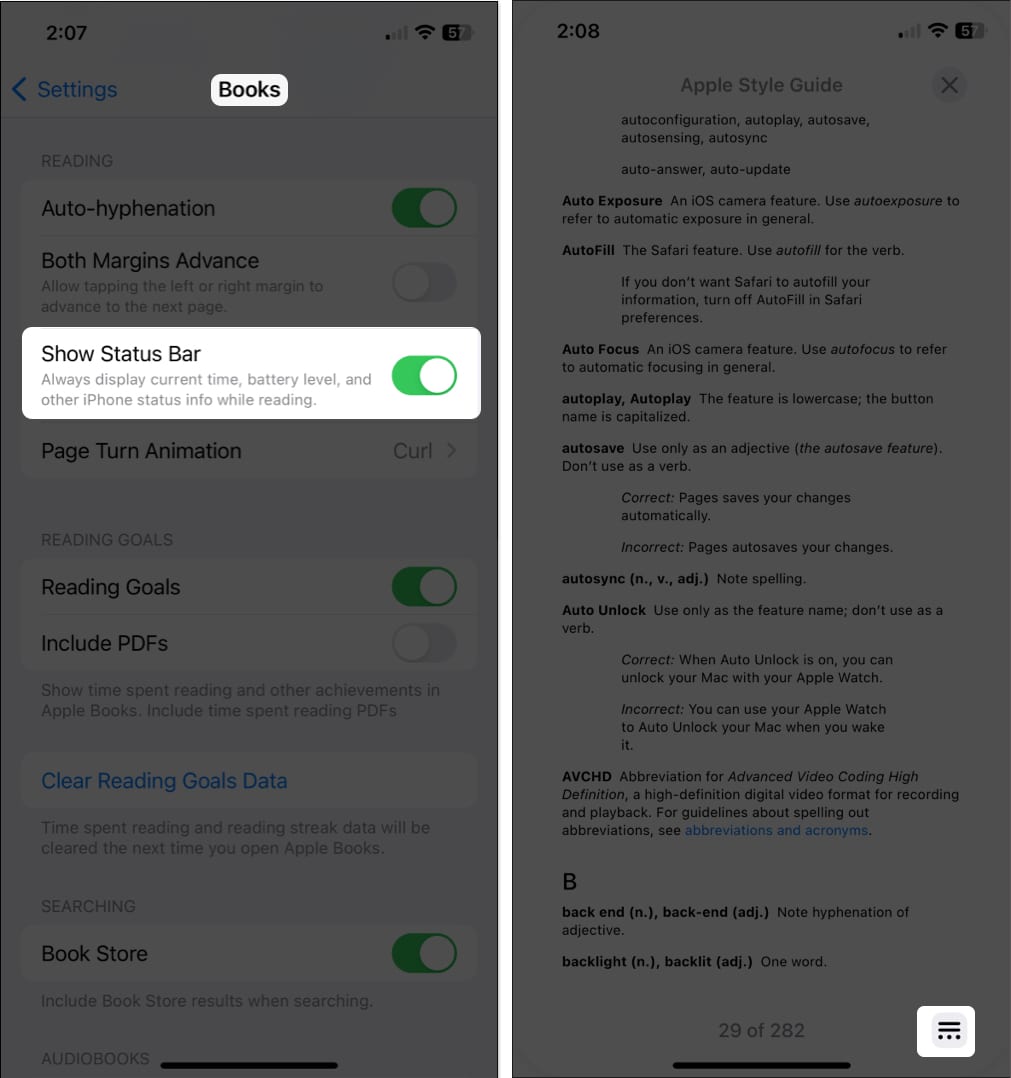
This may seem like a simple thing but is important to many people. You can either hide or show your device’s Status Bar when reading in the Books app.
For instance, you may want to hide the Status Bar so that you have a distraction-free reading experience. On the other hand, you may want to display it to keep track of the time or your battery level.
- Open your Settings → Select Books → Go to the Reading section.
- Toggle on Show Status Bar to display it or turn off the toggle to hide it.
8. Use the mini Audio Player for audiobooks
Similar to songs in the Music app, you can use the mini Audio Player when listening to audiobooks in the Books app. This then keeps the controls for playback in a tidy bar at the bottom rather than consuming the entire screen.
When you are listening to an audiobook, swipe down from the line at the top. You’ll then see the controls in the mini-player so you can play, pause, or skip quickly.
- To hide the Audio Player: Open the audiobook in full view, just tap the player.
- To close the Audio Player altogether: Long-press it and choose Close Audio Player.
9. Adjust the appearance
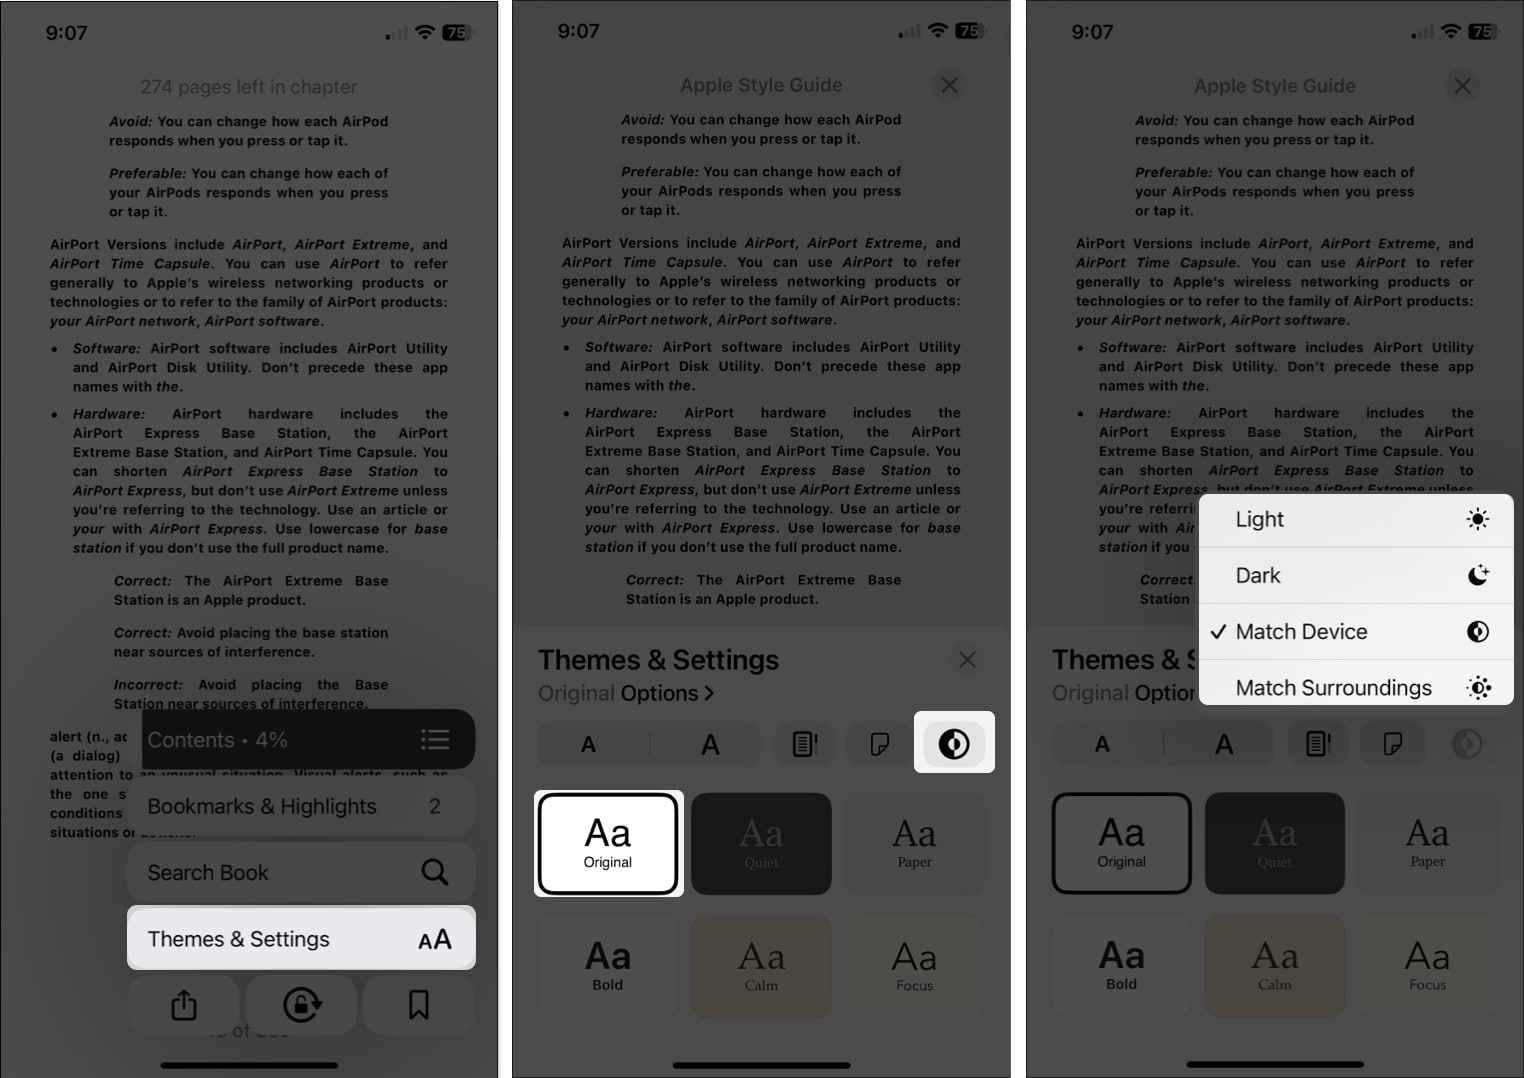
To enhance the experience in the Books app, you can customize the appearance when you’re reading. Going beyond the page turn style mentioned above, you can pick a theme, adjust the brightness, change the font, lock the orientation, and more.
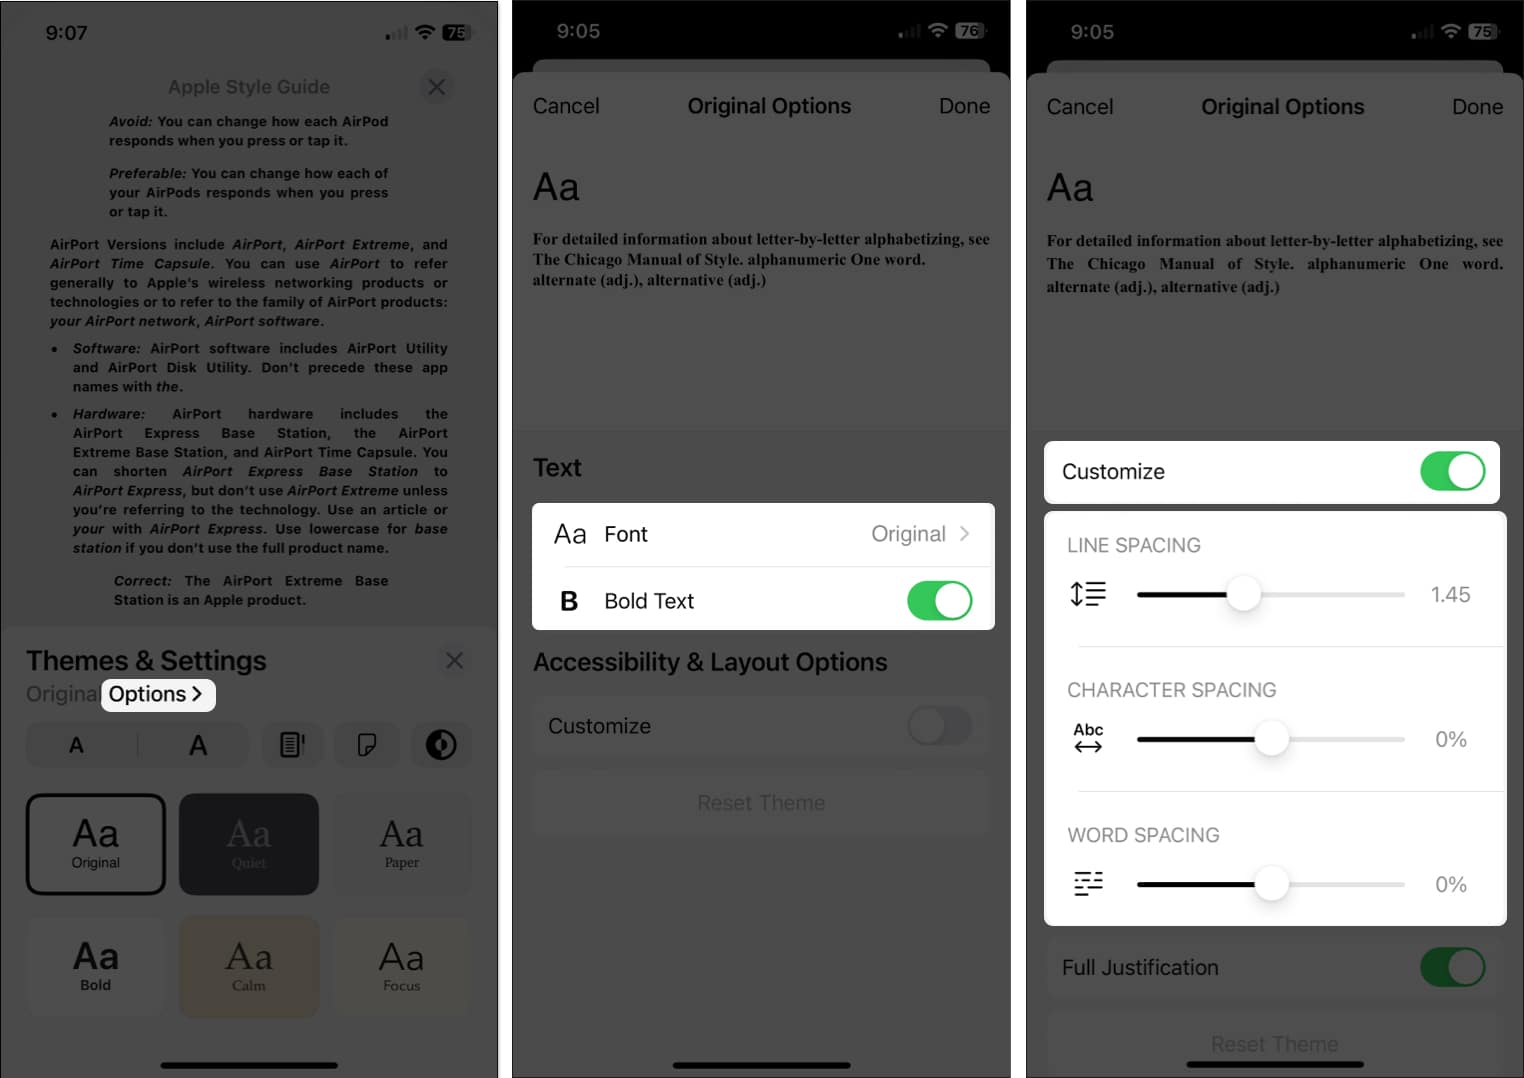
- Open the Reading Menu and select Themes & Settings. You can then adjust a few appearance options right in the pop-up window.
- Font size: Use the letter A buttons to increase or decrease the font size.
- Brightness: Use the Brightness button to pick Light, Dark, Match Device, or Match Surroundings.
- Theme: Pick from one of the six themes, which include a background color and font style.
- To change additional appearance settings, select Options. As you adjust the following, you’ll see a preview at the top of the screen.
- Font: Change the font style.
- Bold Text : Turn on the toggle to make the text bold.
- Customize: Turn on the toggle to change the line, character, or word spacing and enable full justification.
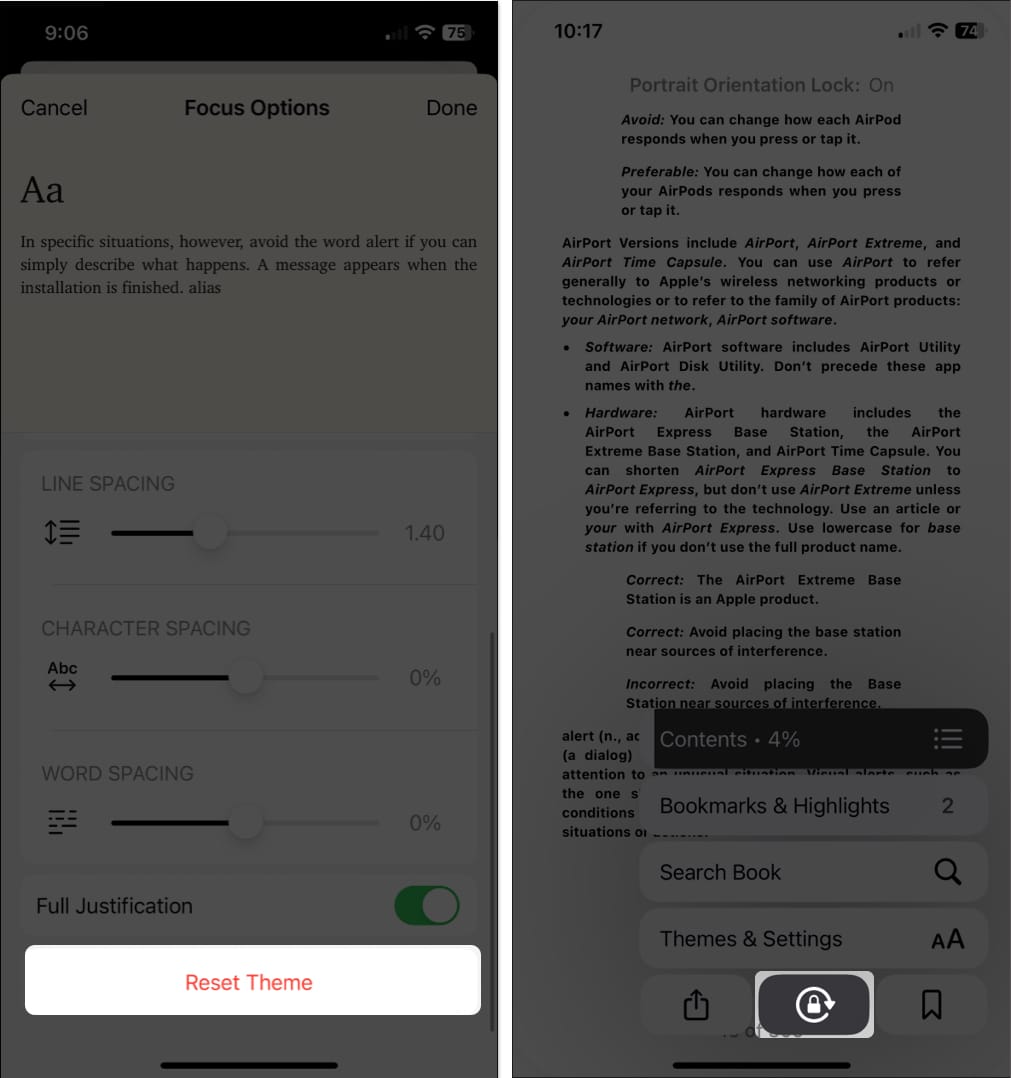
To revert these changes back to the defaults, select Reset Theme at the bottom.
To lock the page orientation so that the page doesn’t change from portrait to landscape or vice versa when you rotate your device, open the Reading Menu and tap the Orientation Lock button (circle and lock).
10. Organize your library
Once you start purchasing more and more books, you’ll want to keep your library organized so that you can easily find the book you want.
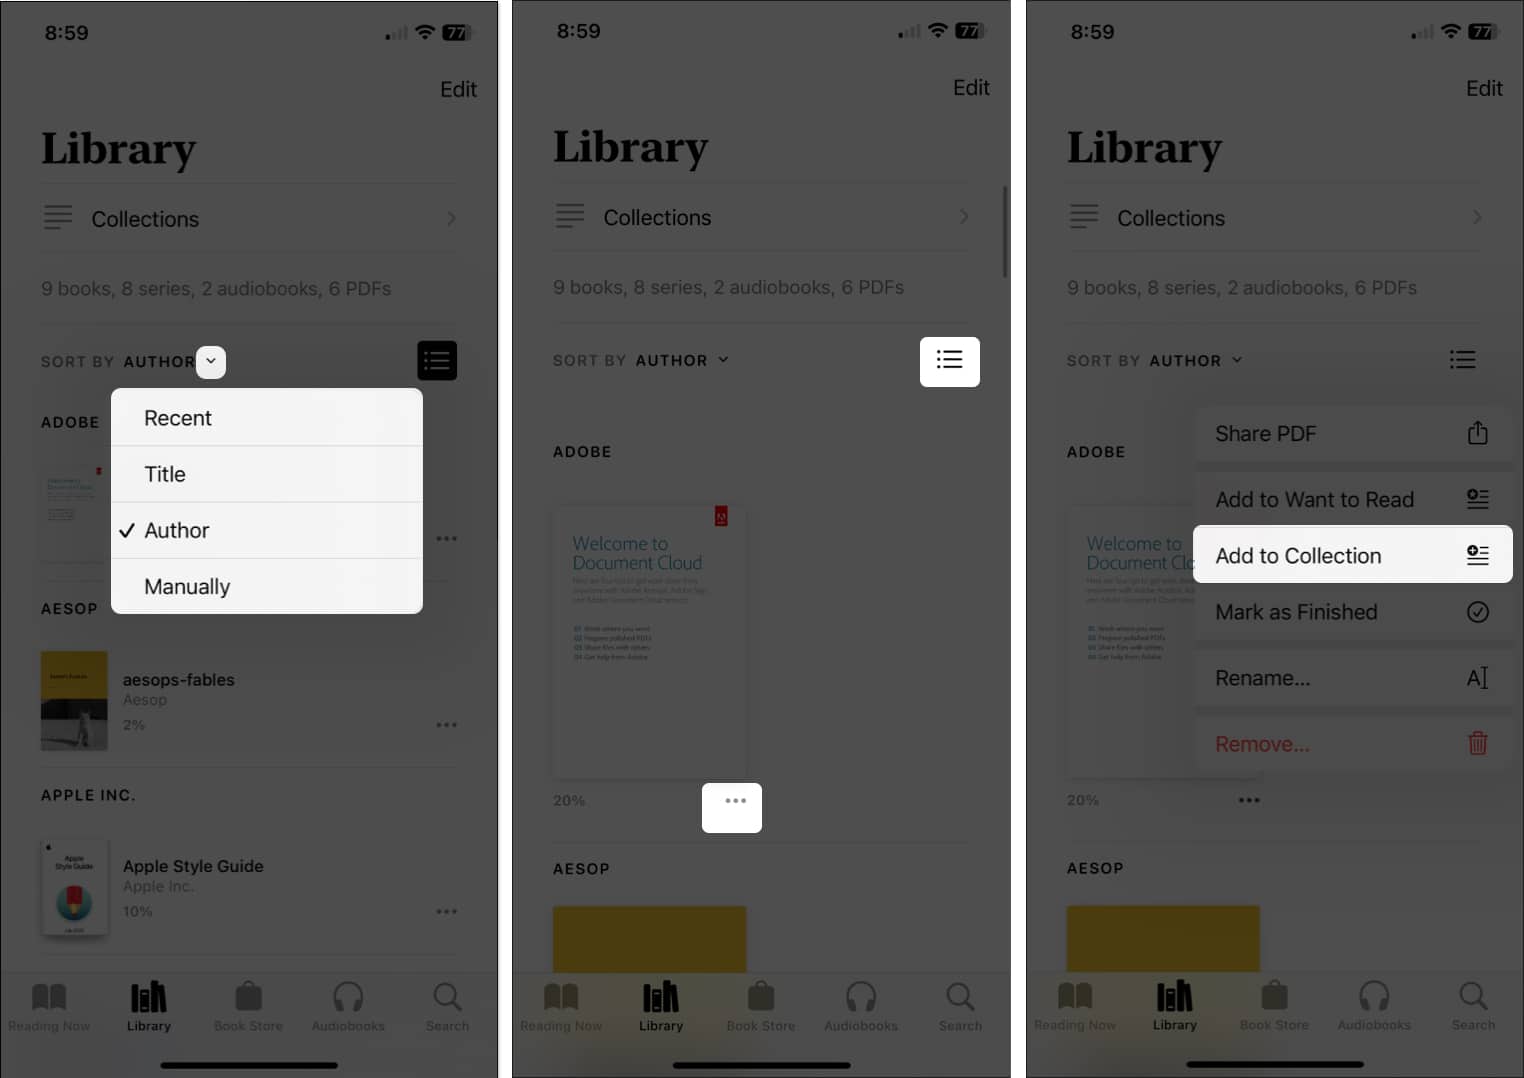
- Sort: Sort by title, author, recent, or manually using the Sort drop-down menu at the top.
- Display: Use list or grid view using the Display icon (three lines).
- Collections: Create Collections of related books. Select Collections to make a new one, tap the three dots for a book to add it to a Collection, and edit the order in which your Collections display.
For more, look at these additional suggestions for your managing your Books library.
Other adjustable settings
Along with all of the above features, there are a few more settings for Books that you may want to check out.
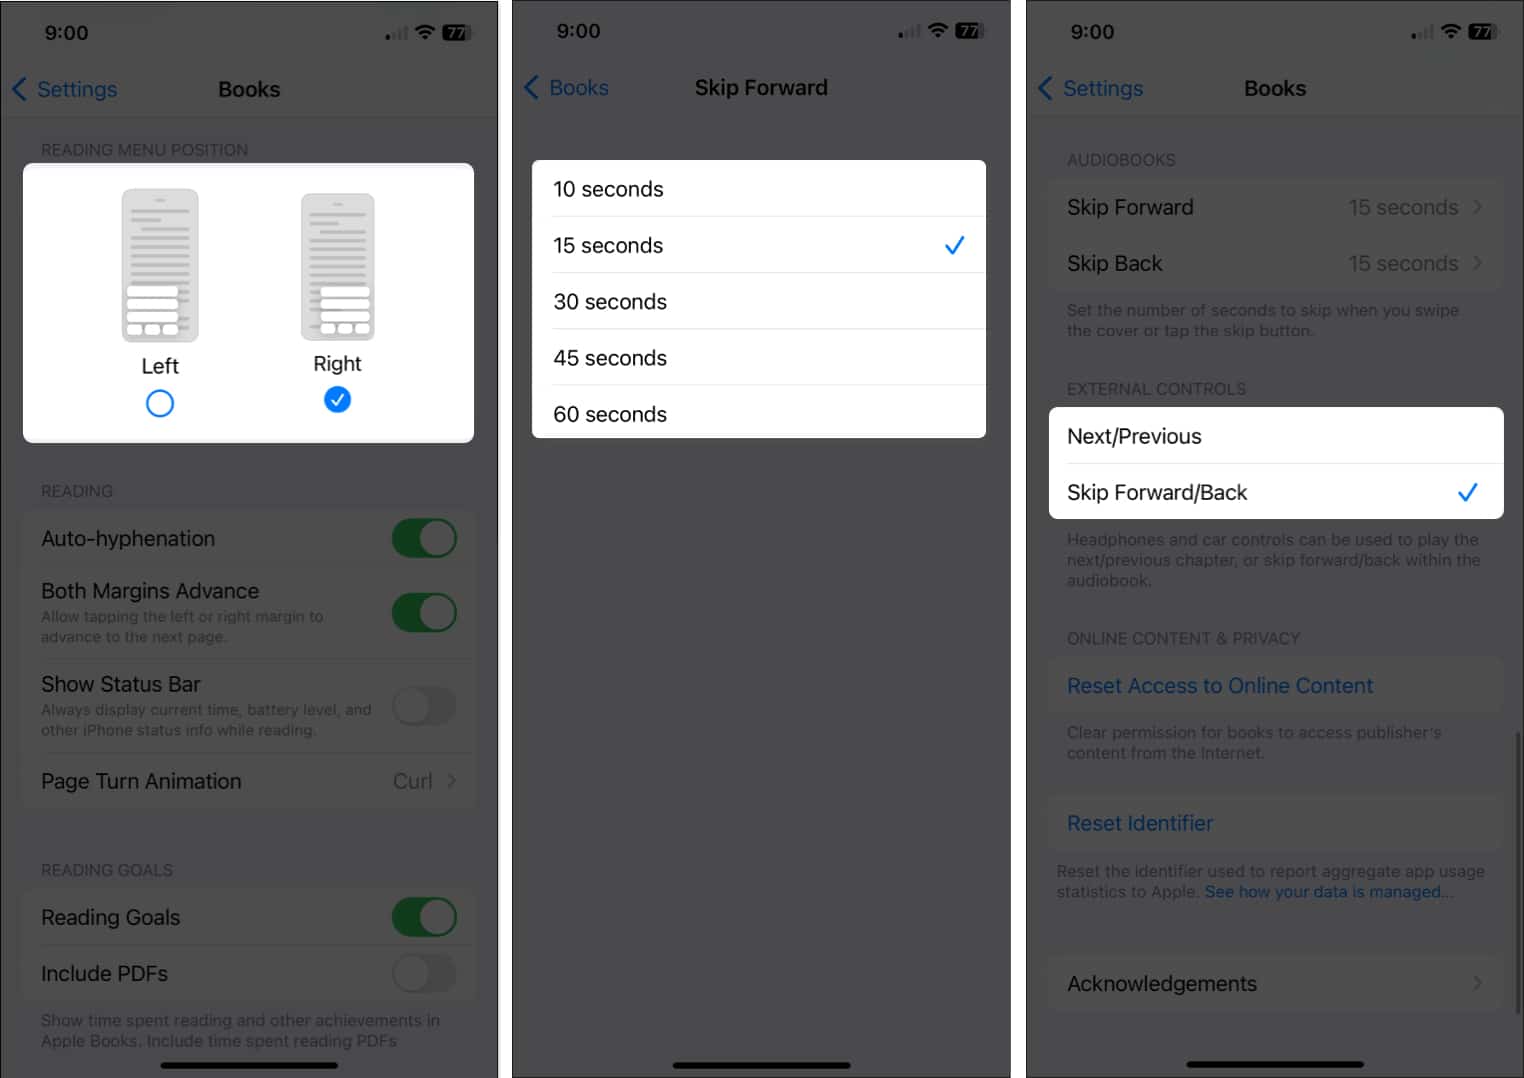
Open your Settings and select Books. Then, take a look these settings:
- Reading Menu Position: Choose from the bottom right or left for the placement of the Reading Menu.
- Both Margins Advance: Enable this toggle to use both the right and left margins to advance to the next page.
- Audiobooks: Adjust the Skip Forward and Skip Back timing when using the forward and back buttons in the audiobook player.
- External Controls: Choose one of these options for moving through audiobooks when using headphones or car controls.
Be a Books pro!
With these tips and features, you can enjoy your Books app experience even more than before. Do you have tips of your own you’d like to share? Let us know!
For more, look at how to share books with your family on iPhone.
Read more:




Leave a Reply