Recording your iPhone screen is useful when you want to capture and share a clip with friends, family, or coworkers. For instance, if you want to show someone an error that’s occurring on your iPhone, explain how to use an app, record your gameplay, etc.
While it’s usually super convenient, it can be pretty frustrating when Screen Recording stops working on your iPhone or iPad. But there are several quick solutions you can try.
Note: Before proceeding, be aware that screen recording doesn’t work for everything. Some sections or apps on your phone won’t allow screen recording for security or privacy reasons. In this case, there’s not much you can do.
- Turn Screen Recording on in Control Center
- Force restart your device
- Update device to the latest iOS version
- Check Restrictions
- Check available storage on iPhone or iPad
- Reset All Settings on iPhone
- Restore your iPhone/iPad
- Fix a Screen Recording with no sound
- Can’t save iPhone screen recordings?
1. Turn Screen Recording on in Control Center
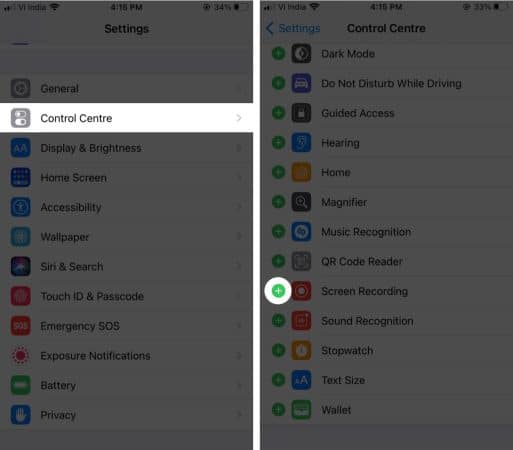
- Go to Settings → Control Center.
- Scroll down to Screen Recording and tap the + icon next to it.
2. Force restart your device
Often, force restarting your iPhone or iPad is enough to fix any technical glitches and get Screen Recording working again.
To force restart iPhone 8 or newer (including iPhone 13):
- Quickly press and release the Volume Up button, followed by the Volume Down button.
- Then, press and hold the Side button until the Apple logo appears on the screen.
To force restart iPhone 7/7 Plus:
- Press and hold the Side button and Volume Down button until you see the Apple logo on the screen.
For iPhone 6S and earlier: Press and hold the Home button and the Side button until you see the Apple logo appear on the screen.
3. Update device to the latest iOS version
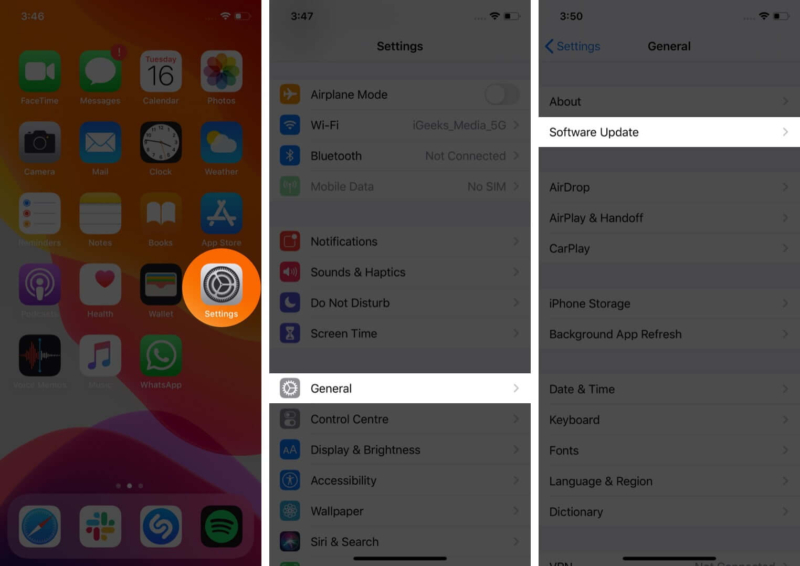
Go to Settings → General → Software Update to check if any are available. If so, follow the onscreen instructions to download and install.
4. Check Restrictions
Sometimes, the Screen Recording icon may be grayed out in the Control Center due to Parental Control restrictions. You wouldn’t be the first person to complain of this issue.
Here’s how to tweak these:
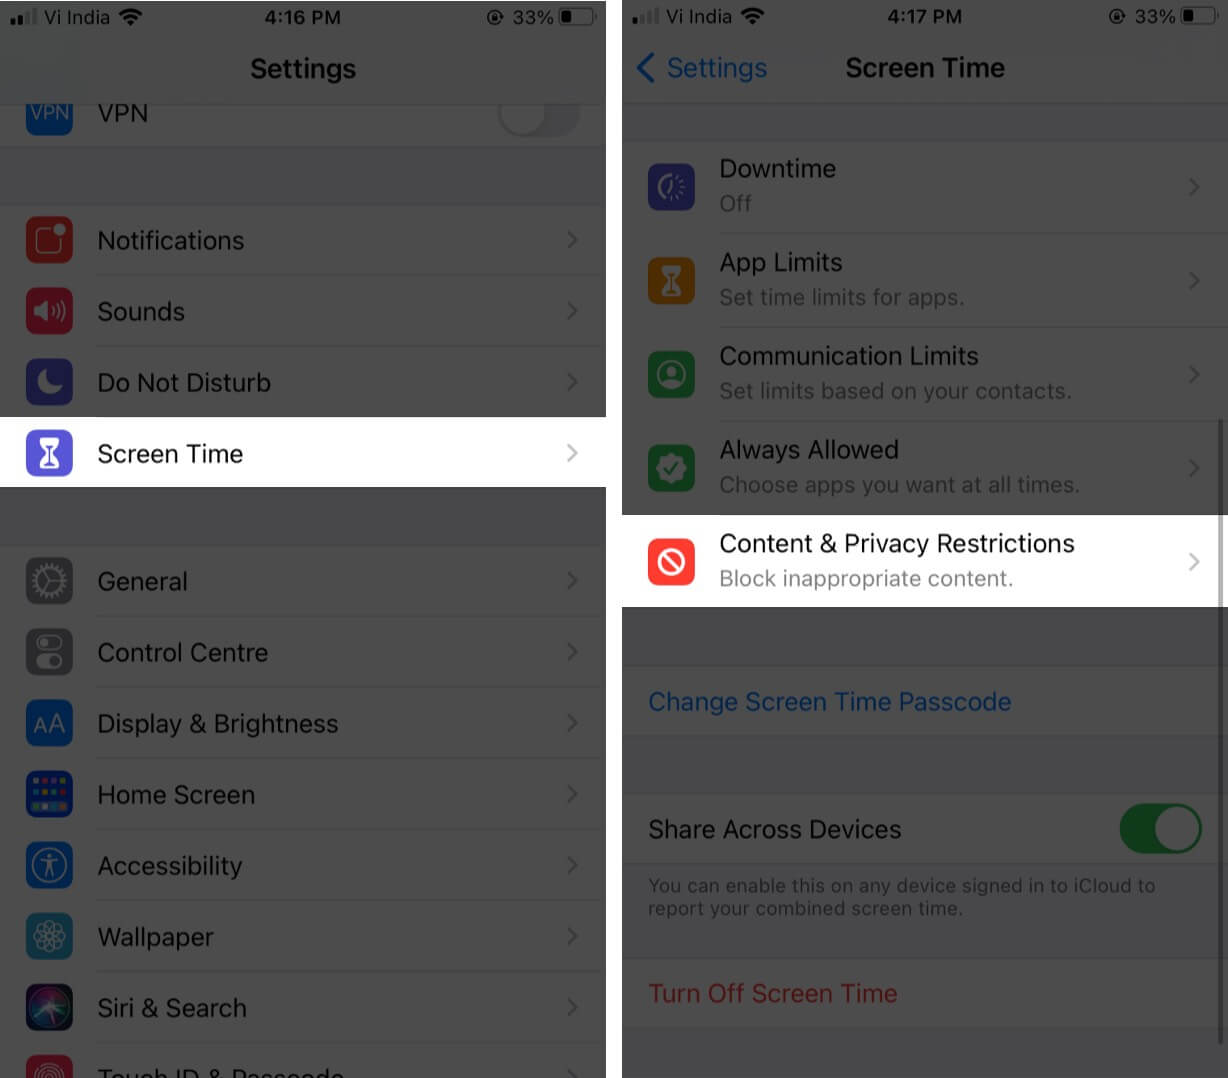
- Go to Settings → Screen Time → Content & Privacy Restrictions.
- You might be prompted to enter your Screen Time password.
- Select Content Restrictions.
- Tap Screen Recording, then tap Allow.
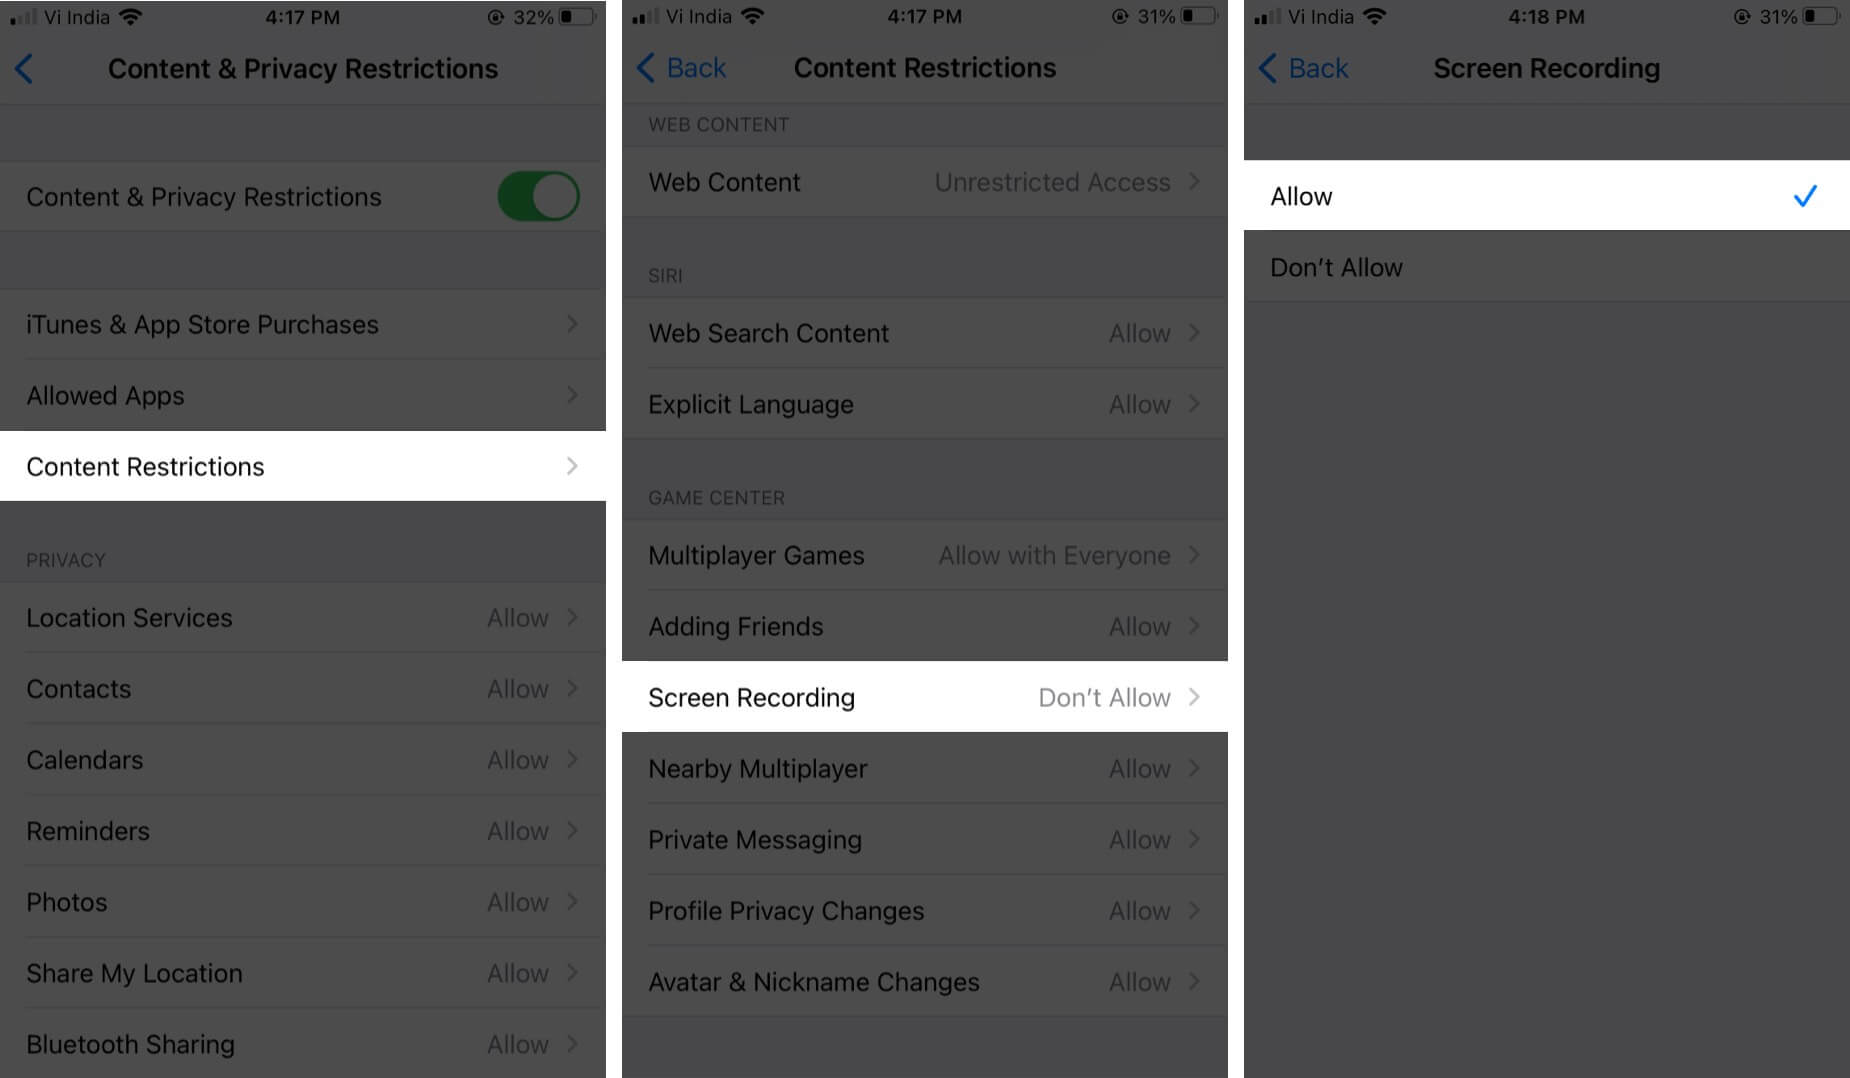
The Screen Recording icon will now be activated in the Control Center. You can just tap it to start recording.
5. Check available storage on iPhone or iPad
If your iPhone or iPad is low on storage, screen recordings will fail to save. Here’s how you can check this:
- Go to Settings → General and tap iPhone/iPad Storage.
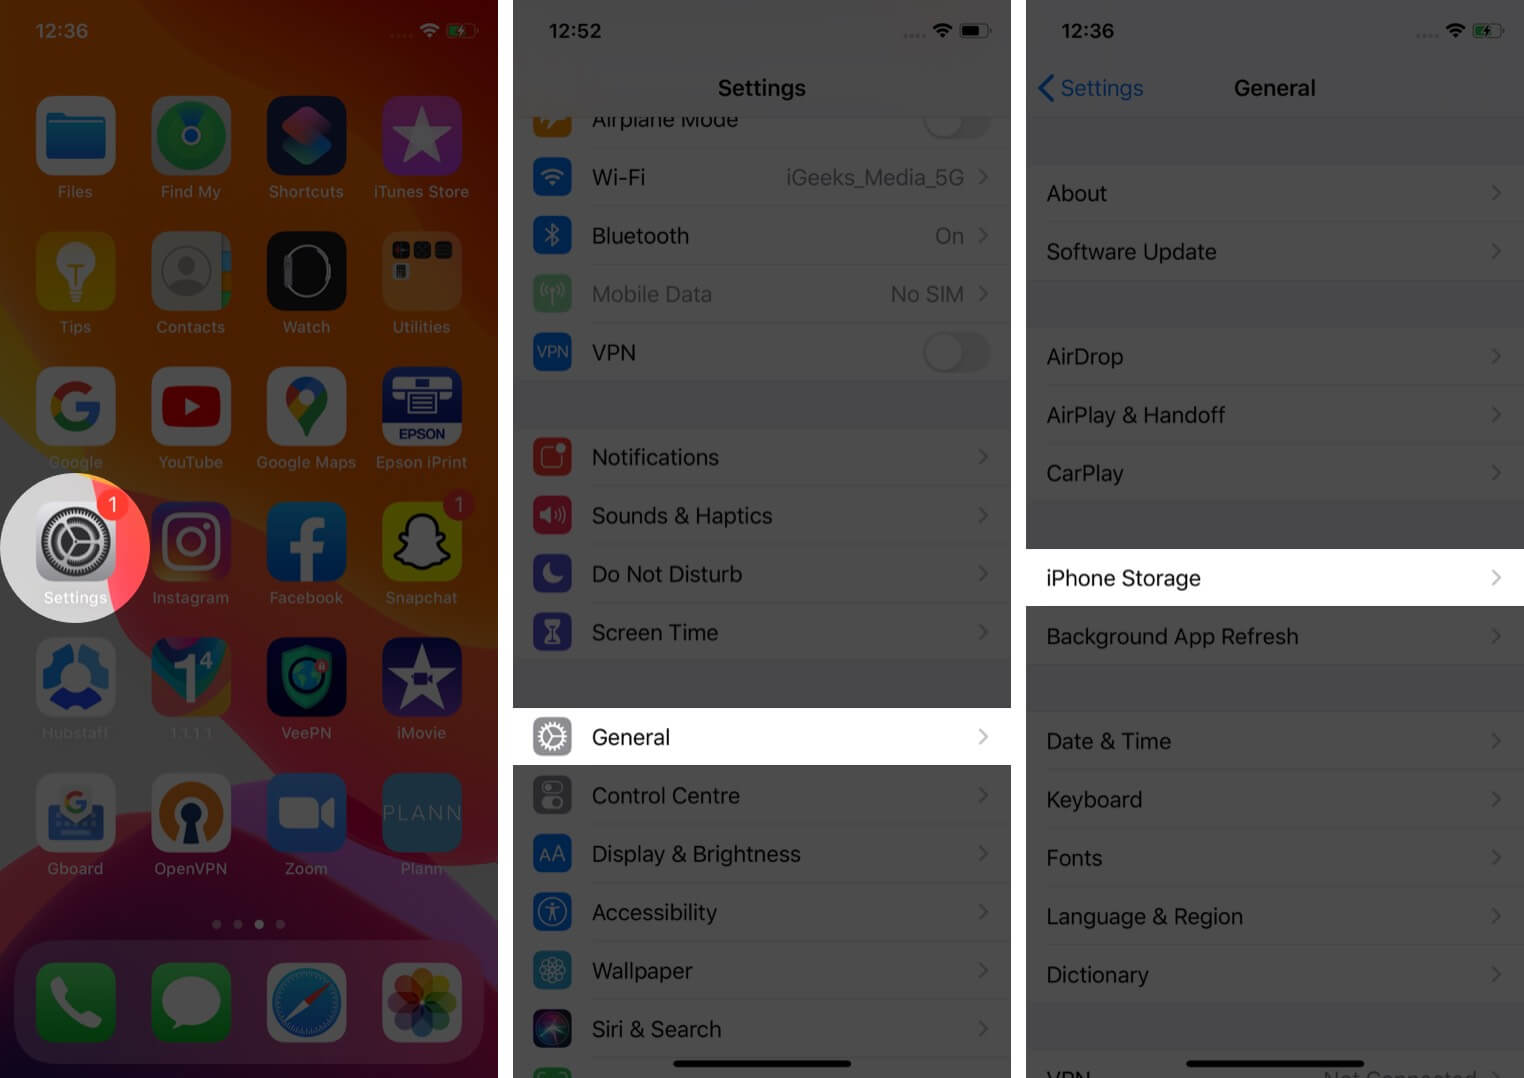
- Here you’ll see an indicator at the top of the screen that shows how much space is left on your device.
If you’re running low, you can try these tips to free up space on your iPhone and iPad.
6. Reset All Settings on iPhone
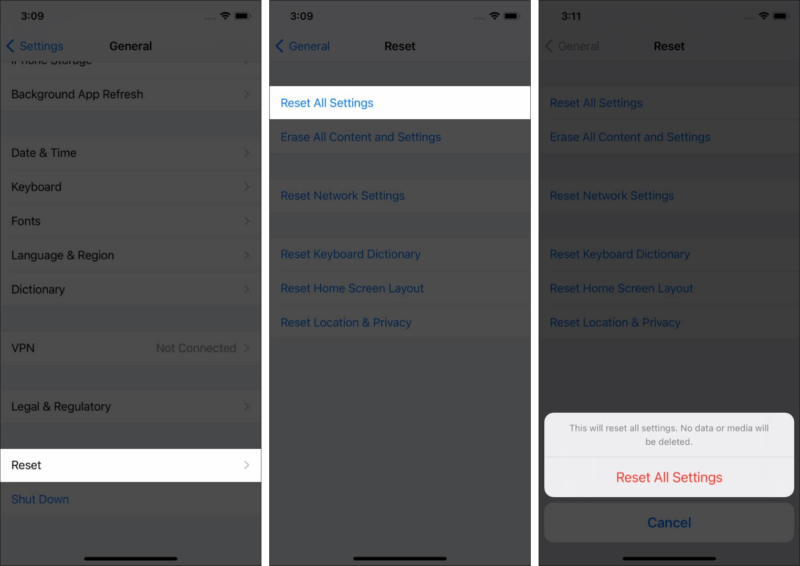
If you’ve tried all of the above solutions and still Screen Recording is not working on iOS 15, you should Reset All Settings on your iPhone or iPad. This will smooth over any settings that are preventing screen recordings.
Going through with this step won’t affect your files or media, but it will reset the layout of your Home screen, location settings, network settings, privacy settings, the keyboard dictionary, and your Apple Pay cards to the default options.
Go to Settings → General → Reset → Reset All Settings.
7. Restore your iPhone/iPad
If you’re still not having any luck, you can try restoring your device from an iCloud backup or from your computer. However, take note that this step will erase all of the data on your device. Check out this complete guide for more information about this.
If your problem is that there’s no sound in the screen recording, we have a solution for that as well.
8. Fix a Screen Recording with no sound
Audio only gets saved when the microphone is turned on. So, long-press the Control Center icon and tap the Microphone icon. It’ll indicate that it’s active by turning red in color.
Do you see an error message that says Screen recording failed to save? This could be because Low Power Mode is enabled. This restricts certain functions to save on battery and might interfere with your screen recording saving properly.
9. Can’t save iPhone screen recordings?
Go to Settings → Battery and make sure Low Power Mode is toggled Off.
Signing Off…
We hope these tips helped you fix the problem of Screen Recording not working on your iPhone or iPad. Share your experience or questions below.
FAQ’s
If your phone seems to be getting too warm while screen recording, make sure you disable or close apps and processes you’re not using. For instance, turn off Bluetooth and GPS, close any games or intensive apps, and avoid charging your phone while screen recording.
If your screen recording video is too long or the file is too large, you might face problems uploading to YouTube. Try cutting or compressing the video first, then uploading to YouTube.
Usually, Screen Recording doesn’t make your iPhone crash, but it can happen if an app is malfunctioning. So try closing down the problem app and see if it fixes the problem.
You may want to take a peek at:

