- The Requirements: To use a mouse with your iPad, you need a compatible Bluetooth or wired mouse and your device must be running iPadOS 13.4 or newer.
- Connecting Bluetooth: To connect a Bluetooth mouse, enable Bluetooth on your iPad, put the mouse in pairing mode, and then select it from the list in your settings.
- Connecting Wired: For a wired mouse, plug it into your iPad’s port. You may need a USB-C or Lightning to USB adapter if the connectors do not match.
- Customizing Your Mouse: After connecting, you can customize pointer speed, appearance, and button actions by going to Settings > Accessibility > Touch > AssistiveTouch.
- The Main Benefit: Using a mouse transforms your iPad into a powerful productivity tool, making tasks like editing documents, navigating spreadsheets, and multitasking much faster.
I have been using the iPad extensively for the past few days and was really missing the trackpad that I was so used to on my MacBook. Then I connected a mouse to the iPad, which significantly changed the game for me; I can now do almost everything that I could on my Mac and as swiftly. Let me take you through how I did that and how you can, too, use a mouse on your iPad.
What you need to use a mouse with iPad?
Connecting a mouse or an external trackpad/touchpad to your iPad requires some pre-requisites. Here they are:
- Your iPad should be running iPadOS 13.4 or later (It can be an iPad Pro, Air, Mini, or the regular iPad.)
- You should have a dedicated mouse. (It can be wired or Bluetooth.)
Check out our buying guide for the best Bluetooth mouse for iPad.
How to connect a mouse to your iPad
Follow the steps below to connect a mouse to your iPad. Note that I am using the Apple Magic Mouse 2nd Gen to demonstrate the process, but the same steps should work on any other mouse.
Connecting a Bluetooth mouse to an iPad
If you own a Bluetooth mouse, you can connect it to your iPad like this:
- Head to Settings → Bluetooth.
- Turn on Bluetooth and let it perform a scan.
- You will see the name of your mouse appear under the Other Devices section. Tap on it to connect.
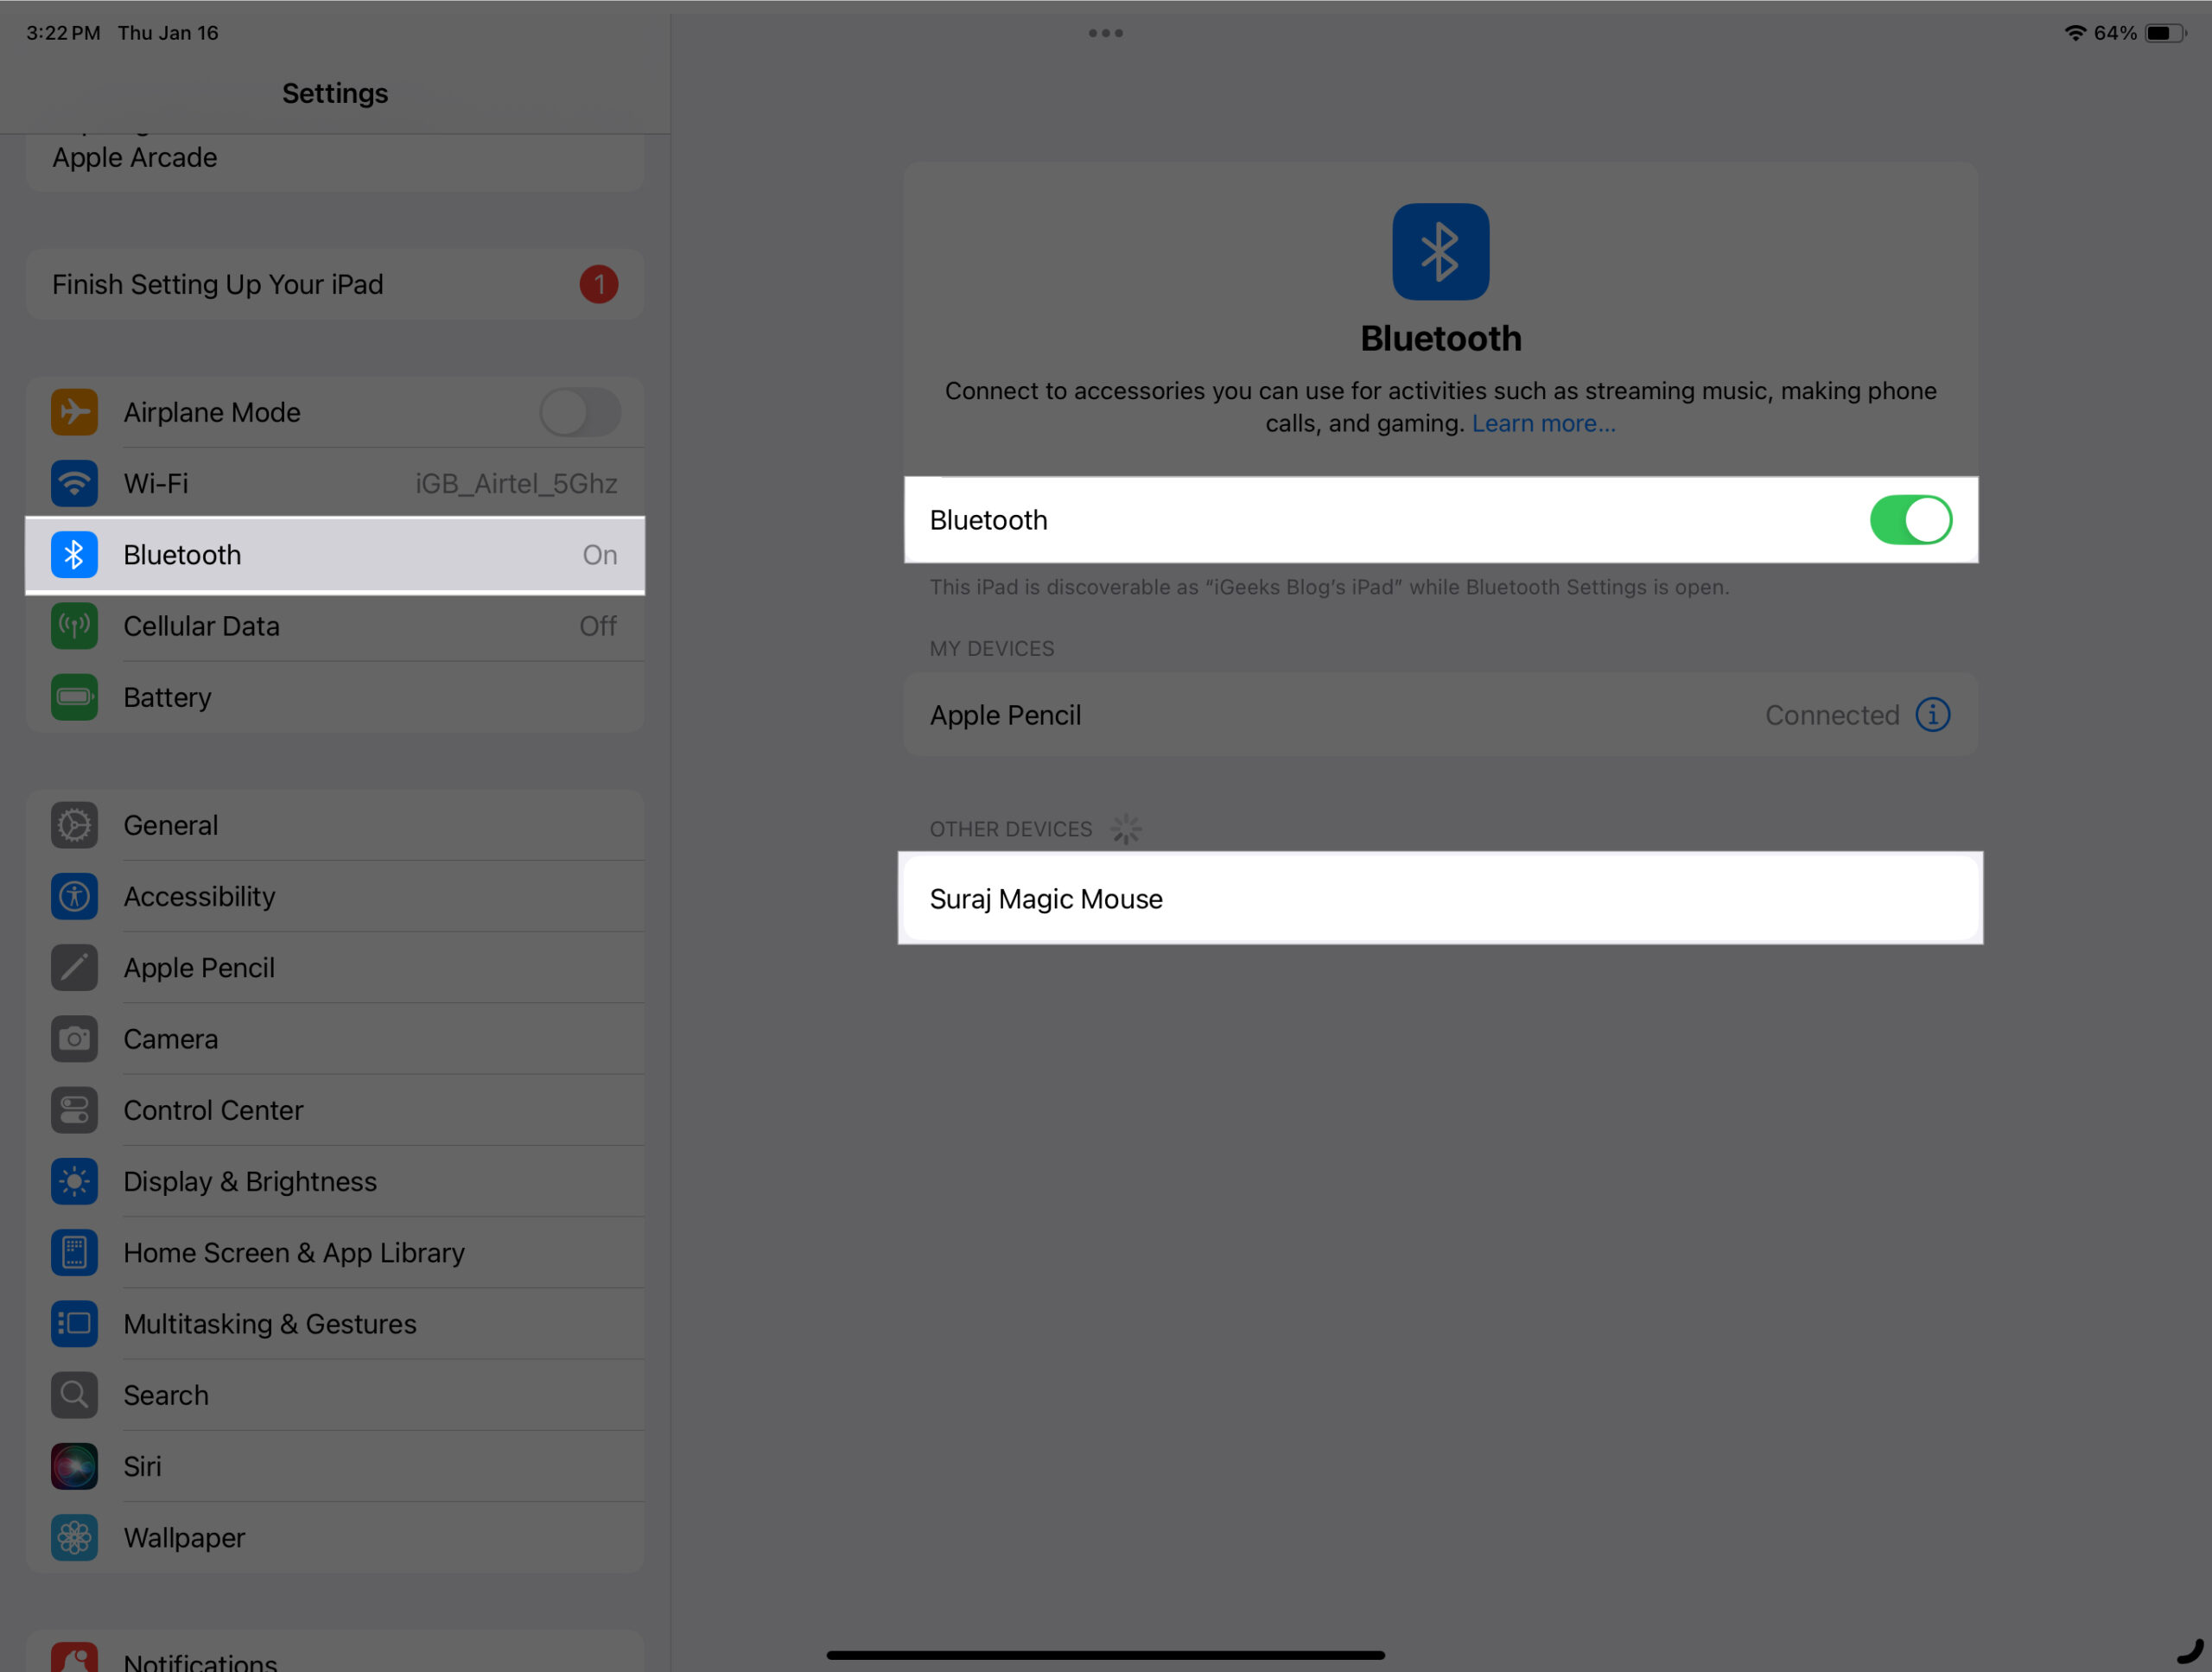
Once the connection is successful, your mouse will appear in the My Devices section.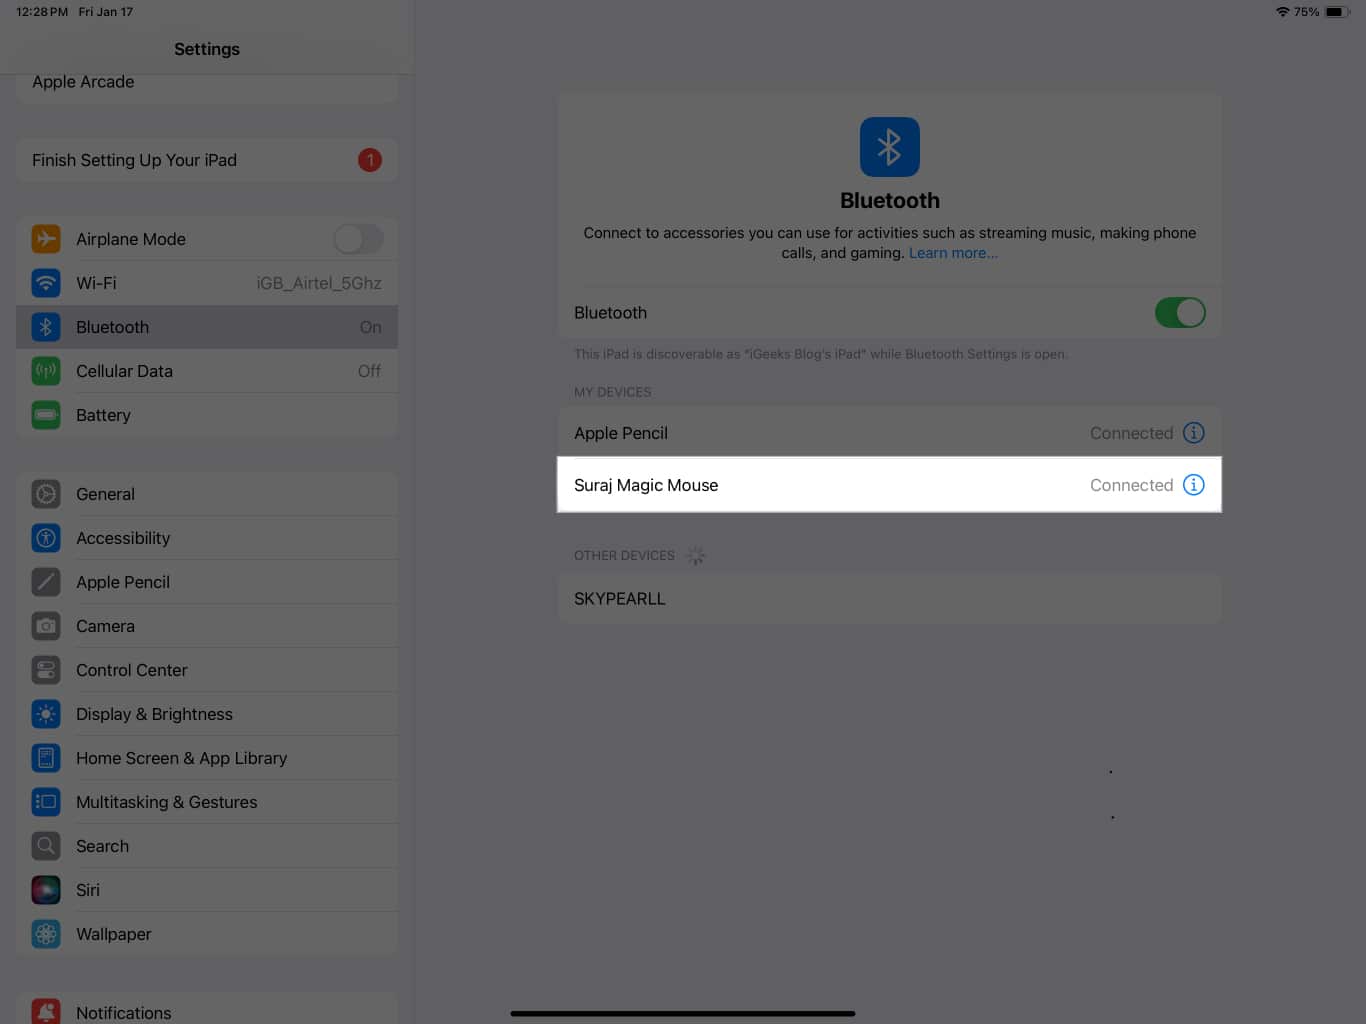
Connecting a wired mouse to an iPad
Firstly, check the port on your iPad and Mouse. If both of them match, for instance, your iPad and Mouse have USB C, you can just plug it in to connect. Otherwise, you will need a dongle to connect. Here are some dongles we recommend:
- IVSHOWCO Lightning to USB Adapter – If you have a Lightning iPad and a USB-A mouse
- Syntech’s USB-C to USB-A adapter – If you have a USB-C iPad and a USB-A mouse
Choose the one based on the port on your devices.
Configuring mouse settings on iPad
Now that you have successfully connected your mouse to your iPad, you will see a small round, grey-colored cursor on your screen. It is called the mouse pointer. But before you start enjoying the newly obtained mouse energy on your iPad, you should know about the following settings to fully utilize the mouse’s capabilities.
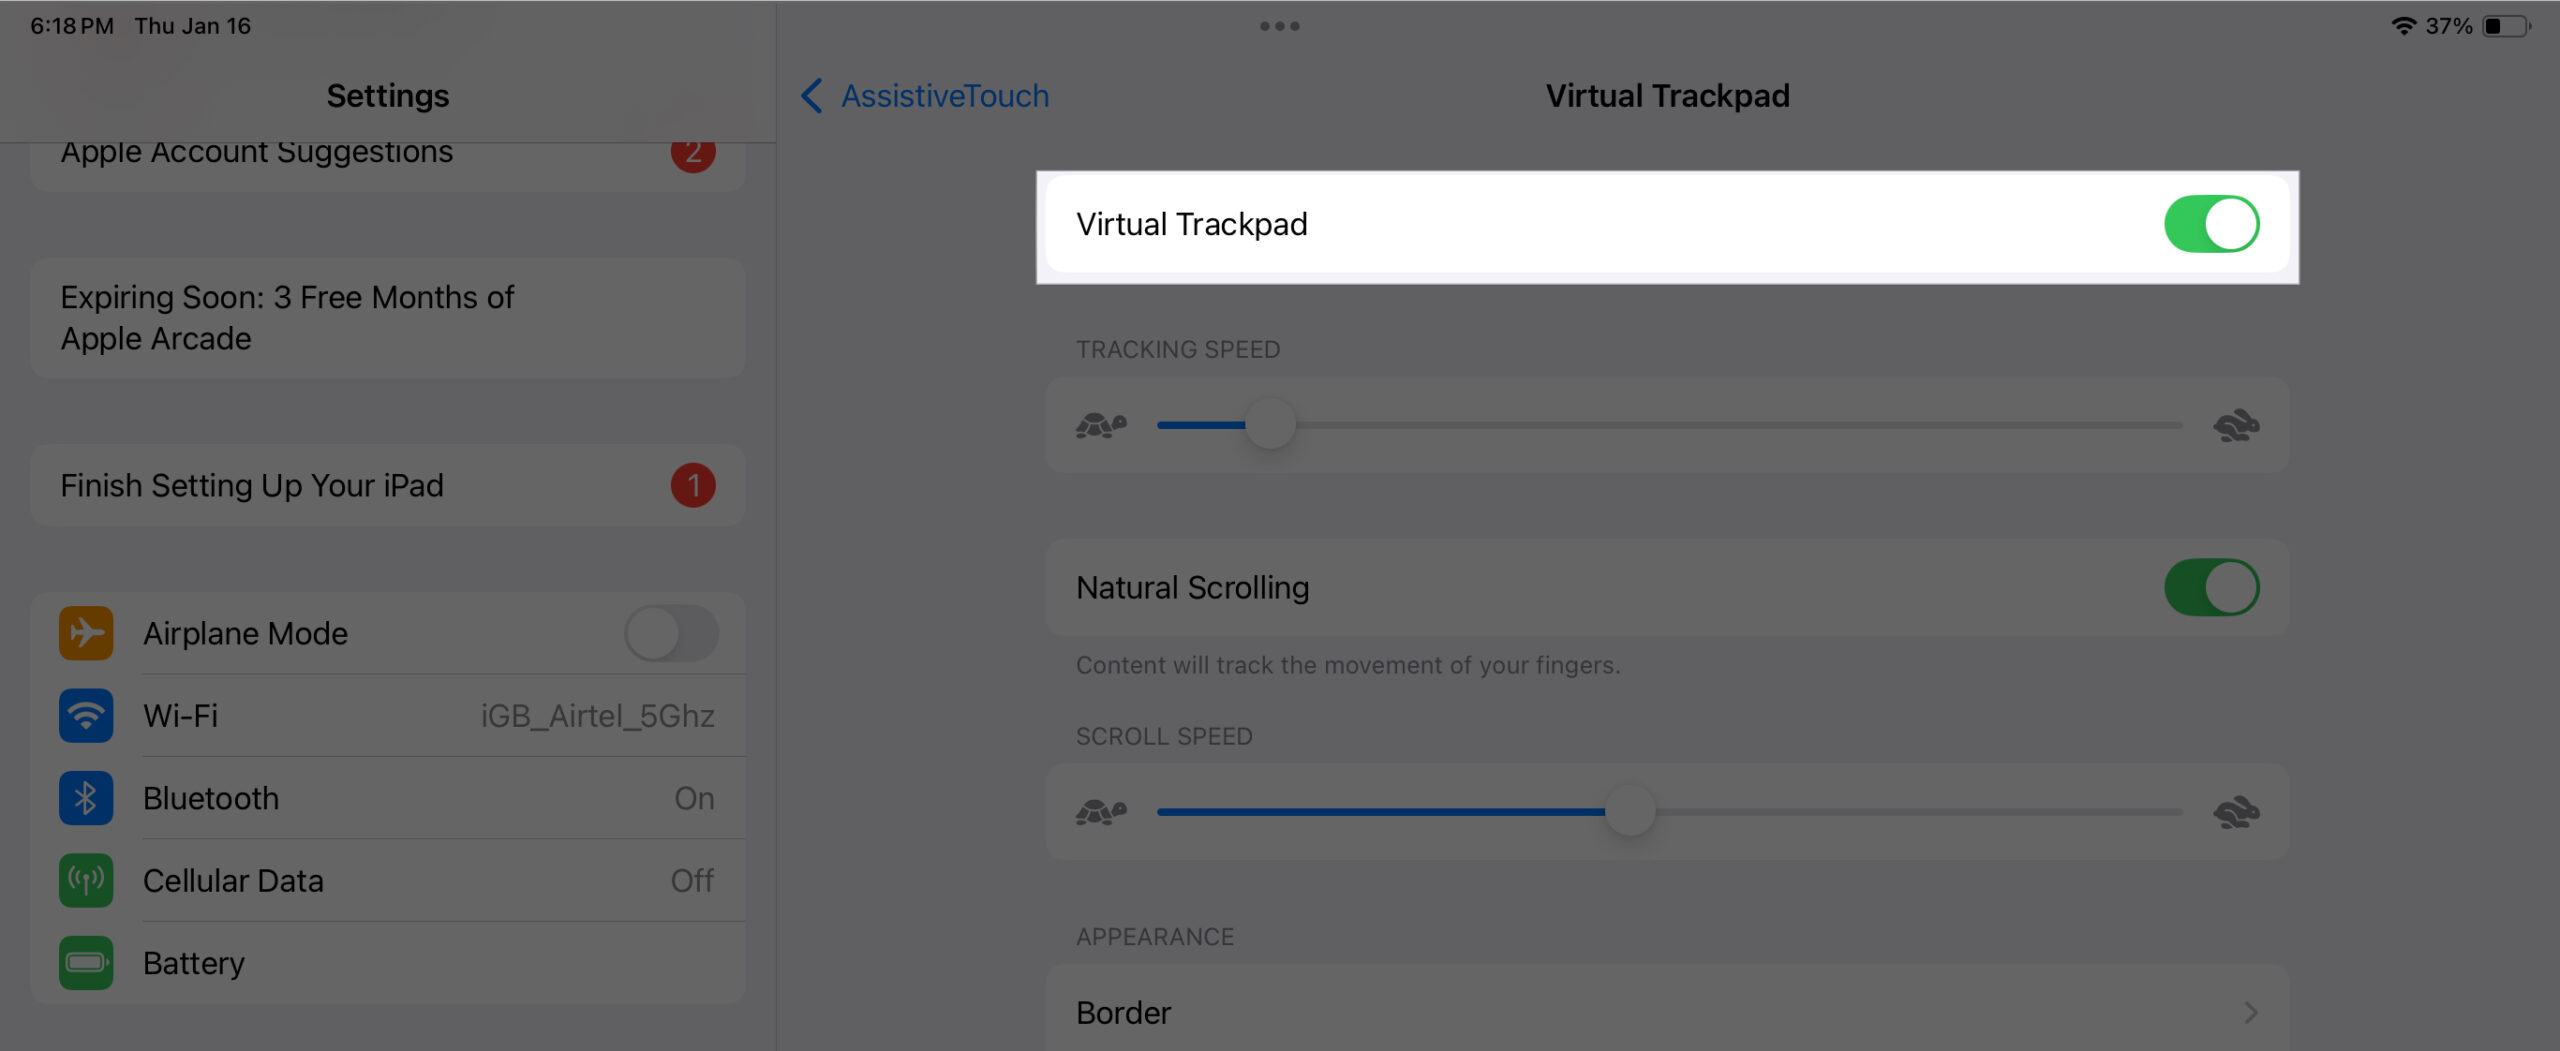
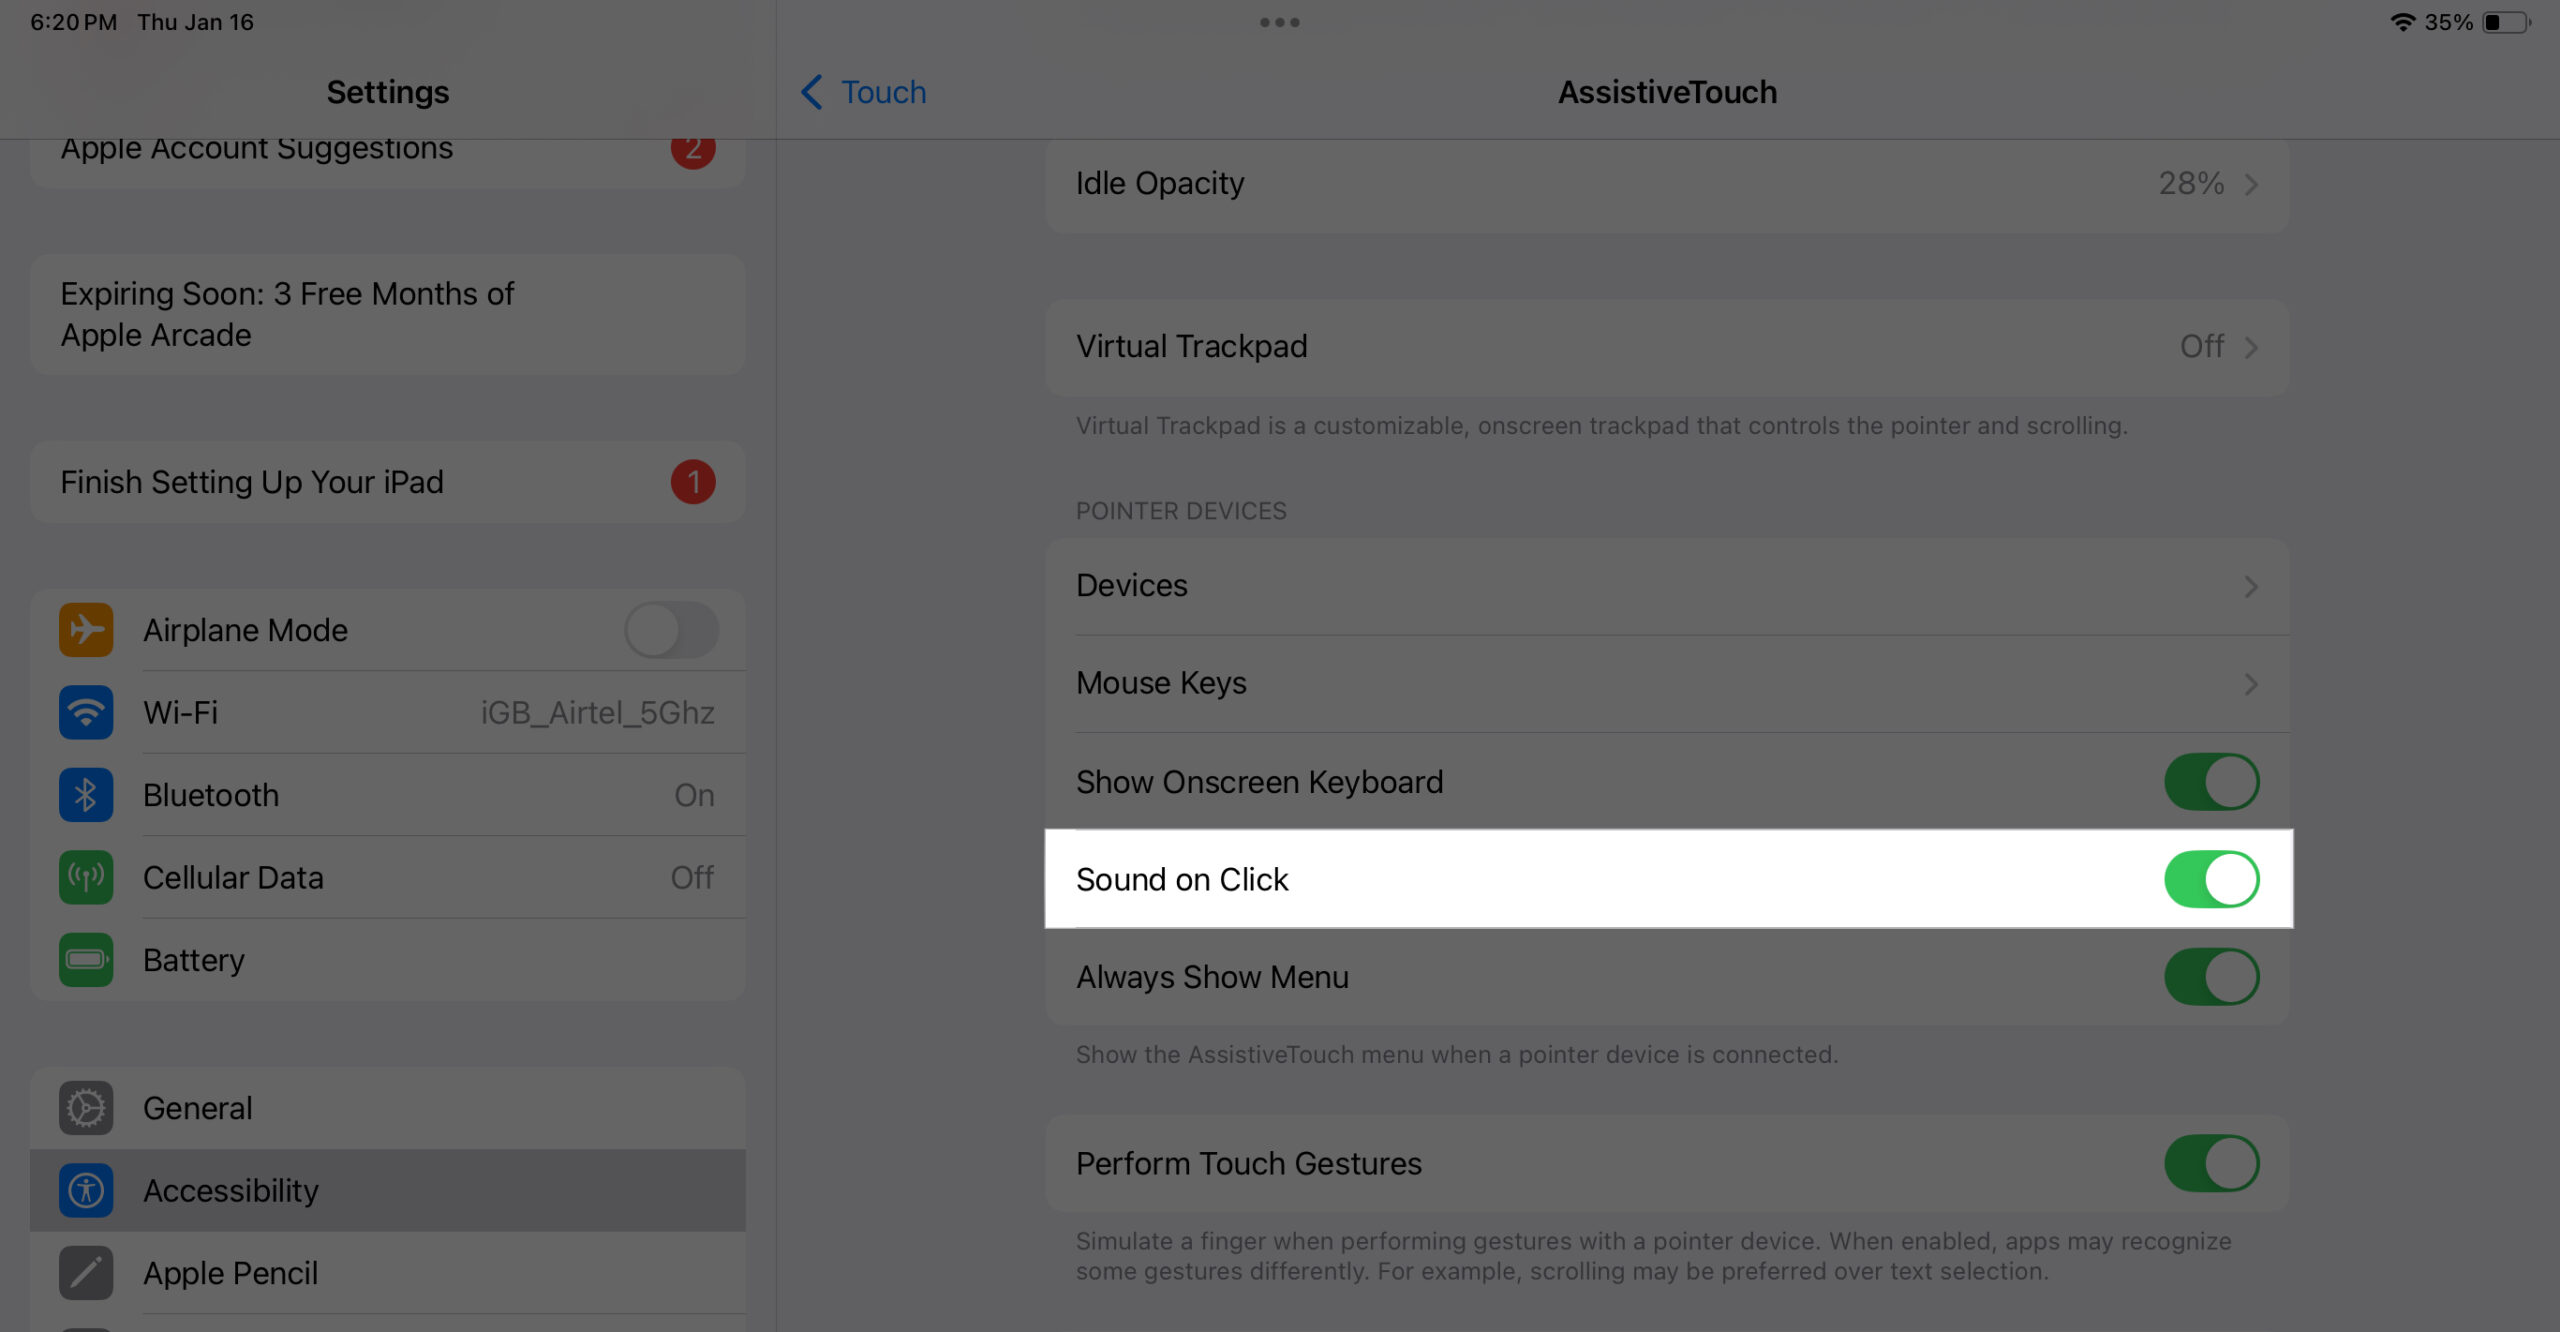
Enable AssistiveTouch
AssistiveTouch enhances the mouse experience on your iPad by allowing you to enable sound when pressing a pointer device. You also need to enable it to configure other options, which we will discuss below. Let’s see how to turn on AssistiveTouch.
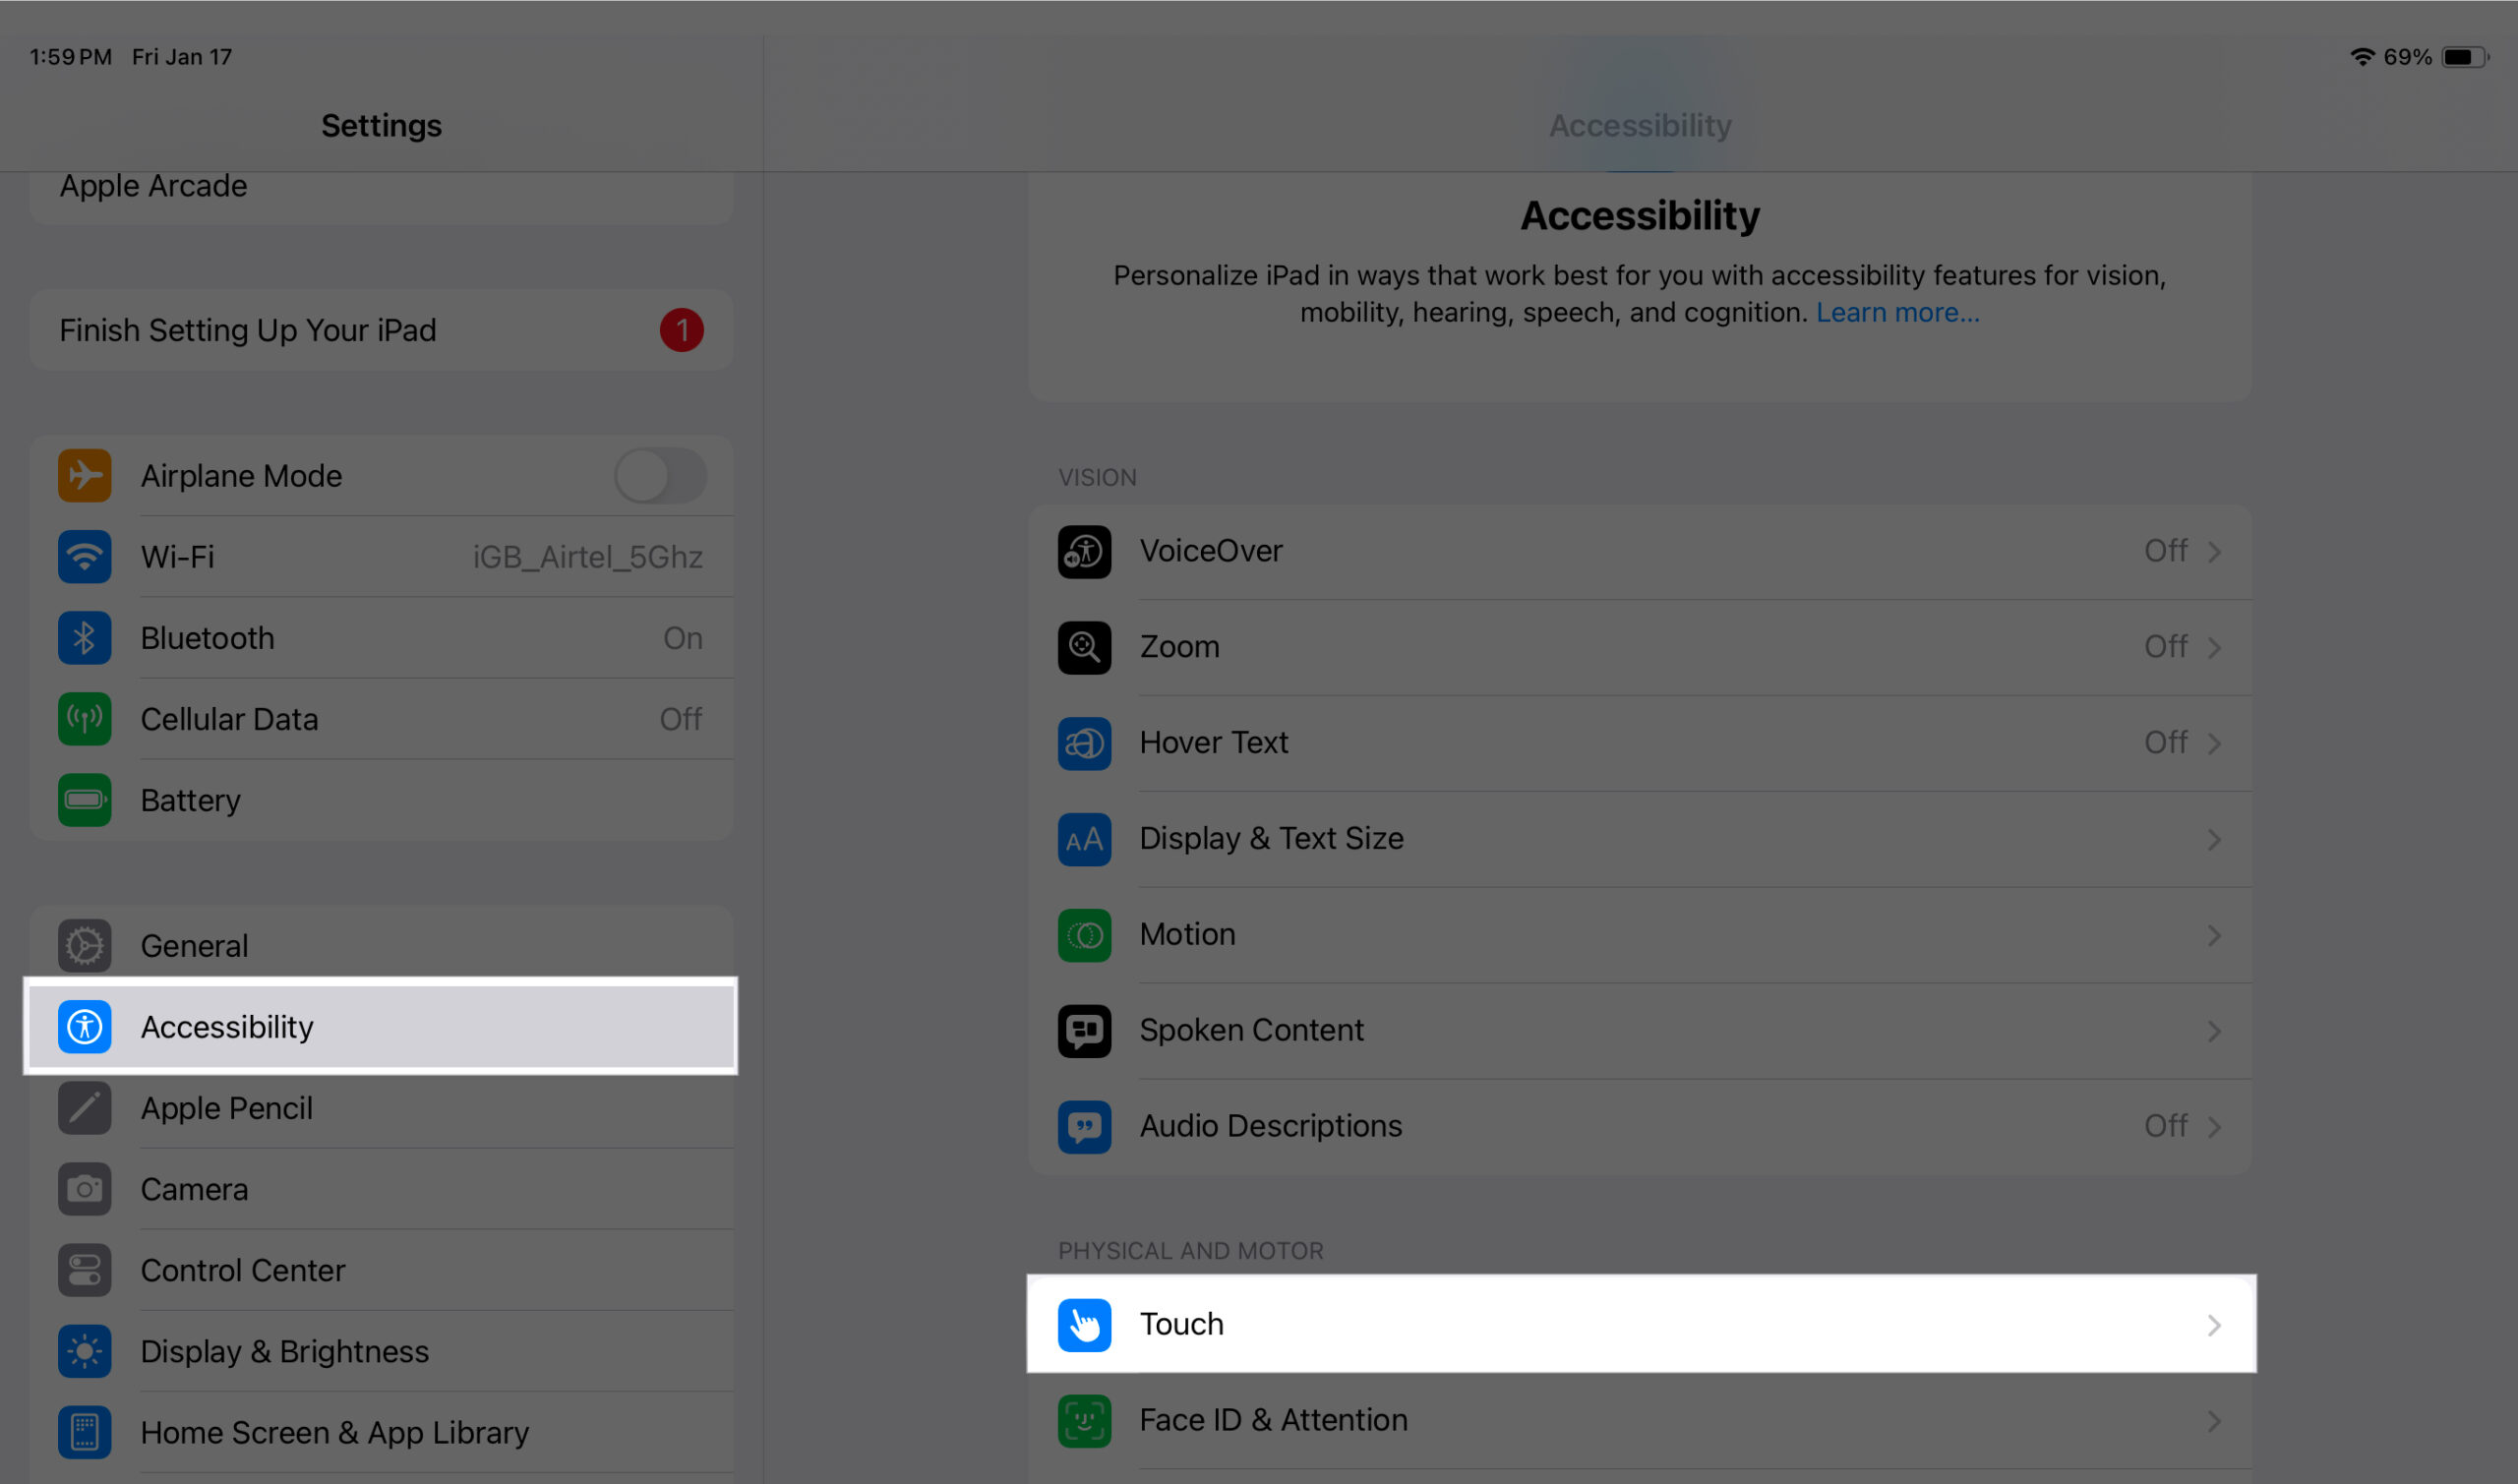
- Head to Settings → Accessibility.
- Turn on AssistiveTouch.
- [OPTIONAL] Scroll down, tap Virtual Trackpad and turn it on. You may find it useful when the mouse wheel is broken.
- Now, go back and find Sound on Click. Toggle it on to get a sound upon every mouse button click.


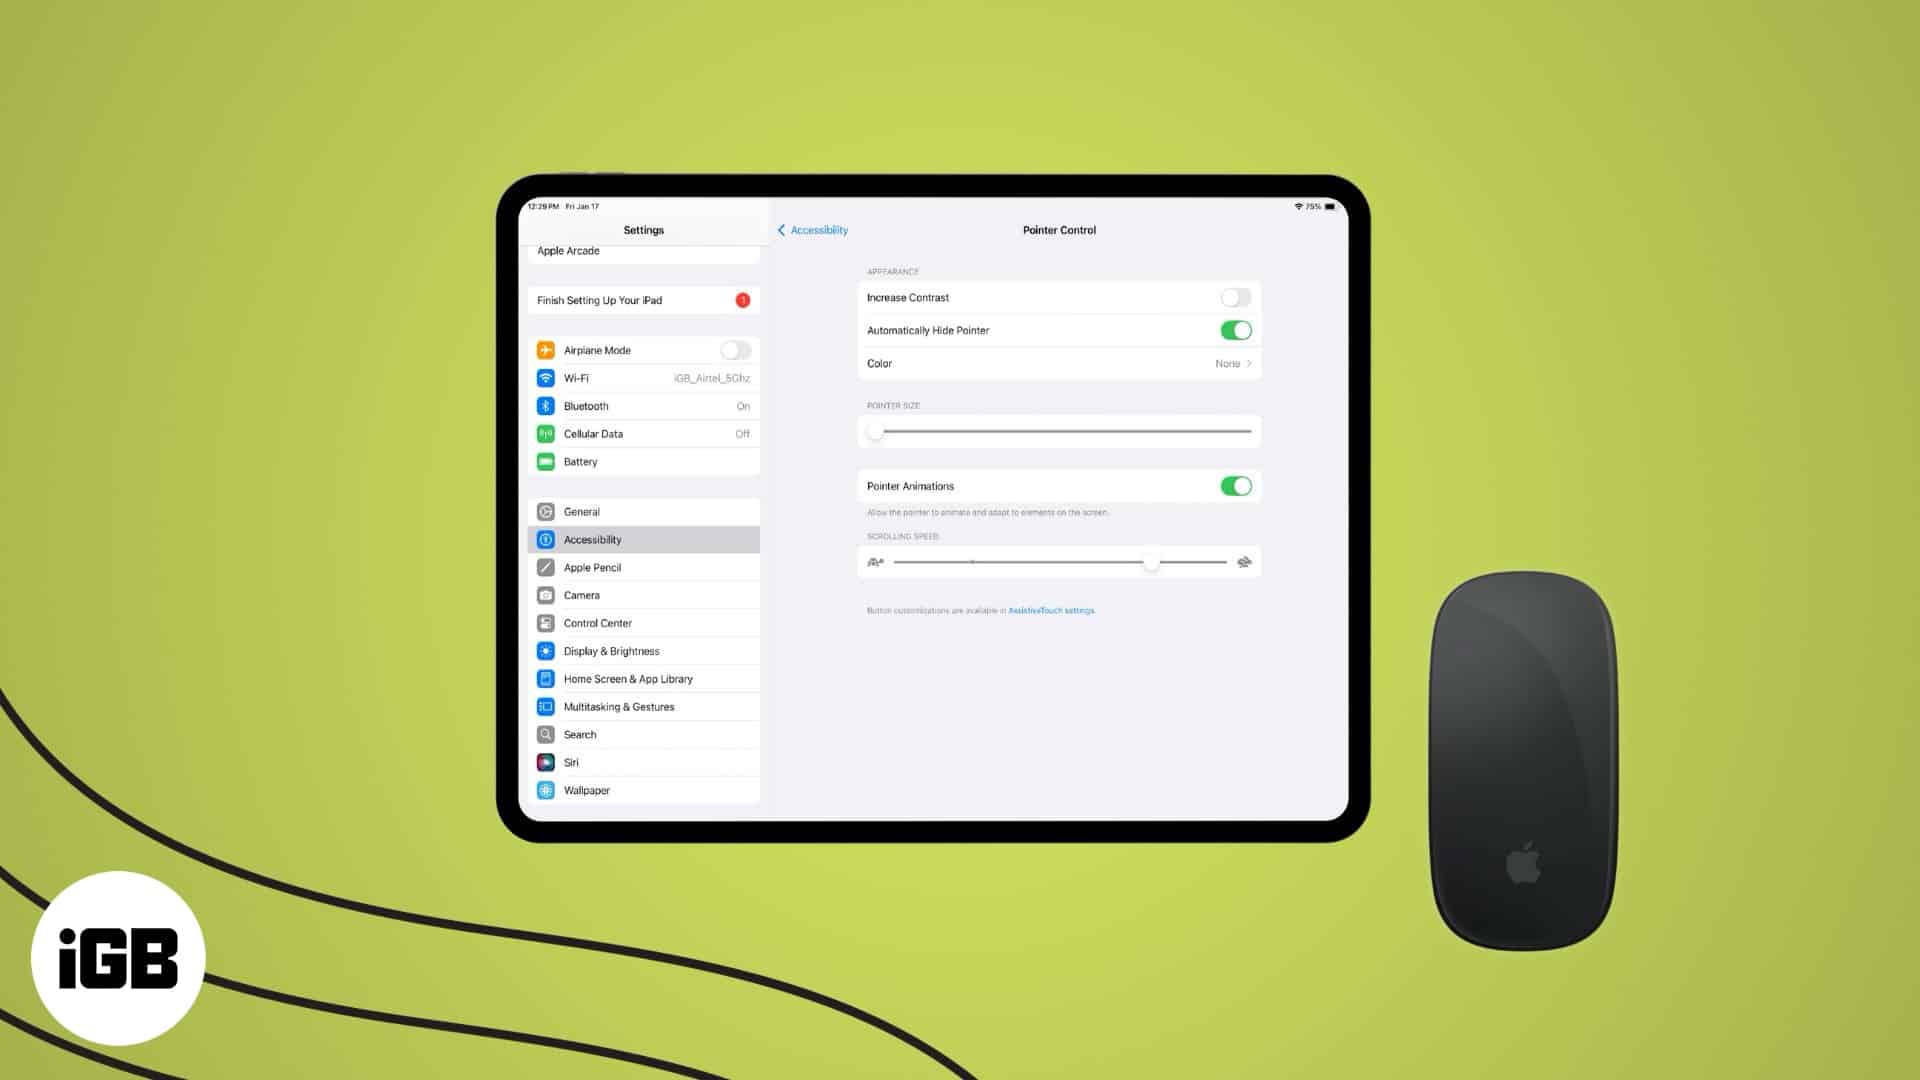
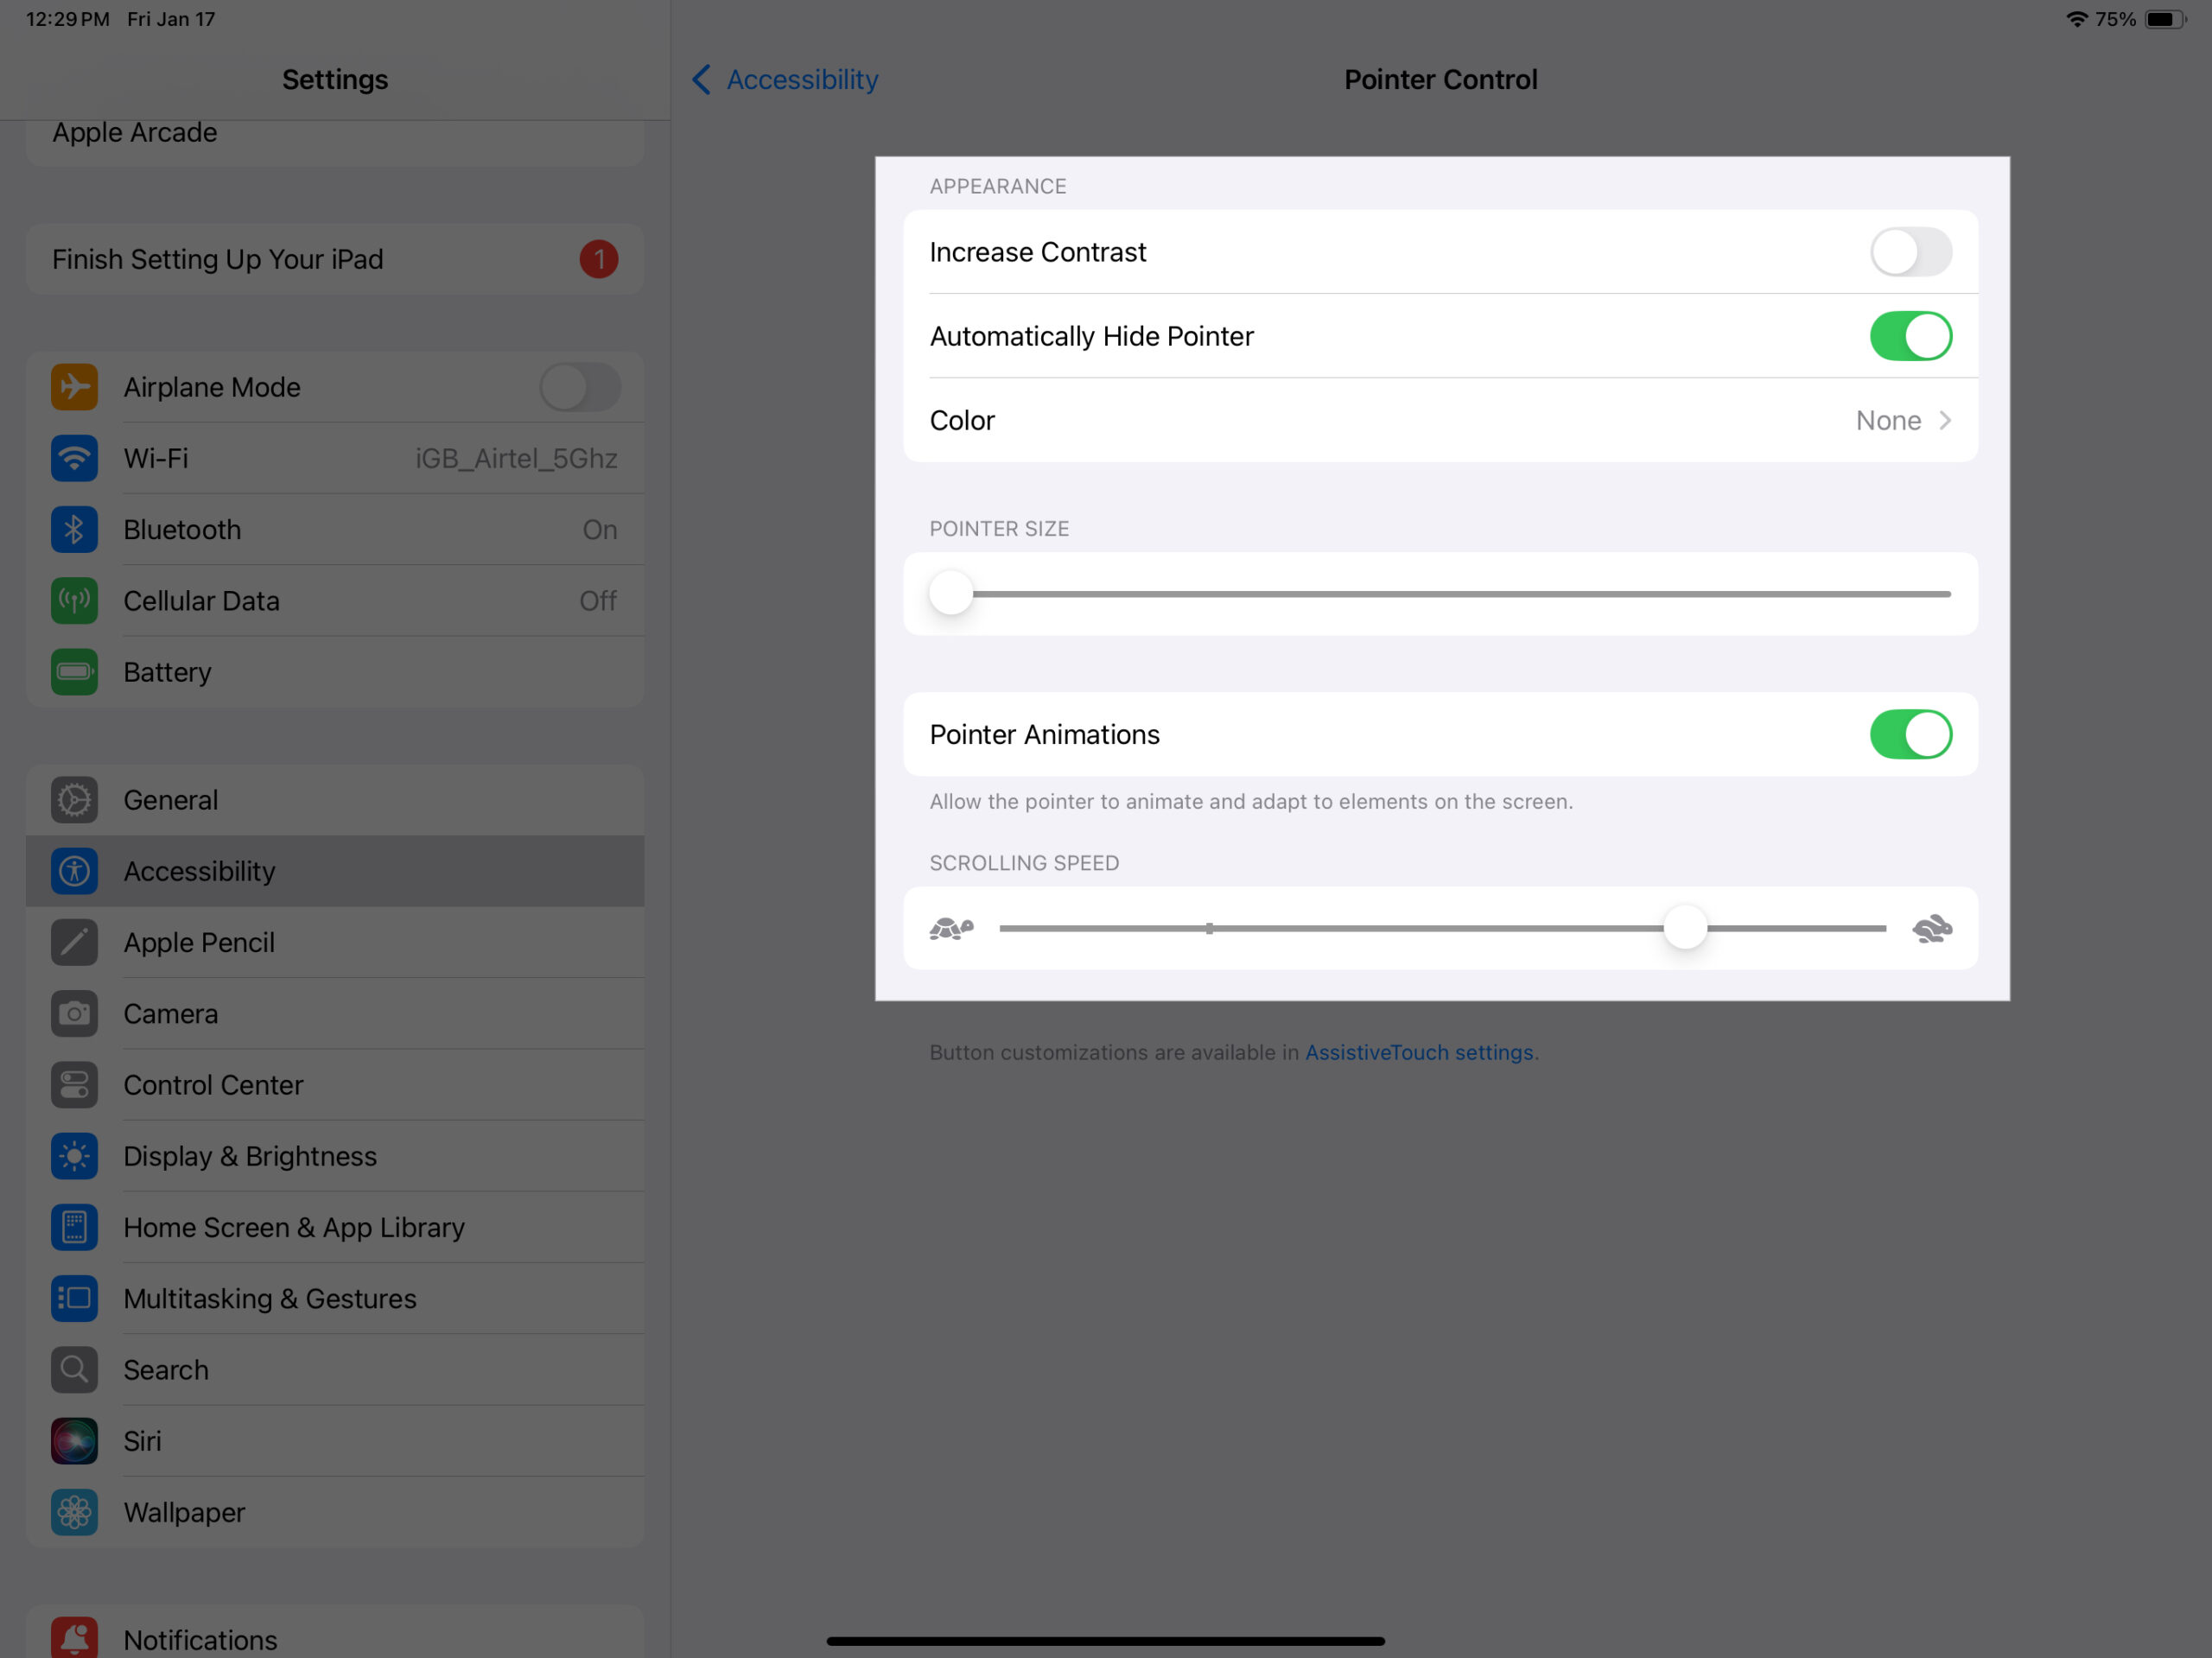
Customize pointer options
You can customize the mouse pointer to change its appearance, animations, and scrolling speed. Follow these steps:
- Open Settings and head to Accessibility.
- Scroll down and tap Pointer Control.
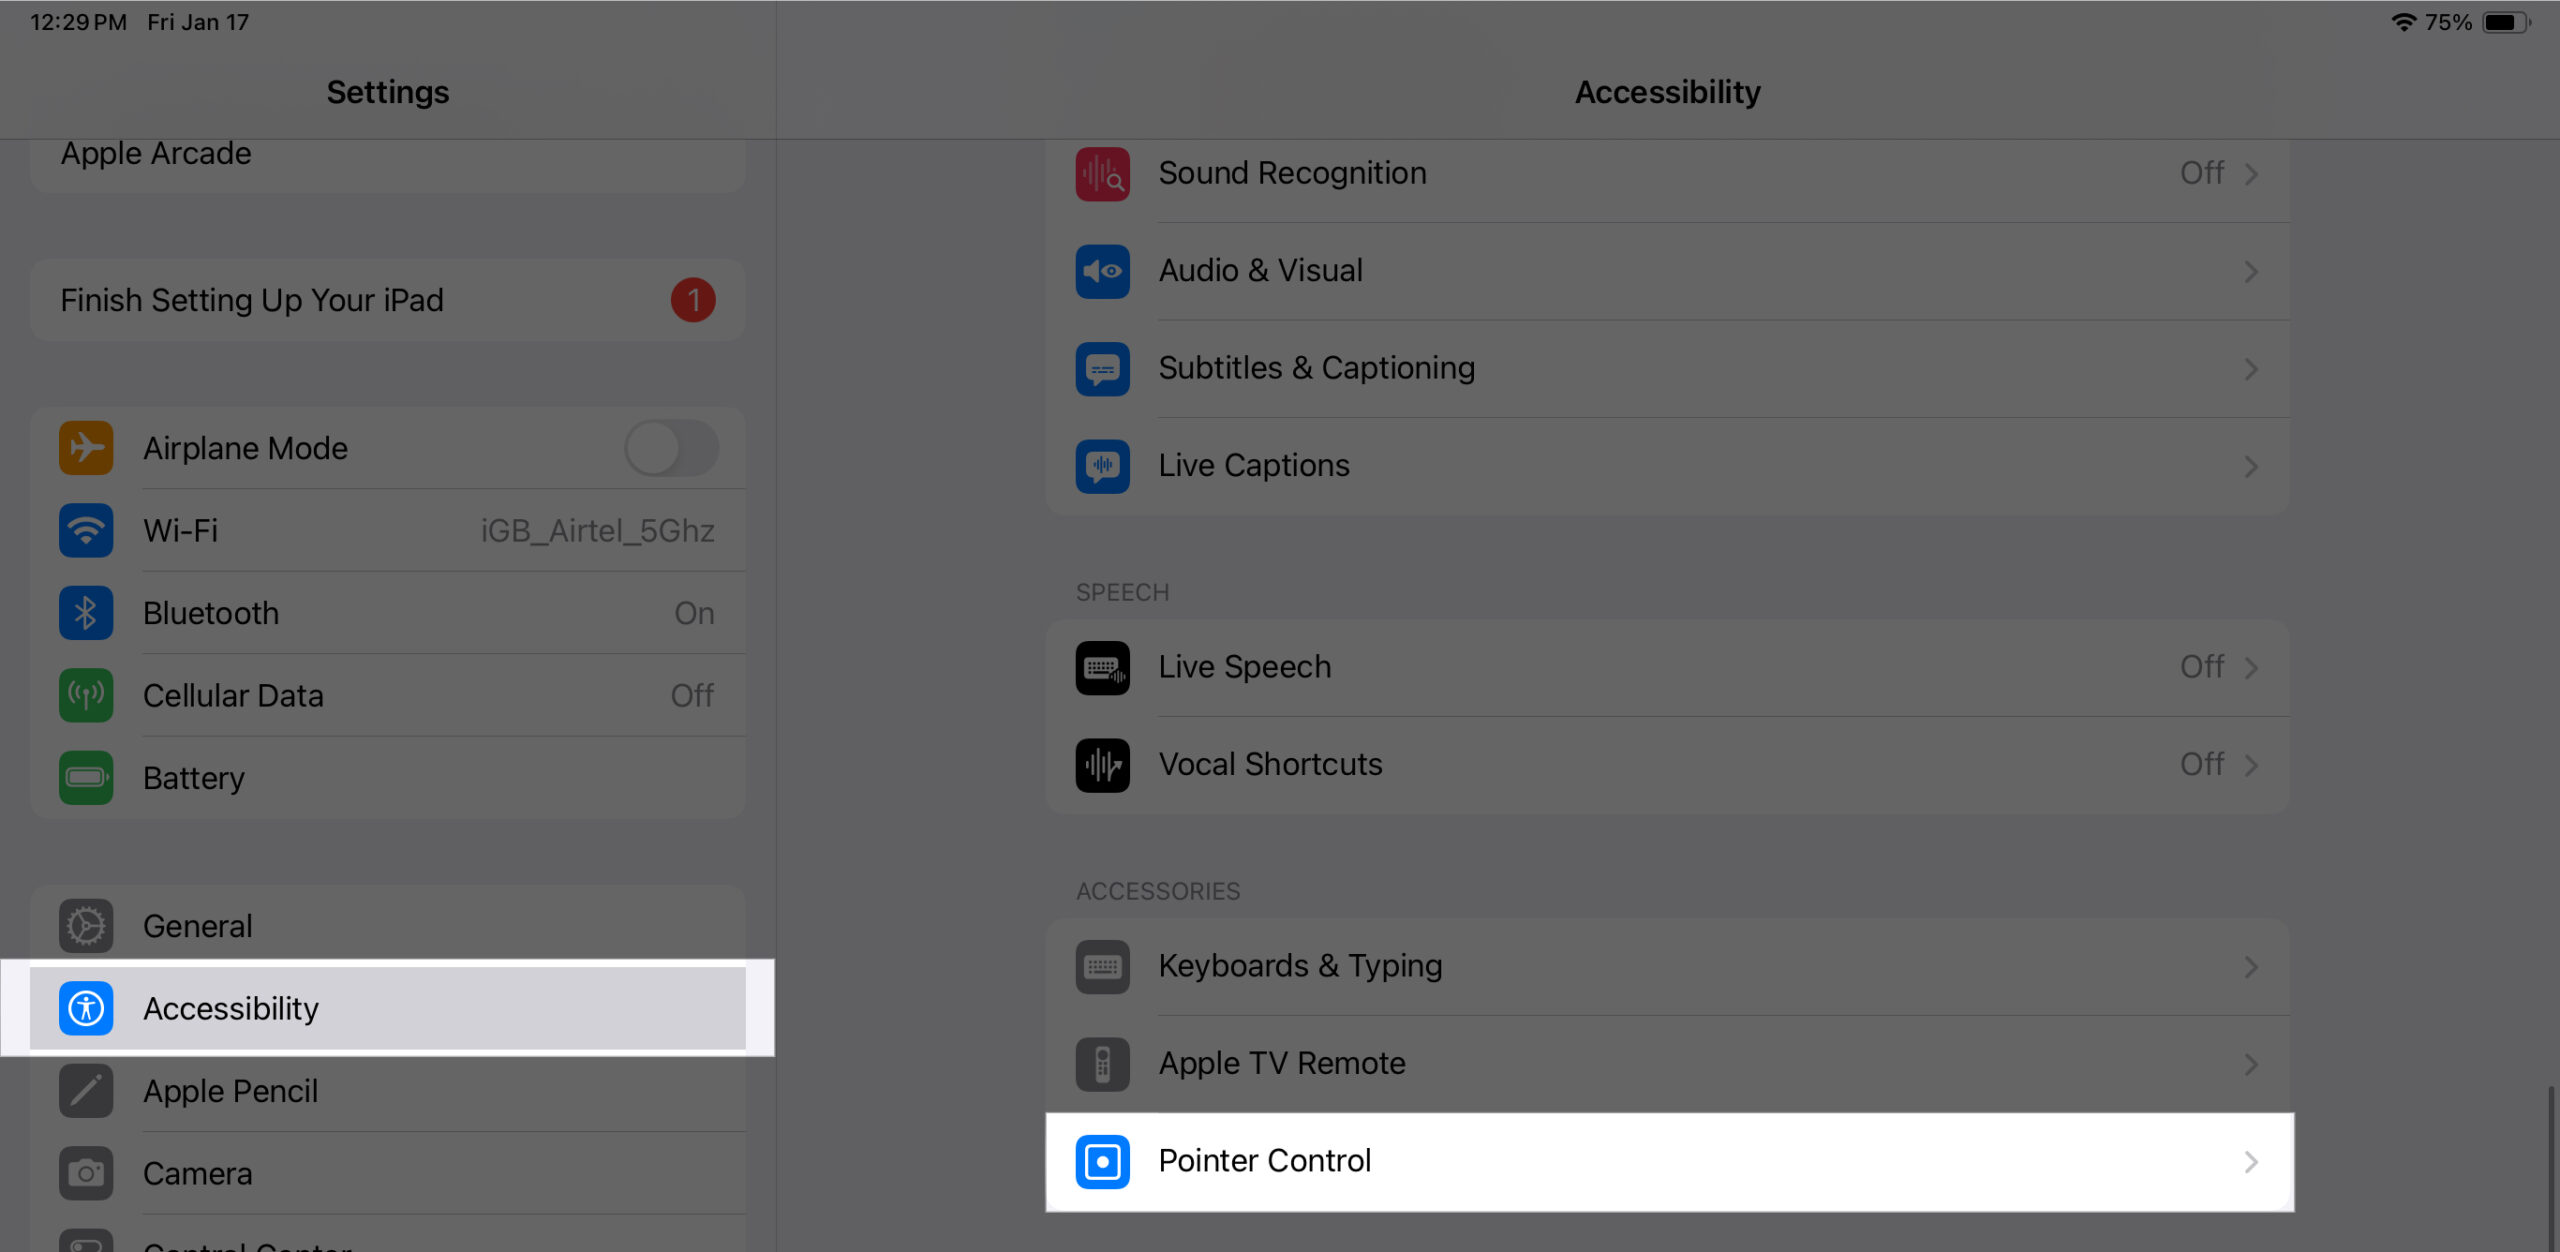
- Here, you will see several options to customize the appearance and behavior of pointer like Increase Contrast, Automatically Hide Pointer, Pointer Animations, Scrolling Speed, and more. Modify them as per your preference.


Assign custom actions to mouse buttons
You can also set specific actions for each mouse button. This becomes useful when you use a mouse with multiple buttons and want to assign different tasks to each one. Here’s how to set them:
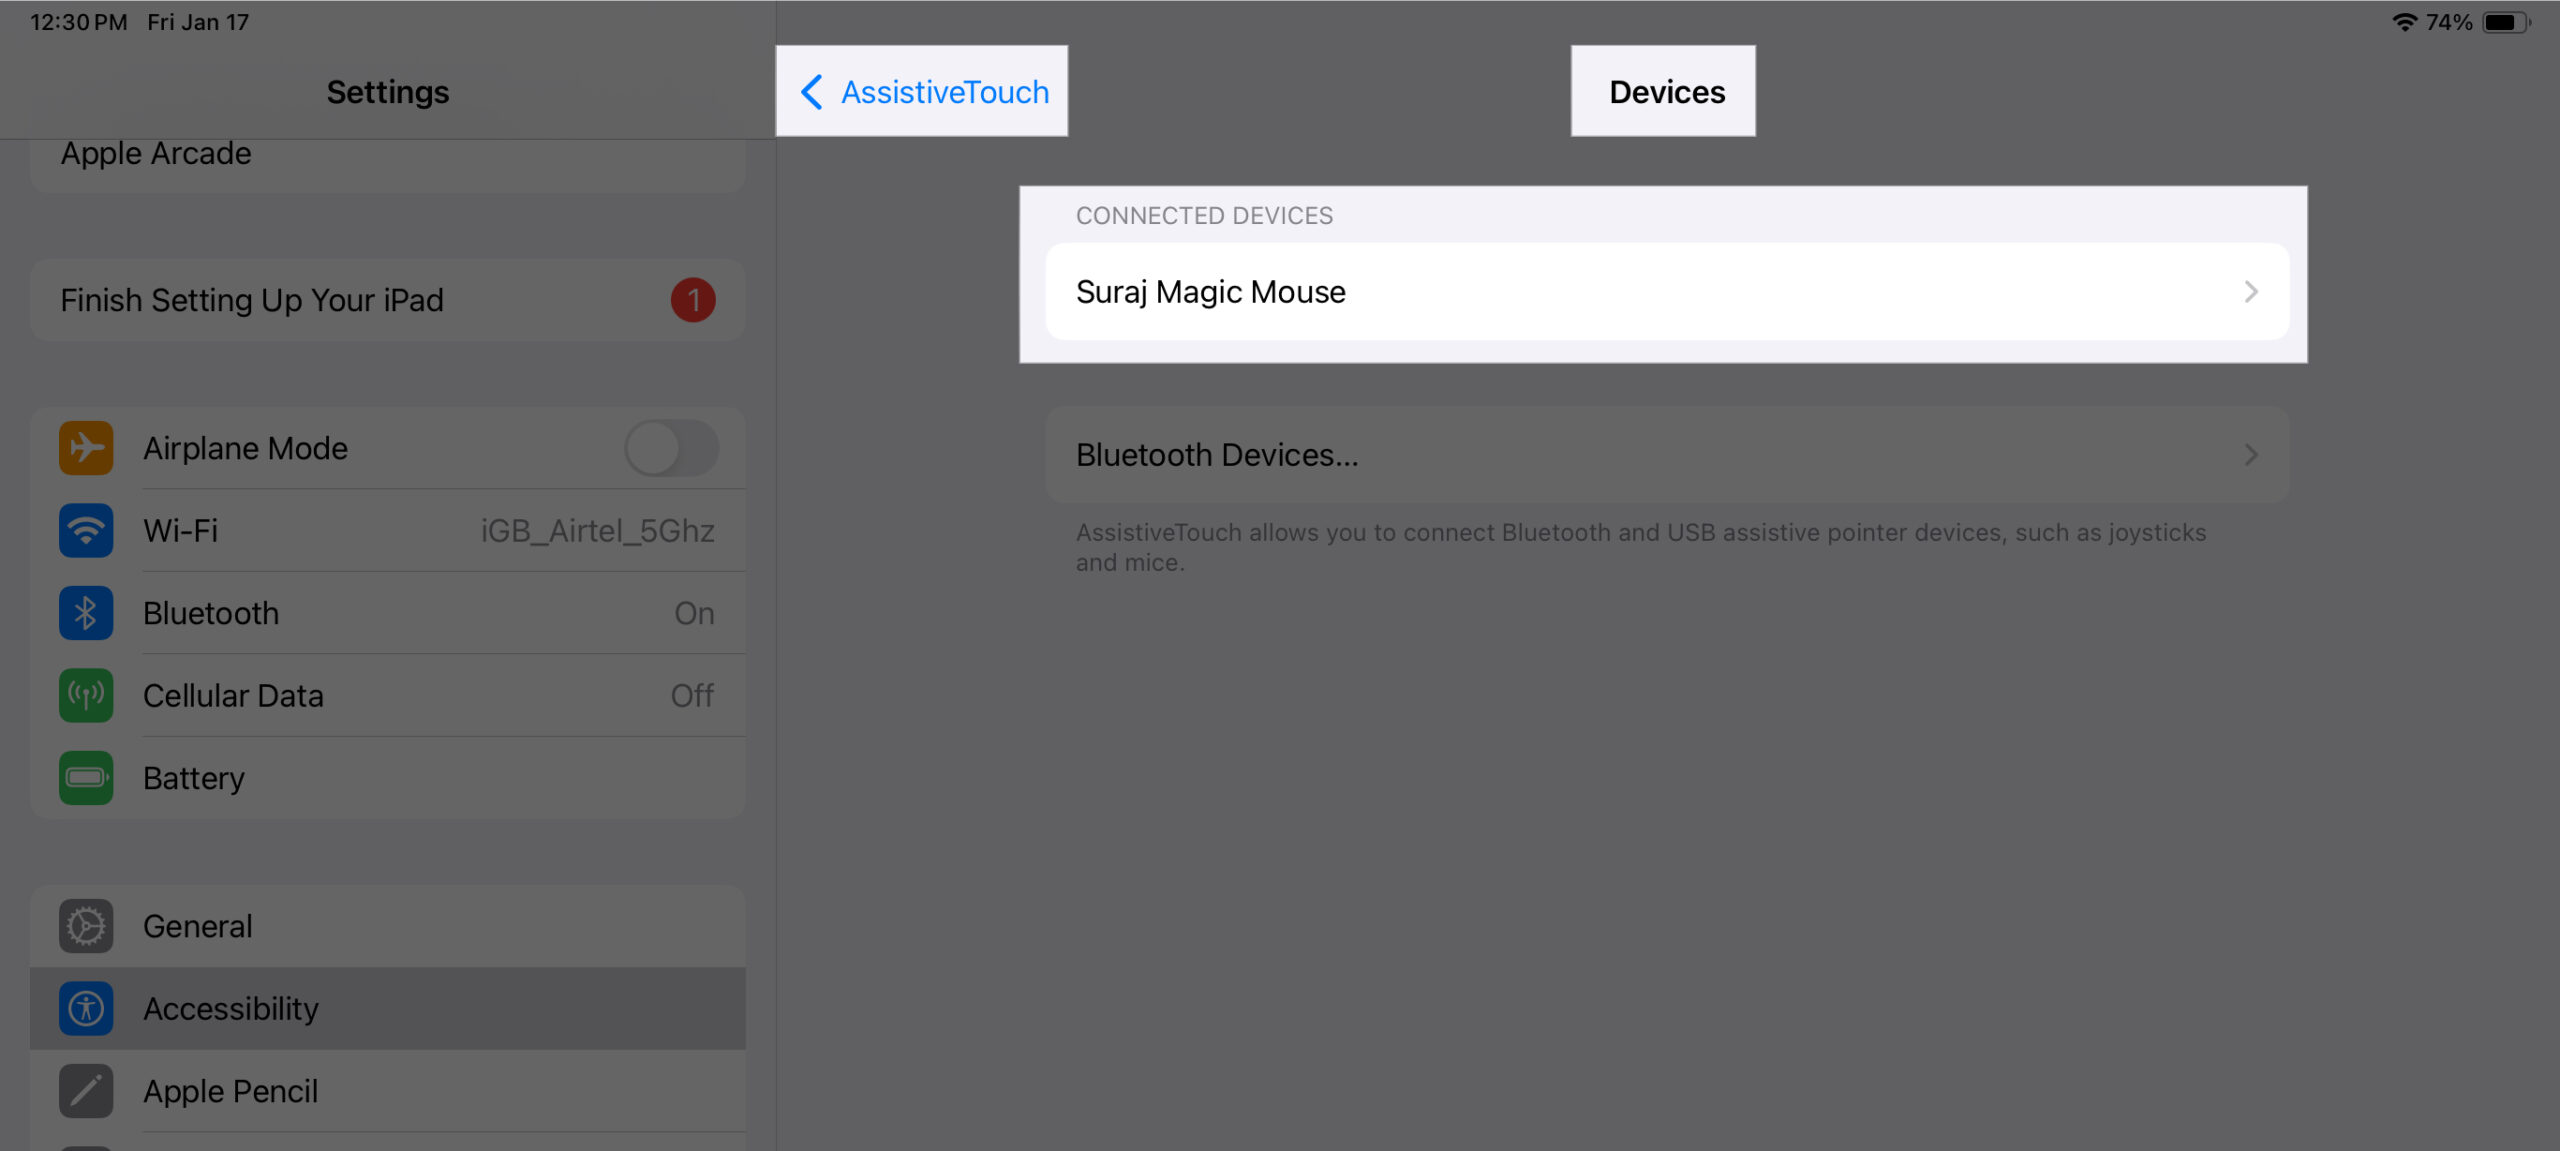
- Open Settings and head to Accessibility → Touch.
- Next, go to AssistiveTouch > Devices.
- Tap on the name of your connected mouse under the Connected Devices section.
- Tap Customize Additional Buttons.
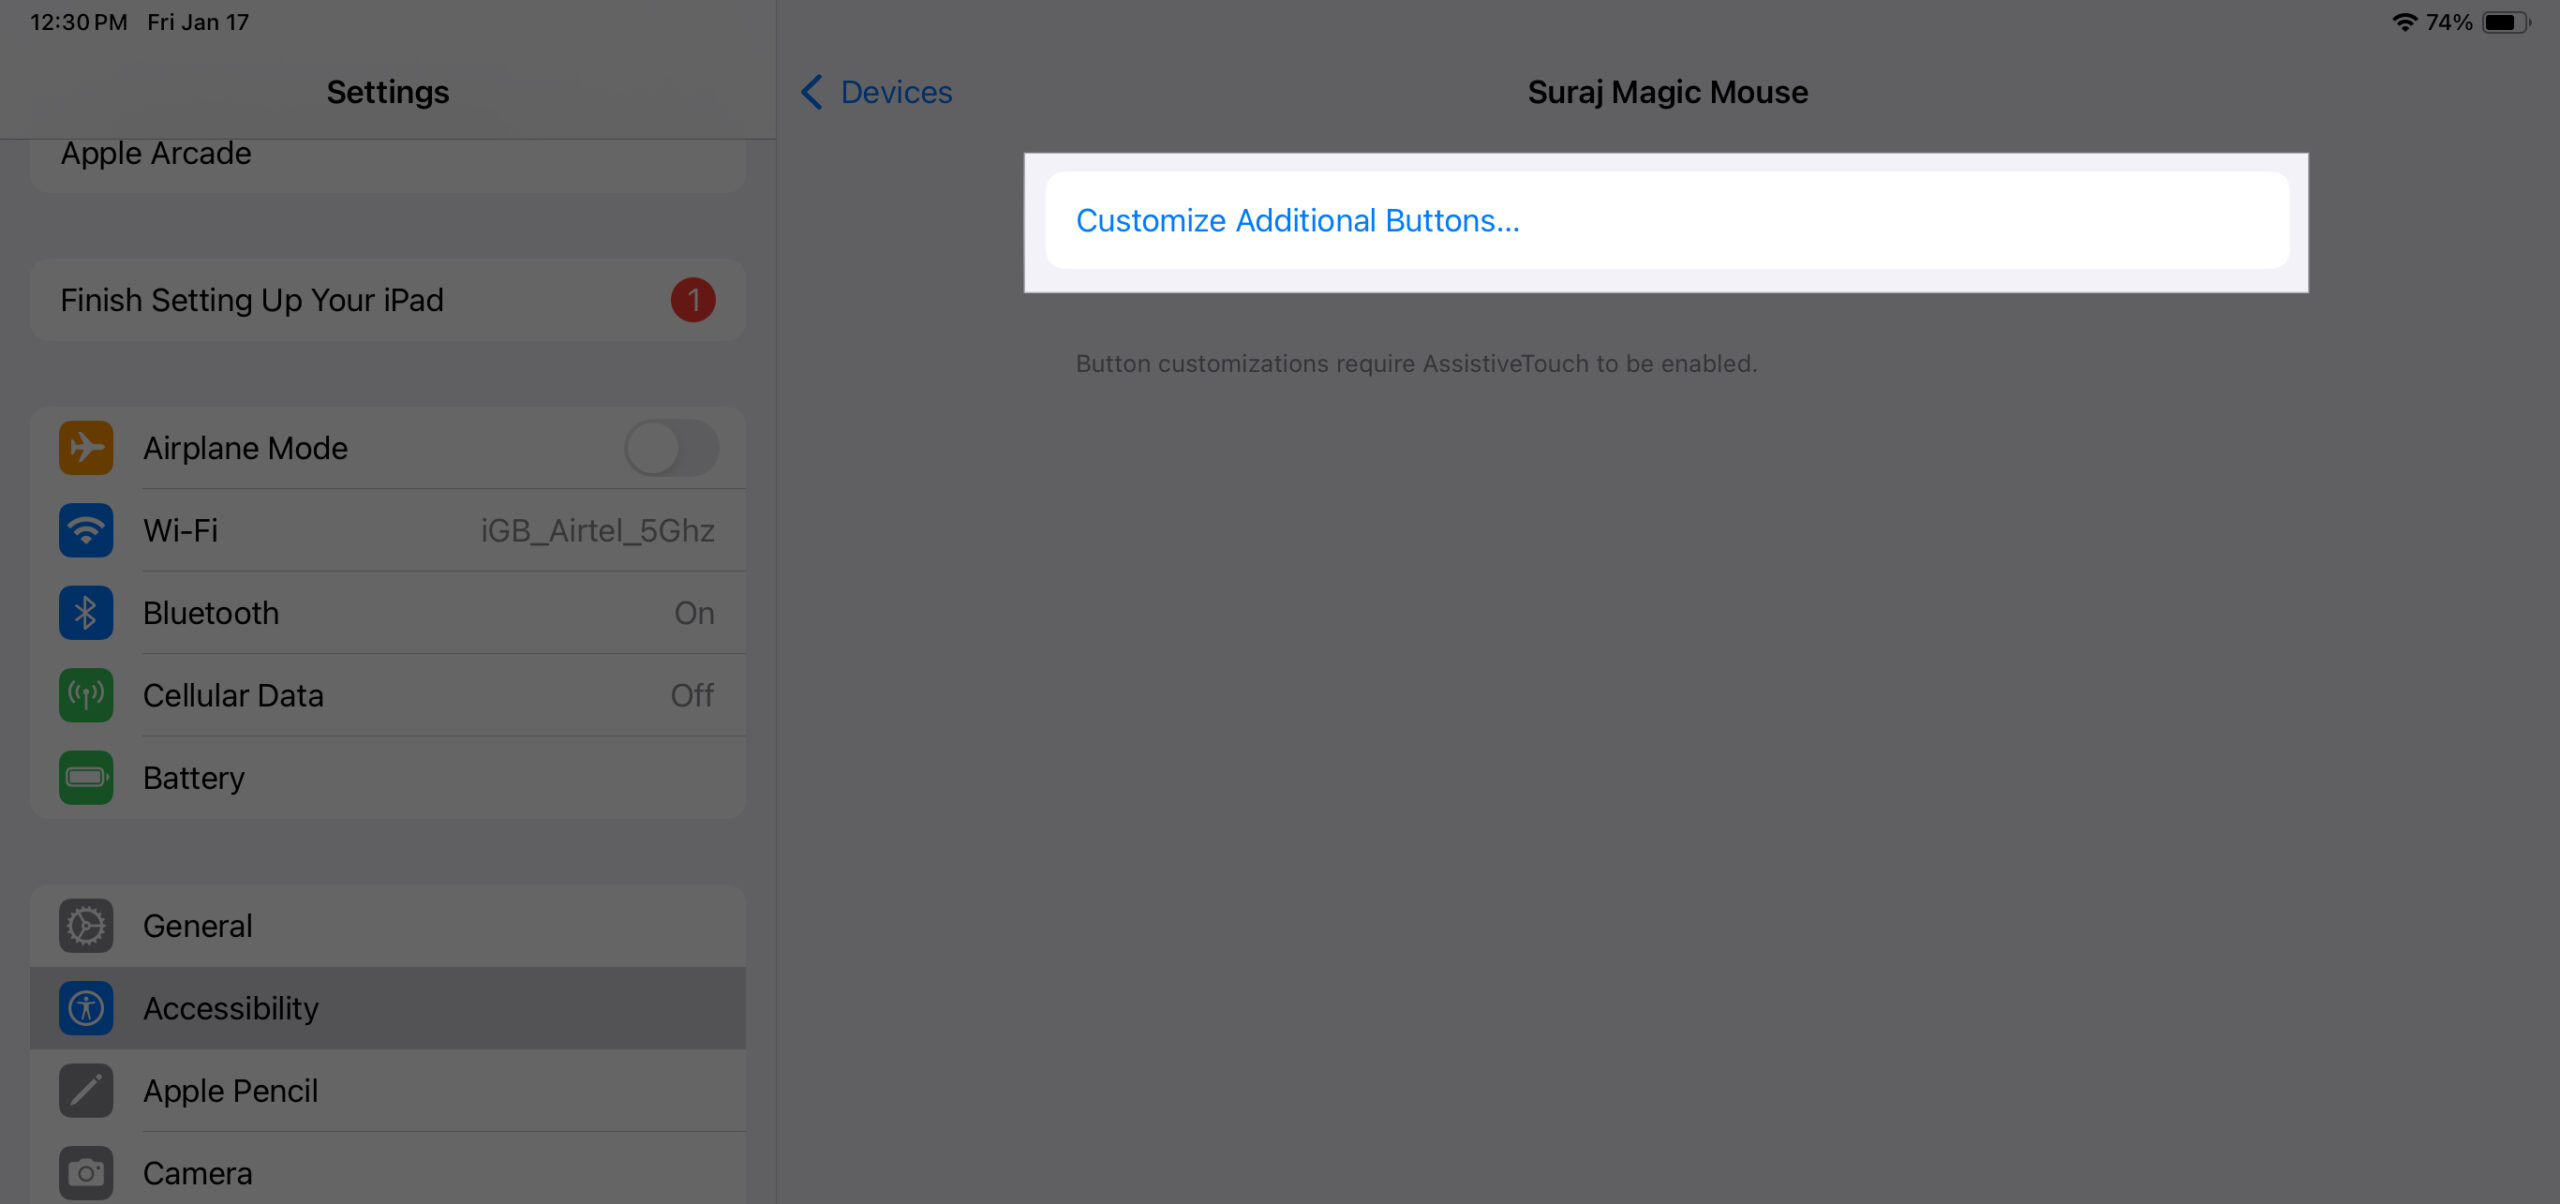
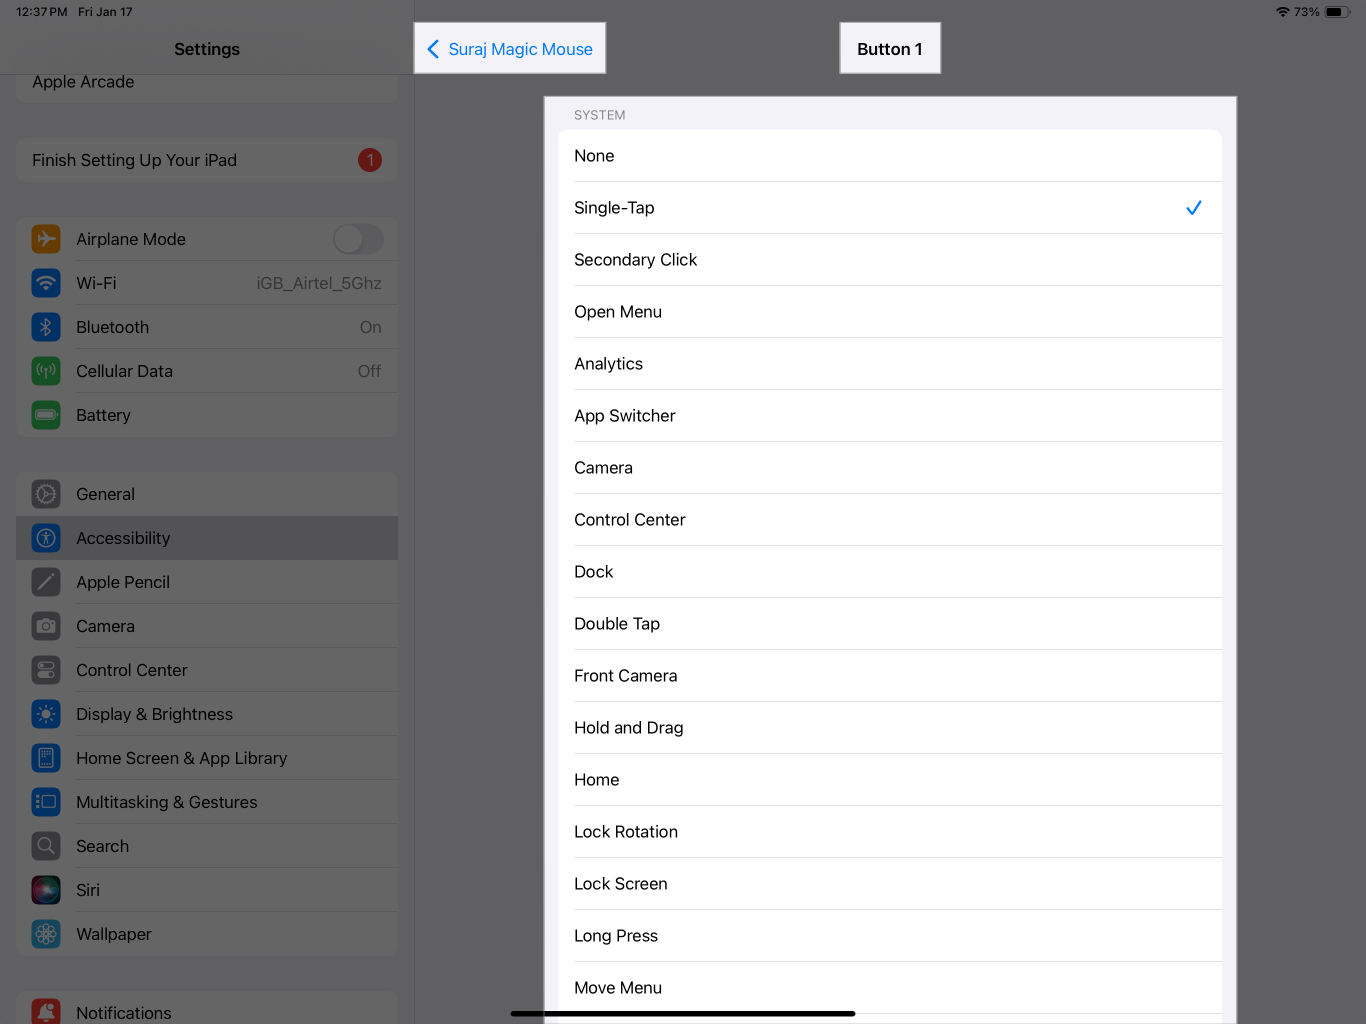
- Now, a pop-up will ask you to press the button you want to customize. Single-click that button on your mouse.

- After the click, a menu will open with all the actions you can assign to the button. Select your preferred action.
- Similarly, you can customize the other mouse button, too. Go back, tap Customize Additional Buttons again, and repeat the same steps.


Benefits of using a mouse with iPad
Using a mouse has several benefits:
- Editing: With iPads getting more powerful year-on-year, thanks to the M series chips, you can easily edit videos and photos on them. This is when a mouse comes in handy, making it easier to select, drag, and cut items on the screen.
- Copy-pasting: When you use an iPad to write or edit documents and notes, you can easily select, copy, and paste with a mouse like on your traditional computers.
- Navigation: Navigating your iPad with a mouse is faster and easier. You can scroll faster, access menus with just a click, and assign shortcuts if your mouse supports multiple buttons.
- Multitasking: If you love to multitask on your iPad, a mouse may elevate your experience by making it simpler to switch between apps and resize app windows.
If you’re using Apple’s Magic Mouse, learning advanced Magic Mouse gestures can make navigation even smoother and help you work faster across apps.
Why isn’t my mouse working on my iPad?
There can be multiple reasons for your mouse not working with your iPad. Here are some possible causes and solutions:
- Non-compatibility: Your iPad may not be compatible with mouse usage. Scroll to the top of this article and check for compatibility before trying again.
- Loose or faulty wire/dongle: If you are using a wired mouse, check for a loose connection or faulty wire/dongle.
- Outdated software: You might not be on the latest version of iPadOS. So, check and update your software before trying to connect your mouse.
- Minor glitches: Sometimes, the software has minor glitches, which you can solve by restarting your iPad. Try that and see if it works.
Signing off…
Most people are unaware that you can use a mouse to get the most out of your iPad. But as you just saw, using a mouse with your iPad can serve you in multiple ways you may not be aware of—unless you try it yourself. The support for such versatile accessories makes the iPad an all-in-one device that you can use for entertainment as well as work.
Also read:


