How to Deregister iMessage on iPhone, iPad, and the Web
Not receiving texts after switching phones? Here’s how to turn off and deregister iMessage on iPhone, iPad, or online so your messages deliver normally.
Switching from an iPhone to something else? Maybe you just got a new Android or a basic phone. If so, there’s one important step you shouldn’t skip: turning off iMessage. If you don’t, when someone sends you an iMessage, it will not convert to SMS and reach you on your new phone. So you won’t receive messages from friends using iPhones.
Here’s how to deregister iMessage and make sure your texts arrive as they should.
How to Turn Off iMessage When You Still Have Your iPhone or iPad
If your old Apple device is still with you, the process is pretty quick. Just follow these steps to disable iMessage from your end.
- Insert your SIM card into your iPhone, or just use your eSIM if applicable.
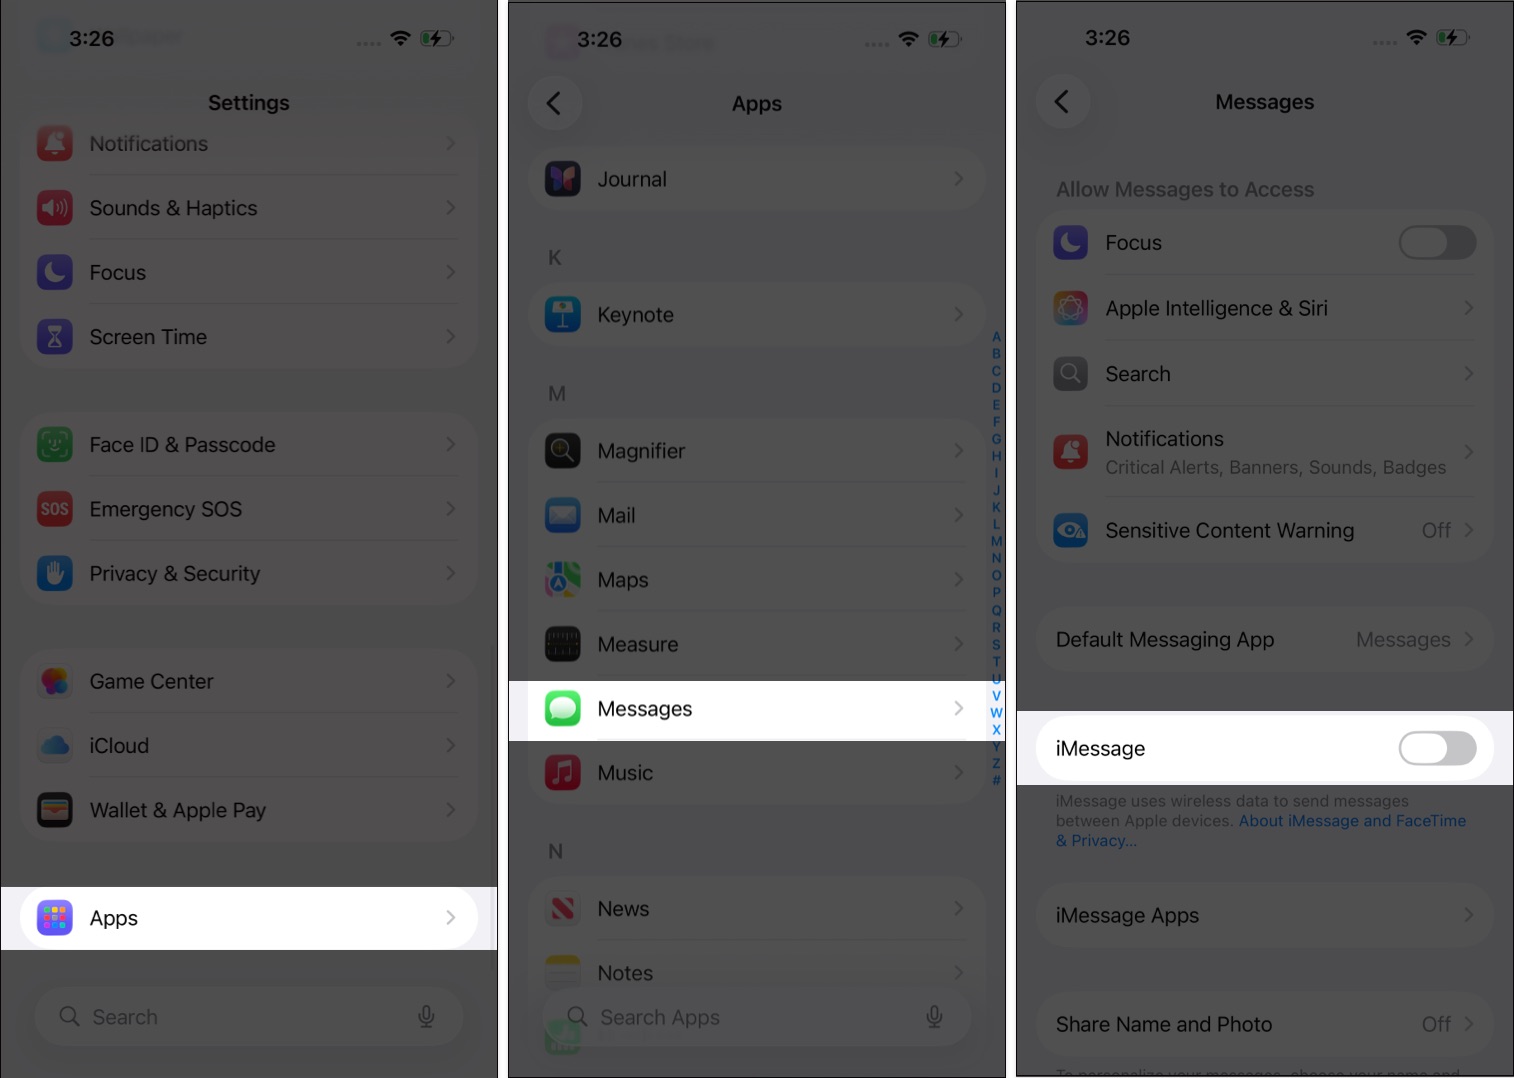
- Open the Settings app > Apps.
- Scroll down and tap Messages.
- Toggle off iMessage.
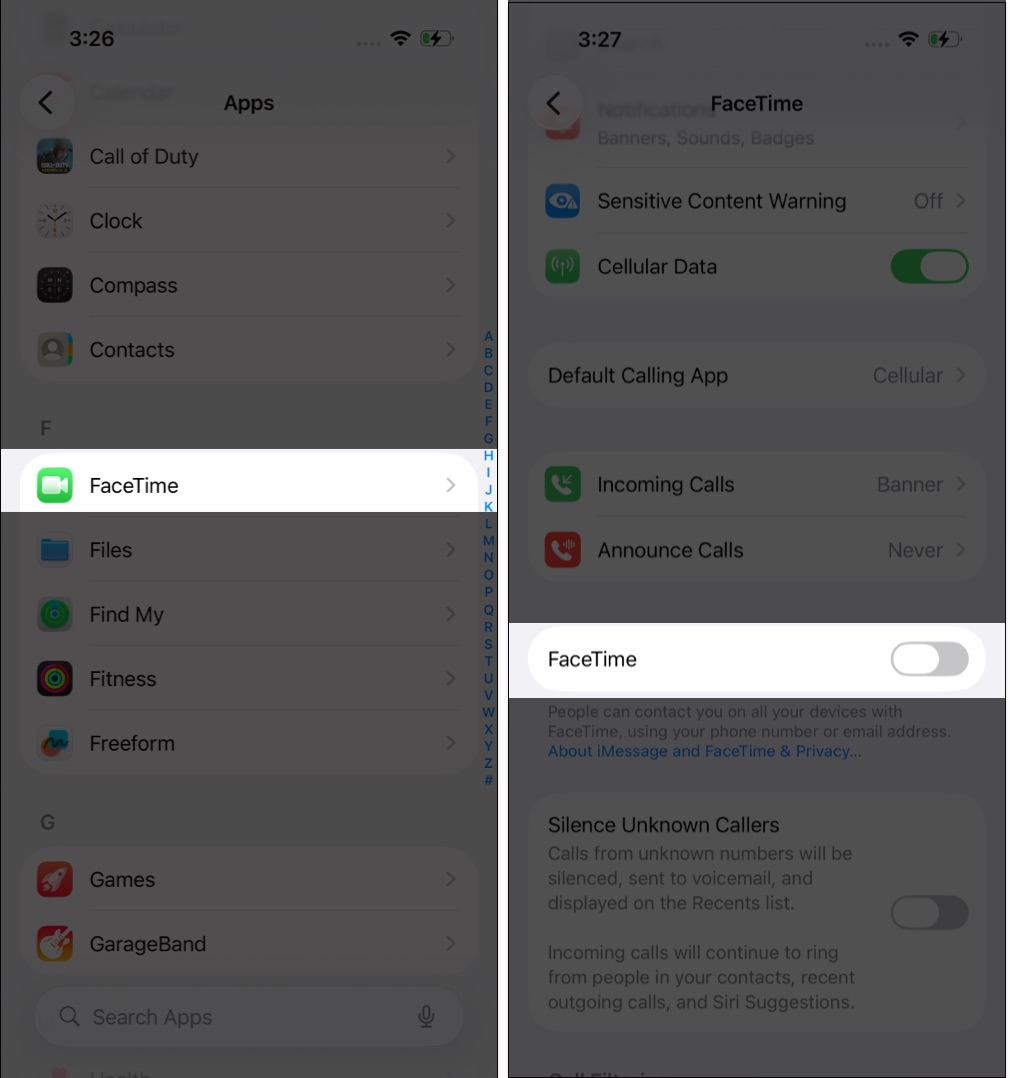
- Go back to Settings and tap FaceTime.
- Turn off FaceTime too.
That’s it. You’ve now unlinked your number from Apple’s messaging and video calling services.
How to Deregister iMessage Without an iPhone
If you sold, lost, or no longer have access to your iPhone, you can still deregister your number remotely using Apple’s official tool.
- Go to Apple’s deregister page.
- Select your country using the dropdown next to your country flag or code.
- Enter your phone number.
- Complete the captcha and hit Send Code.
- You’ll receive a 6-digit confirmation code on your phone.
- Enter the code on the same page and hit Submit.
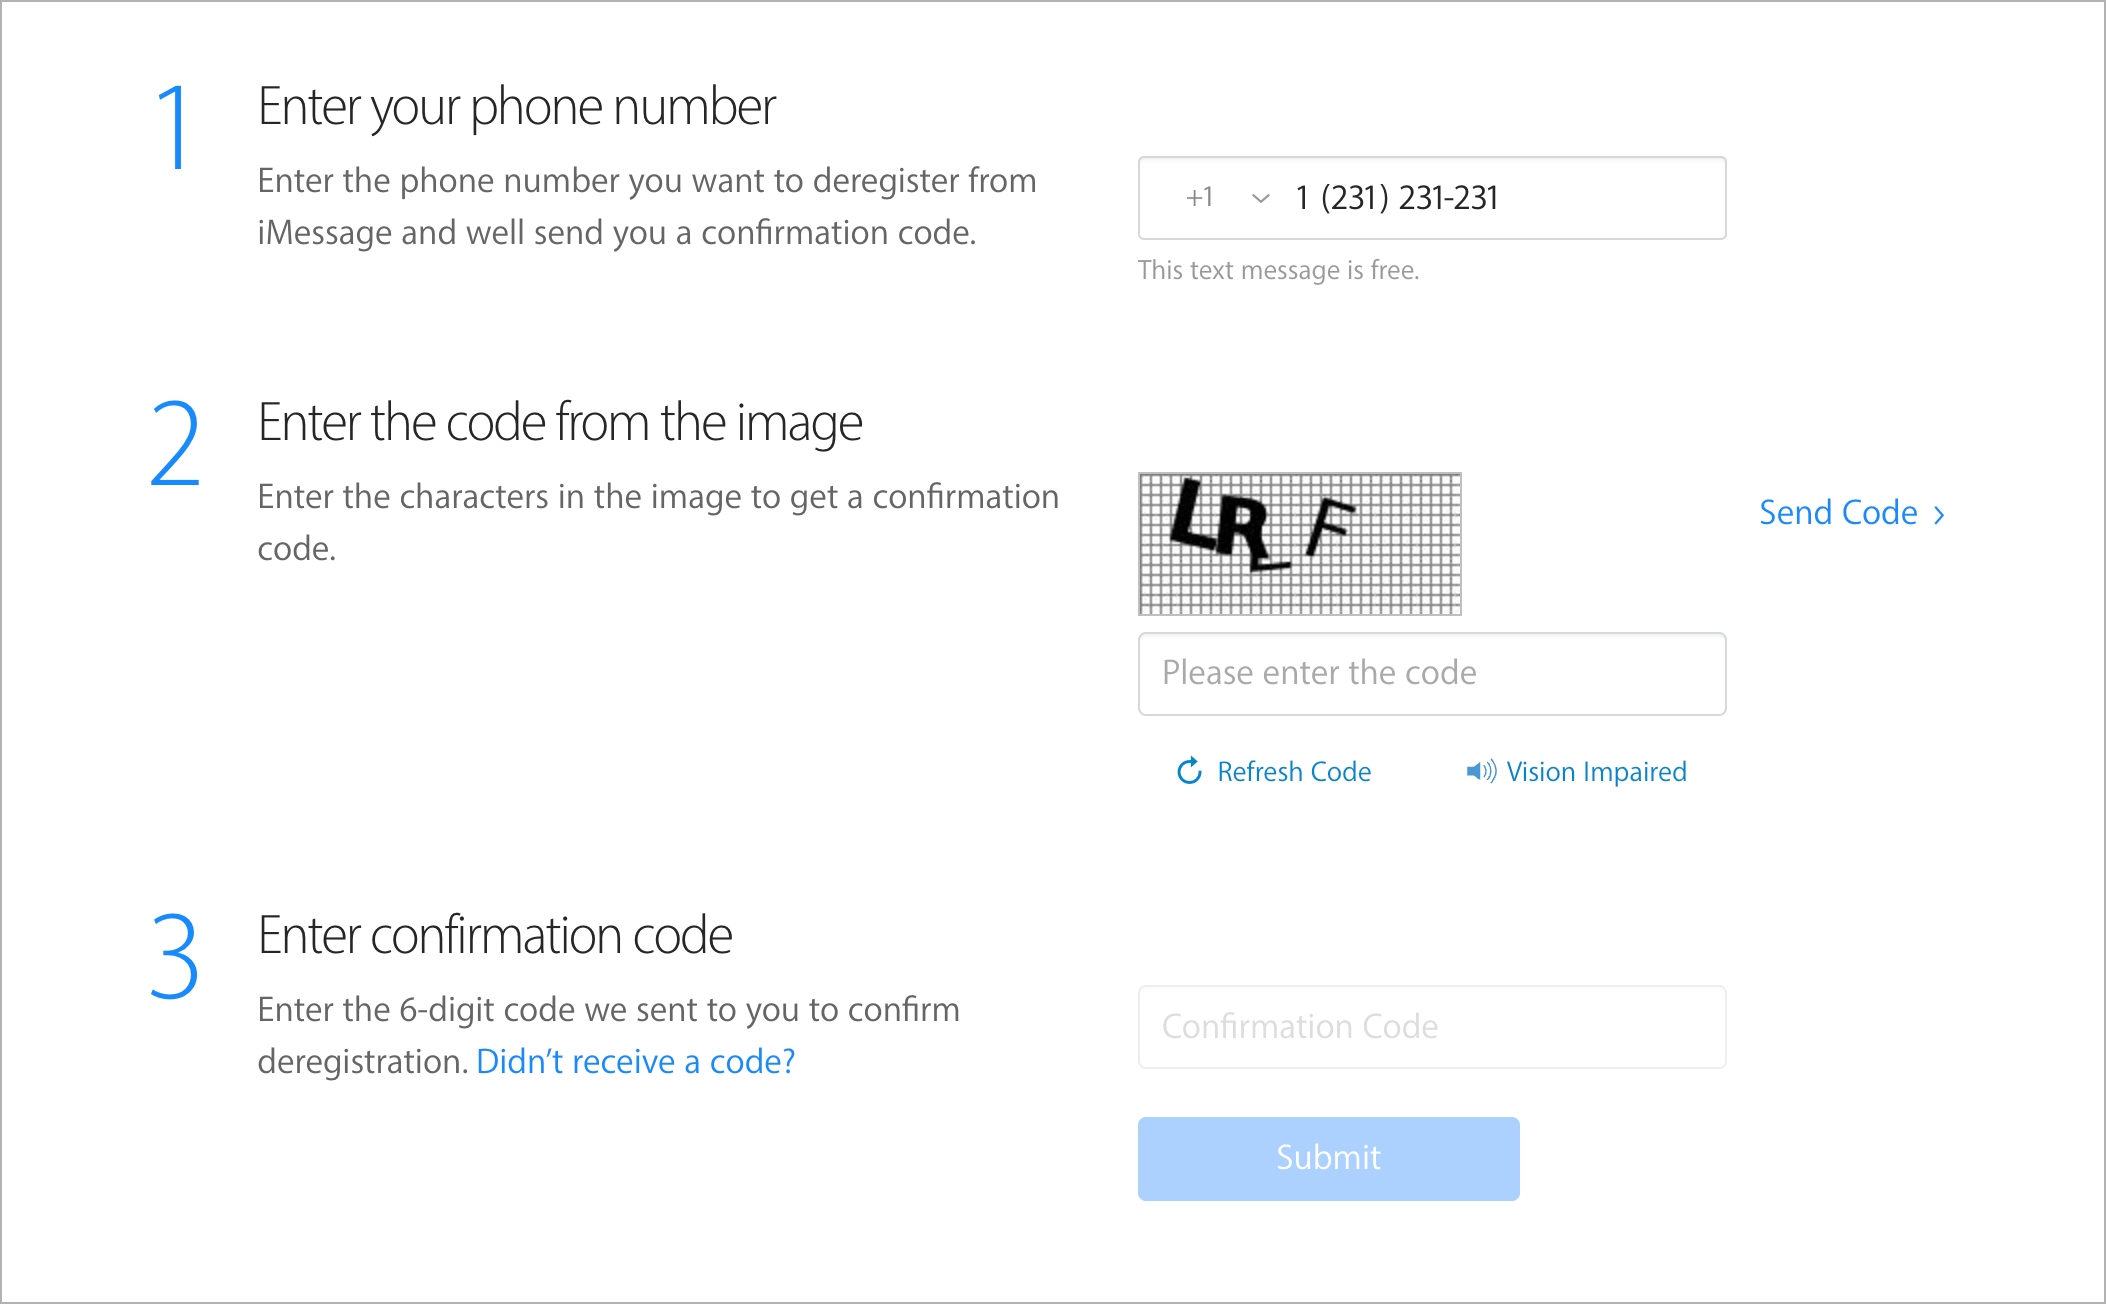
Apple will confirm that your number has been removed. Once that’s done, your future messages will be sent as SMS instead of getting stuck in Apple’s servers.
How to Sign Out of Your Apple ID to Fully Disable iMessage
If you’re giving your iPhone or iPad to someone else or just want to make sure iMessage is fully disabled everywhere:
- Open Settings.
- Tap your Apple ID name at the top.
- Scroll down and tap Sign Out.
- Choose whether to erase data or keep it.
- Enter your Apple ID password and confirm.
This removes your Apple account from the device and ensures that no iMessage data stays active in the background.
Why This Step Matters
If you skip this, Apple’s servers will still consider your number as iMessage-enabled. So when someone with an iPhone texts you, their message will be routed through iMessage, not your carrier network. Since you’re no longer using an iPhone, the message won’t reach your new device.
That means texts from your friends using iPhones won’t reach you; they’ll be sent as iMessages to a device you no longer have. This is why many users miss messages after switching.
By deregistering your number, you stop this from happening. Apple updates its servers and ensures texts are sent over SMS like normal.
Wrapping Up
Deregistering iMessage is a small but essential step when switching phones. It takes just a few minutes, but it saves you from missing texts or wondering why your friends aren’t replying. Whether you’re doing it on your iPhone, iPad, or through the web, following these steps ensures a smooth transition from Apple to wherever you’re headed next.
Frequently Asked Questions
Get to know more about iMessage on Apple devices:
Topics

Written by
Marcus Mears IIIMarcus Mears III is a lifelong technology enthusiast with half a decade of experience developing prose that keeps readers in the know. With hundreds of reviews, buying guides, and how-to explainers across a number of tech and lifestyle publications like How-To Geek, MakeUseOf, and iGeeksBlog, Mears’ work helps readers around the globe learn to make the most of their devices and software. He uses a 2016 MacBook Pro as his daily driver laptop and a self-built Windows PC for gaming and productivity.
View all posts →