Every day, we share a lot of contents on our chat apps, and this includes images. Not all smartphone users own iPhone, and therefore, iOS users may have to change image formats before sending the image to others. If for any reason, you require to alter the image format, you can follow this guide to convert image formats on iPhone and iPad.
App developers have designed some of the best apps to change the image format. So, you can quickly change an image from JPEG to PNG or vice versa. The apps listed below can also support other image formats like GIF, BMP, TIFF, TGA and more.
How to Change Image Formats on iPhone or iPad using Third-party Apps
Converting images into JPGs and PNGs is as easy as ABC. But it takes some pain to change BMPs, PSDs, or GIFs. Our list of apps combines apps that can convert both types of images mentioned here.
Moreover, the apps included in this list offer an easy interface for users to convert an image file format in a few simple taps.
JPEG, PNG, Image file converter
There are two popular file formats used by iOS users on their devices: JPEG and PNG. This image file converter effortlessly converts image formats in quick steps. Moreover, the app can also convert image formats from HEIC/HEIF, GIF, BMP, TIFF or TGA.
This app is available Free and ad-free version. The free version shows ads; to remove ads, you can buy the paid app.
To convert image format:
Step #1. Download and install JPEG, PNG, Image file converter.

Step #2. When the app opens, tap on Load a Photo option. You will be asked to allow access to your Photos app. Grant the access and then select a photo from the app.

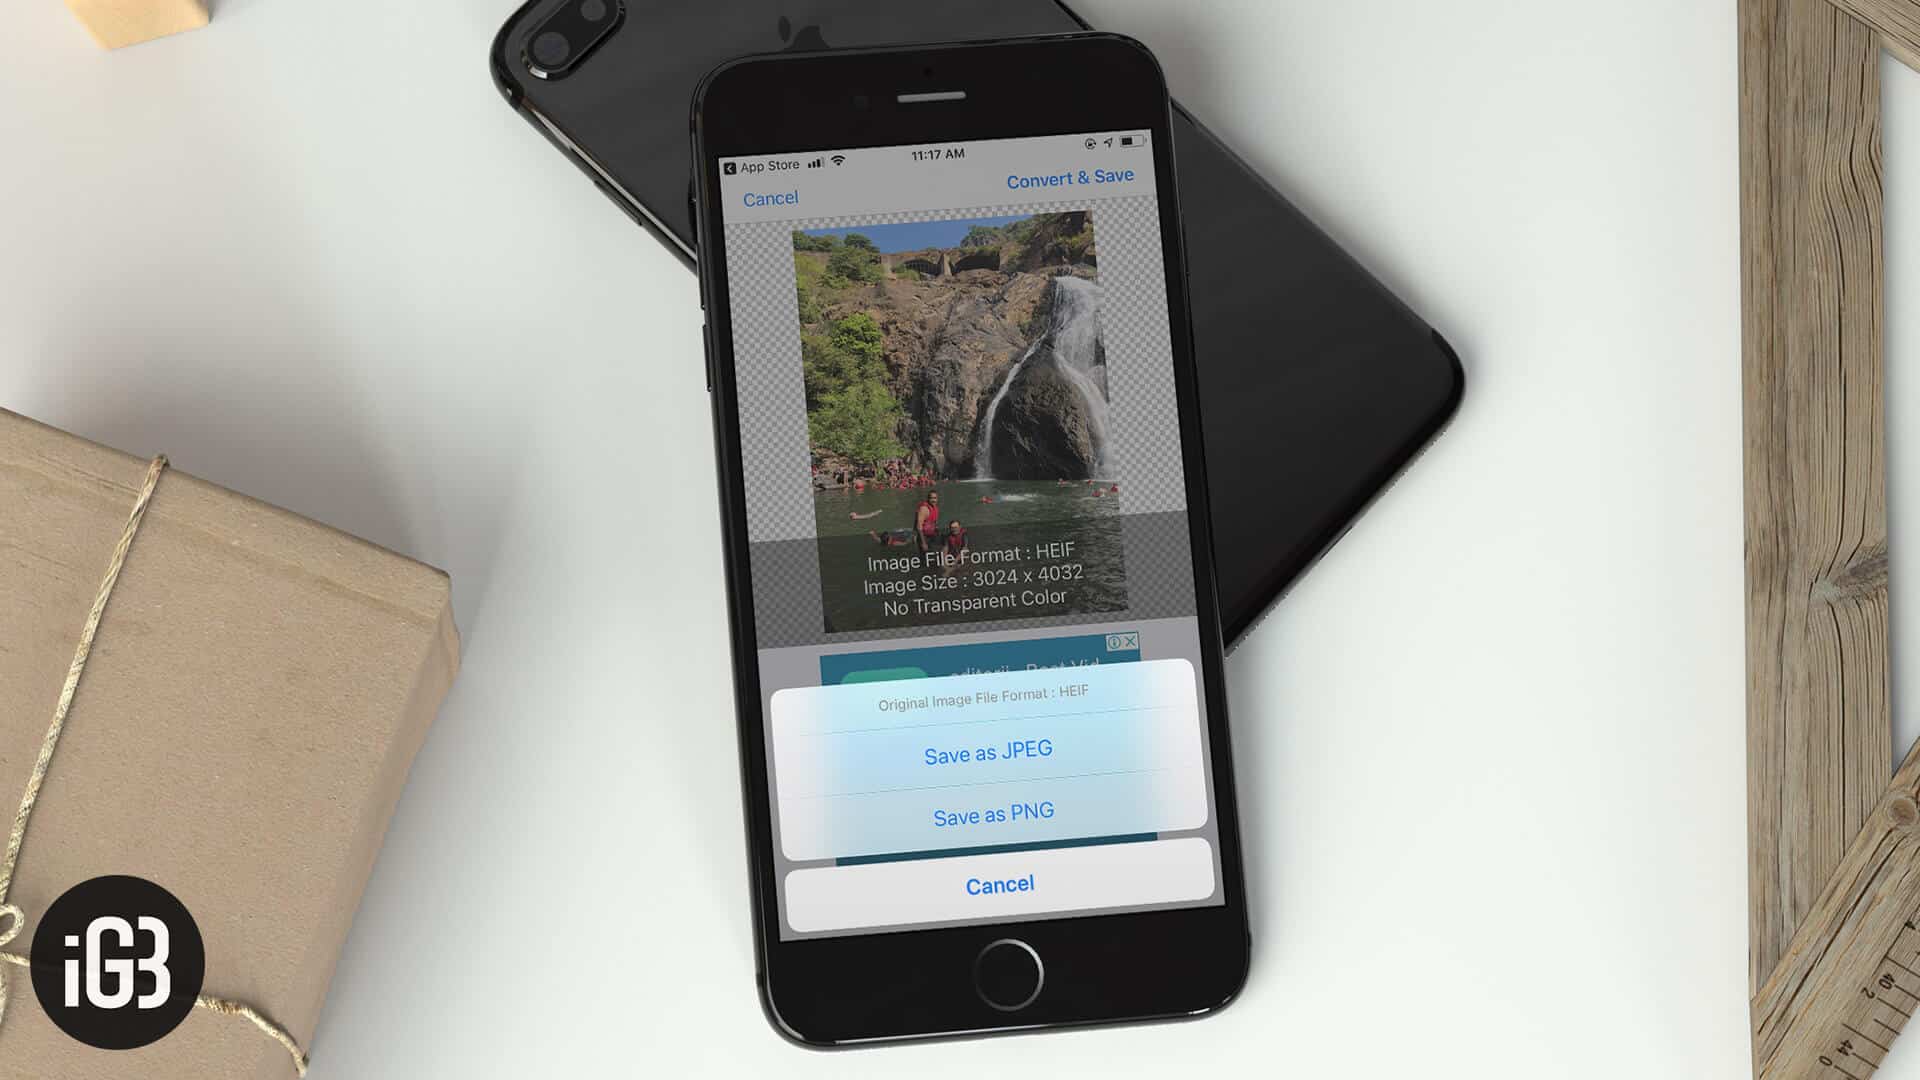
Step #3. Now, tap on Convert & Save from the upper right corner.

Step #4. Two options will swipe up from the bottom: Save as JPEG and Save as PNG. Select the option and your photo will be converted to the corresponding file format.
You can access this newly converted image from your Photos app and share it with others.

Image Format Converter
This app offers you nearly 40 file formats. No matter which image format you have in your iOS device, you can use this app to convert the image into your choice of format. Note that the process of converting image formats is a complex one as compared to the above app.
Step #1. Download and install Image Format Converter.

Step #2. When you open the app, you will be asked to grant permission for notifications. Tap on Allow.

Step #3. Now you are on the main screen of Image Converter; tap on up arrow. You can choose Photos or Take a Photo and go ahead.
Step #4. The app prompts you to give access to Photos. Tap on OK.

Step #5. Now, select the image you want to convert and then, tap on Done from the bottom.

Step #6. Next, you can resize percentage of original image and tap on two arrows given at the bottom right corner. You can see select output folder; tap on the two arrows.

An Auto Scan screen appears. You can toggle this Auto Scan feature on. Then, tap on two arrows from the bottom.

Here, you will be prompted to select the file format; choose any one format and tap on Convert icon at the bottom.
The app has completed and saved all conversions; you can press Open to view the folder in which you saved the converted files.

File Converter – By Online-Convert.com
File Converter presents a relatively simpler interface than Image File Format Converter. It’s a free app you can download from App Store.
When you open the app, you will be greeted with conversion history and how the app works. Next tab is STATS, which shows the file size limit to upload a file and convert it for free (this is set to 100MB). On this screen, you can also see some files/images you have converted. On the Settings tab, you can see Delete History, version of app and support email.
Step #1. Tap on SELECT YOUR FILE (+) icon.

Step #2. Now you are on Select Input screen; the app gives you inputs like Cloud, Camera Roll, Take a picture, Record video, Record audio, Scan QR-Code, and Convert from URL.
You can select any input method; I have selected Camera Roll for this tutorial.

Step #3. “File Converter” would like to access your photos. Tap on OK and go ahead.

Step #4. Select any one photo from the Camera Roll and then tap on “Choose” option from the bottom right corner.

Step #5. Tap on Show All under Image converter. You can see all the image formats. Select any one format.

Step #6. Now tap on Start Conversion icon from the bottom.

The app will convert your image to the selected format. A tick mark appears in the circle.
Finally, you can save your file, share your file or delete the file.

That’s it!
Summing up…
Except for Image File Format Converter, the two apps have a better interface to convert your image formats on your iPhone or iPad. I prefer the last app if I were to change image formats on my iOS device.
Do Not Miss:
- Best GIF Maker iPhone Apps: Crafting Bliss with Moving Images
- iPhone Photo Apps to Get Your Hands on Now
- Best iPhone Photography App
Which app would you like to use to convert image format? Share your feedback with us in the comment box.

Leave a Reply