- Why screenshots matter on iPhone: Screenshots help document payments, capture app moments, and share details quickly, making them one of the most used iPhone features.
- Multiple screenshot methods available: You can capture iPhone screenshots using button shortcuts, Siri, AssistiveTouch, or Back Tap depending on your preference and device setup.
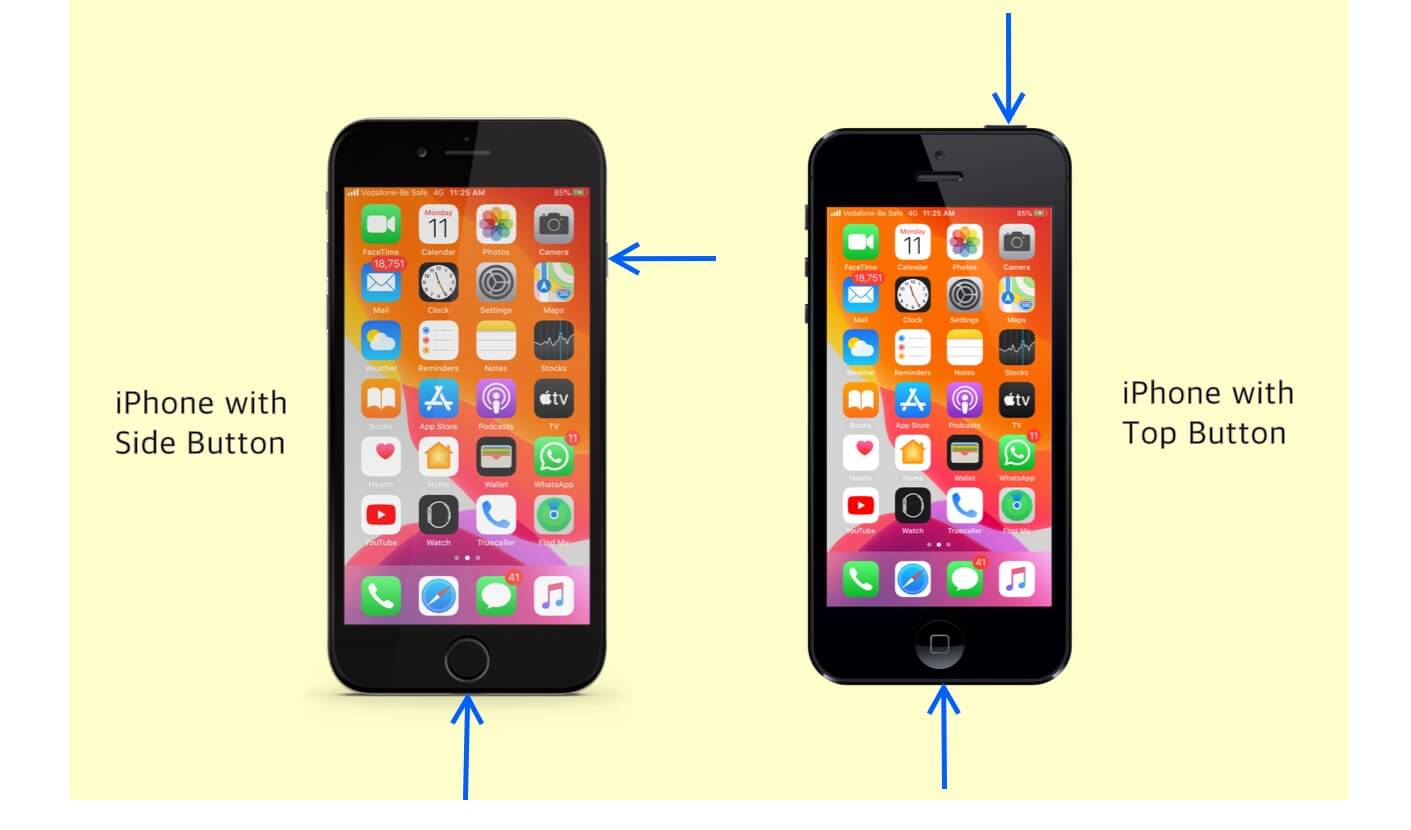
- Face ID model shortcut explained: On iPhones with Face ID, press the Side and Volume Up buttons together to instantly take a screenshot and edit it from the preview.
- Home button model shortcut explained: On iPhones with a Home button, press the Home and Side buttons simultaneously to capture a screenshot that appears as a small thumbnail.
- Accessibility features as backup options: AssistiveTouch or Back Tap can replace button presses when hardware is faulty or difficult to reach, preventing screenshot issues.
Capturing a screenshot on an iPhone is an essential skill that every iPhone user must know from the day they first get their hands on one. Screenshots help you document proofs of financial transactions, capture in-game achievements, share information that is difficult to explain textually or verbally, and more.
While taking a screenshot on an iPhone is relatively straightforward for seasoned users, it can be a bit confusing for new users migrating from an Android device. Continue reading to discover how to take screenshots on an iPhone, whether using buttons or not.
How to take a screenshot on iPhones with Face ID
Starting with the iPhone X, Apple replaced Touch ID with Face ID on all subsequent iPhones, except for the SE series, thereby removing the Home button, which was a primary requirement for capturing screenshots.
So, if you just upgraded from your classic iPhone to a modern one, including the latest iPhone Air, here’s how you can take a screenshot:
- Press the Side and the Volume Up buttons simultaneously to capture a screenshot on your iPhone with Face ID.
- Once done, you’ll see a small preview thumbnail at the bottom-left corner of the screen or a full-screen preview of the screenshot (Depends upon your Screen Capture settings in iOS 26).
- Tap it to view, markup, edit, share, or delete the screenshot. If your iPhone supports Visual Intelligence, you can even interact with its texts.
- Alternatively, swipe left on it to dismiss the preview, and the screenshot will automatically be saved to the Photos app library.

Tip:
How to Take a Screenshot on iPhone with a Home Button
Capturing a screenshot on an iPhone with a Home button (iPhone 6, 6 Plus, 6s, 6s Plus, 7, 7 Plus, 8, 8 Plus, and iPhone SE 2020 & 2022) is as easy as capturing one on an iPhone without the Home button.
- Press the Side and the Home buttons simultaneously to capture a screenshot on your iPhone with Touch ID.
- Once the screenshot is taken, a small preview thumbnail will appear at the bottom-left corner. Tap the thumbnail to view, markup, edit, share, or delete the screenshot.
- Otherwise, swipe left on it to dismiss the preview, or wait until it disappears, and the screenshot will automatically be saved to the Photos app.
How to Take a Screenshot on iPads with Face ID
Just like on the iPhone, Apple replaced the Touch ID with Face ID on modern iPad models as well. Therefore, capturing a screenshot on an iPad with Face ID is precisely the same as doing so on an iPhone. You only need to:
- Quickly press and release the Side and Volume Up buttons simultaneously.
- A screenshot animation will appear, followed by a preview thumbnail at the bottom-left corner of the screen. Tap this to markup, edit, or share the screenshot without saving it.
- Otherwise, swipe left on the preview, and the screenshot will be added to the Photos app.

How to Take a Screenshot on iPads with a Home Button
Again, the process of taking a screenshot on an iPad with a Home button is similar to taking one on an iPhone with a Home button. Here’s how you can do this:
- Quickly press and release the Side and Home buttons simultaneously.
- Swipe left on the screenshot preview to save it in the Photos app.

How to Take a Screenshot with the Apple Pencil (for iPad only)
While you can use all the iPhone methods to capture a screenshot on iPads without physical buttons, there’s one method that is specifically reserved for iPads that support Apple Pencil. Here’s how you can use an Apple Pencil to take screenshots on an iPad that supports it:
- Using the Apple Pencil, swipe up from either bottom corner of your iPad’s display.
- Here, you can mark up the screenshot by simply drawing over it with the Apple Pencil.
- When finished, tap on Done and choose the appropriate option.
Use Siri to Capture a Screenshot on an iPhone or iPad
If using the buttons every time you want to capture a screenshot is too much of a task for you, you can simply ask Siri to take a screenshot. Here’s how it works:
- Invoke Siri on your iPhone and ask, “Take a screenshot.”
- Once done, Siri will take a screenshot of your present screen, and the usual screenshot animation will appear, along with a preview thumbnail.

Take a Screenshot on iPhones or iPads using Assistive Touch
While Apple designed the Assistive Touch feature to help users with physical and motor skill impairments, anyone can customize the feature to perform tasks like taking screenshots, saving them the hassle of pressing physical buttons.
Here’s how to set up and use Assistive Touch to capture screenshots with a single tap:
- Open Settings and navigate to Accessibility.
- Here, tap on Touch under the Physical and Motor section.
- Next, tap AssistiveTouch.

- Toggle on AssitiveTouch, and the AssistiveTouch button will then appear on the screen.
- Tap on Single-Tap under Custom Actions and select the Screenshot option in the subsequent menu.


Now that you have enabled AssistiveTouch and assigned the Screenshot functionality, you only need to tap the AssistiveTouch button, and the screenshot will be taken.
Take a screenshot on an iPhone using the Back Tap
Introduced with iOS 14, but supported only on iPhone 8 or later models, Back Tap allows you to perform various tasks on your iPhone, such as invoking Siri, launching apps, and capturing screenshots. To use it, assign the functionality and double-tap or triple-tap on the back of your iPhone.
To use Back Tap for taking screenshots on your iPhone, you must set it up first. Here’s how:
- Open Settings.
- Select Accessibility and go to Touch under the Physical and Motor section.
- Next, scroll to the bottom and tap Back Tap.

- Now, tap on Double Tap or Triple Tap, then select the Screenshot option on the subsequent menu.


Going forward, you can simply double or triple-tap on the back of your iPhone, and it will take a screenshot.
How to Take Scrolling Screenshots on an iPhone or iPad
There are times when the information you want to capture isn’t confined to a single screen, like a web page, email, or PDF file. In this case, taking a regular single-page screenshot won’t suffice.
Thankfully, Apple allows you to capture scrolling screenshots on your iPhone and save them as PDFs or a regular image. Here’s how:
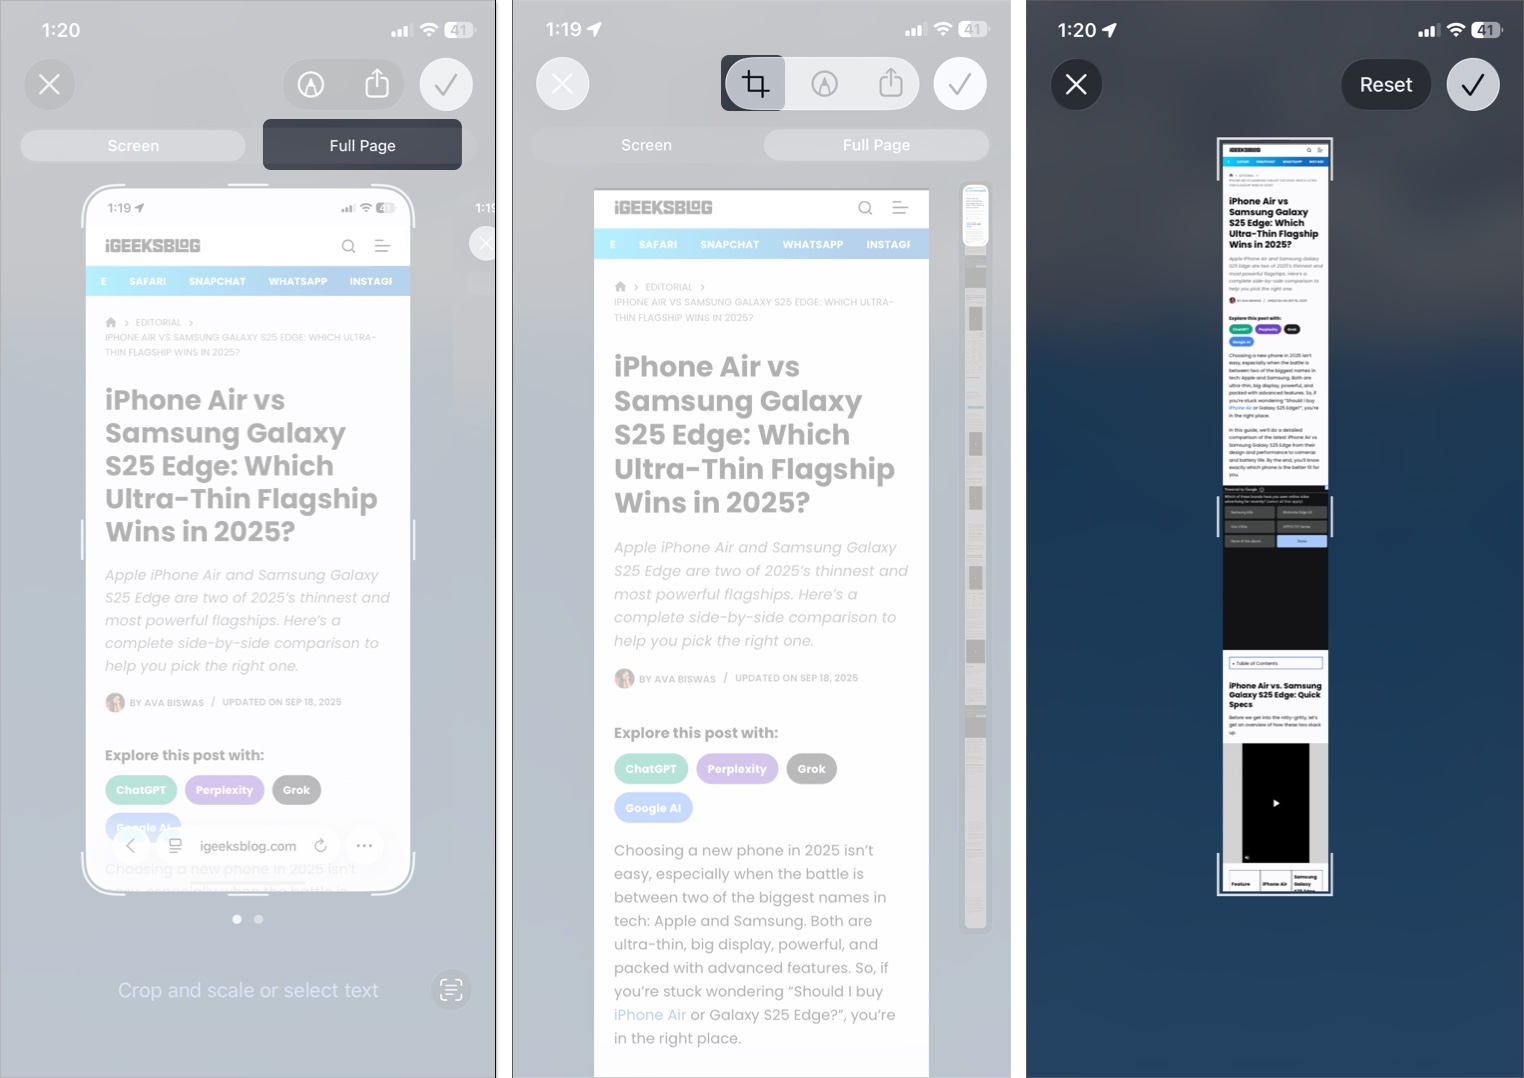
- Open the web page, email, or PDF file, and take a normal screenshot.
- Now, tap the preview thumbnail that appears at the bottom-left corner.
- Go to the Full Page tab. You will now see the preview of the entire screen, which you can scroll through on the right.
- Next, tap the Crop button at the top left to crop out the unneeded area of the screenshot and tap the checkmark to save the changes.
- It will notify you that only the cropped area will be visible in the saved PDF file. Tap OK to proceed.
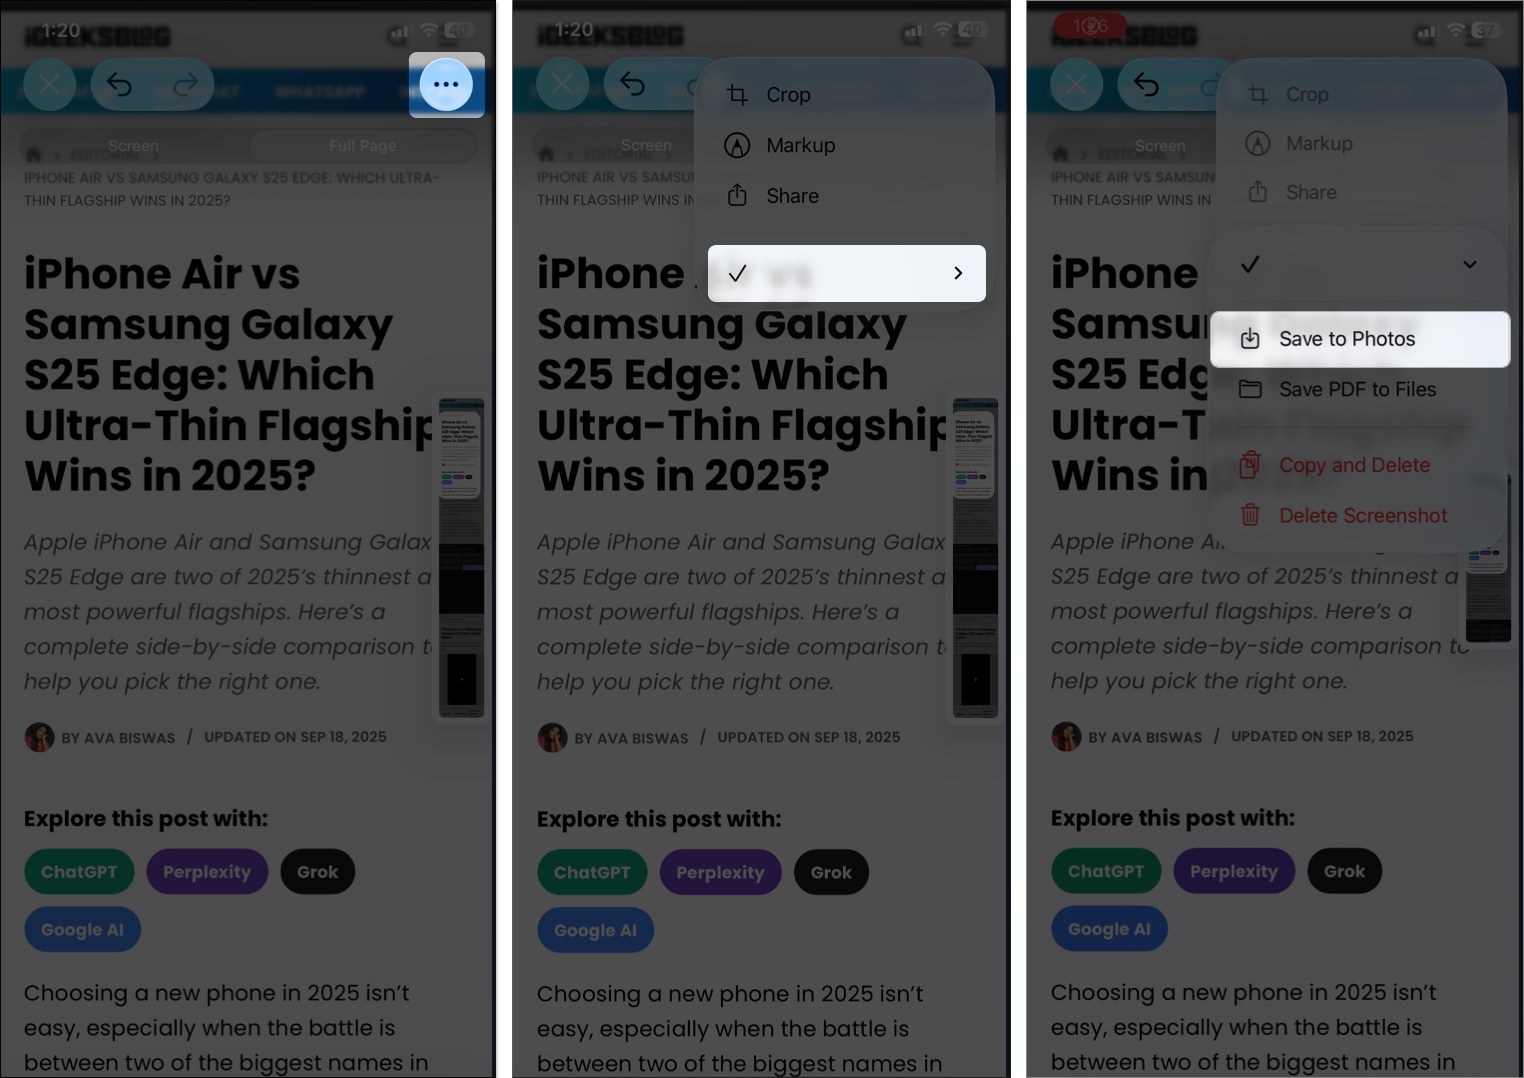
- Now, you can preview your screenshot. If satisfied, tap the three-dot icon at the top > select the checkmark > Save to Photos.
- You can also export it as a PDF document in the Files app to preserve the quality.
- Alternatively, tap the Share button to share the scrolling screenshot without saving it to the Photos or Files app.

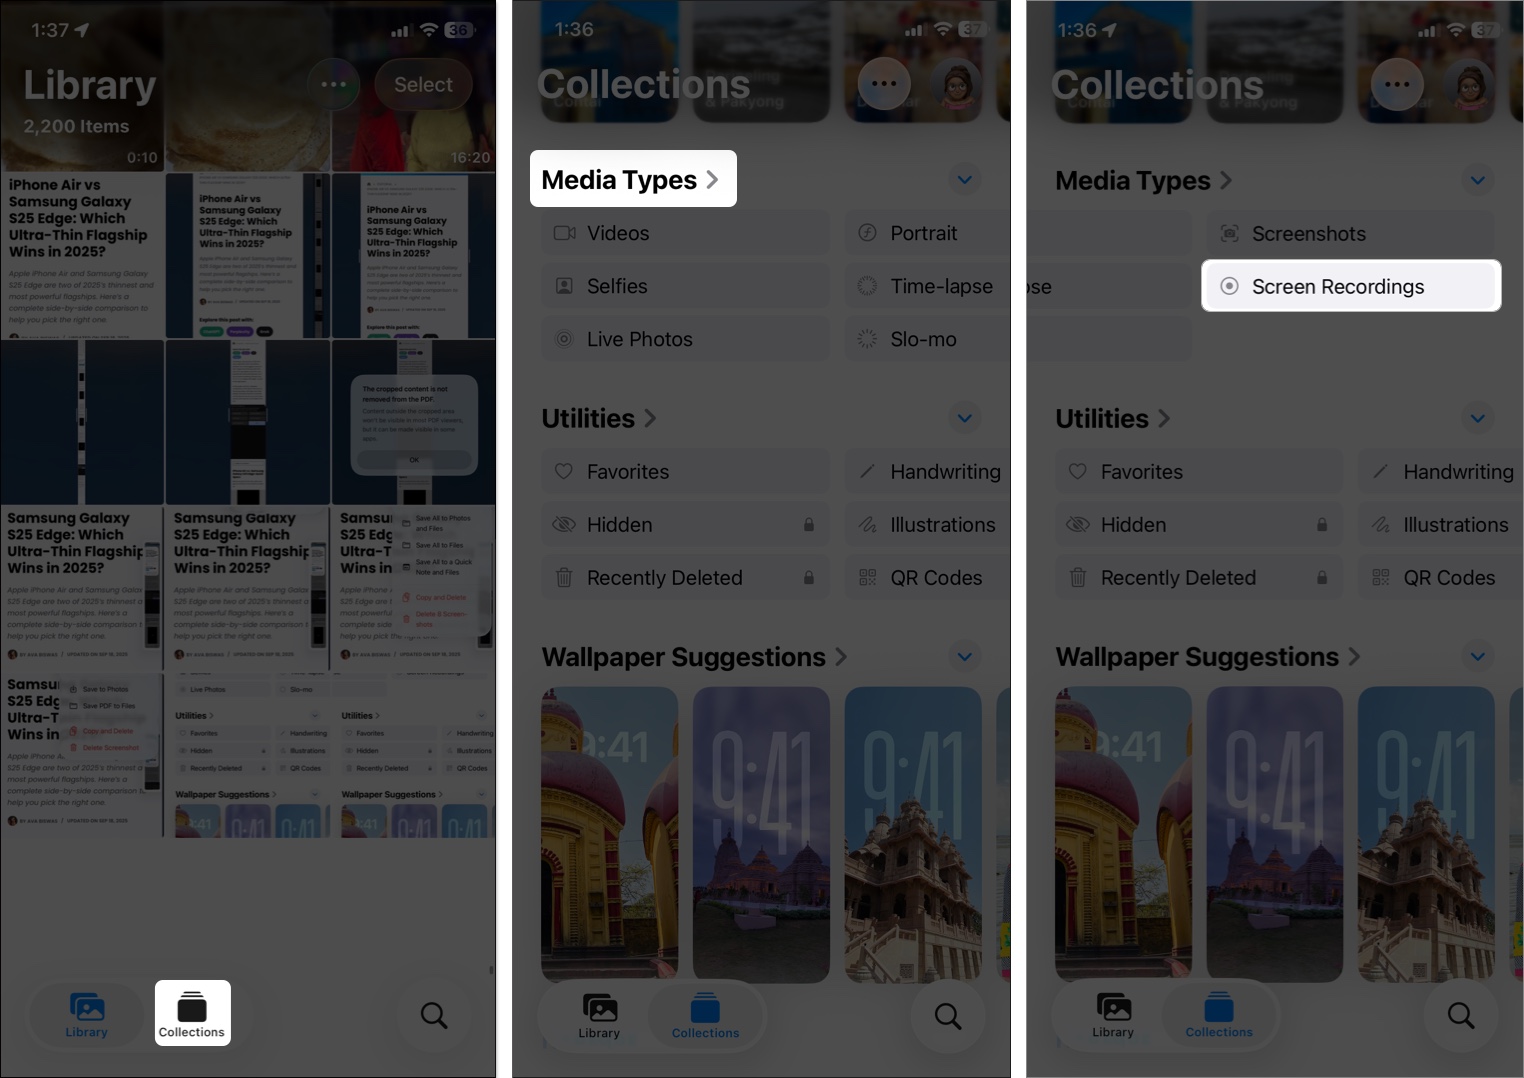
How To View Screenshots on an iPhone or iPad
All the screenshots you take on your iPhone or iPad are automatically saved and can be viewed within the Photos app, as long as you didn’t delete one from the preview screen itself. Here’s how you can view screenshots on your iPhone and iPad:
- Open the Photos app, and you will see recent screenshots at the end in the Library tab.
- To access all screenshots, move to the Collections tab.
- Scroll down to the Media Type section, swipe left the options and tap on Screenshots.
- Here, you can view all the screenshots you have taken on your iPhone so far, except those you deleted.

Digital Proofs Secured
These are all the methods you can use to take screenshots on your iPhone or iPad. Whether you prefer button-based methods, using Siri, or accessibility methods, the choice is yours. Also, note that you can only save a scrolling screenshot as an image if your iPhone runs on iOS 17 or later. Before iOS 17, one could only save a scrolling screenshot as a PDF.
Feel free to contact us via comments if you have any questions or concerns regarding the topic or any other Apple-related matter.