Home – How-to – How to set a song as your ringtone on iPhone (2024 guide)

How to set a song as your ringtone on iPhone (2024 guide)

How to set a song as your ringtone on iPhone
Key Takeaways
  • Setting a song as a ringtone on your iPhone allows you to express your personality and stand out from the crowd.
  • You can create custom iPhone ringtones using GarageBand, Apple Music and third-party apps.
  • Assigning custom ringtones to specific contacts helps you quickly identify who is calling.

Have you ever found yourself reaching for your iPhone, only to realize it wasn’t your phone ringing but someone else’s with the same default ringtone? If you’re tired of this and want to add a personal touch to your iPhone, setting a custom ringtone is the way to go.

How to set a song as your ringtone on iPhone

Apple allows you to set your favorite song or tune as a custom ringtone on your iPhone, even without iTunes or a computer. In this blog post, I will share how to set a song as a ringtone on an iPhone using various methods.

Become an iOS 18 Master: Get our exclusive iOS 18 eBook 📚 for FREE when you sign up for our newsletter below.

Why set a custom ringtone on your iPhone?

Setting a custom ringtone on your iPhone is more than just a fun personalization. It’s a practical solution for many situations as mentioned below:

  • Personal expression: A custom ringtone allows you to showcase your personality and musical taste. Whether it’s a favorite song, a catchy tune, or a sound that has special meaning, your ringtone makes your personality stand out.
  • Recognize your calls: In crowded places, having a custom ringtone helps you immediately notice if your phone is ringing. This avoids confusion with others who may have the same default ringtone.
  • Identify callers: Custom ringtones can help you differentiate between calls. For example, you can assign specific ringtones to particular contacts. Thus, you know who’s calling without even looking at your phone.
  • Fun experience: You may make a song as your ringtone that reminds you of a special moment or lifts your mood. It adds a touch of fun and enjoyment to your daily routine.
  • Avoid boredom: The default iPhone ringtone can become monotonous over time especially if you receive multiple calls every day. Changing your ringtone to your favorite song keeps things fresh and exciting.
  • Professionalism: You can set a subtle tune as your custom ringtone to maintain professionalism in work environments.

Now that you understand why having custom ringtones on iPhone is important, let’s see how to do it. The easiest way is to buy ringtones from the iTunes Store and set it from your iPhone settings. However, if you can’t find your favorite song or tune on the iTunes Store or want to change your iPhone ringtone to a song for free, you can do that too.

Let’s learn how to create a custom ringtone from any song and set it on your iPhone. Before that, ensure you fulfill all the prerequisites.

Prerequisites to make a custom ringtone on iPhone

  • A song or audio file: You must save the song locally on your iPhone Music library or Files app. Also, make sure the file is in a compatible format (MP3, AAC, or M4R).
  • Eligible songs: Note that songs downloaded from Apple Music or other streaming services cannot be used. So, you need to download songs from the DRM-free sources such as Zedge. These song files can be edited and feature high-quality, 256 kbps AAC encoding.
  • Necessary apps: Ensure your iPhone has the necessary apps, such as GarageBand or third-party music editor apps, to create the ringtone. If not, you need to download the apps from the App Store.
  • Storage space: Your iPhone should have enough space for the new ringtone.

After taking care of the above requirements, you can quickly set a custom ringtone on your iPhone.

How to set any song as your ringtone on an iPhone

Setting a custom ringtone on your iPhone can be done using various methods. iPhone comes with a music editor app called GarageBand, which can help you create custom ringtones without iTunes. You may also use third-party ringtone maker apps for a quick solution.

How to set a custom ringtone on your iPhone without iTunes

First, we will discuss how to make custom ringtones using GarageBand. As it is developed by Apple, the app works smoothly on your iPhone. Also, your data is safe and protected as you need to give the app access to your Files and Contacts. So, I prefer using this app.

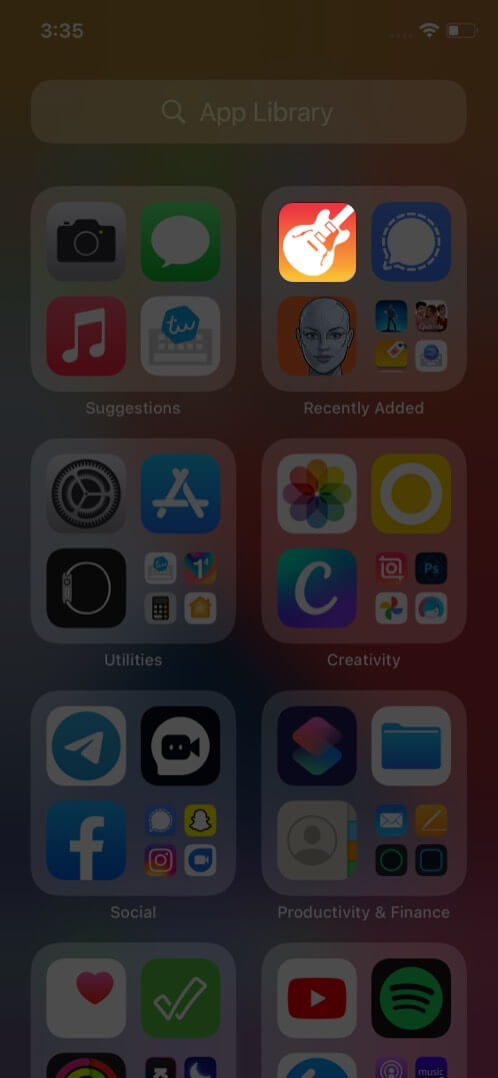
  1. Launch the GarageBand app on your iPhone.
    Launch GarageBand app on your iPhone
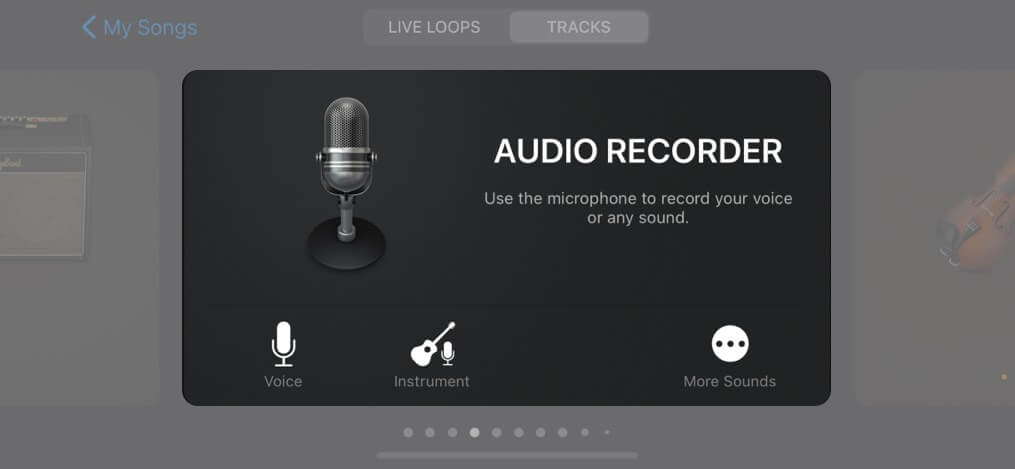
  2. Swipe and find Audio Recorder from the options, and tap Voice (mic icon). You can also use a Keyboard or Drummer for this purpose.

    In Audio Recorder option tap on Voice
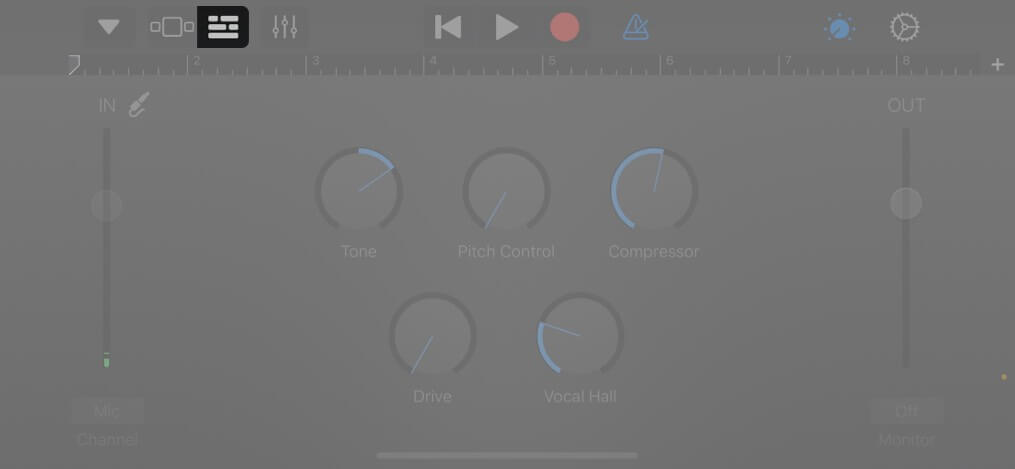
  3. Here, tap View (brick wall-like icon) to enter the editing section.

    Tap View to enter the editing section on iPhone
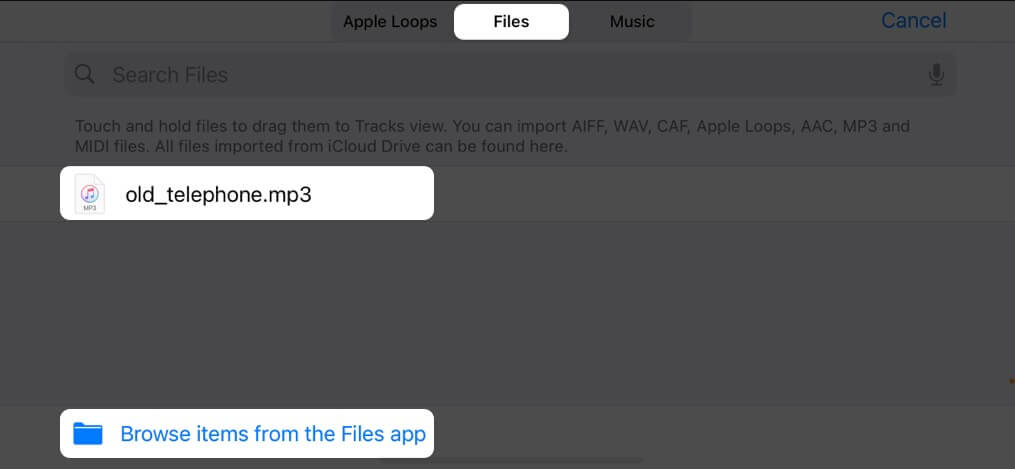
  4. Tap the Loop icon. You’ll see three subheadings here – Apple Loops, Files, and Music.
    Since my ringtone is saved in files, I will be using that tab.

    Tap Loop icon in GarageBand app on iPhone
  5. Look for the song you want; tap and hold it for a few seconds to import the file. If you can’t see the song, tap Browse items from the Files app to find it.

    Hold a song for a few seconds to import on iPhone
  6. To edit the song, drag the long vertical bar to your custom ringtone’s desired starting point. You can use the play button to achieve the perfect starting point of your tone.
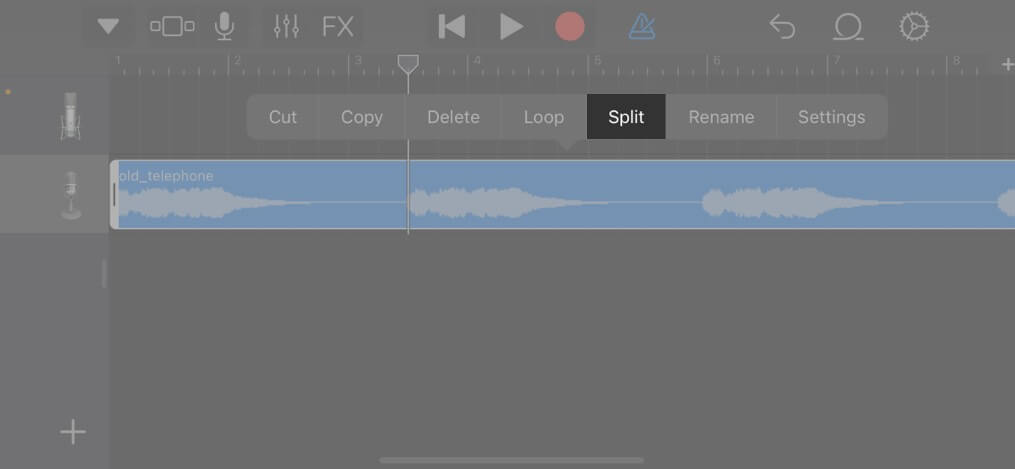
  7. Once done, double-tap the song and select Split.

    Double tap on song and select Split on iPhone
  8. Drag the Scissor icon down to cut/divide the song at your chosen point.
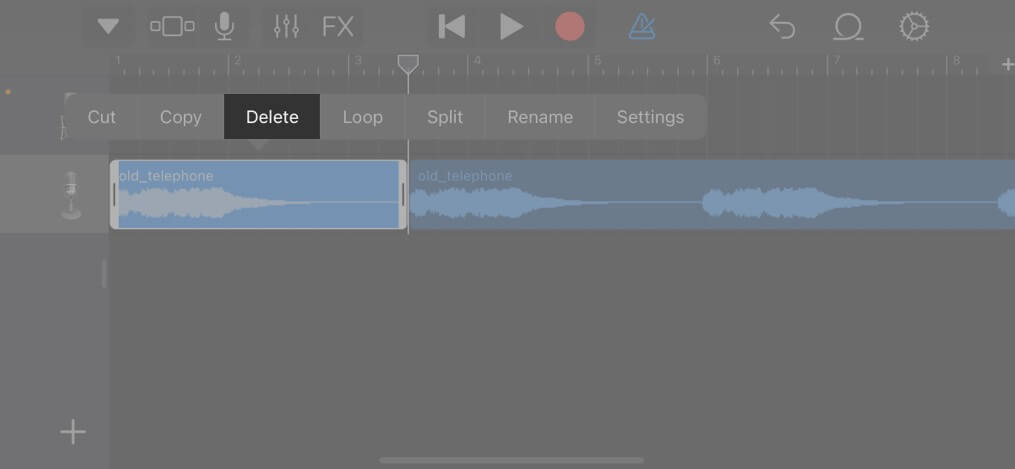
  9. Delete the unusable part of the song by tapping it twice and then choosing Delete.

    Delete unusable part of the song on iPhone
  10. Now, select the down arrow icon from the top-left corner and tap My Songs.

    Select down arrow icon and tap My Songs on iPhone
  11. Tap and hold the project and select Share from the list.
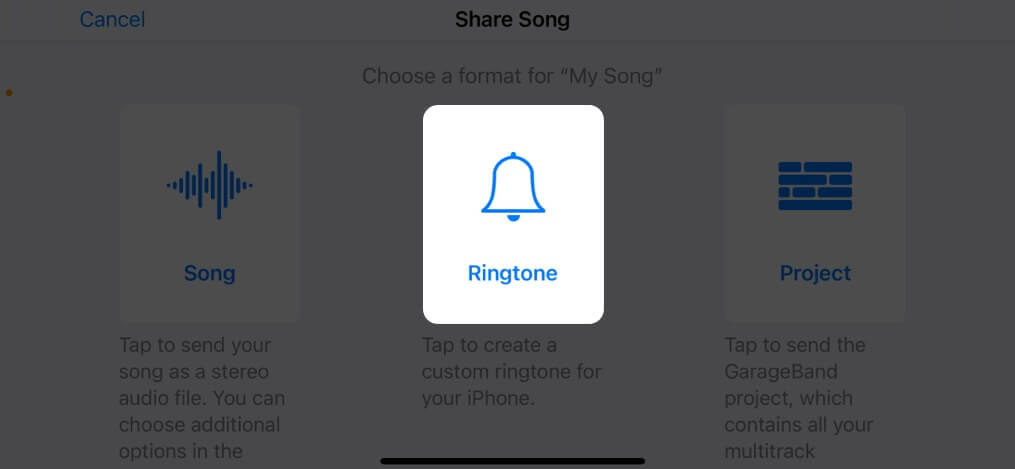
  12. Here, select Ringtone, then continue, name the song as per your choice, and tap Export.

    Select Ringtone and tap Export on iPhone
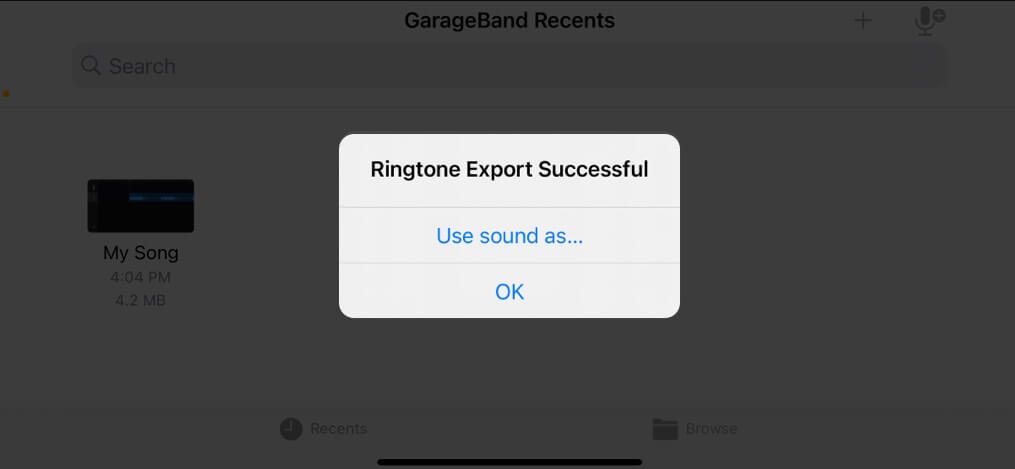
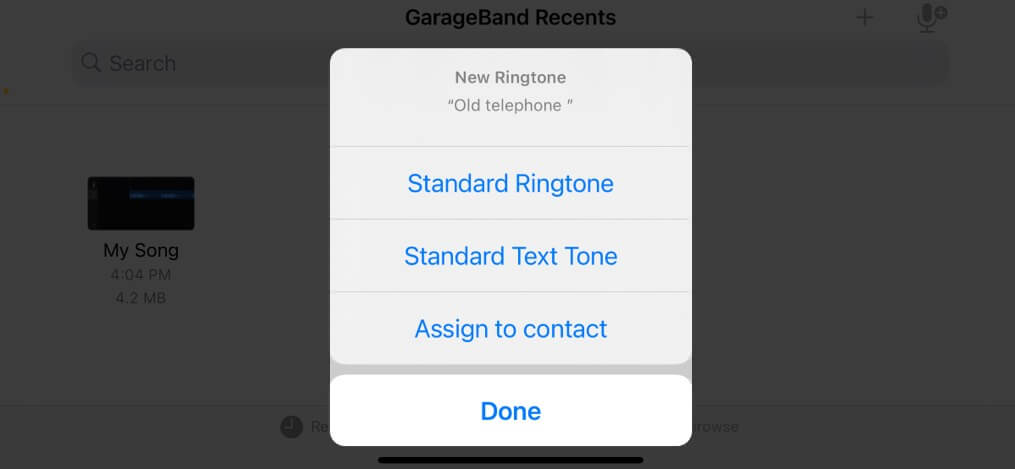
  13. Once the process completes, tap Use sound as… to set it as ringtone directly or OK to do it manually.

    Tap Use sound as to set it as ringtone directly
  14. If you have selected Use sound as…, you will see options to set the ringtone as Standard Ringtone. If you want to change the ringtone for a specific caller, choose Assign to contact.

    Create custom ringtone on iPhone without computer
Note While exporting, the iPhone automatically trims the ringtone at 30 seconds. If you want to set an endpoint somewhere before 30 seconds, repeat steps 6 to 9.

If you find the GarageBand method daunting, don’t worry. You can make a custom ringtone using Apple Music. Yes, you heard it right! Let me show you.

How to create custom ringtones for iPhone on Mac or Windows PC

I have a workaround for creating custom songs using Apple Music. However, you need a Mac for the process. This method is beneficial if your music playlist is saved on a Mac. Also, you don’t need to download any additional apps on your iPhone.

Before you start, ensure you have the DRM-free song file saved locally on your Mac.

  1. Launch Apple Music on your Mac.
  2. Select Songs from the left pane and locate the track.
    If you can’t find it, drag and drop the song file to the Music app window.
  3. Play the song and move your cursor to the playing tile at the top.
  4. Note the time stamp where you want your ringtone to start and end. The time gap should be 40 seconds max.

    Select Songs on left panel in Music App on Mac
  5. Now, right-click on the track and select Get Info from the context menu.

    Right click on song and select Get Info
  6. It will pop up a new window with song details. Move to the Options tab.
  7. Enter the Start and Stop time stamp you noted and click OK.

    Select Options and set start and stop time
  8. Next, select the track and click File on the menu bar.
  9. Select the Convert option and choose Create AAC Version.
    If you only have the Create MP3 version option, click it.

    Click on File and select Convert and Create AAC Version
  10. You will see a new track with the time length you set under the original track. Right-click on the new track and select Show in Finder.

    Click on Show in Finder
  11. It will redirect you to Finder. The track will have the same name as the original and a .m4a extension. Right-click on the track and select Rename.

    Right click on song and select Rename
  12. Write .m4r in the extension and hit the Enter key. M4R is a file format specifically designed for iPhone ringtones.
  13. Select the Use .m4r option to confirm it.

    Click Use m4r option

Your custom iPhone ringtone is ready! If you have the ringtone file in .mp3, you may use an online converter to create the .m4r file. Once done, follow the steps below to set the song as a ringtone on your iPhone.

  1. Take a USB cable and connect your Mac to your iPhone. Click Trust on your Mac and enter your iPhone passcode if prompted.
  2. Navigate to the opened Finder window. Click File on the menu bar and select New Finder Window. Ensure the previous window with the track is not closed.

    Click on File and select New Finder Window
  3. Click your iPhone name from the left sidebar of the new Finder window. It will show your iPhone details.
  4. Now, drag and drop the .m4r file to the new Finder window. You will see a green plus icon, indicating the song file will be added to your iPhone.

    Drag and drop song
  5. You may now unplug your iPhone from your Mac.
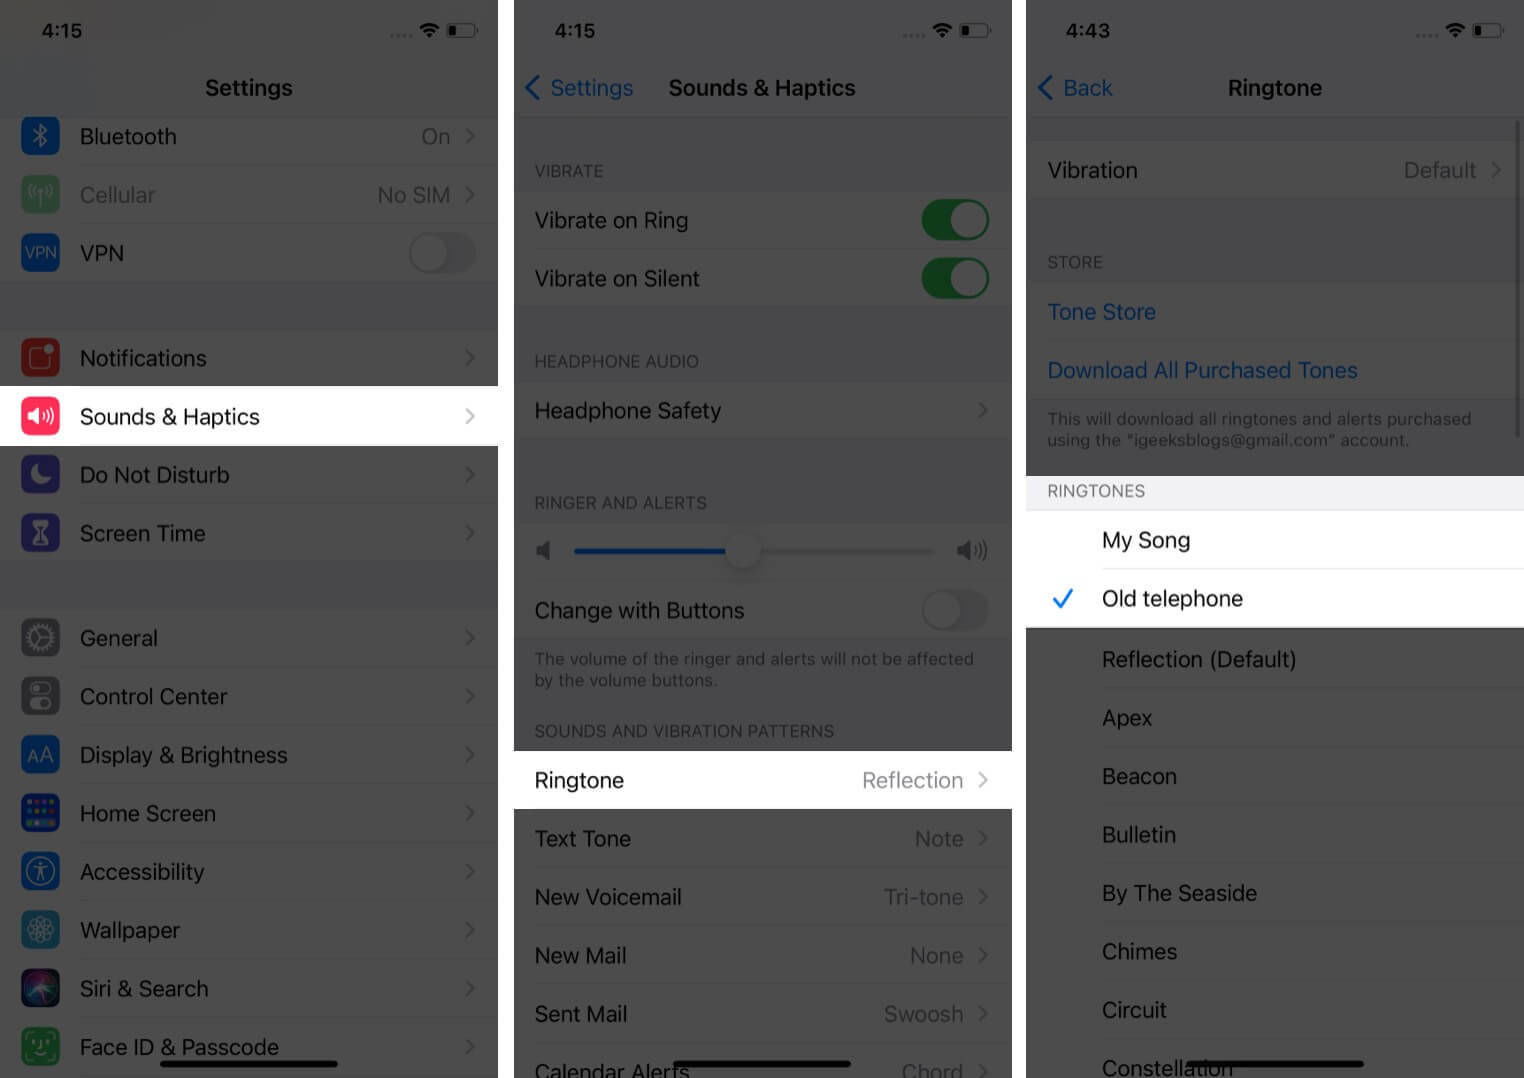
  6. Next, go to the Settings app on your iPhone and select Sounds & Haptics.
  7. Tap on the Ringtone option.
  8. Here, you can see the ringtone you just made. Select it.

    Tap on Ringtone in Sound and Haptics settings on iPhone

That’s it! You have successfully changed your ringtone to your favorite song.

Note

If you have a Windows PC, you can use the iTunes app. Start by cutting the songs to form a 40-second track. The next thing to do is use iTunes to convert it to an AAC format. Afterward, drag and drop the AAC file into any folder. Consequently, this will result in a .m4r extension. Finally, connect your PC to your iPhone and click on the iPhone icon in iTunes. Go to Tones and drop the .m4r file there.

Using third-party ringtone apps

I know the above-mentioned methods are a bit lengthy and time-consuming. If you are struggling with Apple’s built-in methods or don’t have a computer, several third-party apps are available to simplify the process. Such apps offer advanced features and flexibility.

Here are some popular ringtone apps for iPhone you can use:

  • Garage Ringtones for iPhone: This app enables you to create ringtones using songs and videos. There is an easy-to-use platform for cutting the song and setting the ringtone.
  • RingTune: You can browse through popular ringtones from the RingTune library or songs saved on your iPhone. Moreover, the app recommends ringtones that match your interests.
  • Ringtones: for iPhone: The app can be used to easily modify, trim and produce unique ringtones. You can also record audio for your ringtone.
  • Ringtones Maker – the ring app: If you want advanced music editing, go for this app. It lets you precisely cut the song and add fade-in filters to the ringtone.

You may choose any of the apps to have custom ringtones on your iPhone. The process is somehow similar: open the app, import your song file, cut it to make a 40-second track, and set it as a ringtone. Nevertheless, specific steps may differ based on the app you select. Always follow the guidelines and tutorials provided by the app.

Now, you may be asking whether third-party apps are worth it. Let us look at some pros and cons of ringtone apps for iPhones.

Pros:

  • Convenience: These apps allow you to create and manage ringtones from the app itself instead of switching between different apps. Beginners will find them very easy to use.
  • Wide varieties: Many apps have large libraries of ringtones with different themes. Consequently, there is something for everyone in terms of taste.
  • Customization: Most apps are designed with musical editing features such as trimming, fading in and out, changing volume levels and even equalizing beats to make the ringtones more personal.
  • Recording options: Some apps enable users to record their own sounds or voices, adding a unique touch to their ringtone selection.
  • Regular updates: Many apps regularly update their libraries with new ringtones so that you can keep up with what’s trending.

Cons:

  • Hidden costs: While many apps are free, some may come with limited features unless you make in-app purchases or subscribe to the app.
  • Ads: Free apps often include ads, which can be annoying.
  • Compatibility: Not all apps are compatible with every iPhone model or iOS version.
  • Privacy issue: Most ringtone apps ask for Files app and contacts access permission. However, granting access to third-party apps may compromise your data privacy.
  • Potential malware: Downloading apps from unofficial sources can increase the risk of malware.

Therefore, ensure you are using a credible ringtone app.

How to set a ringtone for a specific contact on an iPhone

Along with changing the default ringtone to a song on your iPhone, you can set a custom ringtone for a specific contact. Before you start the process, ensure you have the ringtone saved on your iPhone.

  1. Launch the Contacts app on your iPhone.
  2. Scroll through and select the contact for whom you want to set a custom ringtone.
  3. Tap the Edit button located in the upper right corner.
  4. Scroll down until you see the Ringtone option. Select it to open the ringtone selection menu.

    Tap Edit after opening contact and select Ringtone
  5. You will see a list of available ringtones, including the ones you added. Choose the desired ringtone. A checkmark will appear next to your choice.
  6. Finally, tap Done in the upper right corner to save your choice. Then, hit Done again to exit the contact editing screen.

    Select your preferred ringtone and tap on Done

Now, whenever that contact calls you, your iPhone will play a different tone than the default ringtone you assigned. Thus, you can identify who is calling without looking at your phone. This feature enhances your phone’s personalization and makes it easier to manage incoming calls.

Video: How to set any song as ringtone on iPhone

Signing off…

This is a handy trick to set a custom ringtone on an iPhone. If you have any queries or face any issues during the process, please share them in the comment section below.

FAQs

Can I set a song from Apple Music as a ringtone?

No, songs streamed on Apple Music cannot be used directly as ringtones due to DRM restrictions. You need to own the song file and have it in a compatible format.

How do I delete a custom ringtone from my iPhone?

You can easily delete a custom ringtone if you no longer need it. Go to the Settings app, access the Sounds & Haptics menu, and select Ringtone. Now, swipe left on the track you want to remove and tap Delete.

What formats are supported for iPhone ringtones?

iPhone ringtones must be in M4R format. If you have the ringtone in other formats like MP3 and AAC, you must convert it to M4R.

Can I create a ringtone from a voice memo?

Yes, you can create a ringtone from a voice memo. For detailed steps, refer to our guide on making a voice memo into a ringtone on an iPhone.

Can I set a custom ringtone for text messages or other alerts?

Yes, you can set custom tones for text messages and alerts. Access Settings → Sounds & Haptics. Now, select the desired alert type, such as Text Tone, Calendar Alerts, Reminder Alerts, etc., and choose the tone.

Read more:

Become an iOS 18 Master: Get our exclusive iOS 18 eBook 📚 for FREE when you sign up for our newsletter below.
1 comment
Leave a Reply

Your email address will not be published. Required fields are marked *