How to create an event on Facebook on iPhone or iPad
When you’re organizing an event, Facebook can make it easier to invite others and communicate all the details. Whether it’s a private affair such as a birthday party or open to the public, you can create a custom event page with information such as date, time, location, etc. Further, you can also keep track of who’s attending and edit details if needed. So, let’s learn more about how to create an event on Facebook on your iPhone.
How to create an event in Facebook on iPhone or iPad
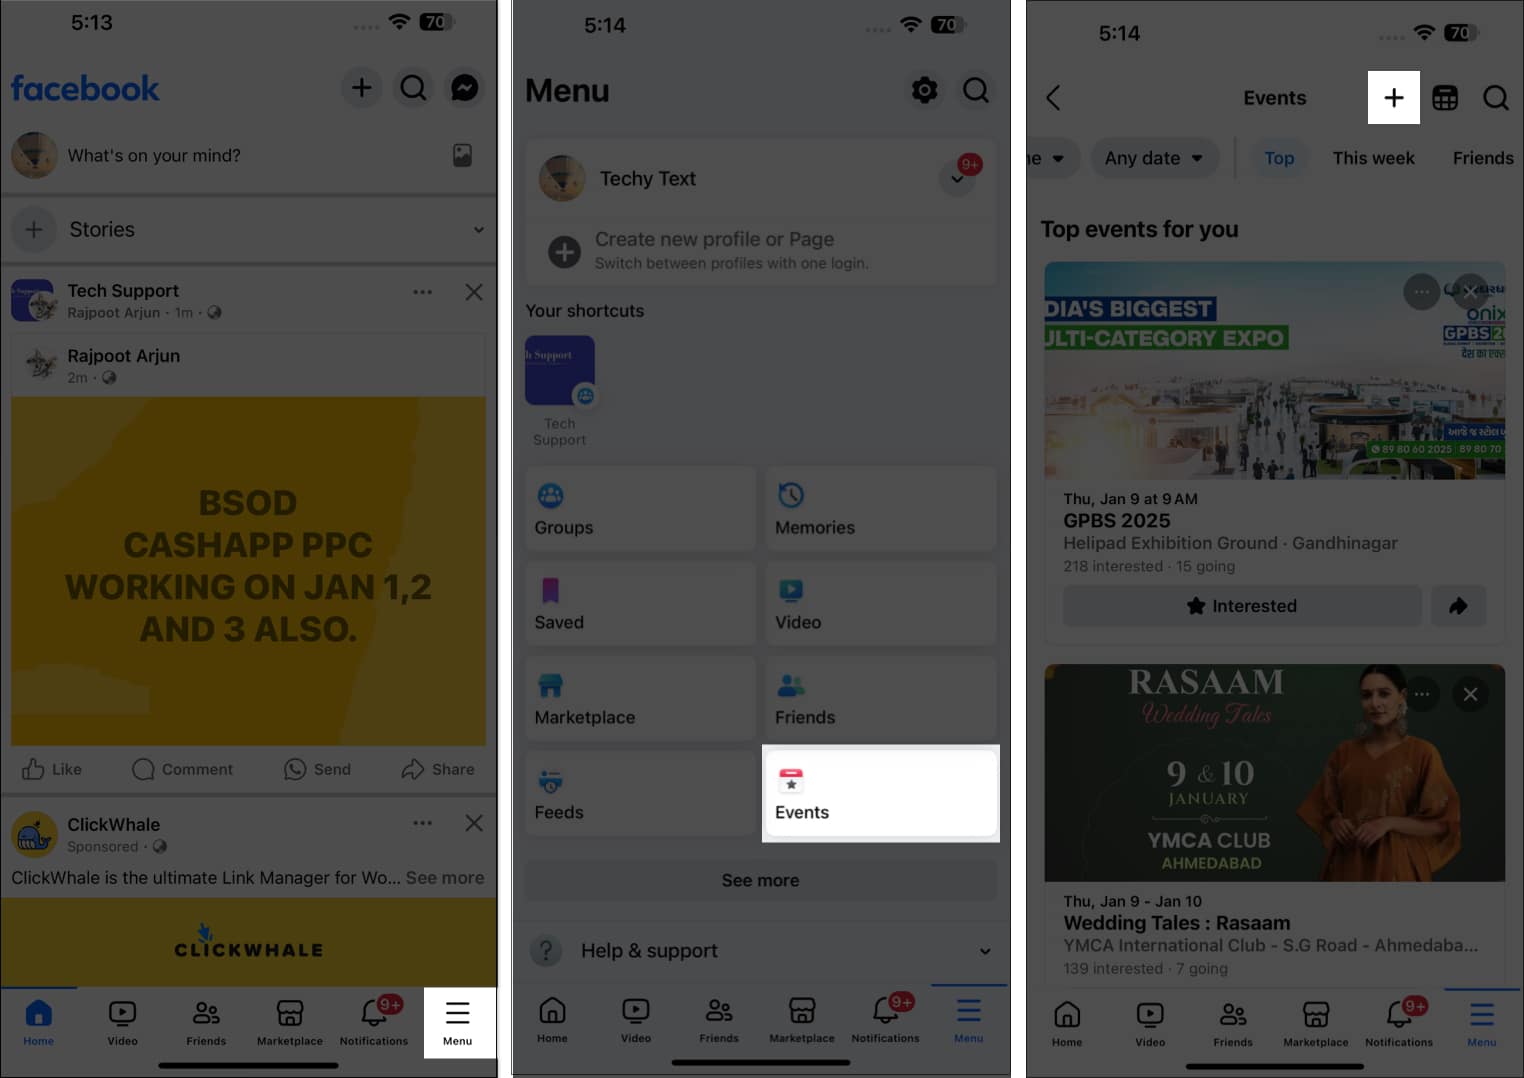
- Launch the Facebook app and tap on the Hamburger icon with your profile picture at the bottom right corner.
- Scroll down and select Events. If you don’t see the option, tap See more to reveal it.
- Now, tap the plus icon at the top to create a new event.
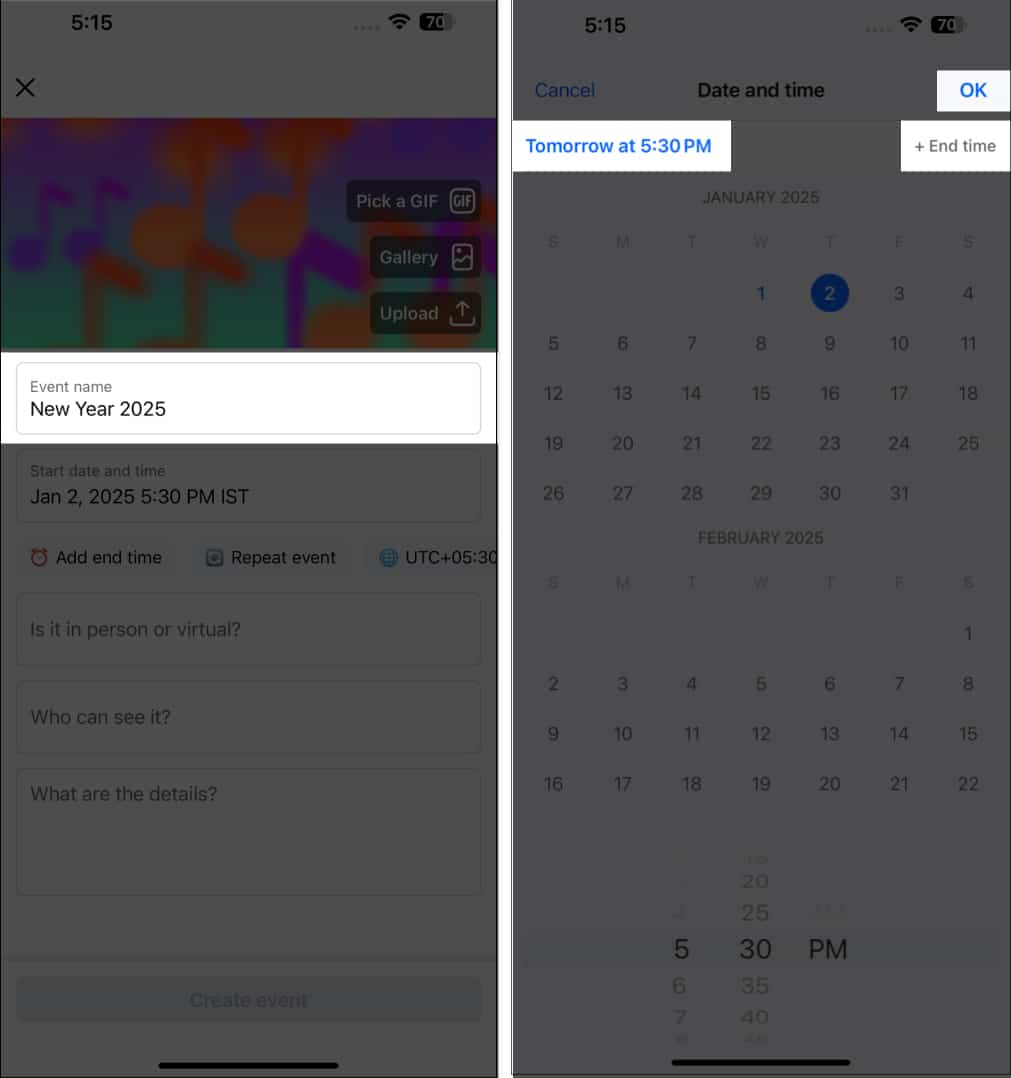
- Then, enter a suitable Event name and tap done on the keyboard.
- Next, add the Start Date and time. When setting the date and time, you can also add the End time of the event. Tap OK to save it.
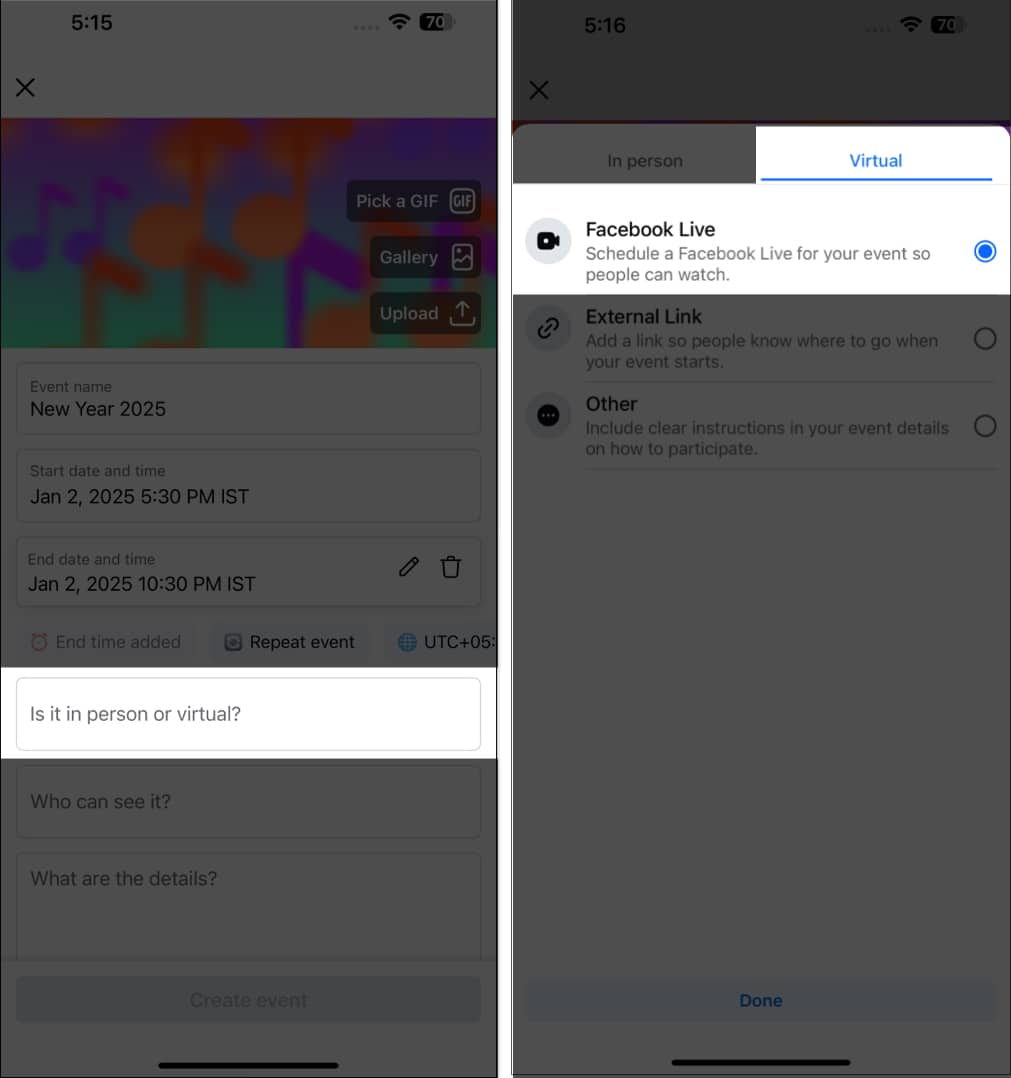
- Now, tap the “Is it in person or virtual” box to set the location.
- If it’s in person, search and select a location.
- For online events, move to the Virtual tab and select how the event will be hosted.
- Facebook Live: A Facebook Live will be scheduled for your event so that people can watch.
- External link: Adding a link will help people to know where to go when your event starts.
- Other: It allows you to add instructions on how to participate to your event details. Here, I chose Facebook Live. Tap Done to save it.
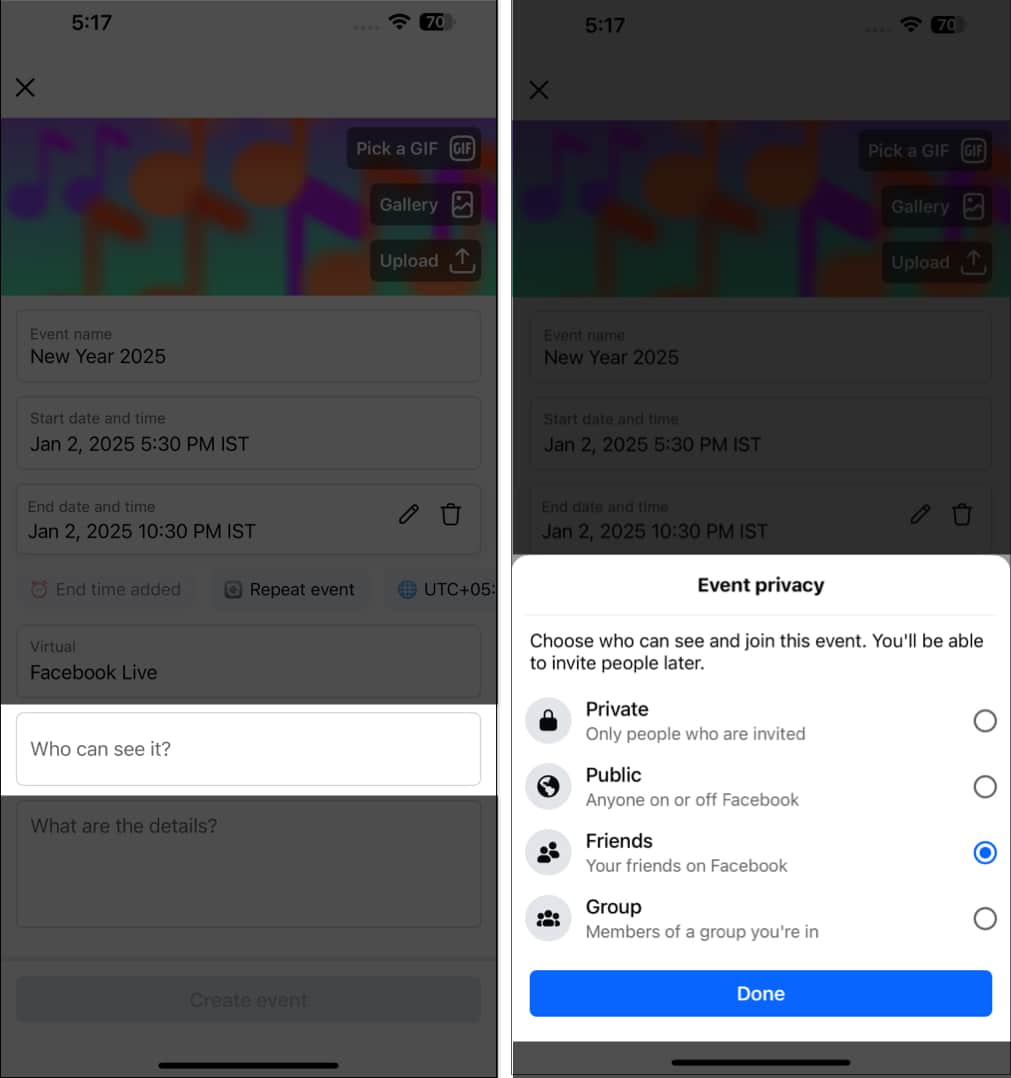
- Set the event privacy by tapping the “Who can see it?” box.
- Private: It would only allow the participants who have been invited prior to the event. You can also let the guests invite their friends to the event.
- Public: Can be viewed by anyone on or off the Facebook app.
- Friends: Will be visible to all of your Facebook friends.
- Group: You can send the event invite to the groups you are in on Facebook.
- Select an option and tap Done to confirm your choice.
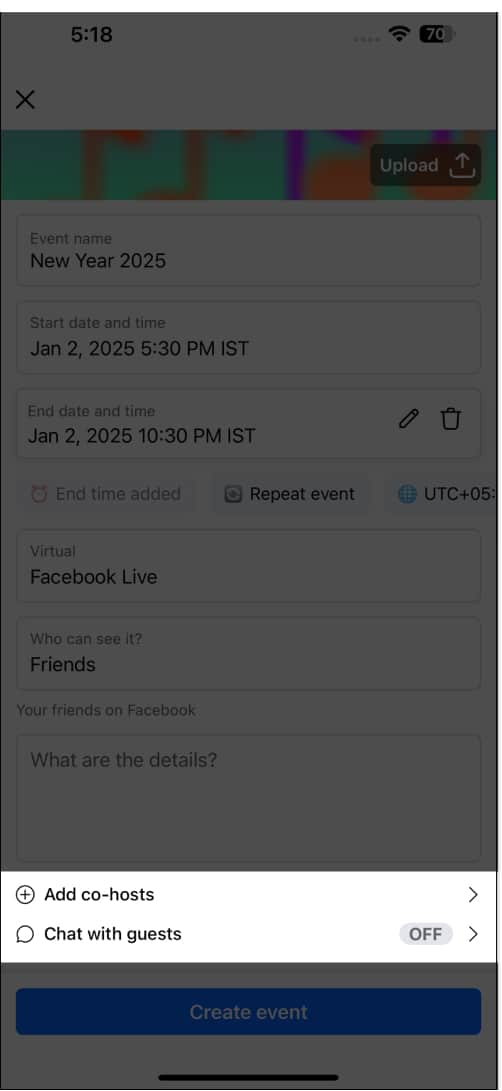
- Next, add a description or guidelines for the event.
- If you are hosting the event in collaboration, tap Add co-hosts, choose friends, select Add X co-hosts.
- For more fun, you can create a group with the participants. Tap Chat with guests, toggle on Add a WhatsApp group chat and select Next.
- If you want to add a custom banner for your event, tap Upload at the top, select a photo, hit Done, frame the banner properly, and tap Save. Else, you can choose banners from Facebook Gallery or Pick a GIF.
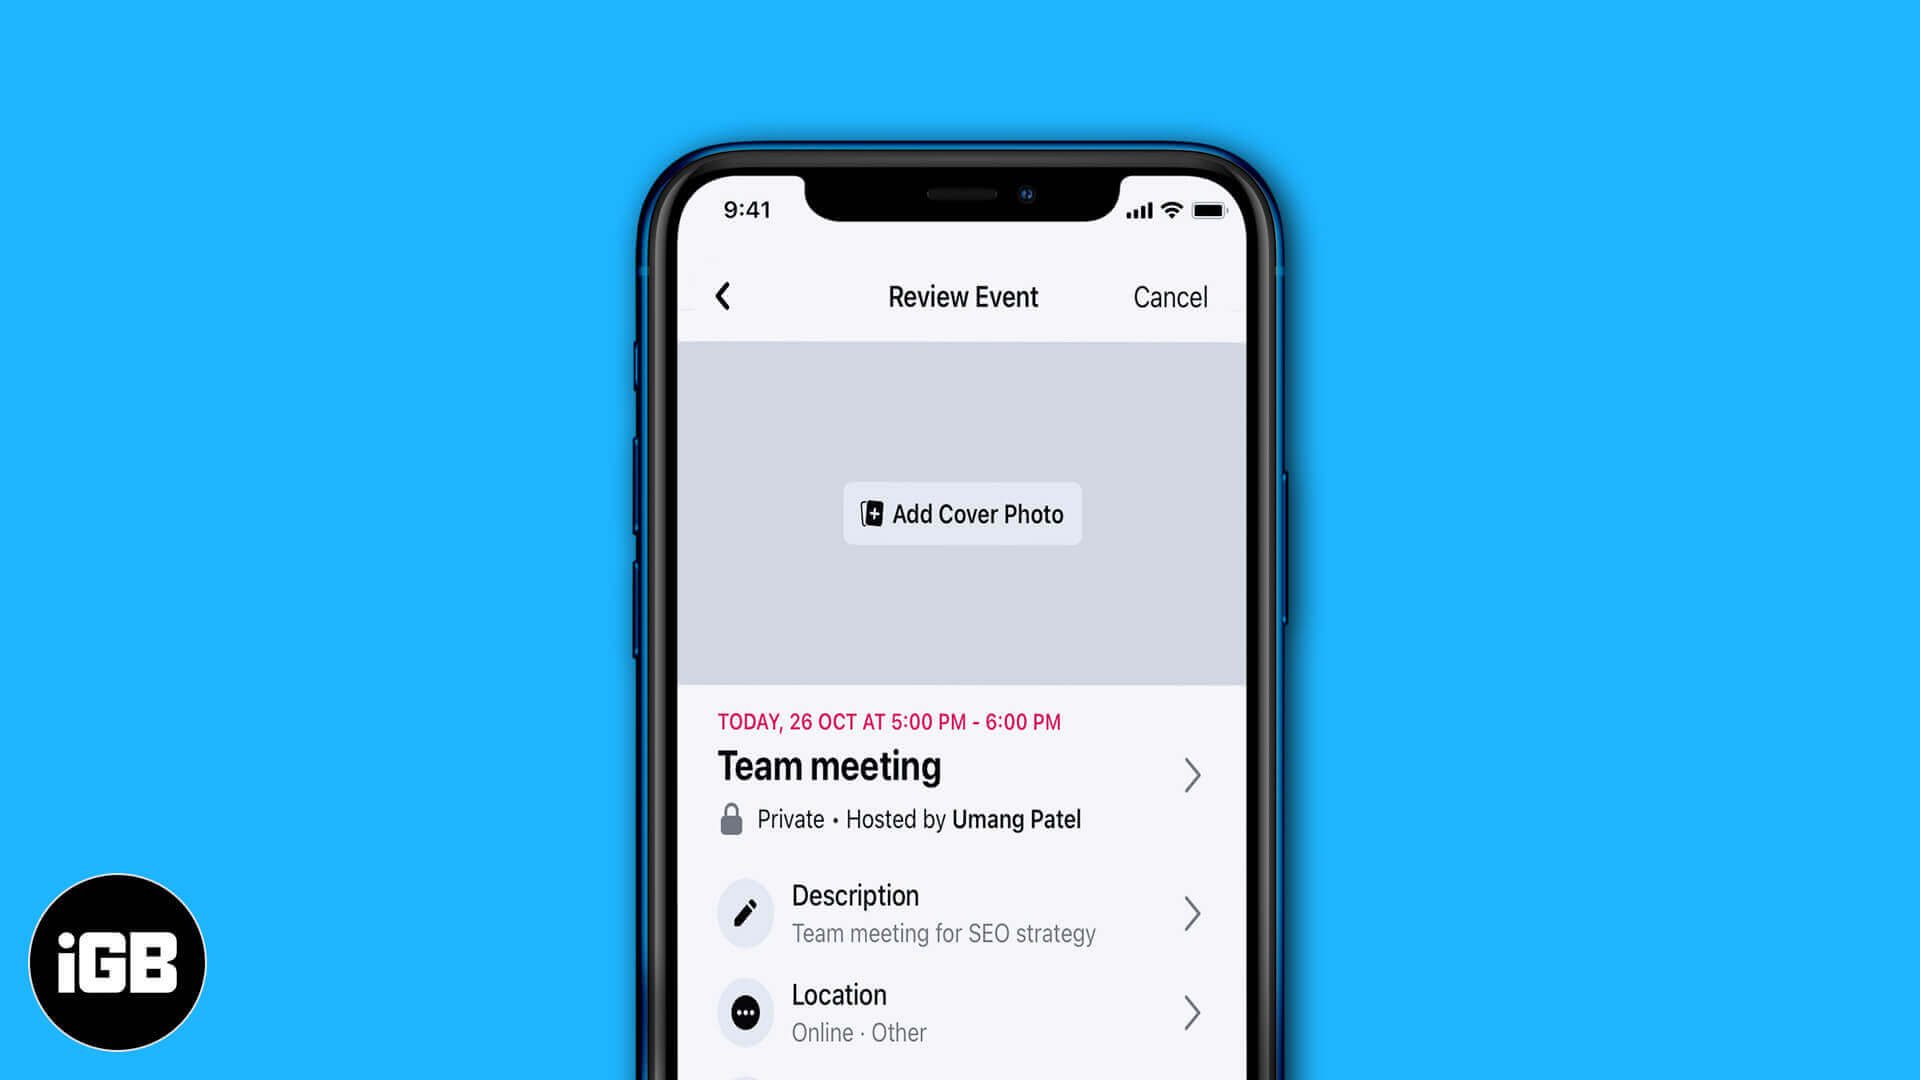
- Review the details of the event and tap the Create event button at the bottom.
- Now, you will be prompted to send invites. Select your friends and tap Invite.
To spread the word about your event and create engagement, you can create posts on the event details page. For private events, only the invited friends can see the posts.
If you have enabled group chat when creating the event, you need to set it up as well.
- From the Facebook Event details page, tap Add a WhatsApp group invite → Continue → Open.
- It will redirect you to WhatsApp.
- Tap New group, select the members, tap Next.
- Enter a suitable group name and hit Create.
Invite friends to your event on Facebook
Once the event is created, you can copy its links and share them with your friends and family. Tap the Manage button under the event name and select Copy invitation link. Note that this invitation link will expire once 100 people respond to it and confirm their email or phone number.
If you want to invite a person who doesn’t have a Facebook account, follow the steps below:
- Tap the Invite button on the event details page. If you don’t see it, tap Manage and select Invite.
- Select Text or email from the menu.
- Enter their phone number or email address and tap Invite.

Facebook also lets you invite your Instagram followers. From the Invite people page, search for the Instagram ID, tap the Invite button next to them, and hit Done.
Edit an existing event in Facebook on your iPhone
- Open the Facebook app and go to the Events section.
- Here, you will see your events. Tap on the event you wish to edit.
- Now, tap on Manage and select Edit.
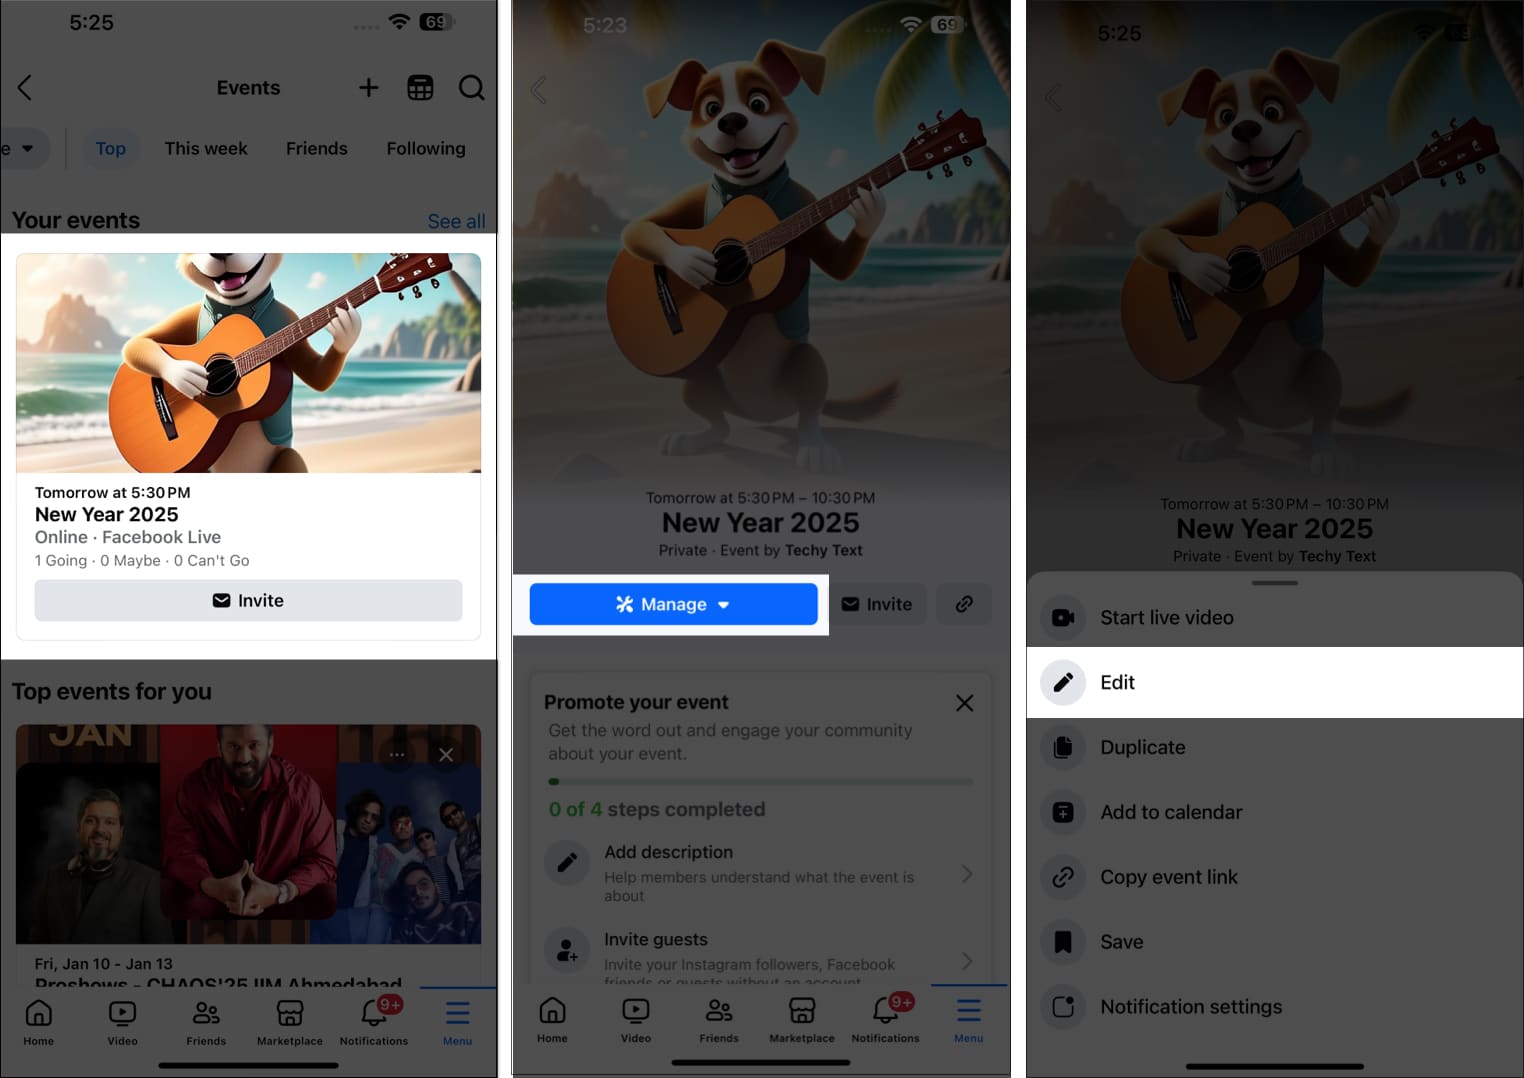
- You can change the event name, time, location, banner, add co-hosts, and more info about the event.
You will change the event name, time, location, add co-hosts, and add more info about the event. In addition, you will be able to view the changes you’ve done in the event details.
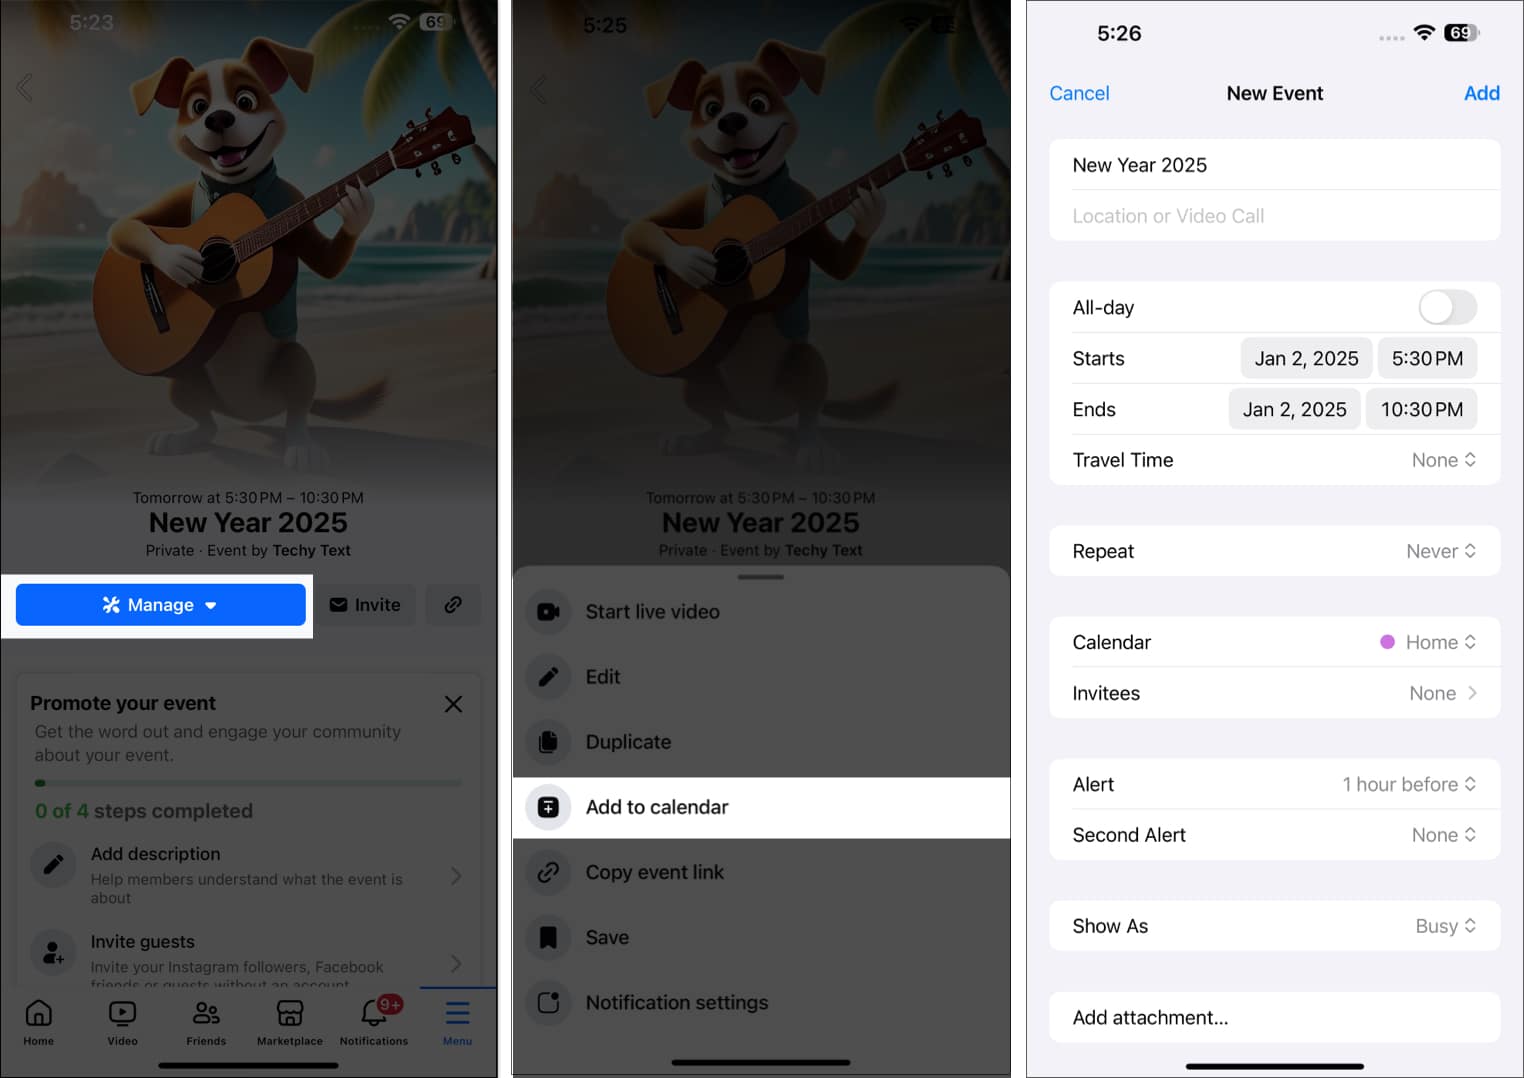
How to add Facebook events to your iOS’s Calendar app
One thing I always do after creating an event on Facebook is add it to my calendar so I can keep up with my schedule. Here’s how:
- Tap Manage on the event details page.
- Select Add to calendar and grant permission to Facebook to access your Calendar app.
- Now, edit the details as per your requirements and tap Add to save it.
How to cancel or delete an event on Facebook
- Go to the Facebook event you’ve created.
- Tap the Manage button and select Edit.
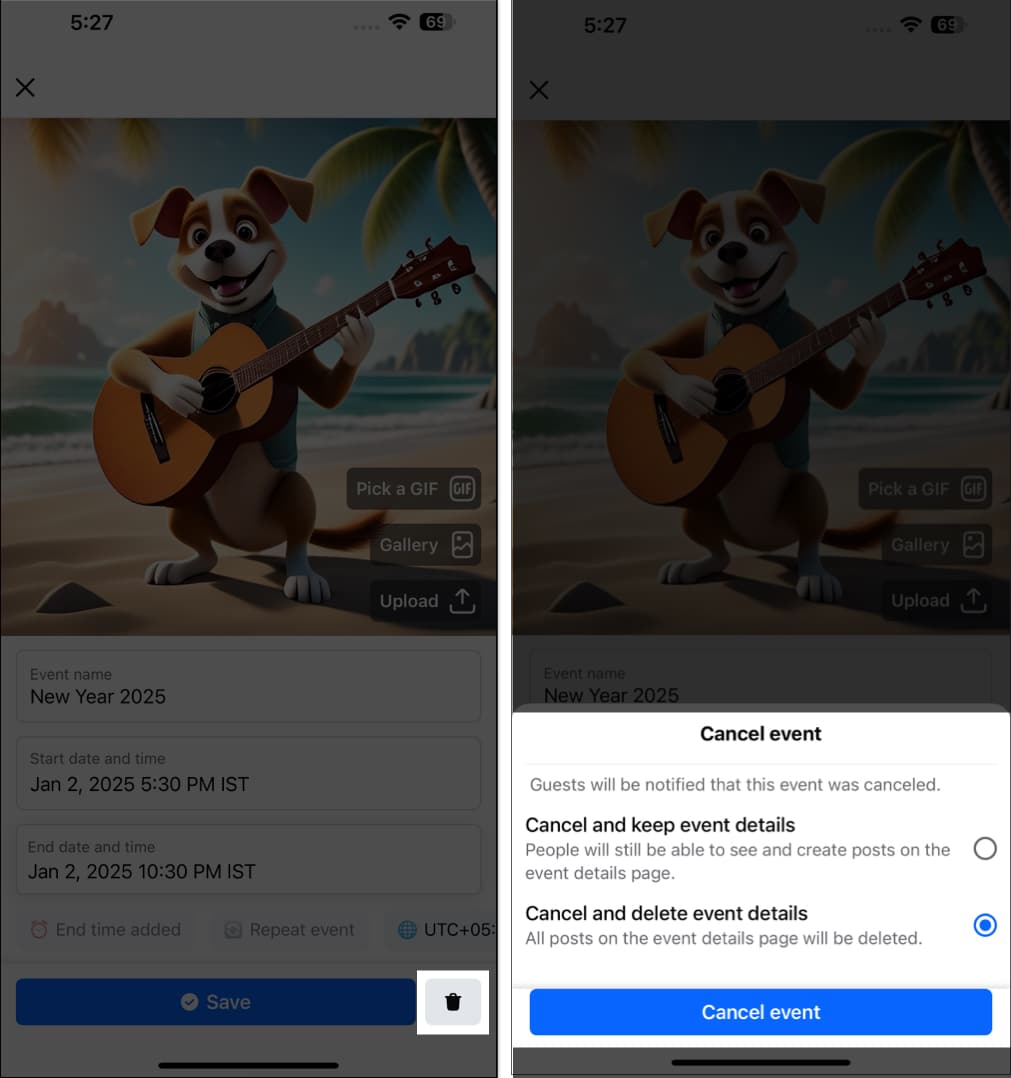
- Tap on the Trash icon at the bottom right corner. Now, select an option:
- Cancel and keep event details: It will only cancel the event schedule. But people will continue to see the event details page and create posts on it.
- Cancel and delete event details: This option cancels the event and removes the event details page along with all the posts.
- Select the Cancel Event button to confirm your choice.
All the guests will get a notification that you have canceled the event. You may also add a post about the cancellation.
Note:
That’s It!
I hope all your queries in this article were resolved. If you still have some questions! Write to us in the comment section below! Till then, keep reading and stay updated.
You may also like to read:
Topics

Written by
Suraj PadmasaliSuraj is an operations head on the iGB team. He contributes to the social media section along with tips and tricks for iPhone, Apple Watch. Apart from blogging, he likes to work out as much as he can in his gym and love to listening to retro music.
View all posts →