Apple has long prioritized accessibility, building features into iPhone and iPad that help people interact with their devices in ways that match their physical abilities and personal preferences. Among these tools, Switch Control stands out as one of the most powerful and customizable options. It allows you to operate your iPhone or iPad without relying on traditional touch gestures, using switches, adaptive accessories, or alternative input methods to navigate, select items, and perform actions across the system.
Here is everything you need to know about Switch Control and how to use it.
Table of Contents
- What Is Switch Control on iPhone and iPad?
- How Does Switch Control Work?
- What’s New in Switch Control in iOS 26?
- How to Turn On Switch Control on iPhone and iPad
- How to Use Switch Control to Navigate Your iPhone or iPad
- How to Customize Switch Control Settings
- Switch Control vs AssistiveTouch vs Voice Control: What’s the Difference?
- Final Thoughts
What Is Switch Control on iPhone and iPad?
Switch Control is an accessibility feature on iPhone and iPad that lets users control their device using external switches, screen taps, or adaptive accessories instead of standard touch gestures.
It is primarily designed for people with motor impairments or limited mobility, allowing them to navigate the interface, select items, type, and perform actions using one or more switches. The system works through an automatic scanning interface that highlights items on the screen, which you can select using a switch input.
In simple terms, Switch Control lets you operate your iPhone or iPad with minimal physical interaction.
How Does Switch Control Work?
Switch Control uses a scanning system that automatically highlights selectable items. You interact with the device by triggering actions when the correct item is selected.
There are three scanning styles you can choose from, based on your preference:
- Auto Scanning: The cursor automatically moves across screen elements at a set speed.
- Manual Scanning: One switch moves between items while another selects.
- Single-Switch Step Scanning: One switch controls navigation and selection via timed steps.
A floating menu provides additional actions, such as scrolling, gestures, and system controls.
What’s New in Switch Control in iOS 26?
Recent updates to Switch Control make it faster, smarter, and more flexible, introducing improvements that simplify navigation and reduce setup friction.
1. Switch sets
You can now create multiple switch configurations and switch between them instantly. This allows different setups for different tasks without reconfiguring switches each time.
Example use cases include:
- One setup for typing
- Another for browsing or media control
This change removes the need to repeatedly adjust switch assignments.
2. Slide to Type
Typing becomes faster by allowing you to draw a path across the keyboard using the cursor instead of selecting each key individually. The system predicts words based on cursor movement, similar to swipe typing on a touchscreen keyboard.
3. Move to AssistiveTouch
You can now jump directly from Switch Control to AssistiveTouch via the Switch Control menu, making it easier to switch between accessibility tools as needed.
4. Eye tracking support
Eye Tracking lets your gaze control the cursor via the front-facing camera. A switch input confirms selections, enabling near hands-free device navigation.
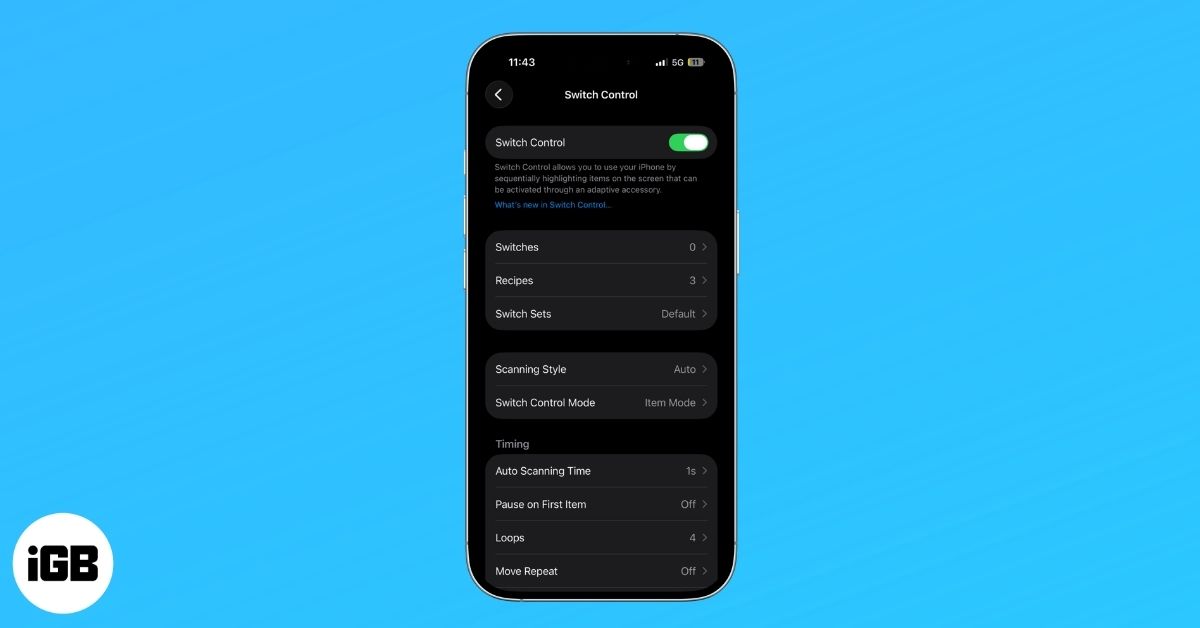
How to Turn On Switch Control on iPhone and iPad
Enabling and setting up Switch Control on your iPhone and iPad is straightforward and can be completed in a few taps. Here’s how:
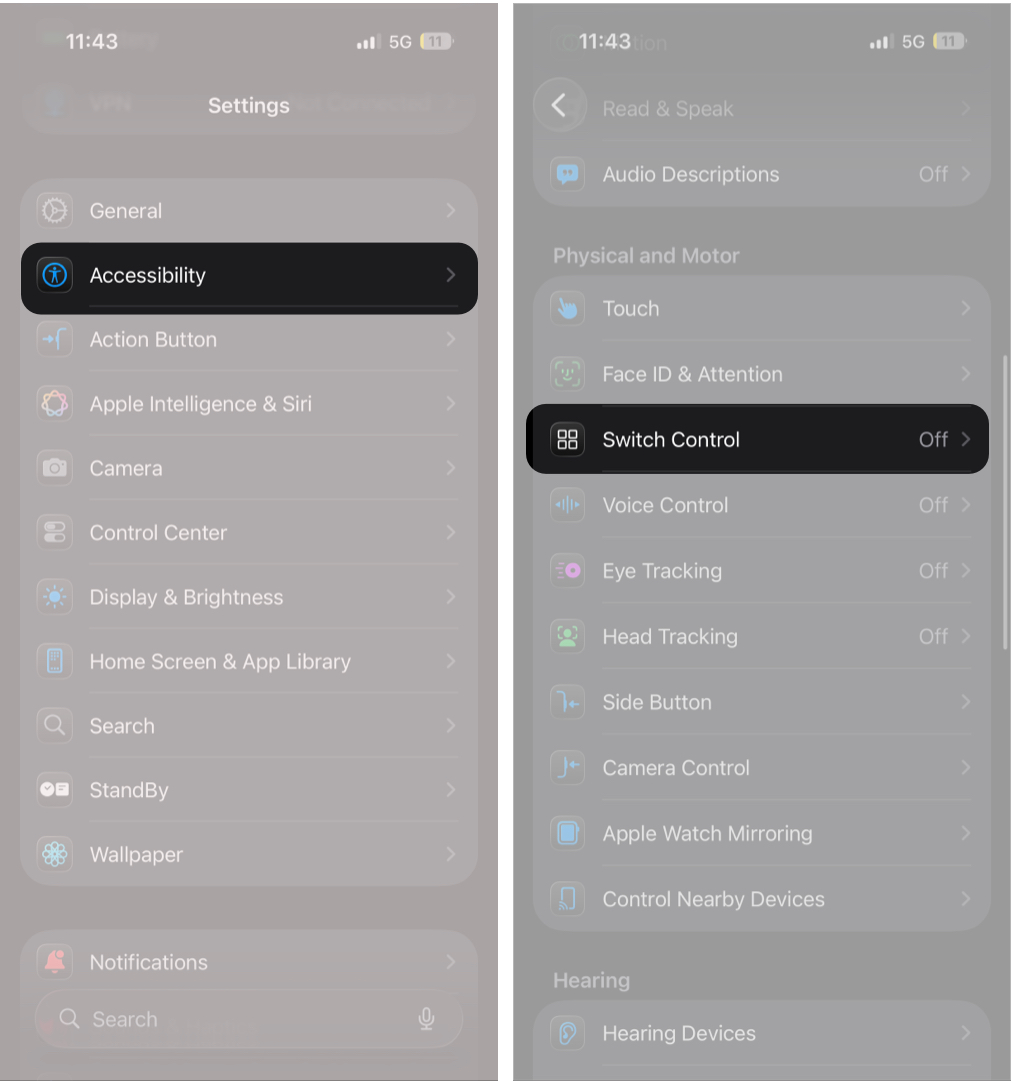
- Open Settings and head to Accessibility.
- Here, select Switch Control under the Physical and Motor section.
- Now, toggle Switch Control on, then tap OK to confirm.
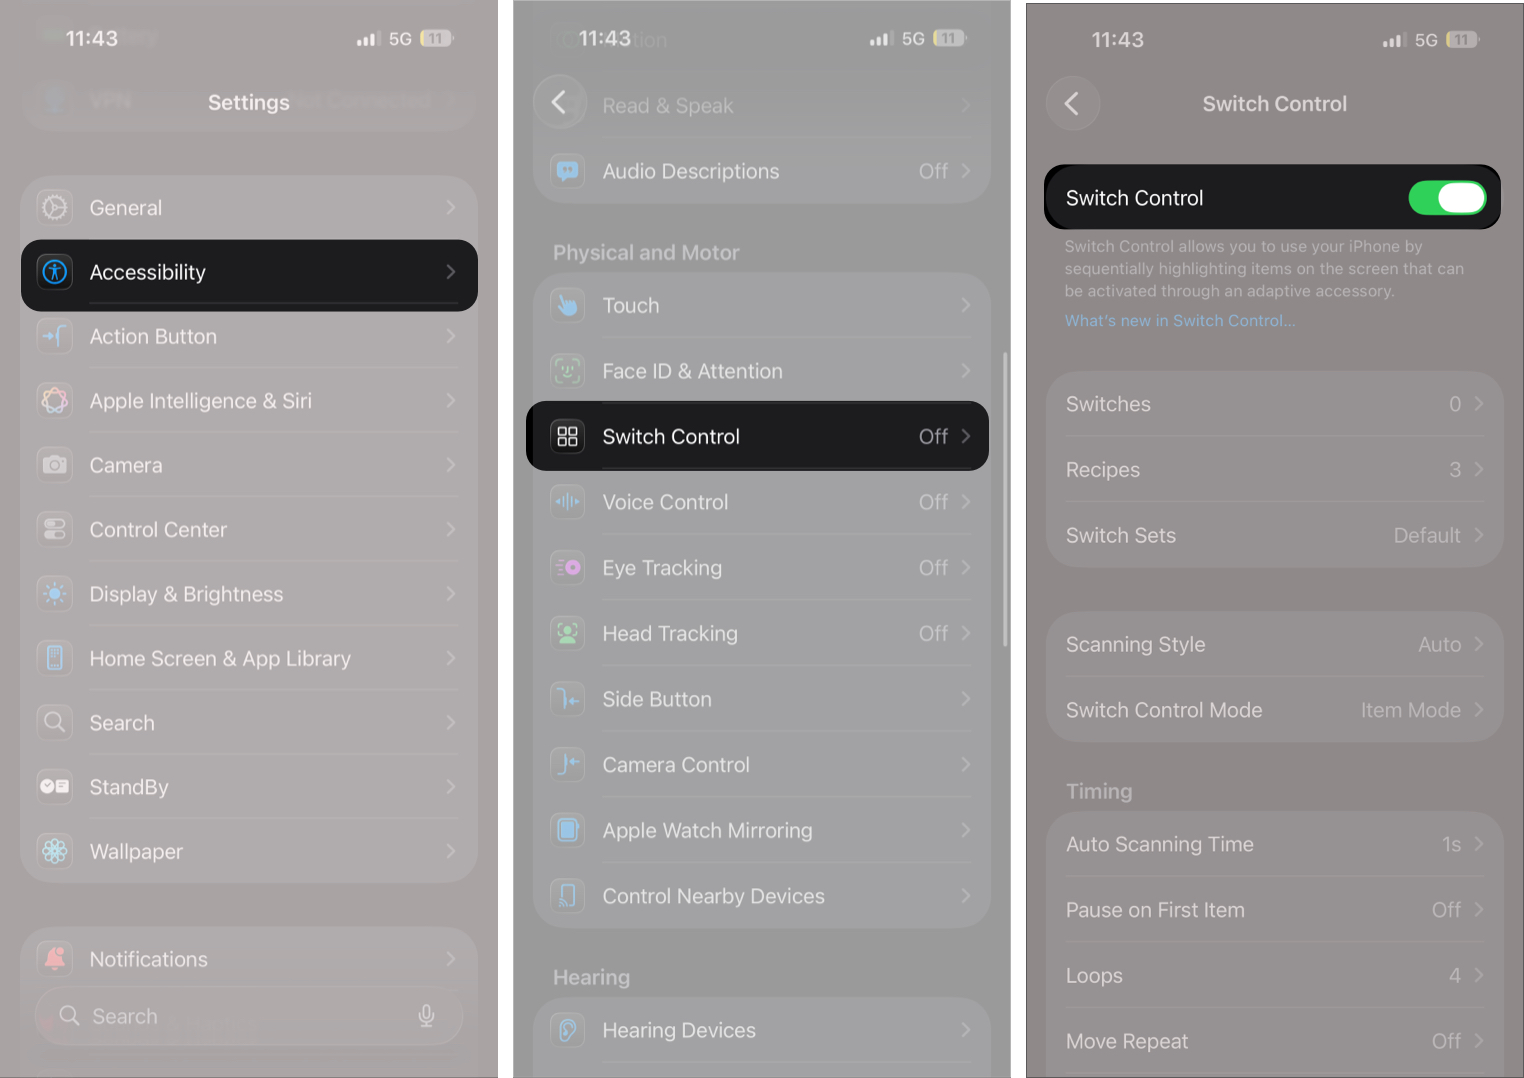
Once enabled, scanning begins immediately on the screen.
After enabling Switch Control, you must assign at least one switch before using it. Here’s how:
- In the Switch Control settings, tap Switch.
- Tap Add New Switch, then select the switch source you prefer.
- Now, assign one of the available actions under:
- Scanner
- Navigation
- System
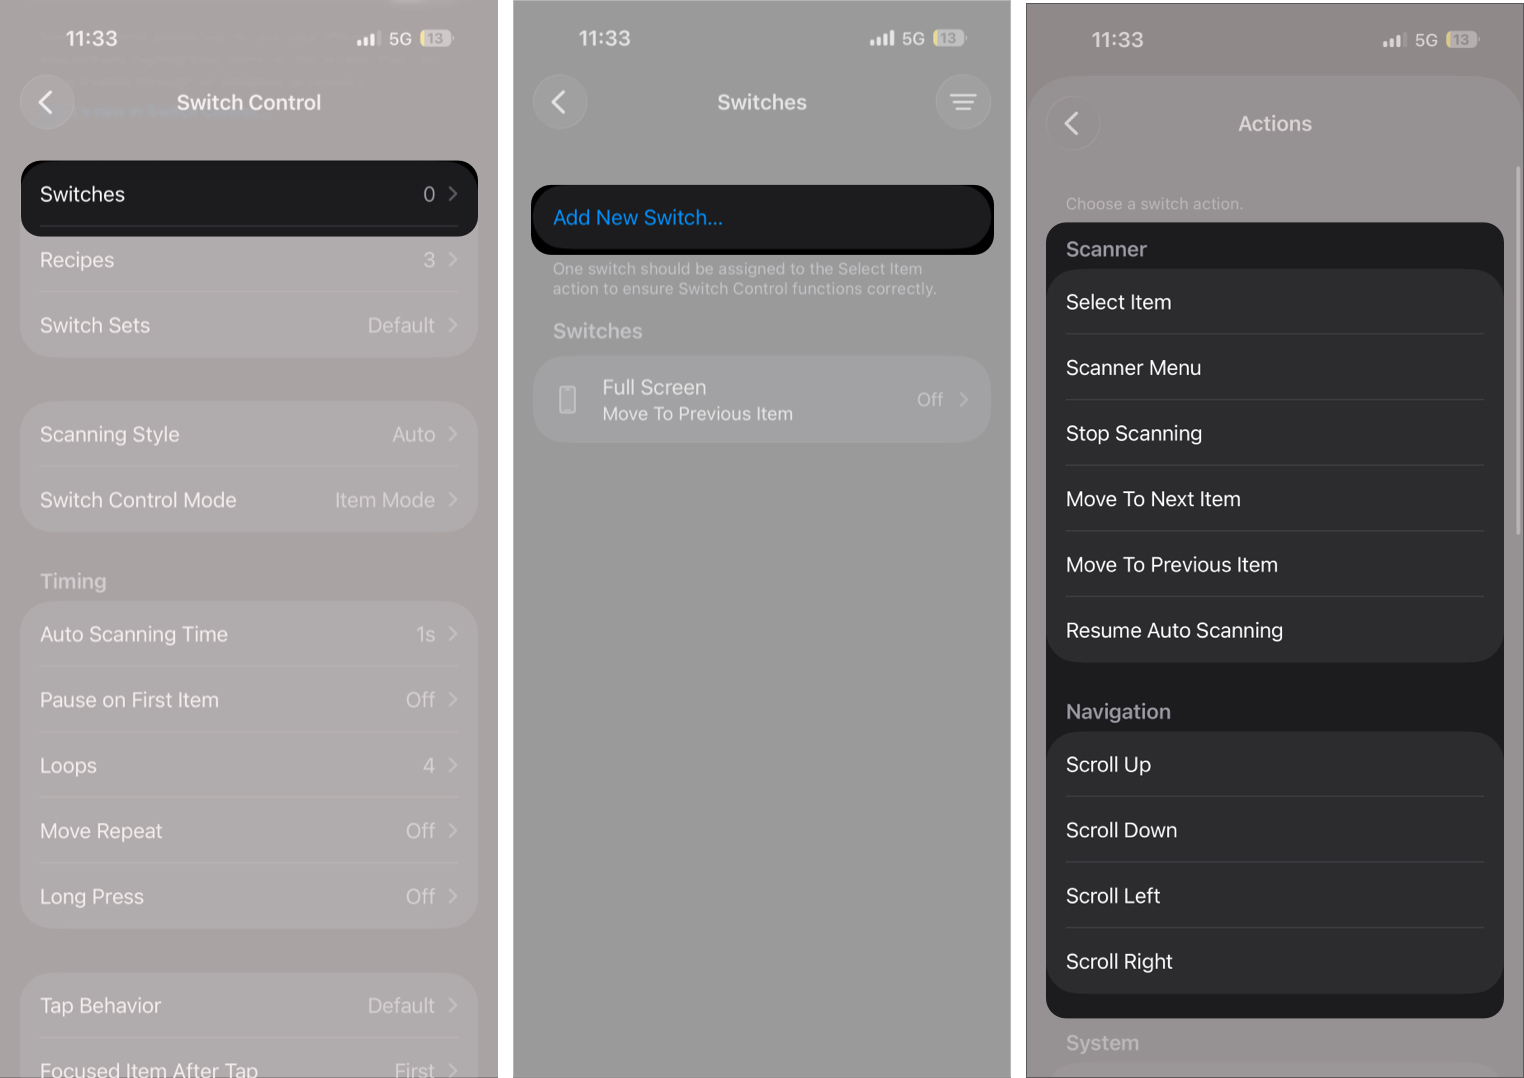

Repeat the process to add multiple switches for more advanced control.
How to Use Switch Control to Navigate Your iPhone or iPad
Once Switch Control is enabled and at least one switch is set up, you can start navigating your iPhone or iPad using scanning and switch actions instead of touch gestures.
Step 1: Watch as items on the screen are highlighted automatically
Switch Control scans the interface by moving a highlight box across buttons, icons, and menus. The highlight moves based on your selected scanning style and timing settings.
Step 2: Activate your switch when the desired item is selected
When the highlight reaches the item you want, trigger your assigned switch. This action selects the item and typically opens the Switch Control menu rather than executing the action immediately.
Step 3: Use the Switch Control menu to perform actions like:
- Tap to open apps or press buttons
- Scroll through pages or lists
- Perform gestures such as swipes or pinches
- Access device controls like notifications, Control Center, or volume settings
Select an action from the menu using your switch to complete the interaction.
To exit Switch Control, you can either head to Settings → Accessibility → Switch Control or use the Accessibility Shortcut if you have assigned one.
How to Customize Switch Control Settings
After enabling and setting up Switch Control, customizing its settings is the most important step. Proper configuration improves accuracy, reduces accidental selections, and speeds up navigation.
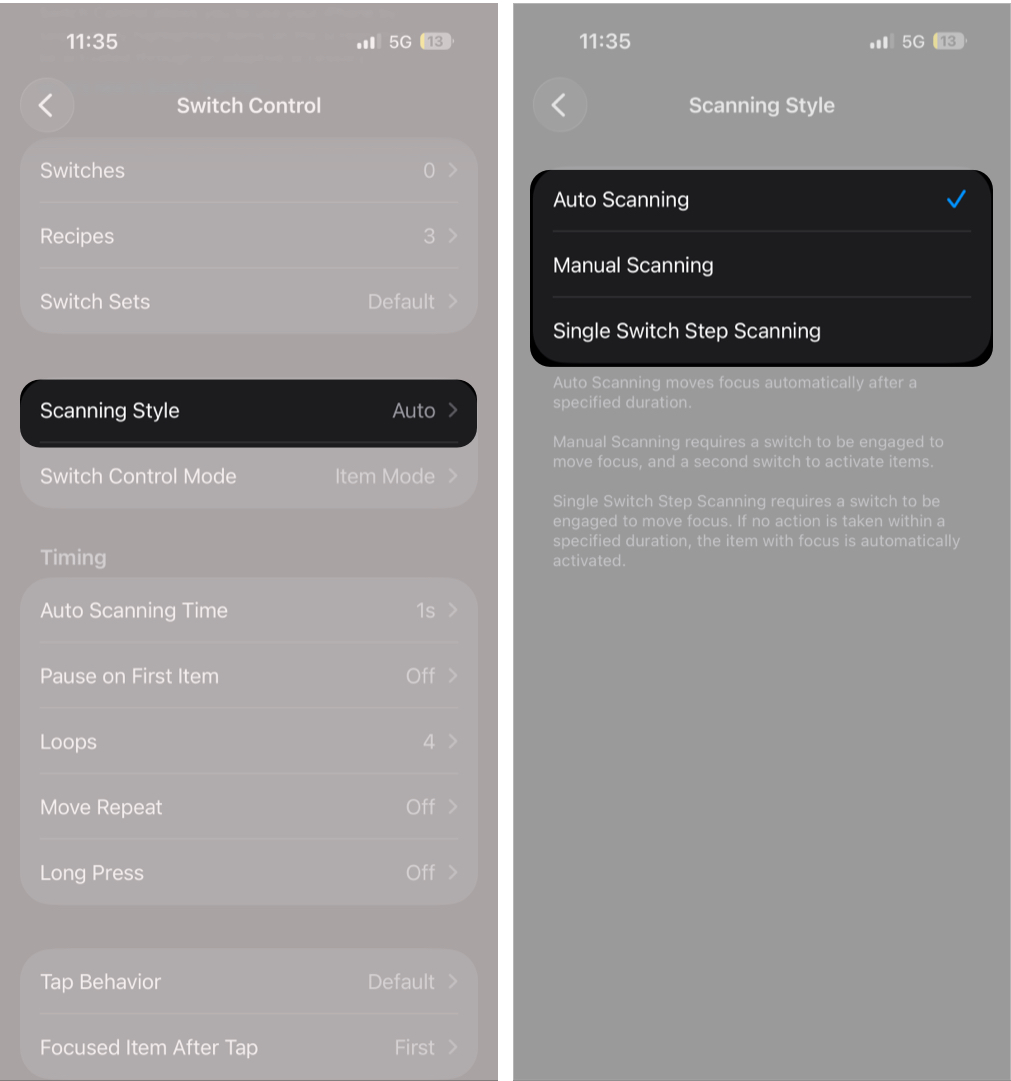
Change the Scanning Style
Scanning determines how items are highlighted on your screen.
- In the Switch Control settings, tap Scanning Style.
- Here, choose one of the available options: Auto Scanning, Manual Scanning, or Single Switch Step Scanning.

Adjust Scanning Speed and Timing
Timing settings control how responsive Switch Control feels.
- Tap Auto Scanning Time.
- Now, tap the plus (+) or minus (–) buttons to increase or decrease the scanning speed.
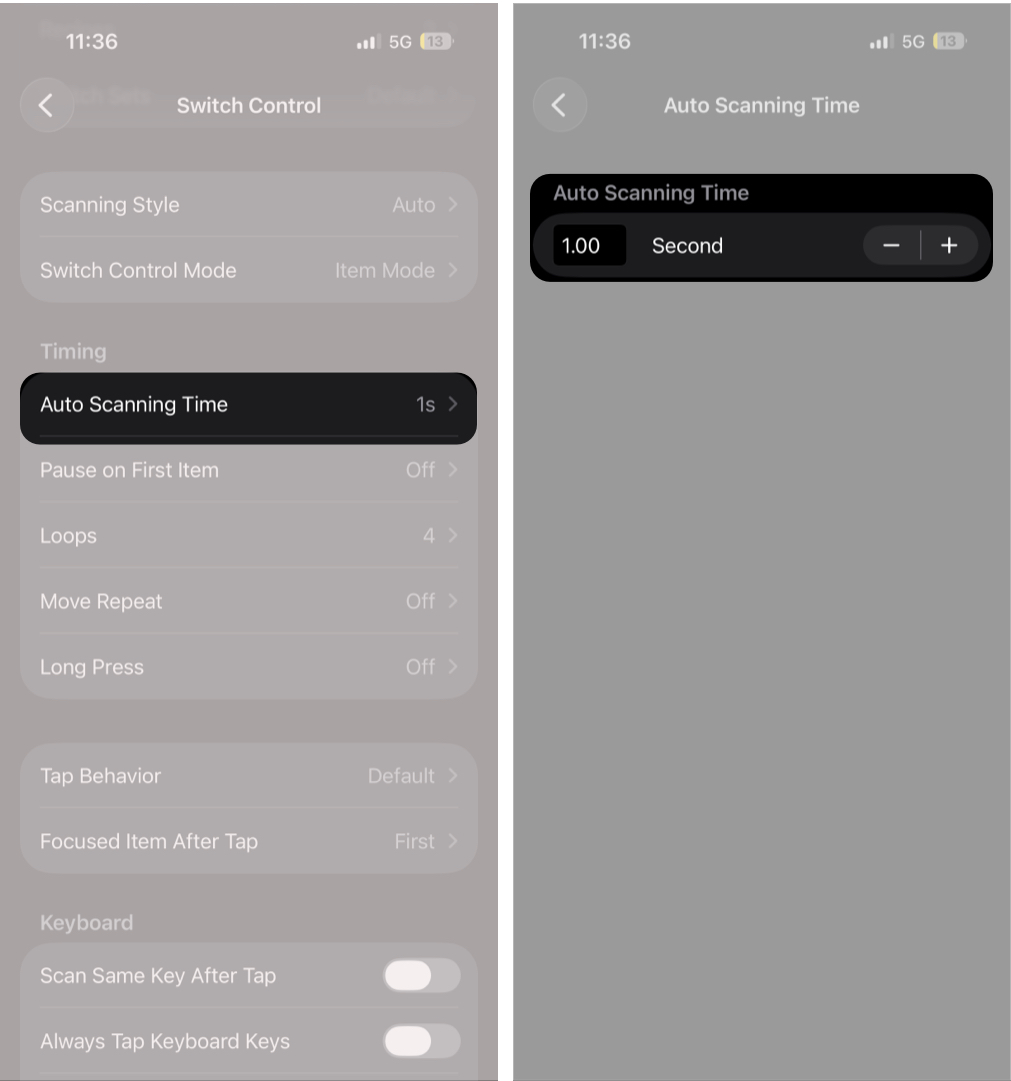
- Next, head back and adjust these options:
- Pause on First Item: Adds a short delay before scanning begins.
- Loops: Sets how many times scanning repeats across the screen.
- Move Repeat: Allows repeated actions when holding a switch.
- Long Press: Assigns secondary actions when holding the switch longer.

Start with slower timing and gradually increase speed once comfortable.
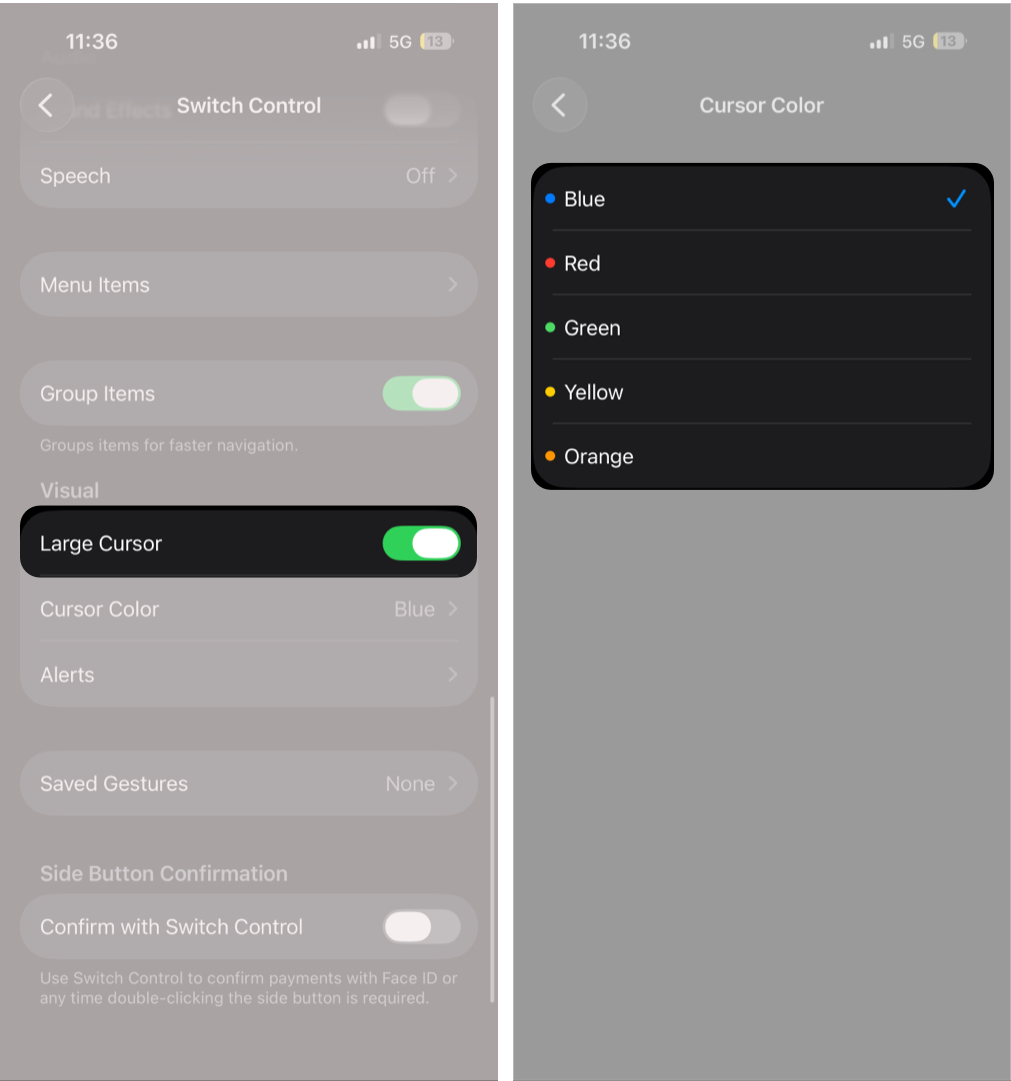
Change Highlight Appearance
Adjusting visual feedback makes scanning easier to follow.
- Go to Settings → Accessibility → Switch Control.
- Here, scroll to the Visual section and make the following changes:
- Toggle on Large Cursor to increase the size of the cursor.
- Tap Cursor Color to choose a different cursor color.


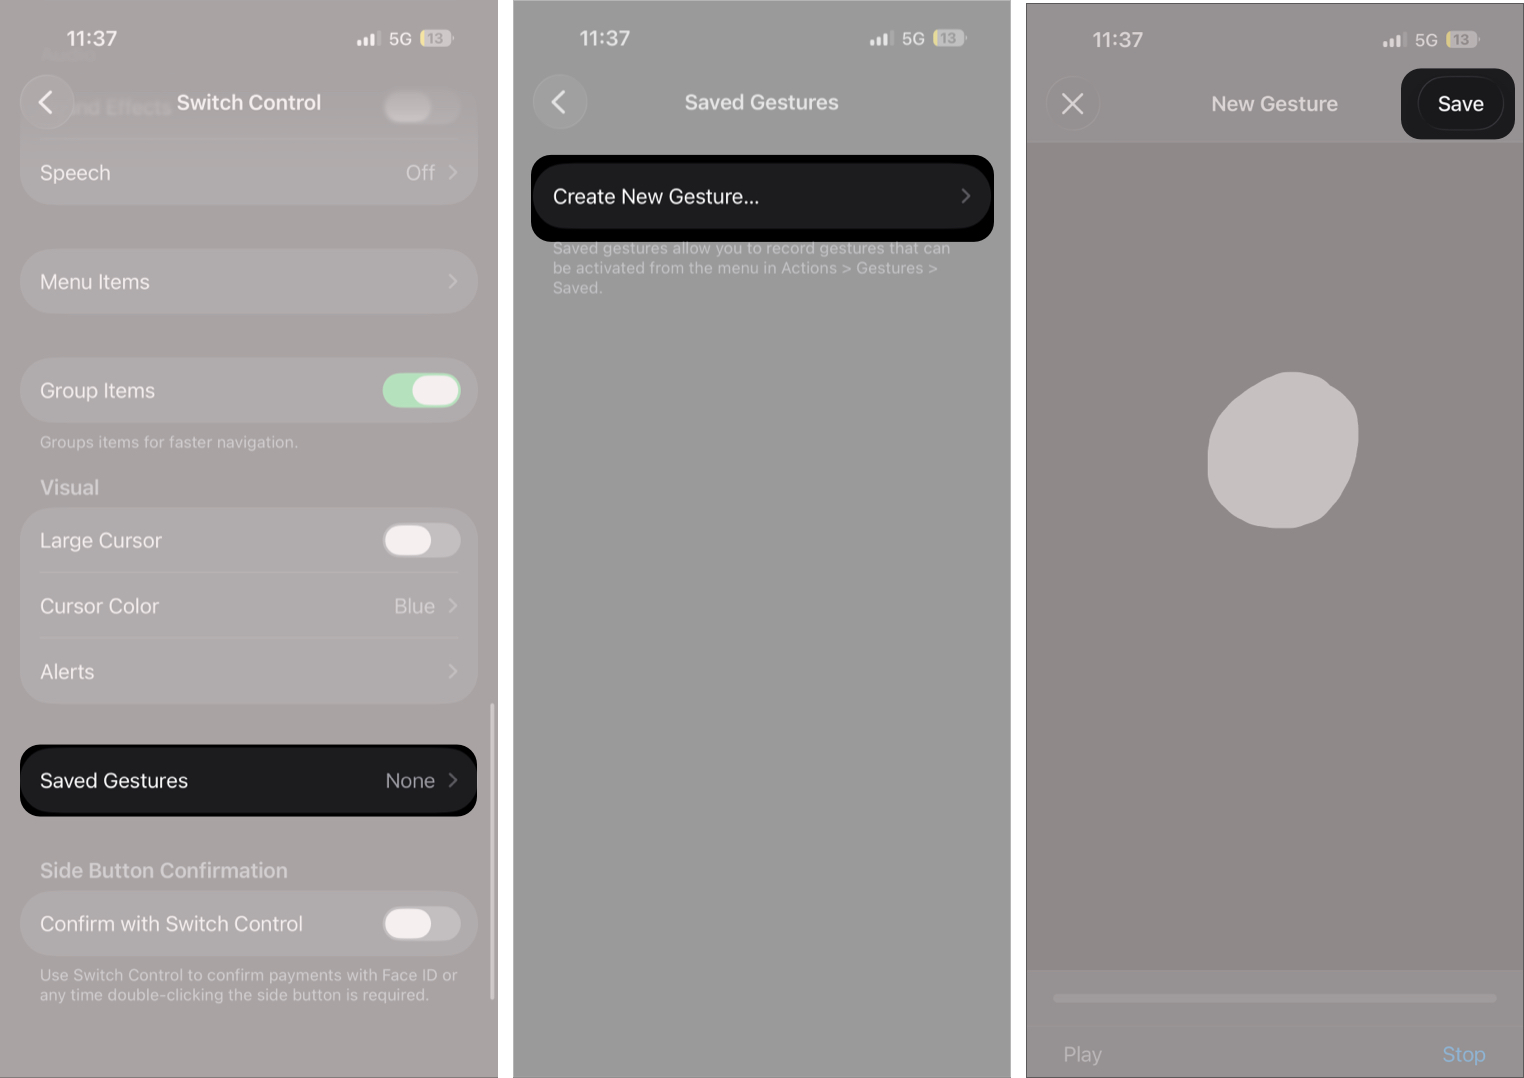
Create Custom Gestures
You can perform complex touch gestures using a switch.
- Go to Settings →Accessibility → Switch Control.
- Scroll down and tap Saved Gestures.
- Tap Create New Gestures.
- Perform a gesture on the screen, such as a swipe or a pinch, then tap Save.
- Name your gesture, then tap Save to confirm.

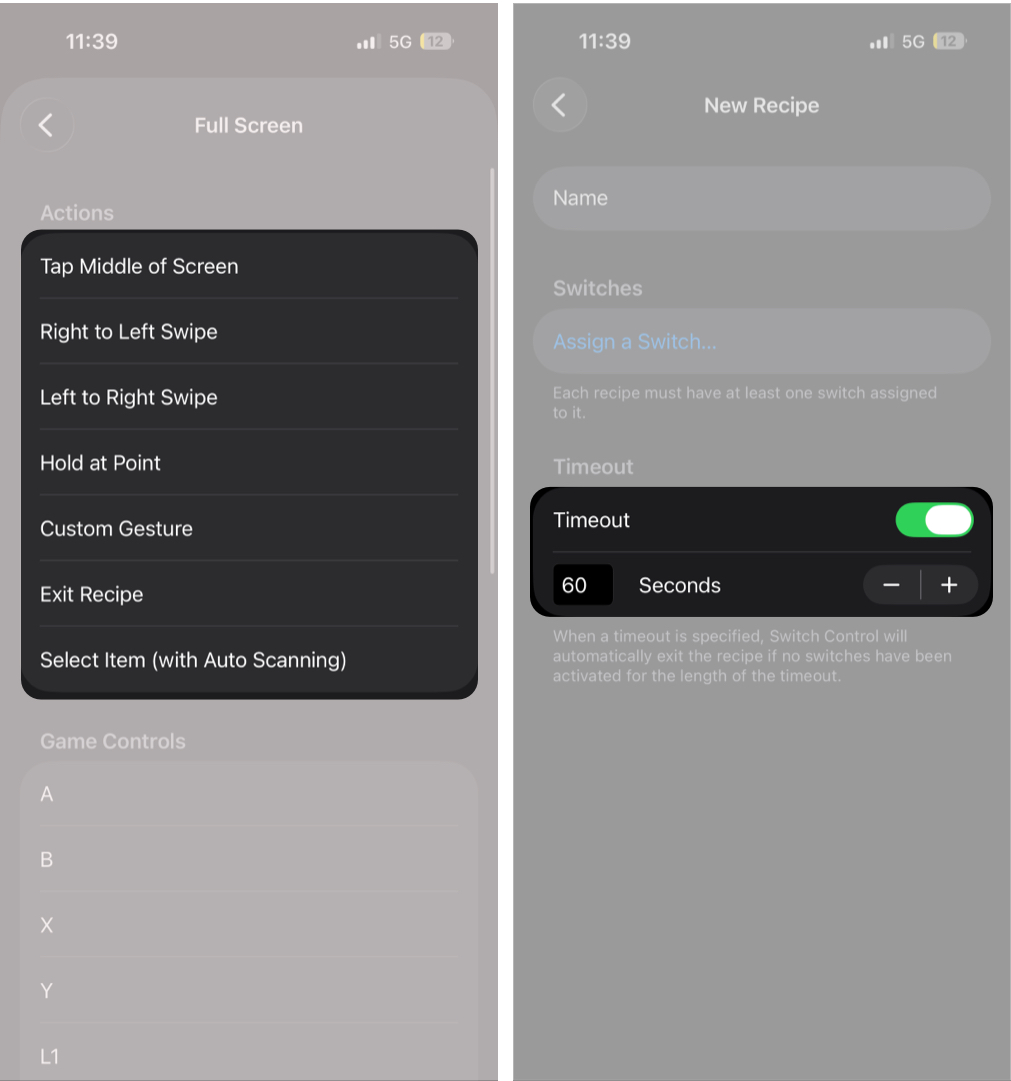
Set Up Recipes for Different Tasks
Recipes allow switches to behave differently during specific activities.
- In the Switch Control settings, tap Recipes.
- Here, tap Create New Recipe.
- Enter a name for the recipe.
- Tap Assign a Switch.
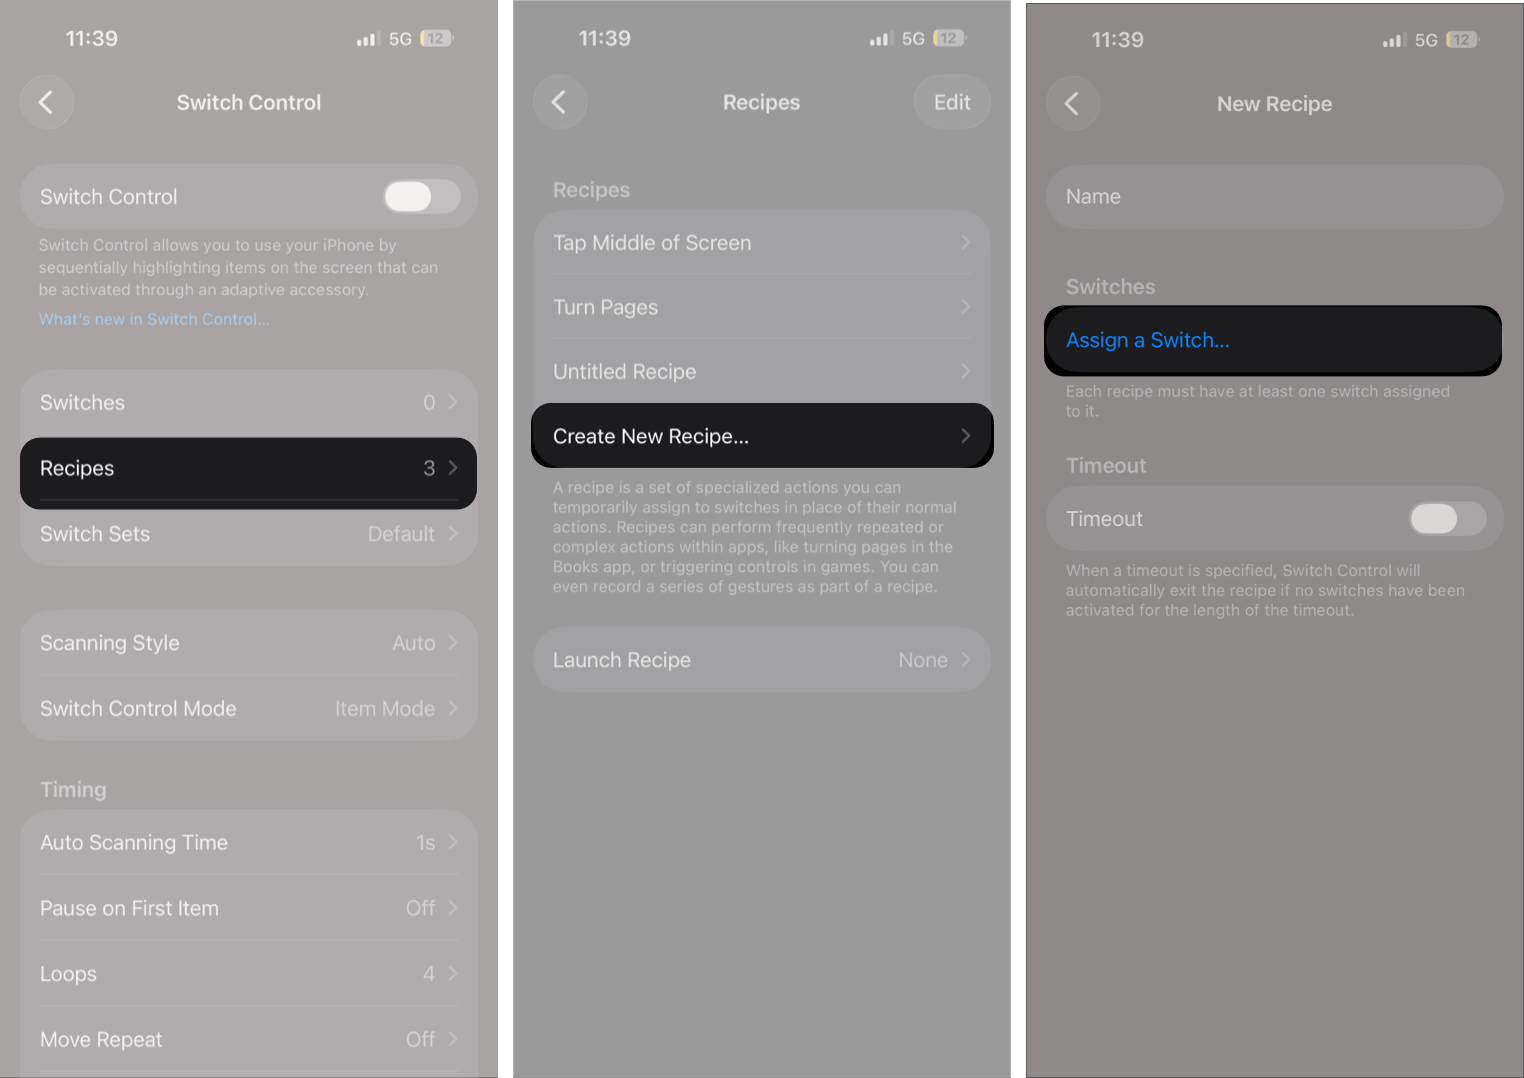
- Next, select the switch you want to customize, then choose the action it should take while this recipe is active.
- Now, head back and toggle on Timeout and choose how long the recipe should remain active before Switch Control returns to the default setup.


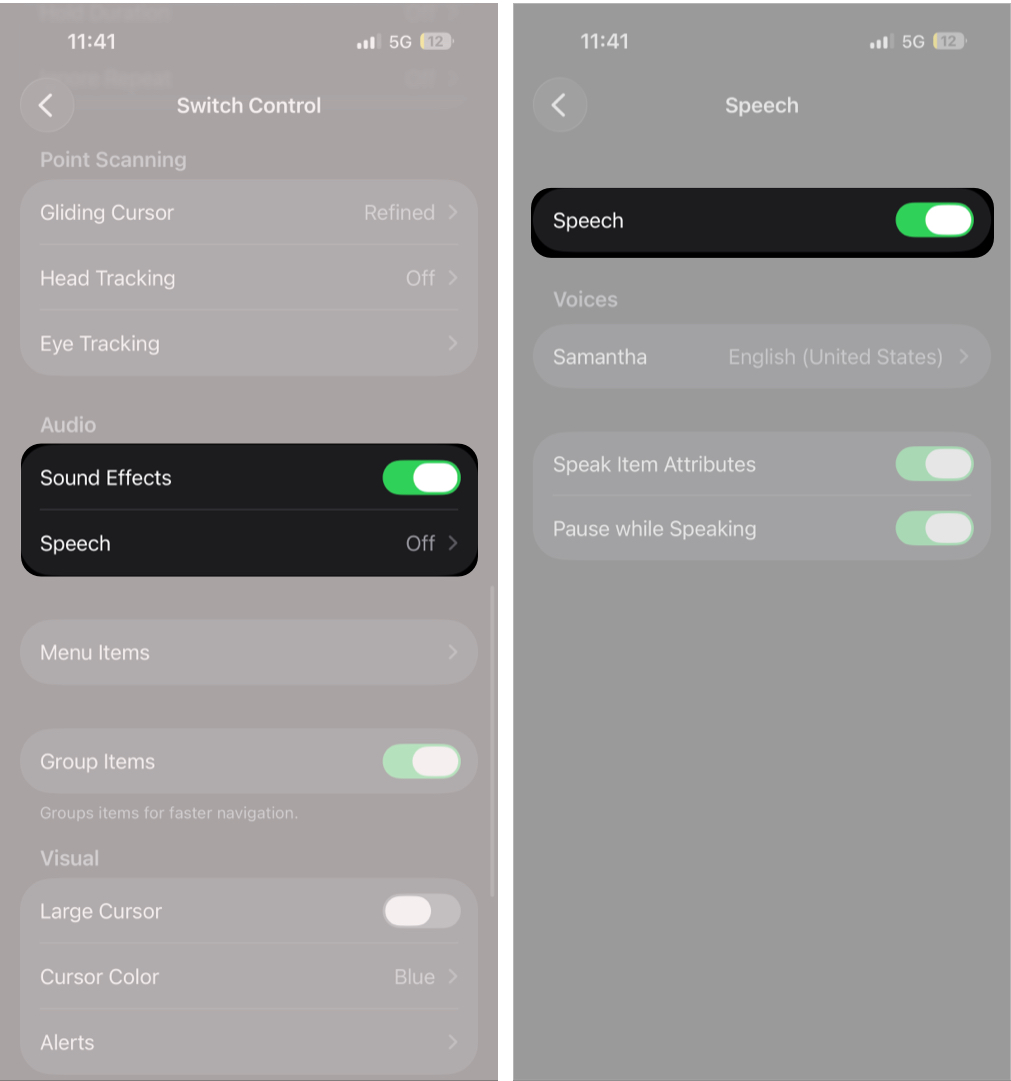
Configure Audio Feedback
Switch Control can play sounds and provide spoken feedback to help you understand what is being selected during scanning. This is useful if you don’t want to rely only on visual highlights.
- Go to Settings →Accessibility → Switch Control.
- Scroll down to the Audio section and toggle on Sound Effects.
- Next, tap Speech to enable spoken feedback for highlighted items and menu actions.

Switch Control vs AssistiveTouch vs Voice Control: What’s the Difference?
iPhone and iPad offer multiple accessibility tools that help users interact with their devices without relying entirely on standard touch input. While Switch Control, AssistiveTouch, and Voice Control may seem similar at first, each serves a different purpose and is designed for different interaction needs.
Here is how they compare:
| Feature | Switch Control | AssistiveTouch | Voice Control |
|---|---|---|---|
| Primary Input Method | External switches, scanning, camera input | On-screen floating menu | Voice commands |
| Best For | Limited mobility or alternative physical input | Gesture shortcuts and one-handed use | Hands-free navigation |
| How It Works | Automatically scans items and selects using switches | Provides virtual buttons for common actions | Controls device using spoken commands |
| Typing Method | Scanning keyboard or switch input | Standard keyboard with shortcuts | Dictation and voice typing |
| Hands-Free Use | Possible with Eye Tracking or camera switches | Limited | Fully hands-free |
| Customization Level | Very high | Moderate | High |
| Learning Curve | Higher | Easy | Moderate |
Final Thoughts
And that’s it; now that you know that once set up correctly, Switch Control can make everyday device use more accessible, precise, and comfortable. With customizable controls and support for alternative input methods, it provides a flexible way to navigate, type, and interact with the entire system.
Have you tried using Switch Control on your iPhone or iPad? Share your experience or questions in the comments below.


