- Why the Mail app shows this connection error: Weak internet, wrong date and time, server outages, iOS bugs, or incorrect account settings often block your iPhone from fetching mail.
- Check your internet before anything else: Confirm that Wi-Fi or cellular data is active and stable since the Mail app needs a reliable connection to load new messages.
- Restart your iPhone to clear glitches: A quick reboot refreshes system processes, removes temporary mail sync issues, and often restores a clean connection to your email server.
- Fix time-related authentication failures: Set your date and time automatically so secure mail servers can verify your device without running into avoidable connection errors.
- Update password or re-add the account: Re-entering your email credentials or removing and adding the account again can fix authentication problems and restore proper server access.
Waiting for an important email and suddenly getting the “Cannot Get Mail: The Connection to the Server Failed” message is enough to ruin anyone’s mood. This message simply means your iPhone couldn’t connect to your email provider’s server and is almost always fixable with a few simple tweaks.
In this guide, we’ll break down what causes this annoying issue and walk through 8 easy fixes to help your Mail app connect to the server and get emails again.
Why Your iPhone Says “Cannot Get Mail: The Connection to the Server Failed”
Before fixing the problem, it helps to know what’s causing it. Here are the most common culprits:
- Weak or unstable internet connection: Your Mail app needs a solid Wi-Fi or cellular signal to fetch new messages.
- Wrong date or time settings: Incorrect time settings can break secure connections with your email server.
- Authentication issues: Recently changed passwords, expired login tokens, or missing account permissions can block server access.
- Misconfigured mail settings: Wrong incoming/outgoing server ports, disabled SSL, incorrect account type (IMAP/POP), or outdated settings often trigger this error.
- iOS bugs or outdated software: A glitch or an older iOS version can interfere with Mail app syncing.
- Server outage: Sometimes Apple, Gmail, Outlook, or your email provider is simply down. You may check it on the Apple System Status page.
Now that you know the probable culprits, let’s fix them.
8 Easy Ways to Fix “Cannot Get Mail” on iPhone
These steps resolve the error for most users. Start from the top and work your way down.
1. Make Sure Your Internet Connection is Strong
Let’s start with the basics. The Mail app relies entirely on your network availability. If your connection is weak, emails simply won’t load. So, first check your Wi-Fi connection.
You can use an internet speed meter to measure your network speed. If it shows a slow connection, follow the steps below to boost the Wi-Fi signal:
- Go to Settings > Wi-Fi
- Select your connected network, then tap Forget This Network > Forget.

- Reconnect to your Wi-Fi and test again.
On the other hand, if you use cellular data, verify that the Mail app has access to it.
- Open Settings and go to Cellular.
- Scroll down and tap Show All.
- Here, ensure Mail is toggled on.

2. Restart Your iPhone
A classic fix that still works wonders. Restarting your iPhone clears temporary glitches and helps the Mail app establish a stable connection with the email server.
- Hold the Side + Volume Up/Down button on your iPhone.
- Drag the Slide to the power off slider.

- Wait a few seconds.
Press and hold the Side button again to turn your iPhone back on and check your inbox.
3. Check Your Date & Time Settings
Incorrect time settings can break security certificates, blocking email sync. So, adjust the date and time to your location, ensuring the Mail app can retrieve new emails.
- Go to Settings, select General, and tap on Date & Time.
- Here, toggle on Set Automatically.

- Verify that the right Time Zone is displayed.
If not, turn off Set Automatically, tap Time Zone, and select the correct location.
4. Re-enter Your Email Password
If you’ve updated your email password on another device or your email address was signed out, your iPhone can’t authenticate. This can result in the “Cannot Get Mail: The Connection to the Server Failed” error. So, ensure that your mail credentials are up to date.
- Open Settings, scroll down, tap on Apps, and select Mail.
- Next, tap Mail Accounts and select the email address for which you’re getting the error.
- You will see a Re-enter Password prompt at the top if there’s an issue with your account.

- Tap it and enter your updated login credentials.
Once you’re done, toggle on Mail to sync your inbox for that account. On iOS, Gmail, Outlook, or Yahoo may redirect you to a re-authentication page.
5. Delete and Re-add Your Email Account
If iOS doesn’t show a password prompt, your account configuration might be corrupted. Re-adding it resets all server configurations.
First, you need to remove the email account from your iPhone with these steps:
- Go to Settings > Apps > Mail > Mail Accounts.
- Here, select the problematic email account and tap Delete Account at the bottom.
- Confirm your choice by tapping Delete from My iPhone.

It will delete the inbox, your saved contacts, calendar events, and notes associated with this email from your iPhone. Don’t worry, your email stays on the server. Next, sign in to your email again.
- Go back to the Mail Accounts page in Settings and tap on Add Account.
- Type in your email address and tap Next at the top right corner.
- If you’ve entered a third-party email provider like Gmail, tap Open Browser on the prompt, then enter your credentials.
- Once added, toggle Mail on to loom yoemails on your iPhone.

After a few minutes, check your inbox to see if the error has been resolved.
6. Check Your Incoming & Outgoing Mail Settings
If you’re using a corporate account or a custom domain email address, manual configuration might be required.
First, configure the outgoing server (SMTP):
- Open the Mail Accounts settings and select the account that shows the error.
- Tap Account Settings, select SMTP, and ensure it’s On

- Finally, tap Gmail SMTP Server, then confirm that the Server Port is 465 or 587.
Now, for the incoming server:
- Open the Account Settings for the email address and tap Advanced.
- Check if Use SSL is toggled on and if Server Port is set to 993 for IMAP and 995 for POP.

Not sure about these settings? Find them in Apple’s Mail Settings Lookup or contact your email host.

7. Update to the Latest iOS Version
Apple often releases bug fixes with the newest iOS release that can fix problems with mail syncing. To update your iPhone:
- Go to Settings > General > Software Update.

- Tap Install Now if an update is available.
- Now, wait for your iPhone to restart.
Then, re-open the Mail app to see if new emails are loading again.
8. Reset all iPhone settings
If nothing has worked so far, some system-level config may be interfering. So, reset all settings to remove any conflicts preventing the Mail app from receiving emails.
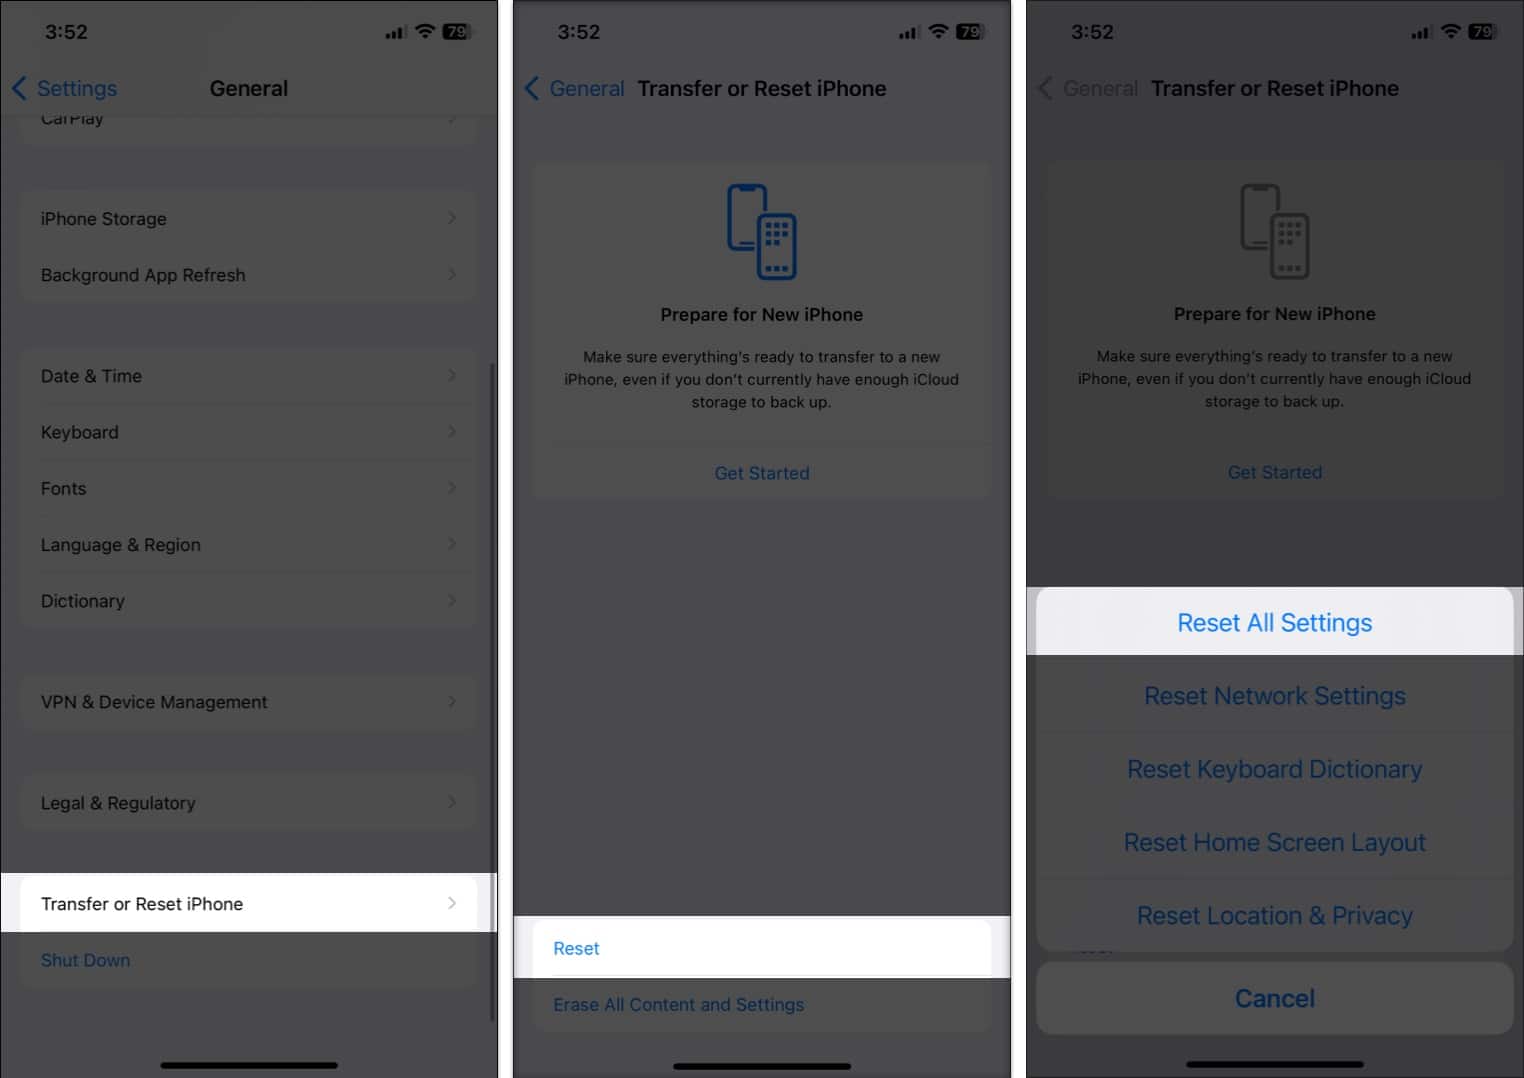
- Go to Settings > General, scroll down, and tap Transfer or Reset iPhone.
- Here, select Reset, then Reset All Settings.
- If prompted, enter your passcode, then tap Reset All Settings to confirm.

This resets Wi-Fi, VPN, network, keyboard, and system preferences to default.
“Cannot Get Mail” Error Solved!
The “Cannot Get Mail: The Connection to the Server Failed” error is frustrating but usually easy to resolve. In most cases, the issue comes down to network hiccups, authentication problems, or misconfigured mail settings. Following the steps above should get your emails flowing again.
If you still can’t receive Mail after trying everything, your email provider or Apple Support may need to check the issue on their end.
You may find these interesting: