With so many distractions popping up on your screen every now and then, it’s pretty hard to stay focused while working on your Mac. If you’re anything like me and love avoiding distractions, it’s time to get yourself familiar with Focus. This guide will walk you through everything you need to know about using Focus mode on your Mac.
- How to set up Focus mode on Mac
- How to modify existing Focus modes on Mac
- How to turn on or off Focus on Mac
- How to remove Focus mode from Mac
- How to share Focus across all devices
How to set up Focus mode on Mac
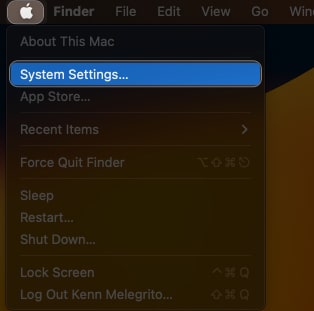
- Access Apple logo () → System Settings.
- Navigate to the Focus option from the menu.
- Click the Add Focus option to design a custom feature.

- Choose Custom when prompted.

- In this instance, customize the look of your profile as you desire → Press OK to proceed.

- You’re now all set to curate a personalized focus mode on your Mac.
How to modify existing Focus modes on Mac
- Go to Apple logo () → System Settings → Focus option.
- Select the existing Focus of your preference.
I have opted for the custom focus mode we set up earlier.
Choose which notifications to allow
- Allowed People: Customize your Focus Mode to control notifications and calls.
- Add specific contacts who can message you or call you during this mode. You can, furthermore, determine what category of connections are allowed to contact you.
- At last, there is a dedicated feature that gives you the ability to block repetitive calls. Once you’ve set your preferences, click Done to save the changes.
- Allowed Apps: After configuring your call and notification settings, you can prioritize essential applications that will notify you of specific activities during Focus mode.
- Select the desired apps by clicking the Add option.
- You can also toggle on Time-Sensitive Notifications if desired. Once you’re satisfied, click Done to finalize the process.
Schedule a Focus to turn on or off automatically
Probing ahead, let’s get a gist of automating the Focus Mode at a preset date and time in a few simple clicks.
- Click Add Schedule.

- Choose the option that suits your preference the best.
I have demonstrated the process via Time.
- Assign a specific format for the input that allows easy parsing of starting and ending times, as well as the days for Focus Mode activation.

- Press Done to save your preferences.


This process can be repeated for both Location and Apps on your Mac.
Use Focus Filters
When you activate Focus Mode on your Mac, you gain the power to choose how each application behaves during this focused state.
Whether you want to minimize distractions, enhance productivity, or create a personalized environment, you have the freedom to decide the actions performed by each application.
- Calendar: With the Calendar application, you can determine whether you want to receive notifications for upcoming events or if you prefer to temporarily pause these alerts to maintain your concentration.
- Mail: Similarly, for the Mail app, you can set it to fetch new messages silently in the background, preventing any interruptions during your focused work sessions.
- Messages: Moreover, you can manage the behavior of the Messages application. You might choose to disable message previews or temporarily mute incoming message notifications to avoid disruptions.
- Safari: You can even customize the actions of the Safari web browser while in Focus Mode. You may want to restrict access to certain websites or block notifications from websites that tend to distract you.
All in all, review and update your Focus Mode settings regularly to ensure they align with your evolving needs and priorities.
How to turn on or off Focus on Mac
- Access Control Centre on your Mac → Click Focus Mode.

- Select a Focus of your preference.

- Your device is now in Focus mode.
- In case you wish to turn off the Focus, click the same mode from the Control Centre.


How to remove Focus mode from Mac
- Access Apple logo () → System Settings → Focus.
- Click Delete Focus.

- Hit Delete when prompted.

How to share Focus across all devices
If you’re an Apple fanatic, you cannot miss out on the well-established ecosystem among all devices. Well, this remains the same for Focus mode. Yes, you’ve heard it right. Follow the steps outlined below to sync your preferences across every device carrying the same Apple ID.
- Access Apple logo () → System Settings → Focus.
- Toggle on the Share across devices option.

Doing so will enable you to access the Focus Status of your profile. - Click Focus Status and toggle on Share Focus status.

- Here, you can select the modes that you wish to share across all devices.
- Upon sharing, you can now customize the Focus profiles that have notifications silenced.


Stay productive with Focus Mode
You’re now ready to make the most of the Focus Mode on Mac! At least I believe so.
What do you think of this feature on the Mac? I’d like to hear your thoughts. Drop them in the comments below!
Read more:


