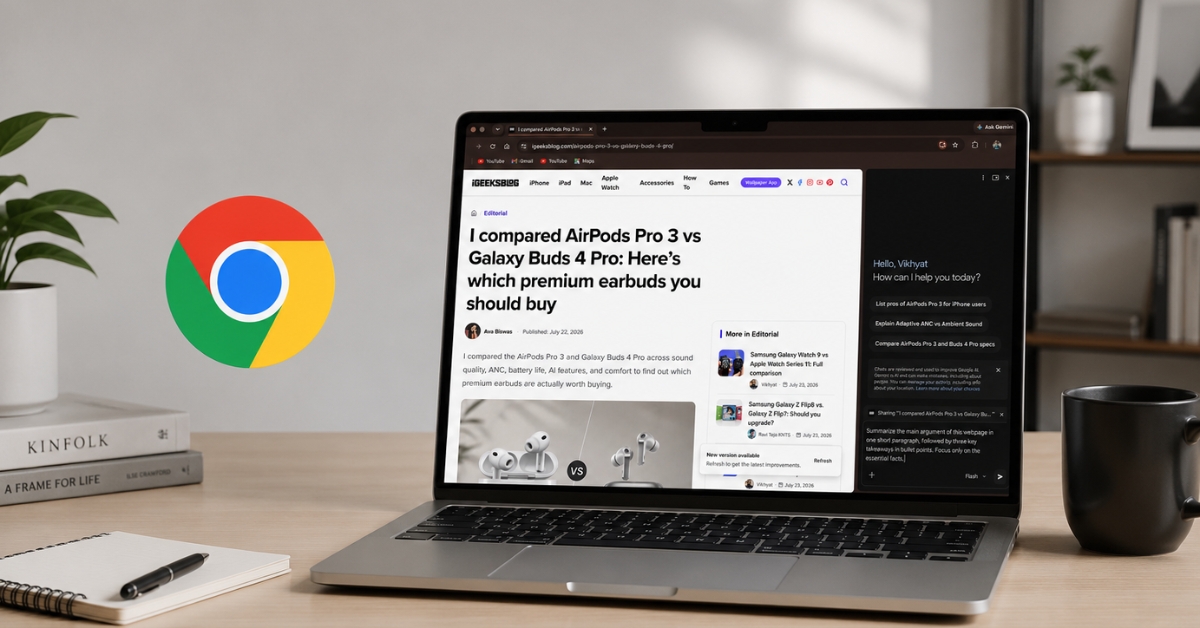
- New Photos App layout in iOS 26: Apple redesigned the Photos app with a cleaner Liquid Glass UI, reintroduced Library and Collections tabs, and added a bottom Edit button for quicker access.
- Simplified editing workflow: The new tabbed editing layout—Adjust, Filters, Crop, and Markup—helps you switch tools easily while AI enhancements handle smart adjustments automatically.
- More control over lighting and color: Updated sliders for exposure, contrast, saturation, and vibrance respond in real time, giving edits a more natural and professional feel.
- Smarter auto tools and Photographic Styles: Auto-crop, adaptive filters, and customizable Photographic Styles let you refine tone and mood even after capturing a shot.
- Apple Intelligence brings Spatial Depth and Clean Up: Spatial Scenes create immersive 3D effects, while the Clean Up tool removes distractions with precise Apple Intelligence processing.
Got a great shot that needs a little fixing? iOS 26 makes it super simple with several new editing tools. From object removal to 3D-style photo effects, and a redesigned editing interface, the native Photos app now rivals professional editors, all while staying easy to use.
Let’s walk through what’s new and how to master these tools to edit your photos on iPhone like a pro.
Table of Contents
- Navigating the New Photos App in iOS 26
- Adjust Lighting and Exposure
- Crop Photos Automatically
- Add a Filter to Photos
- Edit Photographic Styles of a Photo
- Add 3D Spatial Depth Effect to Your Photos
- Remove Unwanted Objects from Photos
- Markup Your Photos
- Add Stickers, text, and more to a photo
- Copy and Paste Edits to Multiple Photos
- Preview App Editing (Bonus for iOS 26)
- Pro Tips to Get the Most Out of iOS 26 Photo Editing
- Edit Photos Like a Pro!
Navigating the New Photos App in iOS 26
The Photos app in iOS 26 introduces a simplified layout, adapting Liquid Glass UI. Tabs for Library and Collections have returned, and the new bottom-bar Edit button (three sliders icon) replaces the older top-corner Edit button.
Here’s how to start editing any photo:
- Go to the Photos app and open the photo you want to edit.
- Tap the Edit icon (three sliders) at the bottom of the screen.
- You’ll now see tabs for Adjust, Filters, Crop, and Markup, plus any AI-powered tools available on your device.
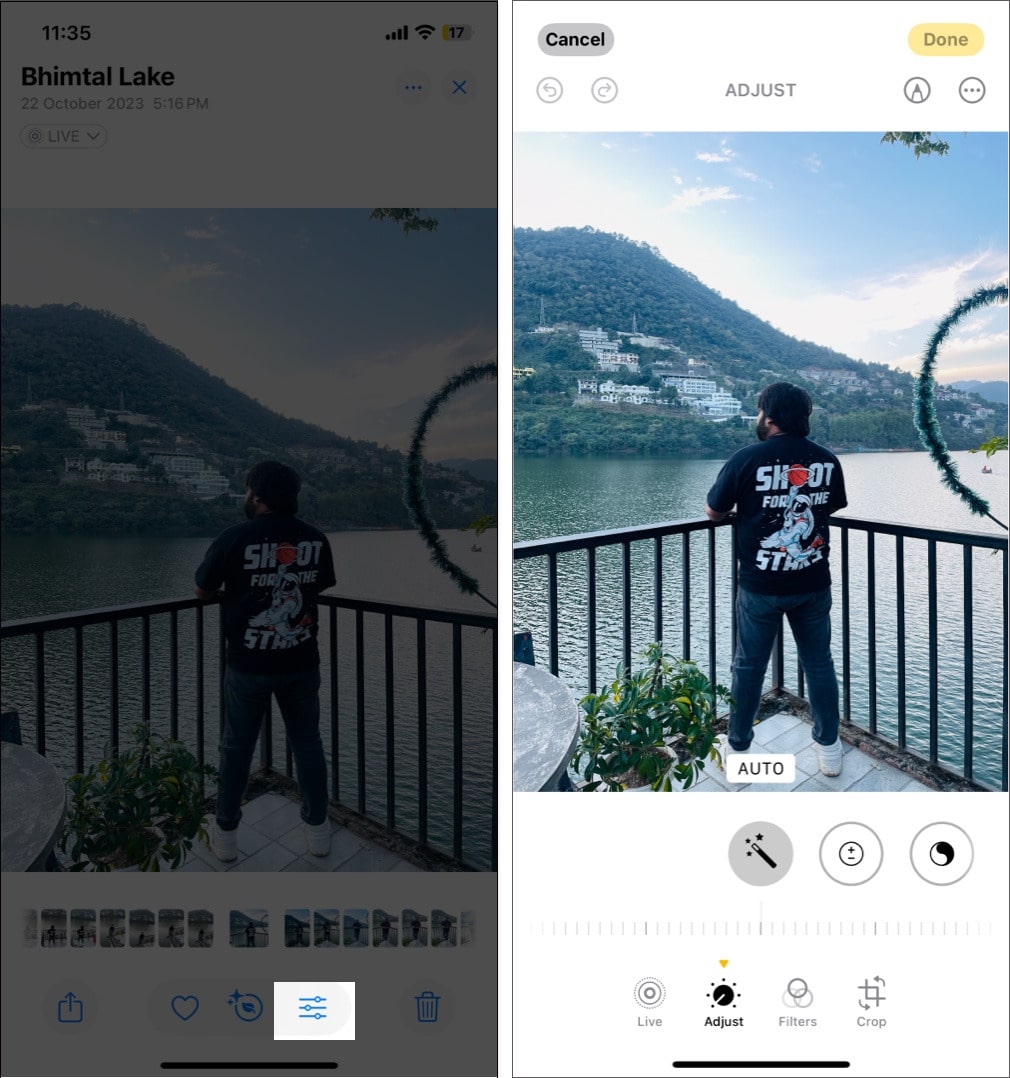
Adjust Lighting and Exposure
Once you’re on the editing interface, you’ll see multiple editing tools you can use to enhance your photo. Among these, the Adjust tool is where all the fun resides.
You can use the auto-enhance option here to have iOS adjust the image colors and tonality for you, or use the adjustment tools yourself to adjust photos manually. Here’s a list of all the adjustment tools you get in the Photos app:
- Auto: Tap the auto button (magic wand icon) to let the iPhone apply automatic adjustments for lighting and color.
- Exposure: Controls the amount of light in your image.
- Brilliance: Improves brightness selectively, targeting underexposed areas while maintaining the contrast.
- Highlights: Brightens the lighter areas.
- Shadows: Enhances the darker areas.
- Contrast: Increases the distinction between light and dark areas.
- Brightness: Lets you make your image lighter or darker. Unlike exposure, it affects all pixels in a photo (and not just highlights).
- Black Point: Adjusts the depth of black in your image, adding contrast and richness, giving your photos a more dramatic feel.
- Saturation: Makes colors pop, adding vibrancy to your photos.
- Vibrance: Works similarly to saturation, but only muted colors are affected by it.
- Warmth: Adjusts the color temperature.
- Tint: Adds subtle color shifts, perfect for correcting color imbalances.
- Sharpness: Enhances fine details, though increasing sharpness too much may add visual noise.
- Definition: Adds clarity and detail to your photo without affecting brightness, which helps make details pop.
- Noise Reduction: Reduces visual noise and grain, especially in low-light photos, making them appear smoother.
- Vignette: Adds a subtle shadow around the edges of the photo, drawing focus to the center.
You can access and use any of these adjustment tools like this:
- Tap Adjust at the bottom.
- Choose one of the currently visible adjustments or swipe right on them to reveal others.
- After you select the one you want to mingle with, use the slider below to control it.
- Once satisfied, tap Done in the top-right corner to save the changes.

In iOS 26, the adjustment slider animations are smoother, and changes update in real time.
Crop Photos Automatically
While you could always manually crop photos on an iPhone, the latest iOS version can crop photos and adjust the alignment automatically for you. Here’s how to crop photos automatically:
- In the editing interface, select the Crop tool in the bottom toolbar.
- Tap the Auto button at the top, and iOS will automatically crop the photo and adjust its alignment.
- Hit Done to save.
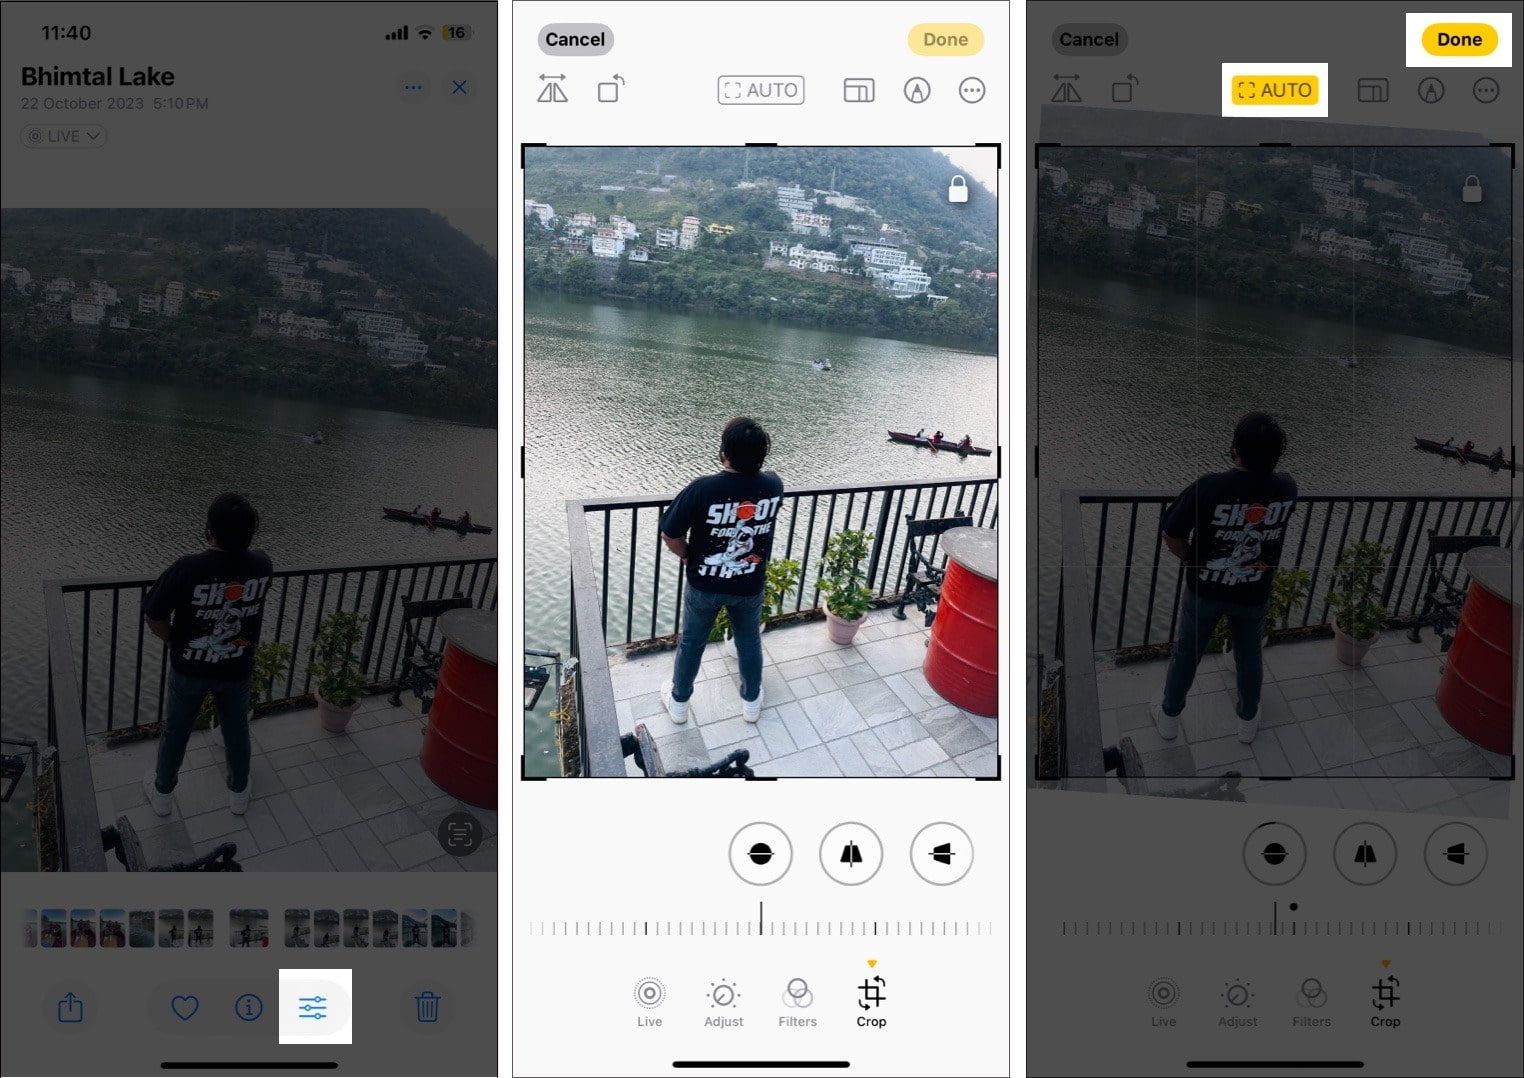
You can also Rotate, Flip, and Straighten your image right from this interface. What I do is, I zoom the photo to the level I want to keep and tap the Done button.
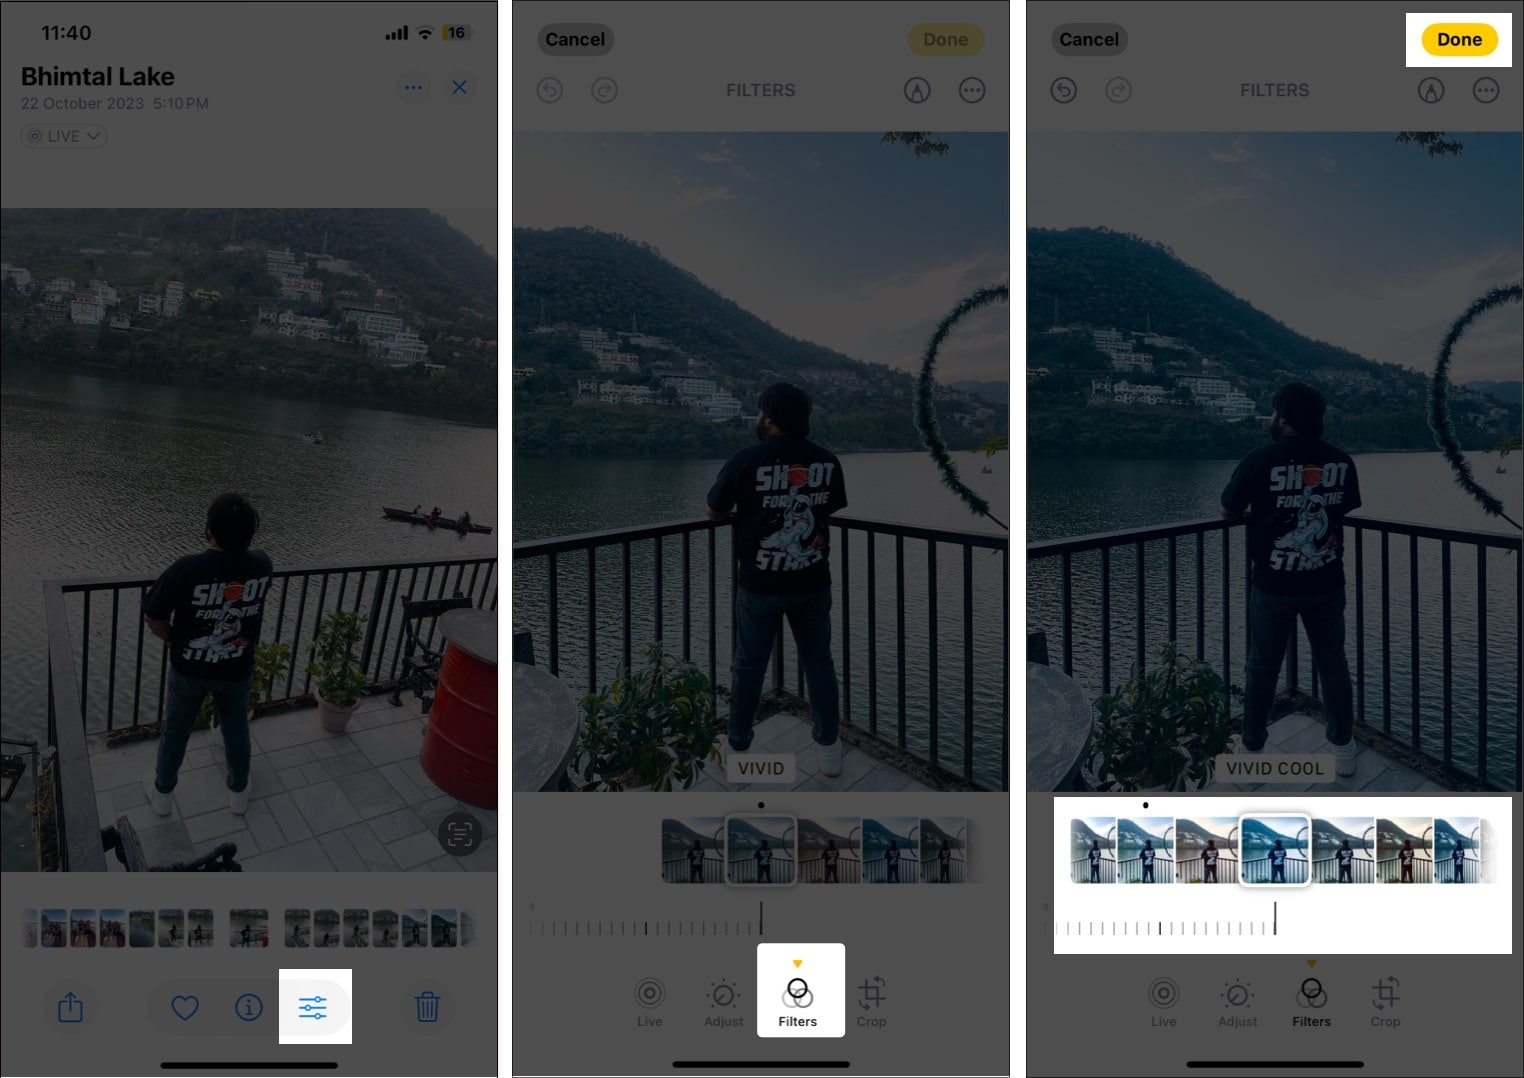
Add a Filter to Photos
Other than adjusting the lighting and exposure or cropping the image, you can also add a filter to your photos if you don’t like a photo’s original look. This is what you need to do:
- Tap the edit button below the photo you want to edit.
- Tap on Filters.
- Swipe right on the available filters to try out different filters and choose the most appropriate one.
- Save the image by tapping Done.

However, using filters is best for iPhone 16e, iPhone 15 series, and previous models. On the newer generation, like iPhone Air and 17 series, Apple uses Photographic Styles to provide a customized look for each image.
Edit Photographic Styles of a Photo
If you own the latest iPhone 16 or later, Filter is replaced by Photographic Styles if you’ve enabled it. Instead of applying a preset look, it adjusts parameters like tone, warmth, and contrast to change the image’s mood while preserving natural skin tones and detail.
In iOS 26, Apple finally lets you edit Photographic Styles even after capturing a photo in High-Efficiency.
- In the editing interface, tap the Style icon.
- Now, you can adjust the Tone and Color of the existing style and change its intensity using the slider below.
- Otherwise, apply a new style like Gold, Vibrant, etc.
- Tap Done to save.


Check out our detailed guide on using Photographic Styles to learn everything about the feature.
Add 3D Spatial Depth Effect to Your Photos
iOS 26 introduces Spatial Scenes, a brand-new feature that gives your regular photos a subtle 3D depth and motion effect. Using on-device machine learning, it separates the foreground and background, creating a layered scene that gently shifts as you move your phone.
It works especially well with portraits, landscapes, and photos that have clear subjects against a distinct background. Here’s how to turn a 2D photo into a Spatial Scene:
- Open the Photos app and select a photo.
- If the photo is eligible, you will see a hexagon icon. Tap it from the top right corner.
- Wait a moment as iOS generates the depth effect.
- Tilt your iPhone or set the image as your wallpaper to see the 3D motion in action.
Note:
Available on iPhone 12 and later, though results are more realistic on iPhone 15 Pro and newer models thanks to enhanced depth sensing and processing.
Remove Unwanted Objects from Photos
With Apple Intelligence, you can remove photobombers or unwanted objects from your photos using the Clean Up tool. All you need to do is:
- Open the image and go to editing interface.
- Select Clean Up at the bottom toolbar.
- Your iPhone will highlight the unwanted objects. You can tap or draw on the object you want to remove.
- Clean Up tool will do its magic. Once satisfied, tap Done.
However, like other Apple Intelligence features, Clean Up is also exclusive to the iPhone 15 Pro, 15 Pro Max, iPhone 16, and iPhone 17 series. There’s more to using the Clean Up tool than you should know about to remove unwanted objects from your photos effectively.
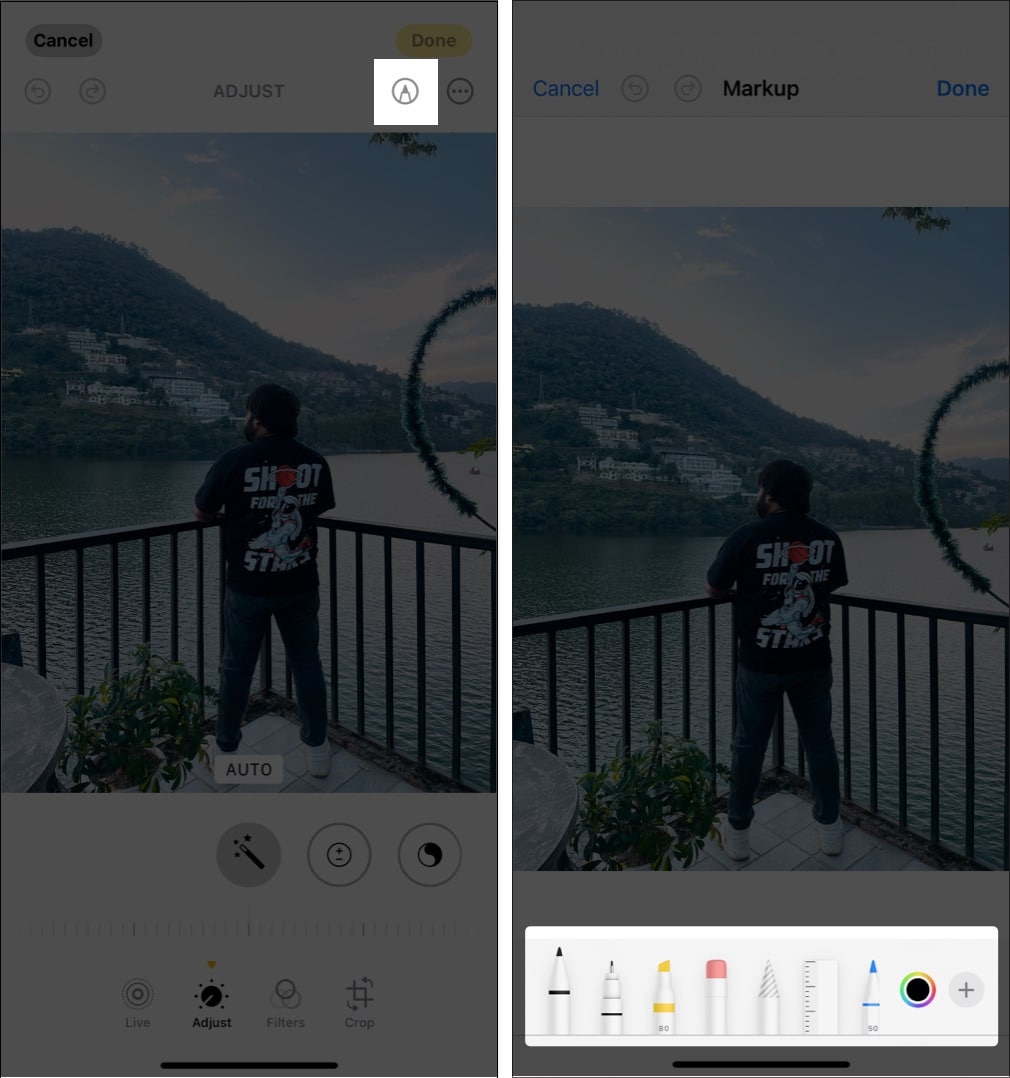
Markup Your Photos
The Markup tool on iPhone lets you draw, add text, create shapes, and even add stickers and your signature to photos, allowing you to give a more creative touch to your photos. Here’s how to use it:
- On the photo editing interface, tap the Markup button (pen icon) in the top-right corner.
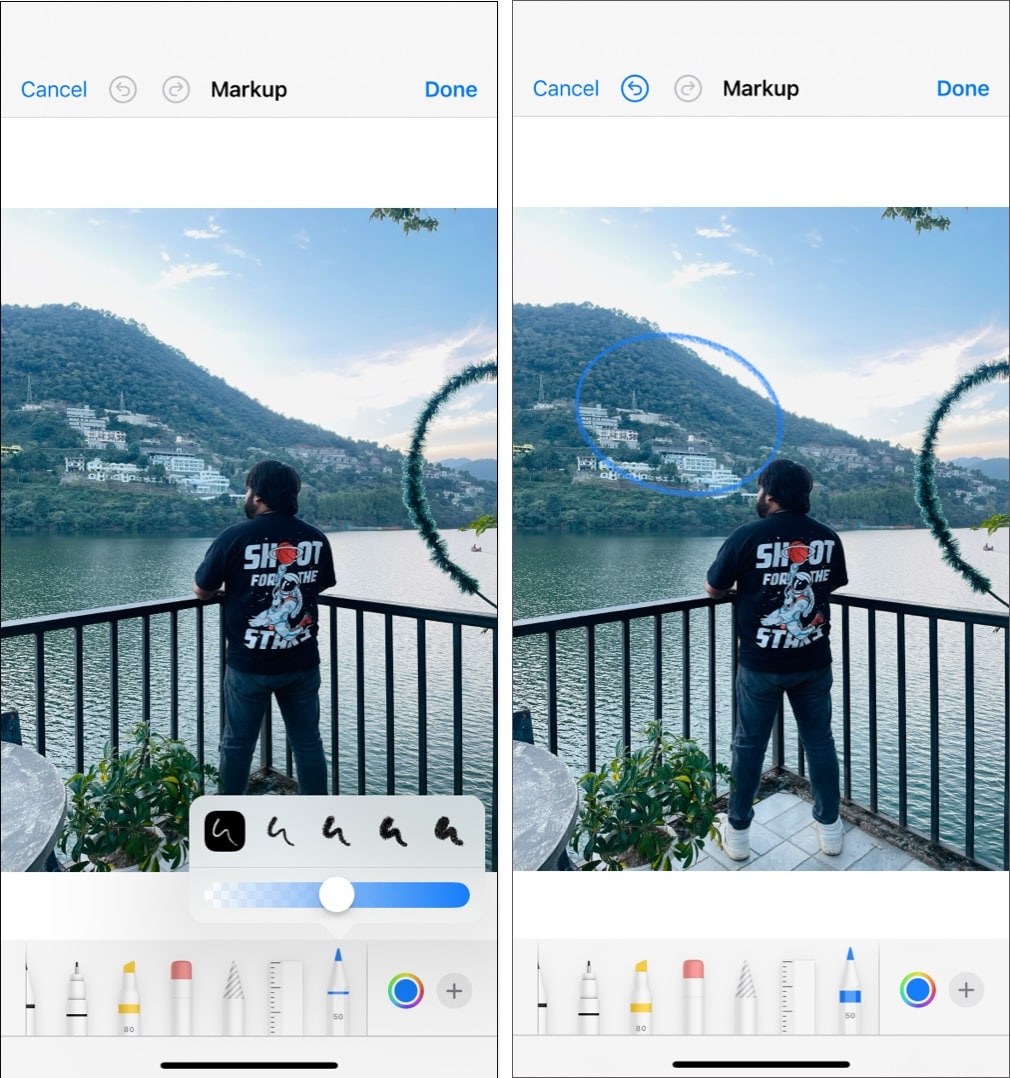
- Once you are in Markup mode, you’ll notice a row of drawing tools at the bottom. Choose the preferred drawing tool.
- You can simply draw any rough shape and keep holding it, and the iPhone will automatically transform it into a perfect one.
- Tap the drawing tool again to adjust the thickness and opacity. You can also change the color using the color wheel icon.
- Tap the checkmark at the top to save.


Add Stickers, text, and more to a photo
Other than drawing over photos, the Markup tool offers several other useful tools as well to help you add stickers, adjust color, and do more, right in the Photos app.
From the editing interface, select the Markup icon, tap the plus icon at the bottom right corner, and choose any of the following:
- Add Text: It adds a text box to let you type in. You can adjust the font, size, and color. Tap the text box to move it, or use the handles to resize it.
- Add Stickers: Select one of the many available stickers on your iPhone.
- Add Shapes: Choose from shapes like squares, circles, speech bubbles, and arrows. Shapes are perfect for highlighting specific areas of your photo.
- Add Image Description: Enter a suitable description to use with VoiceOver.
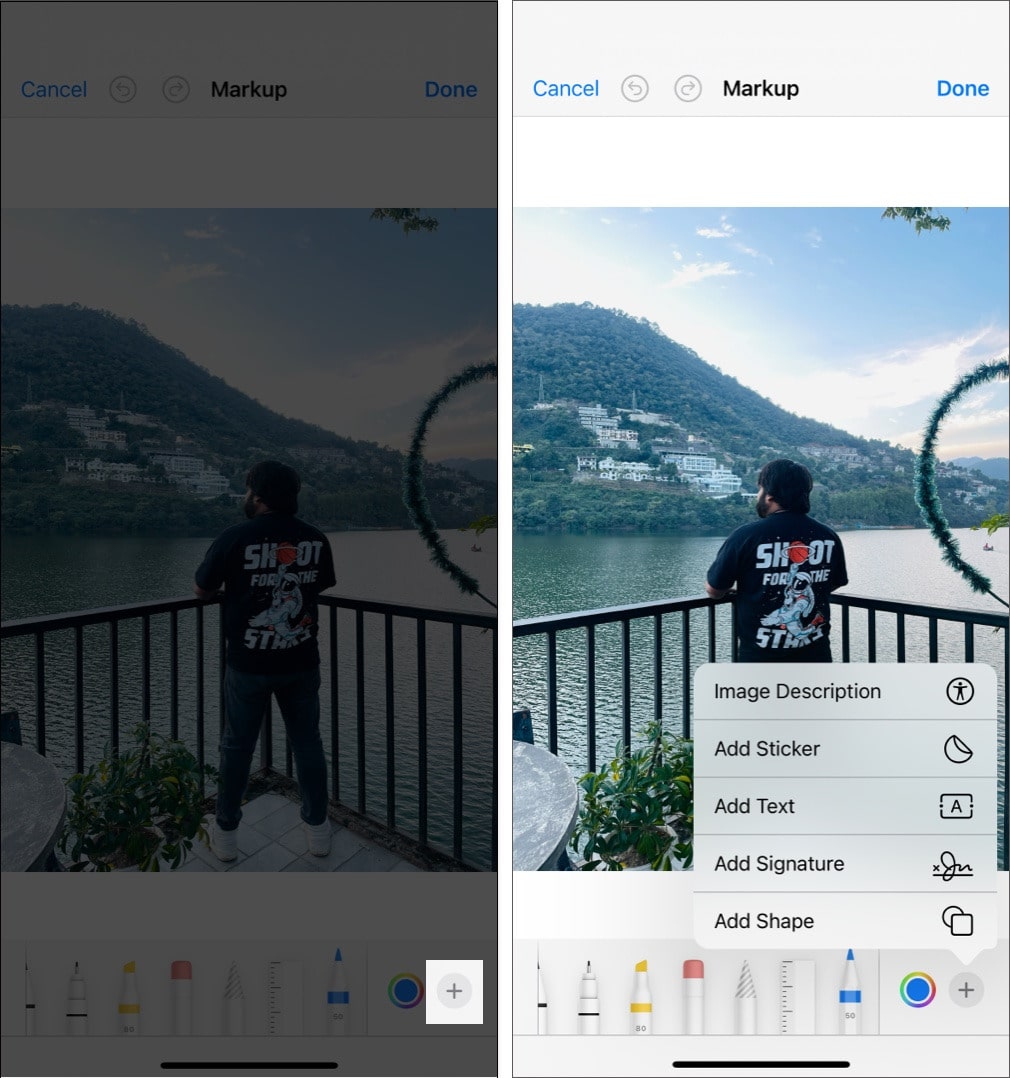

Once you are done, tap the checkmark at the top to save your additions.
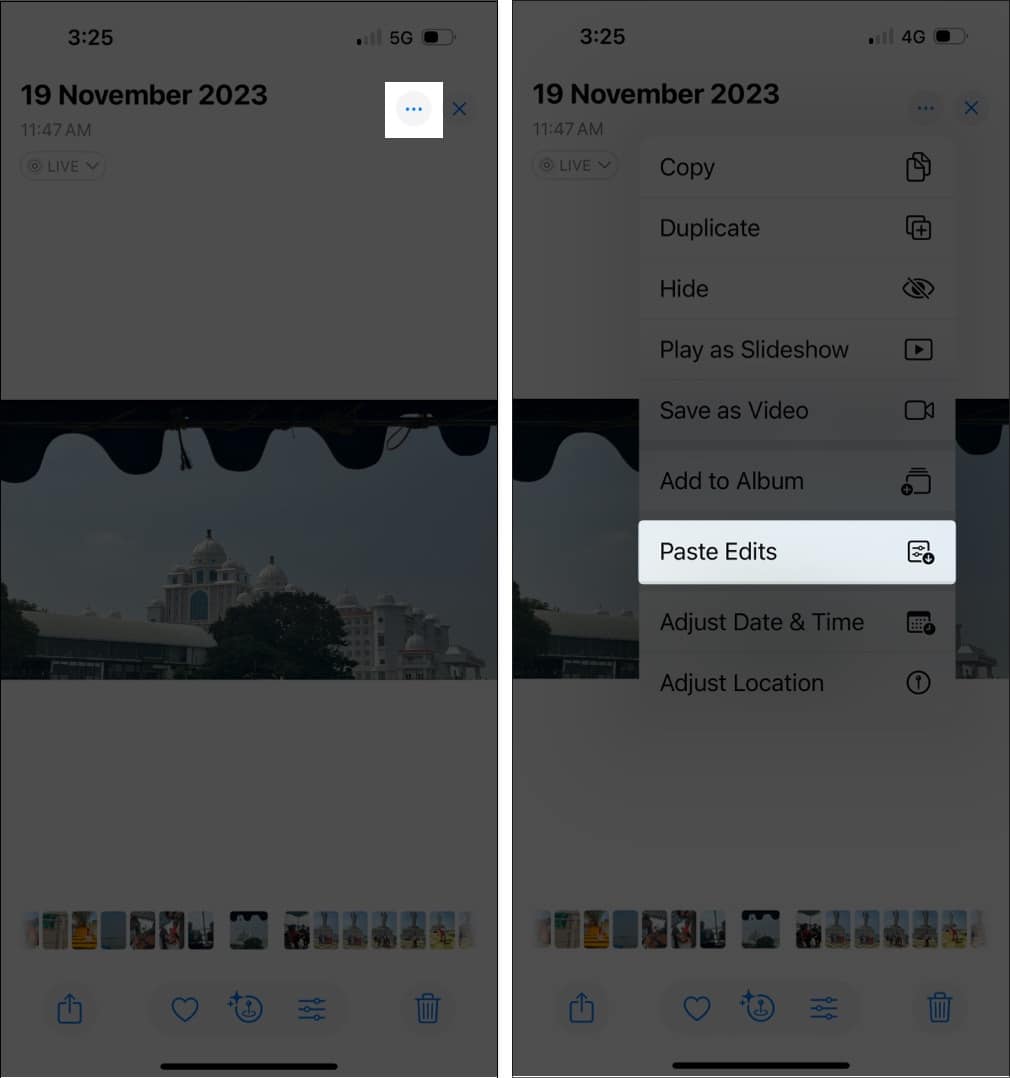
Copy and Paste Edits to Multiple Photos
Have multiple photos and want to make similar edits on all of them? Well, you can batch-edit photos on your iPhone by copying the edits made on a single photo and pasting them to multiple photos in just a few taps. Here’s how:
- Open the edited photo.
- Tap the three-dot button in the top-right corner and select Copy Edits from the menu.
- Now, toggle on the edits you want to copy, like Filter, Crop, etc. Ensure to turn on Adaptive as it adjusts the edits for each image automatically.
- Finally, tap Copy.
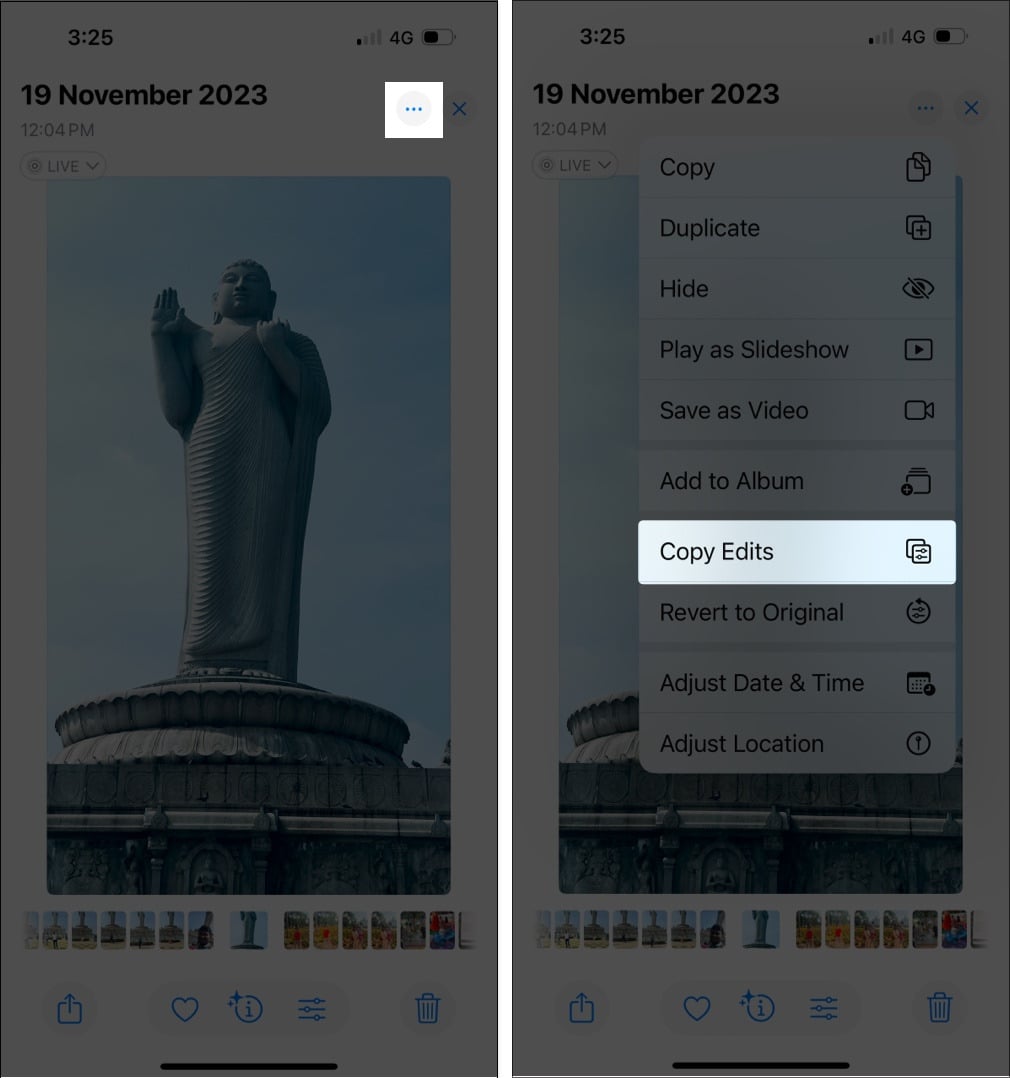
- Now, return to your Photos app library and select the photos you want to edit.
- Tap the three-dot button in the top-right corner and tap Paste Edits.


Preview App Editing (Bonus for iOS 26)
The new Preview app on iPhone allows light image editing, annotation, background removal, and file conversion, just like on macOS.
Use Preview for:
- Cropping, rotating, resizing, and background removal.
- Annotating PDFs and images.
- Signing or marking documents right from your phone.
Pro Tips to Get the Most Out of iOS 26 Photo Editing
- Update your iPhone to the latest iOS version to enjoy all the features.
- Use Auto Enhance first to set a baseline, then fine-tune manually.
- Don’t overuse the Clean Up tool, as it can make photos look artificial. For best results, zoom in and erase small distractions instead of large areas.
- If you use Spatial Scenes, test them as wallpapers. They look stunning!
- To edit more precisely, you can change the interface theme. Tap the edit button > three-dot icon at the top > Appearance and select between Dark or Light.
- Every edit in Photos is non-destructive. If a photo doesn’t look right, tap the three-dot icon at the top and select Revert to Original to instantly undo all changes.
Edit Photos Like a Pro!
Now that you know about various editing tools available in the Photos app in iOS 26, you can easily edit photos on your iPhone like a pro. The new pro-level adjustment tools and the auto-crop feature, among others, ensure you don’t have to depend on any third-party apps to edit your photos unless you need to do something specific that the Photos app can’t help you with.
Feel free to reach out to us via comments if you have questions or doubts.