Mac OS X comes with a set of really awesome, HD screensavers. But, they can never be enough. You will want to download and install other exciting screensavers from the web – say, for example, new movie screensavers or festival-themed screensavers.
Installing screensavers were easy (they’re still easy), but the way you added them to your library has changed in Mac OS X Mavericks or Yosemite. The updates in software and GateKeeper security have made the procedure a little lengthier. And for a few people, complicated.
It is no longer a “double-click and install” procedure, especially for third-party apps. If you try to do so, you will get an error message that the file cannot be opened, as it is from an unknown developer. However, do not be disheartened! Here are a couple of ways to install your favorite screensavers from the web on your Mac OS X.
How to Add Screen Saver via Right-Click on Mac
This method works for files having an extension of, “.saver.” For the files having the extension of “.qtz” extension, follow method #2.
Step #1. Open “Finder” from your dock.
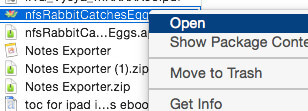
Step #2. In it, locate the screen saver you want to install. It will end with extension “some_name.saver” (some_name being the file name.) Right-click on file and choose “open.”

Step #3. A warning message will pop up, “some_name.saver is from an unidentified developer. Are you sure you want to open it?” Click “Open.”
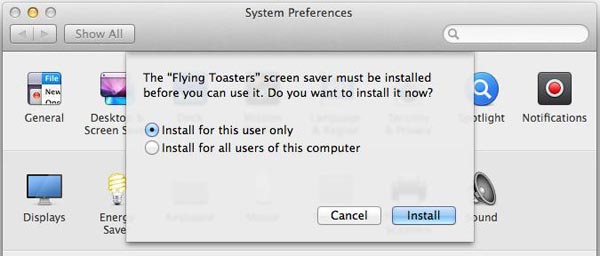
Step #4. Your “System Preferences” will automatically start in your Screen Saver window. With it, you will get a dialogue box asking to install the selected screensaver for the current users or all users on your Mac. Check the appropriate box and click on “Install.”

Step #5. Now, activate the new screensaver from the list as usual.
How to Add Screensaver via Screen Saver Folder on Mac
This method works for the files having the extension of, “.qtz.”
Step #1. Press Command+Shift+G and type ~/Library/Screen Savers/
Step #2. Drag the downloaded screen saver file in the “Screen Savers” folder. (side note: you can drag .saver files into the folder and they’ll work too)
Step #3. Go back to the “Apple” menu → System Preferences → Desktop & Screen Savers to locate this file and use it.
Note that if you want the screen saver to be available for all users on your Mac, in the first step, go to /Library/Screen Savers/ (skip the ~).
That’s all folks!
Do share your feedback with us in the comment.
🗣️ Our site is supported by our readers like you. When you purchase through our links, we earn a small commission. Read Disclaimer.

