If you think the Photos app is just a gallery for your snapshots, you’re missing out on one of its best features—Memories. With the help of machine learning, the Photos app on iPhone curates and turns your favorite moments into cinematic slideshows, complete with transitions and music.
In this guide, I’ll show you how to use Memories in the Photos app, customize them to reflect your style, and even create your own memory movies using iOS 18 or Apple Intelligence.
What Are Memories in the iPhone Photos App?
Memories are automatically generated video slideshows of your photos and videos grouped by people, location, events, or dates. Your iPhone uses on-device intelligence to identify meaningful moments and packages them into short highlight reels with background music and transitions.
These aren’t just for nostalgia—they’re interactive, customizable, and even sharable.
How to View Memories in the Photos App on iPhone
With iOS 18, Apple has redesigned the Photos app interface. Here’s how you can find and view your Memories:
- Open the Photos app on your iPhone.
- Scroll down to the Memories section.
- Swipe horizontally to browse through featured memories.
- Tap on a Memory to play the slideshow.
- Tap the Photos button at the bottom center to see photos and videos in the memory movie in a gallery format.

How to Customize Memories on iPhone
Want to personalize your Memories to make them more meaningful? You can tweak everything—from music to key photos to mood filters. Here’s how:
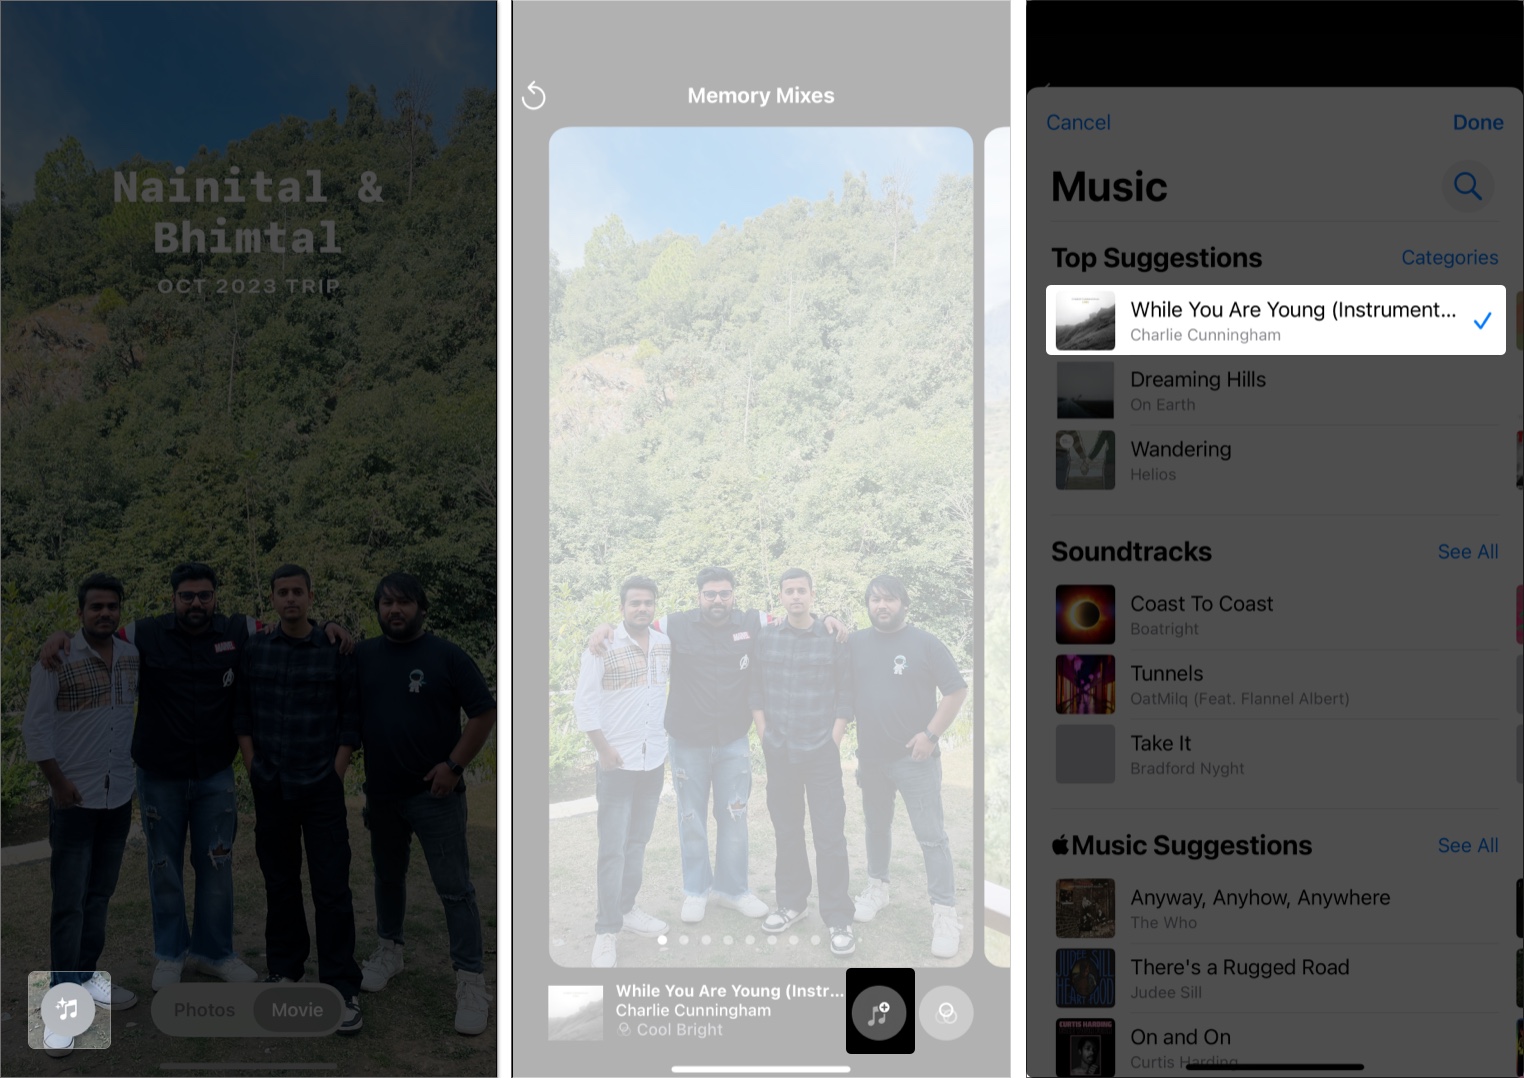
Change the Music
Like transitions and the position of photos and videos in the timeline, the Photos app automatically chooses a music track for the created memory movie. However, it does let you change it if you don’t like it. Here’s how:
- Tap the Music icon in the bottom left corner.
- Tap the Add Music button.
- Choose from recommended soundtracks or your library.
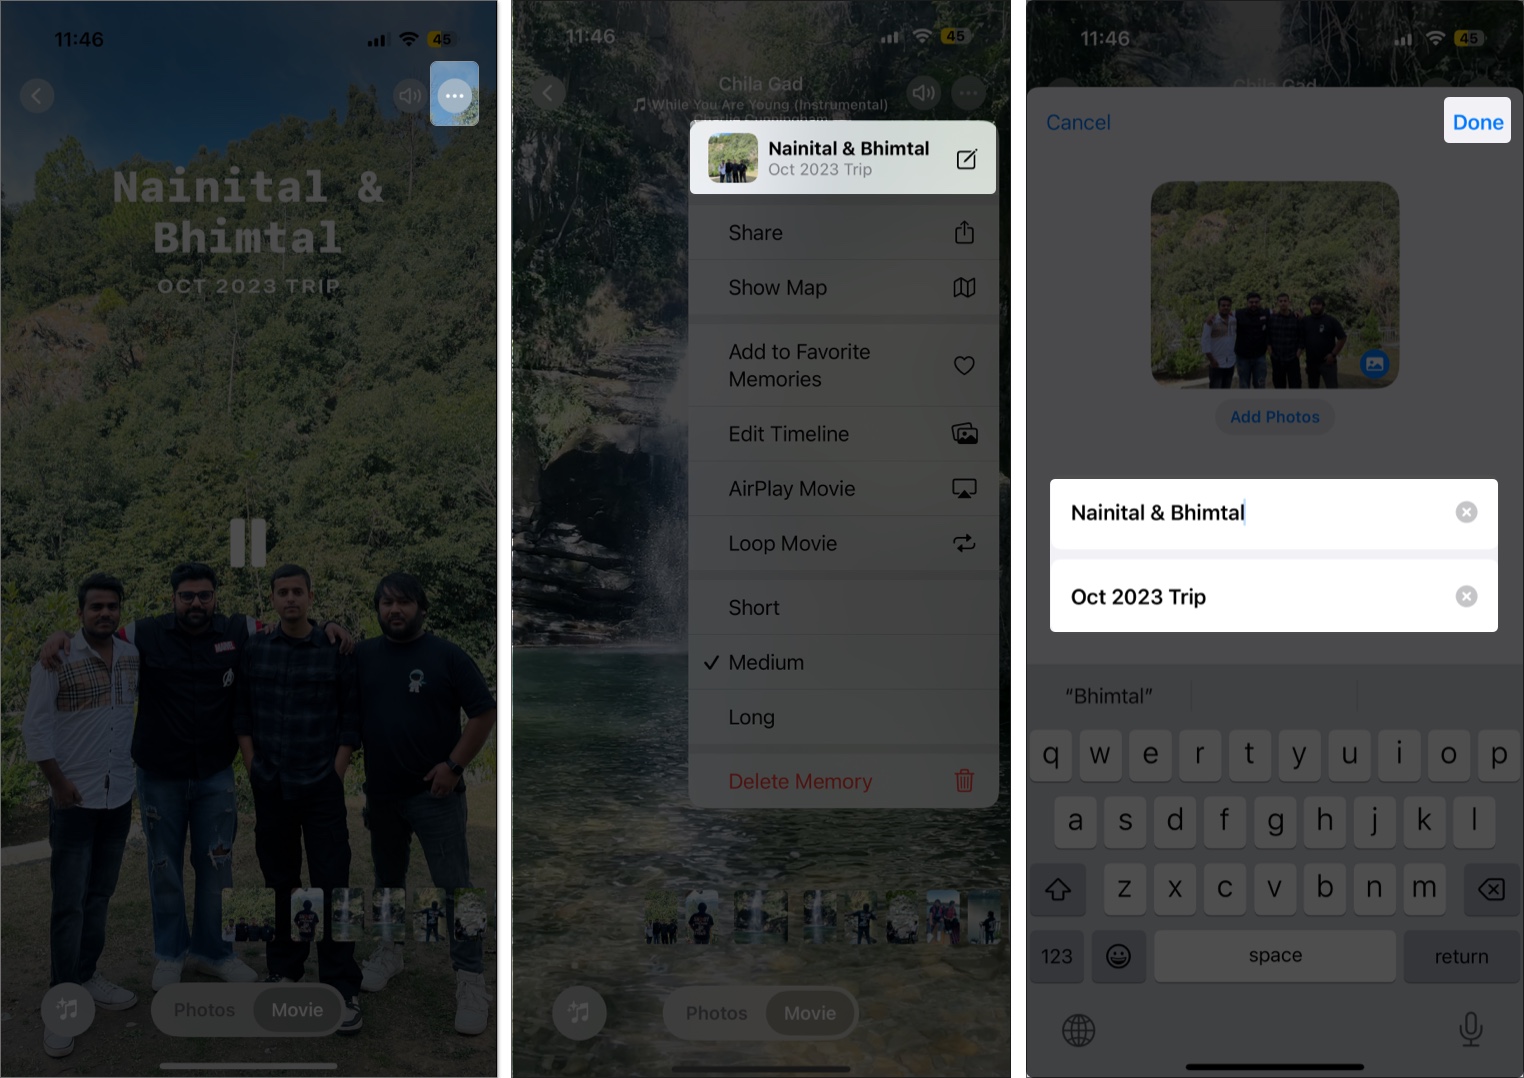
Edit the Title or Key Photo
As memories are automatically generated, your iPhone gives each one a title and chooses a key photo that suits it the best. However, it does allow you to tweak the title and replace the key photo with one of your liking. Here’s how:
- Play a memory, then tap the three-dot (More Options) in the top-right corner.
- Tap the memory‘s title in the drop-down menu to edit it.
- Tap the title image to change the key photo.
- Enter the preferred title and tap Done.
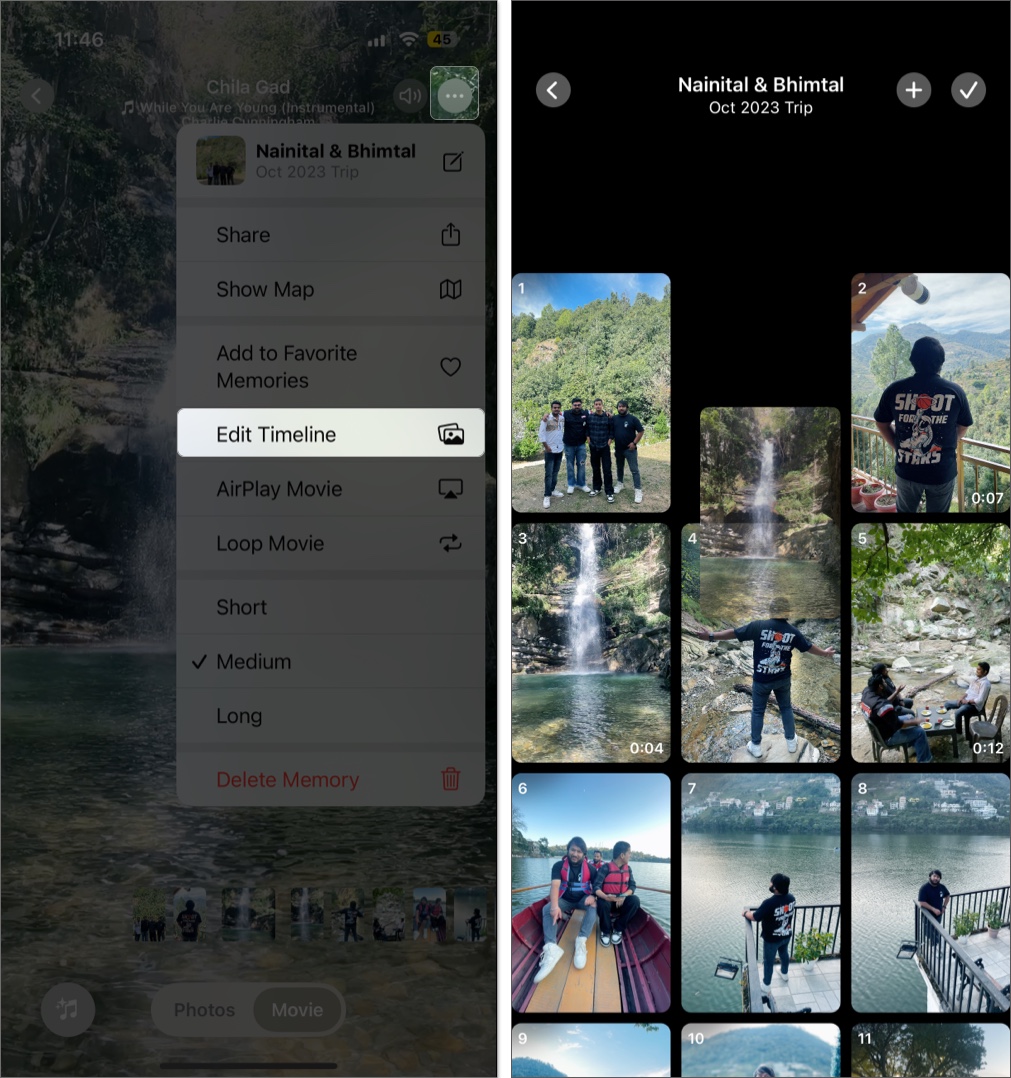
Rearrange Timeline Clips
You can easily change the order of the clips in a memory movie to suit your fancy. Here’s how:
- Tap the three-dot button at the top right corner.
- Select the Edit Timeline option in the drop-down menu.
- Drag and drop a clip to its desired position to change its order in the movie timeline.

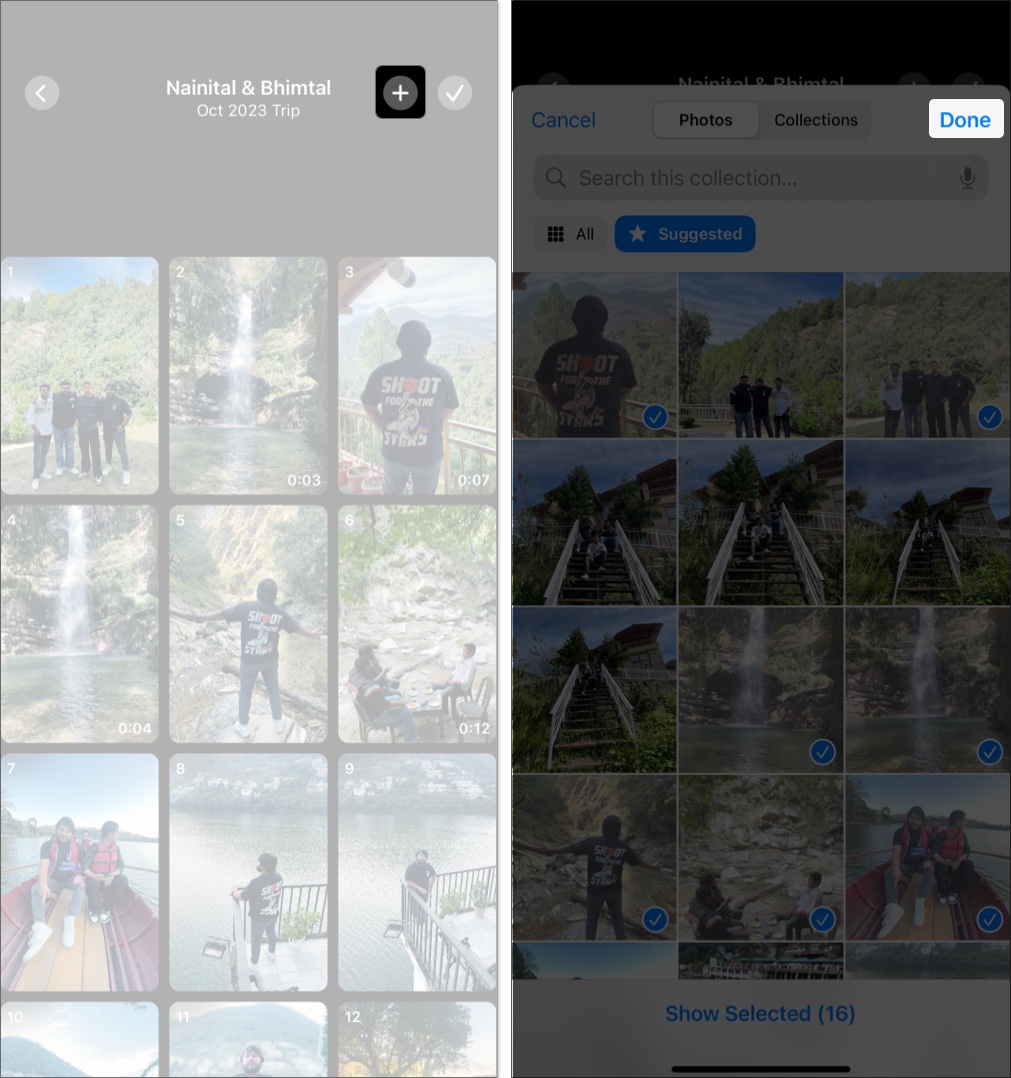
Add or Remove Photos
Didn’t like a particular photo or video in a memory movie, or want to add one that your iPhone missed? Well, here’s how you can do this:
- Tap the three-dot button at the top right corner.
- Select the Edit Timeline option in the drop-down menu.
- To remove photos, tap the Right-tick button at the top right corner, select the photos you want to remove, then tap the Delete button.
- Alternatively, you can tap and hold a photo, then choose the Delete option to remove a single photo.
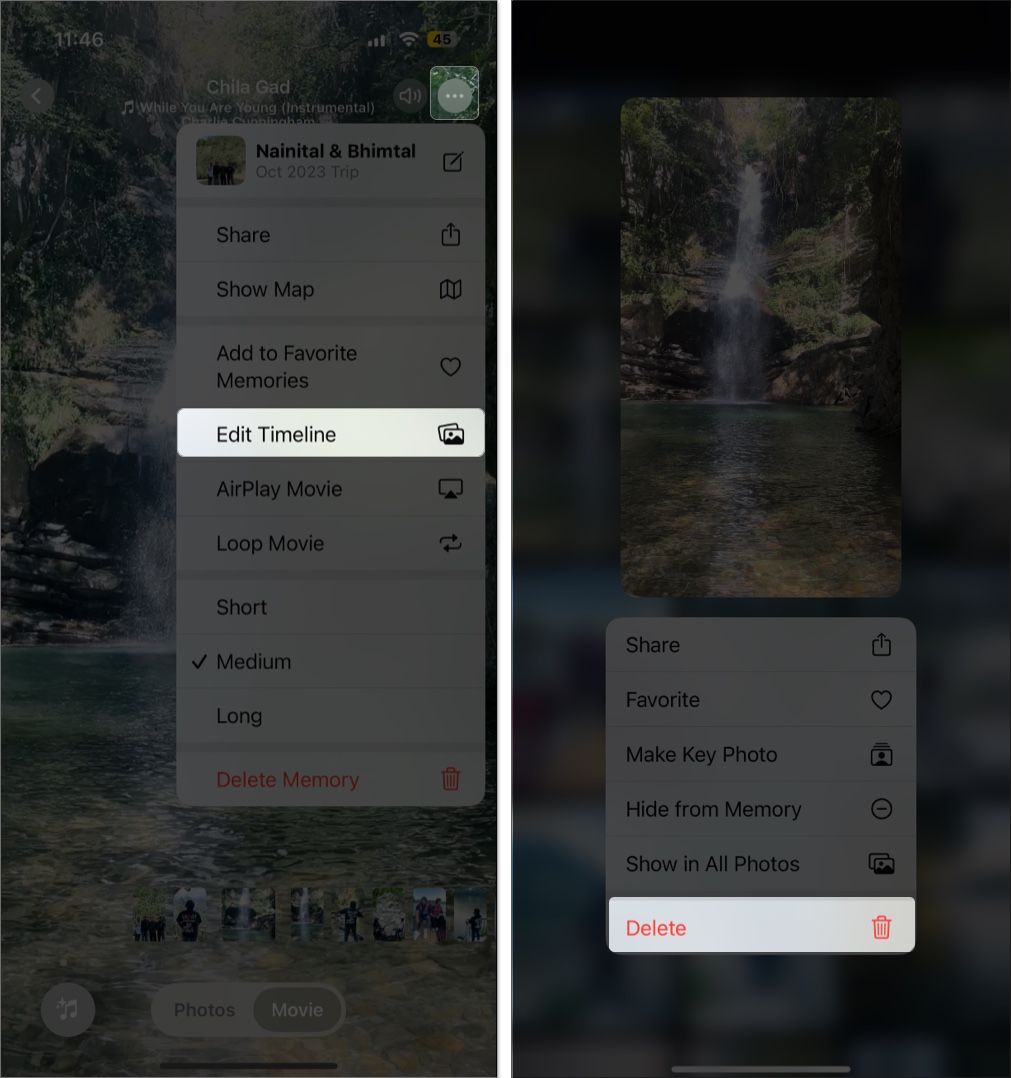
- To add photos, tap the ‘+‘ button at the top right, select the photos you want to add, and tap Done.


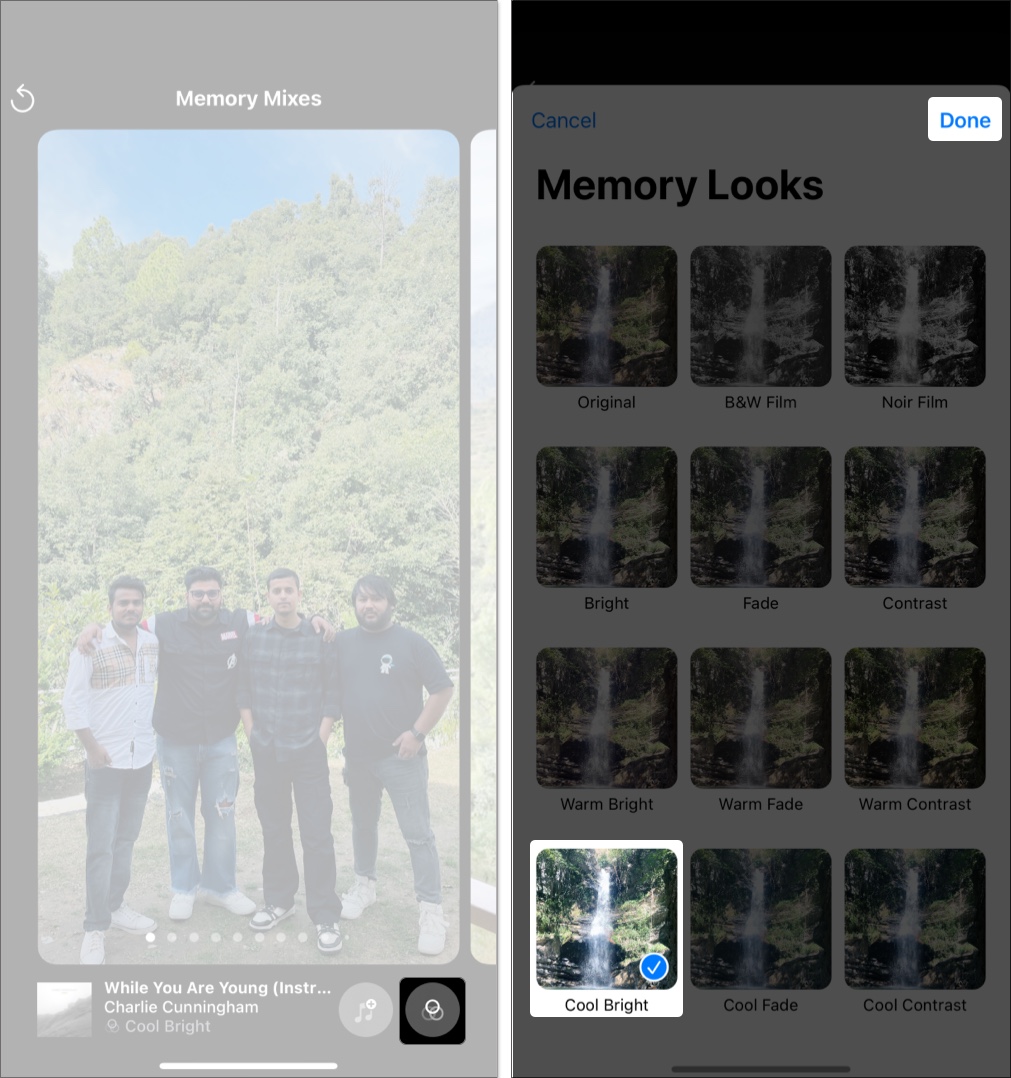
Change the Memory Mood (iOS 17 and Later)
Apple also lets you change a memory’s mood by adding a filter over it to adjust music and transitions automatically. Here’s how:
- Tap the Music icon in the bottom left corner.
- Now, simply swipe right to see how each filter changes the mood of the memory movie. Every time you apply a different filter to the memory movie, the music track also changes.
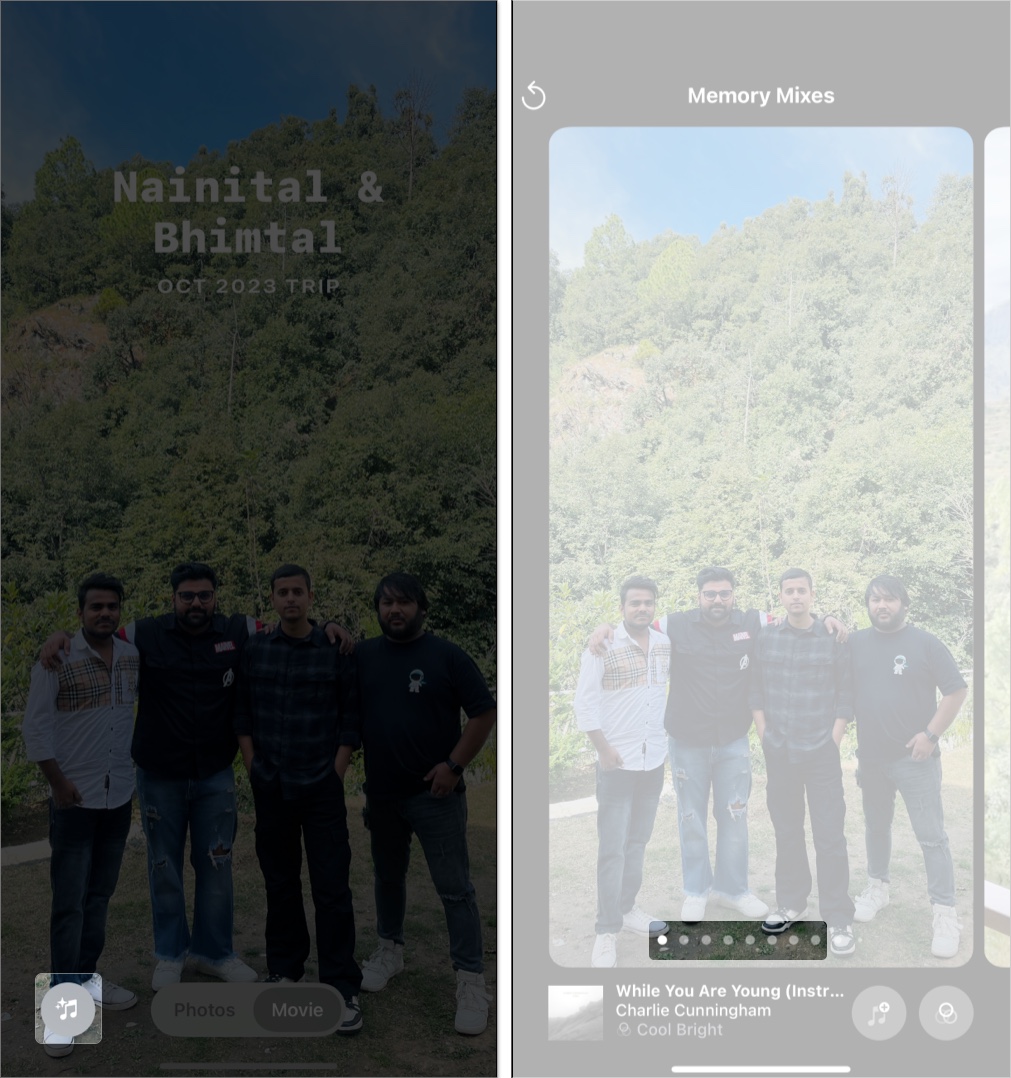

You can also keep the music track as it is while applying a different filter to your memory.
- Instead of swiping right, tap the Filters (three overlapping circles) button in the bottom right corner.
- Choose a mood preset and tap Done.

How to Create Your Own Memory Movies
While the Photos app automatically creates memories, you can manually create them and even ask Apple Intelligence to create one for you if you own a supported iPhone.
On All iPhones (Manual Method)
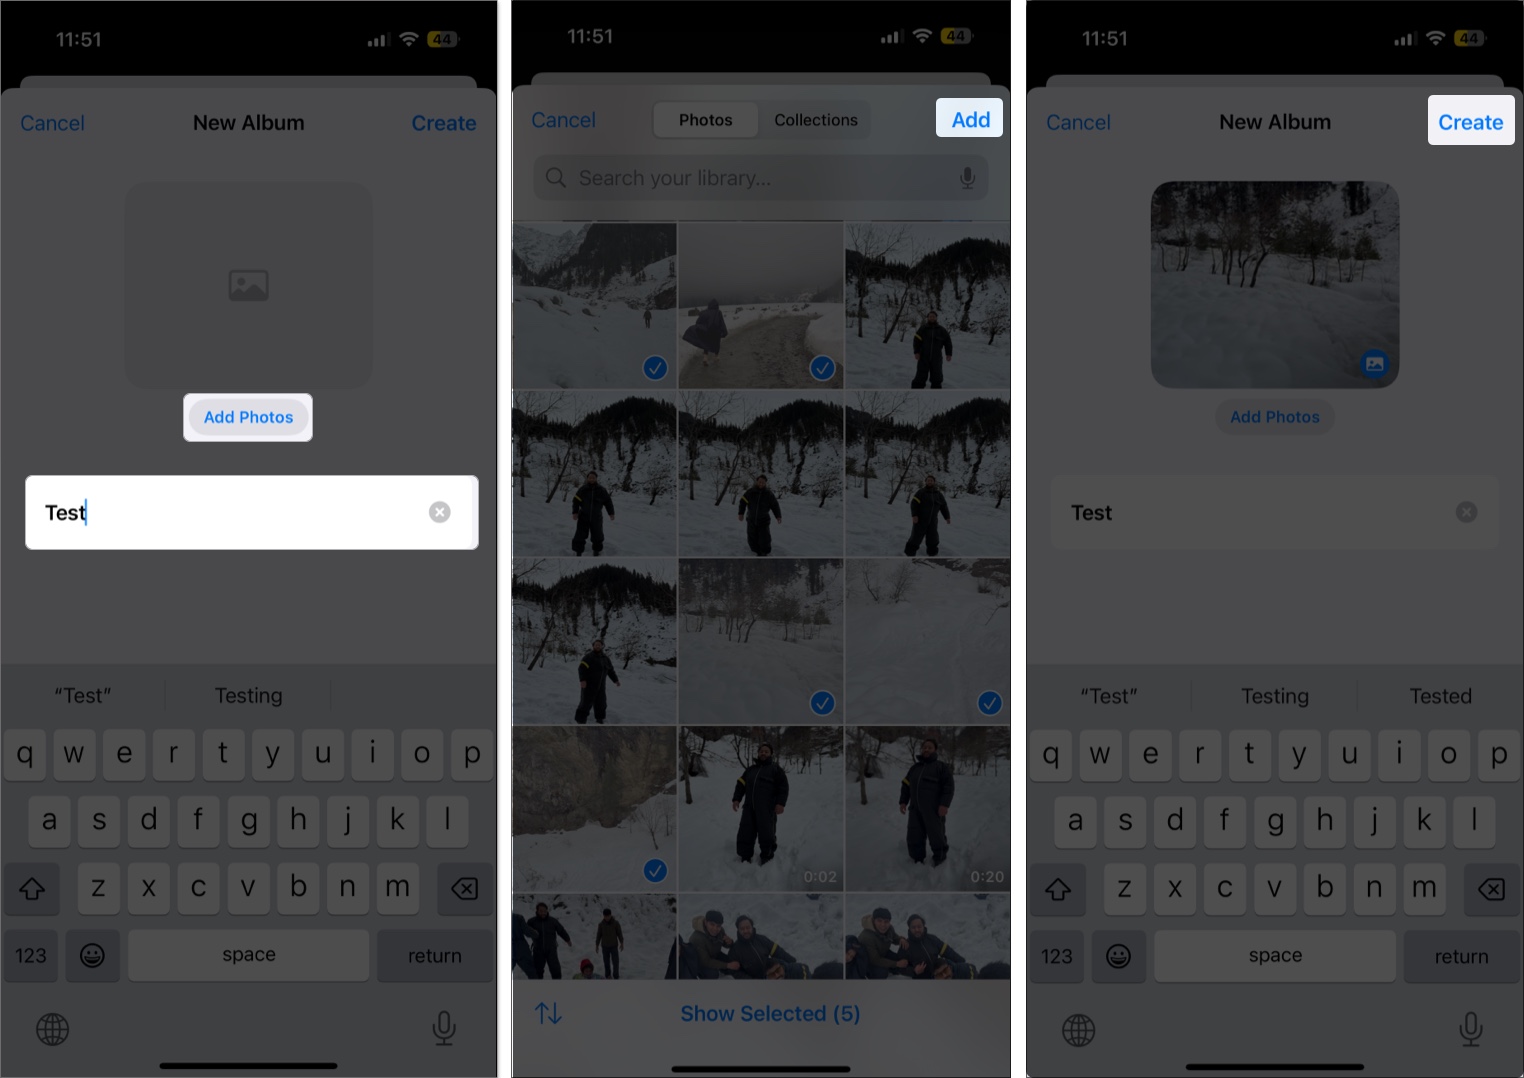
- Open the Photos app, scroll down and tap on Albums.
- Tap the Create button in the top right.
- Select the New Album option in the drop-down menu.
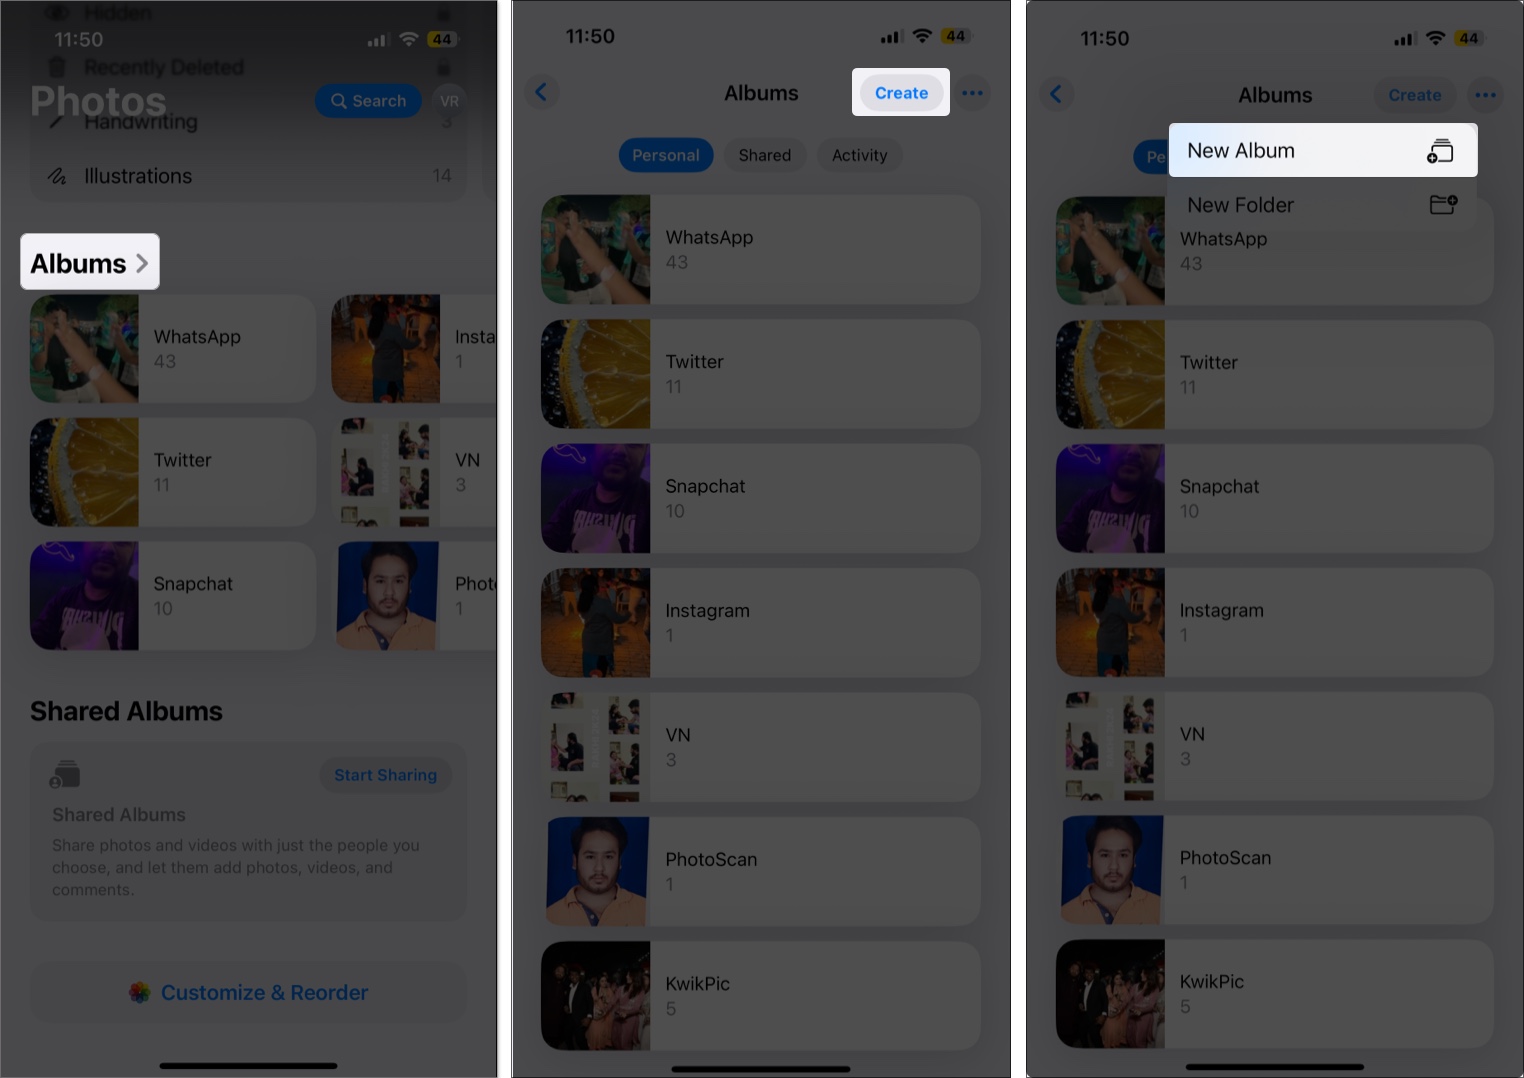
- Give the new album a name, and tap the Add Photos button to add photos and videos to it.
- Once done, tap the Create button.
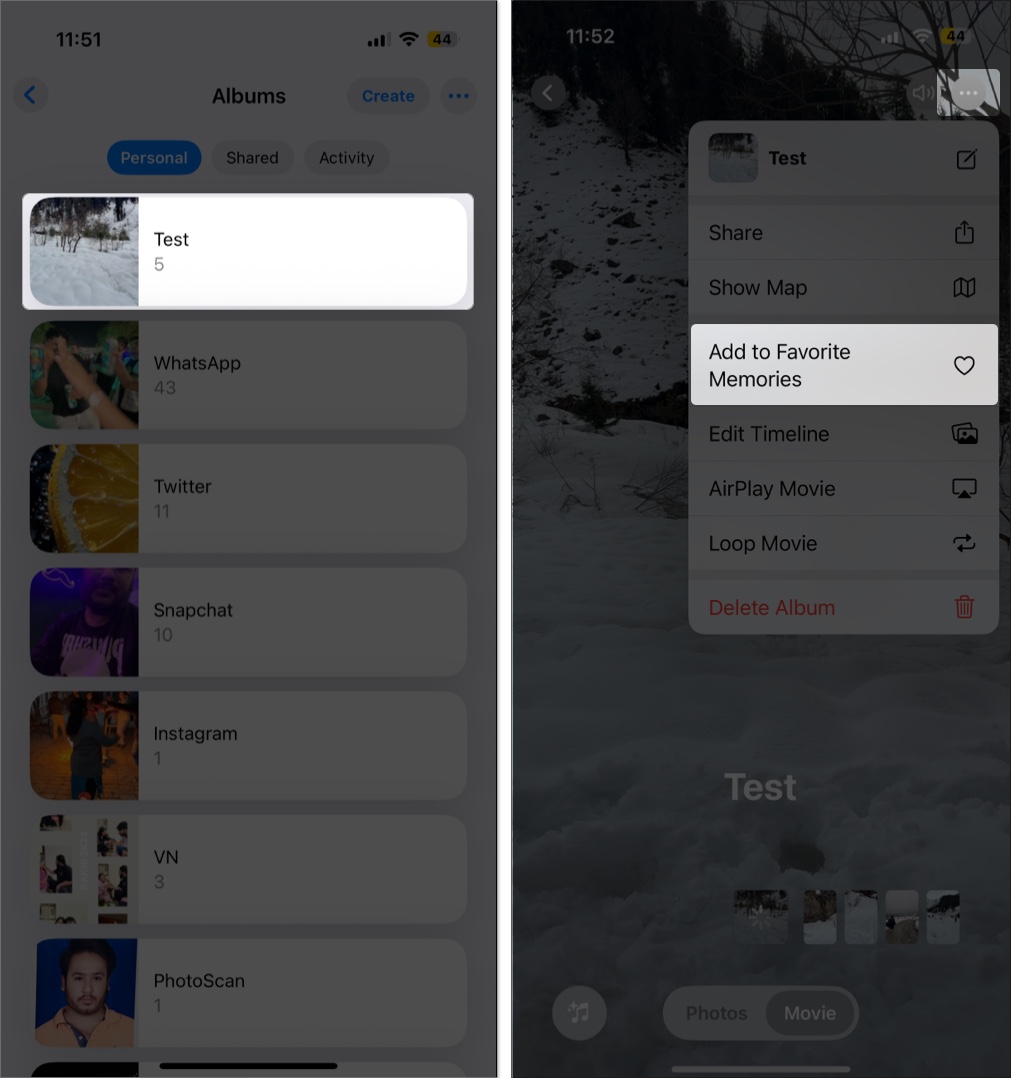
- Now, open the created album, and the memory movie will appear at the top.
- Tap on the memory movie to play it.
- Tap the three-dot (More) button at the top right.
- Select Add to Favorite Memories to add the memory movie to the Memories section in the Photos app.


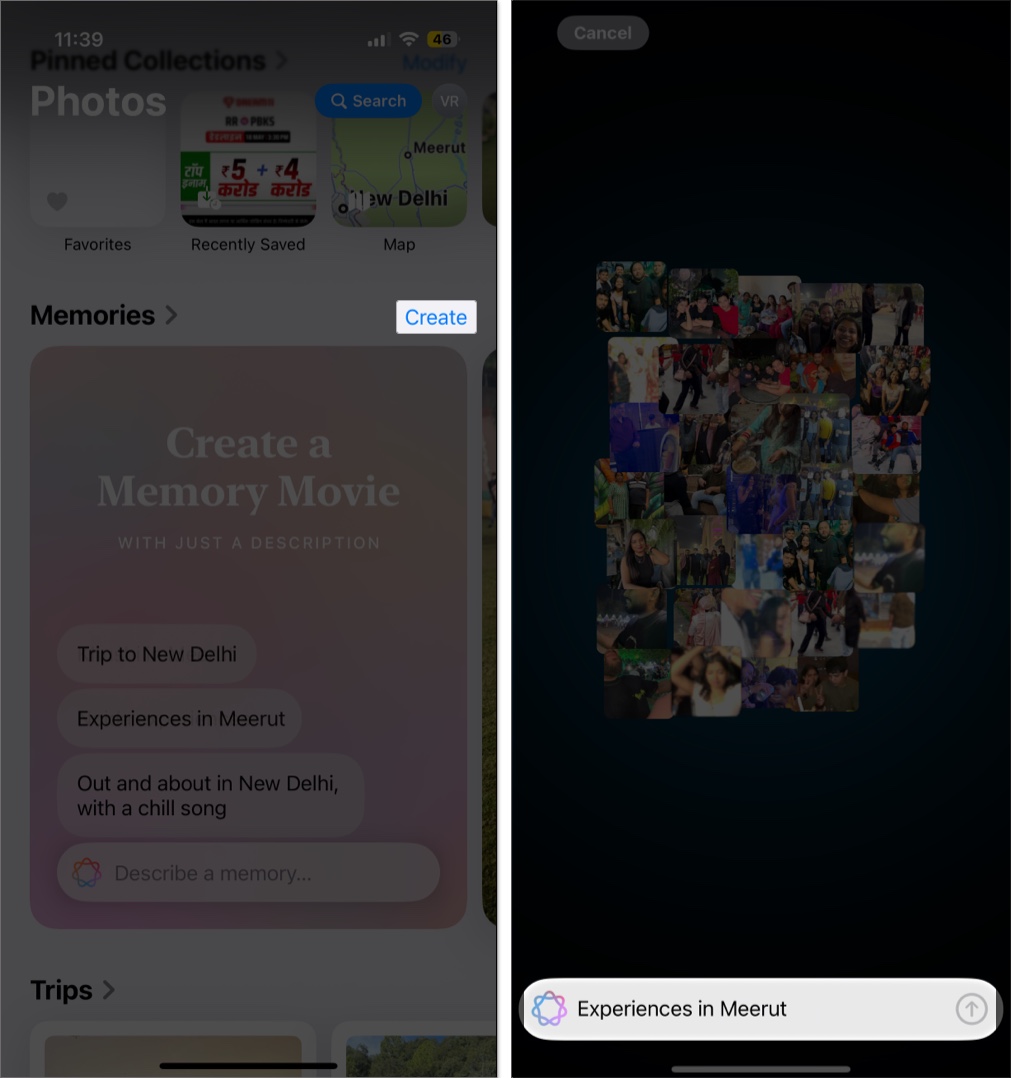
Using Apple Intelligence
Memory movies, automatically generated videos in the Photos app, can be created with just a text description using Apple Intelligence on supported iPhones. To do so:
- Open the Photos app and head to the Memories section.
- Tap the Create button, and enter a text prompt.

After creation, you can customize the movie by changing the music, adding filters, or editing the title and timeline as you usually do.
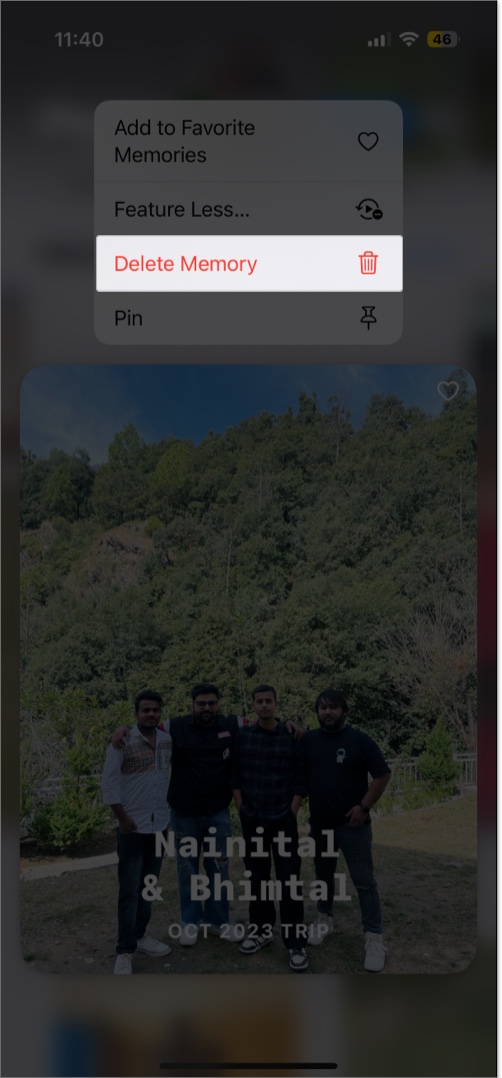
How to Delete a Memory
Deleting a Memory, whether created automatically or manually, is far easier than creating one in the first place. Here’s how you can delete a memory:
- Tap and hold the Memory you want to delete.
- Choose Delete Memory.

Bonus: Search Specific Memories
Use the Search tab in the Photos app. Type in terms like “concert,” “New York,” or “sunset,” and related Memories will appear in your search results.
Relive Life’s Best Moments with a Tap
Memories in the iPhone Photos app offer a powerful way to revisit and reimagine your favorite experiences. From birthdays and holidays to road trips and reunions, turning these into beautiful memory movies lets you enjoy the highlights without sorting through albums manually.
Whether you customize existing Memories or create new ones using Apple Intelligence, these mini movies are sure to make you smile. Want help with your first custom memory? Drop your questions in the comments!
Related articles worth reading:


