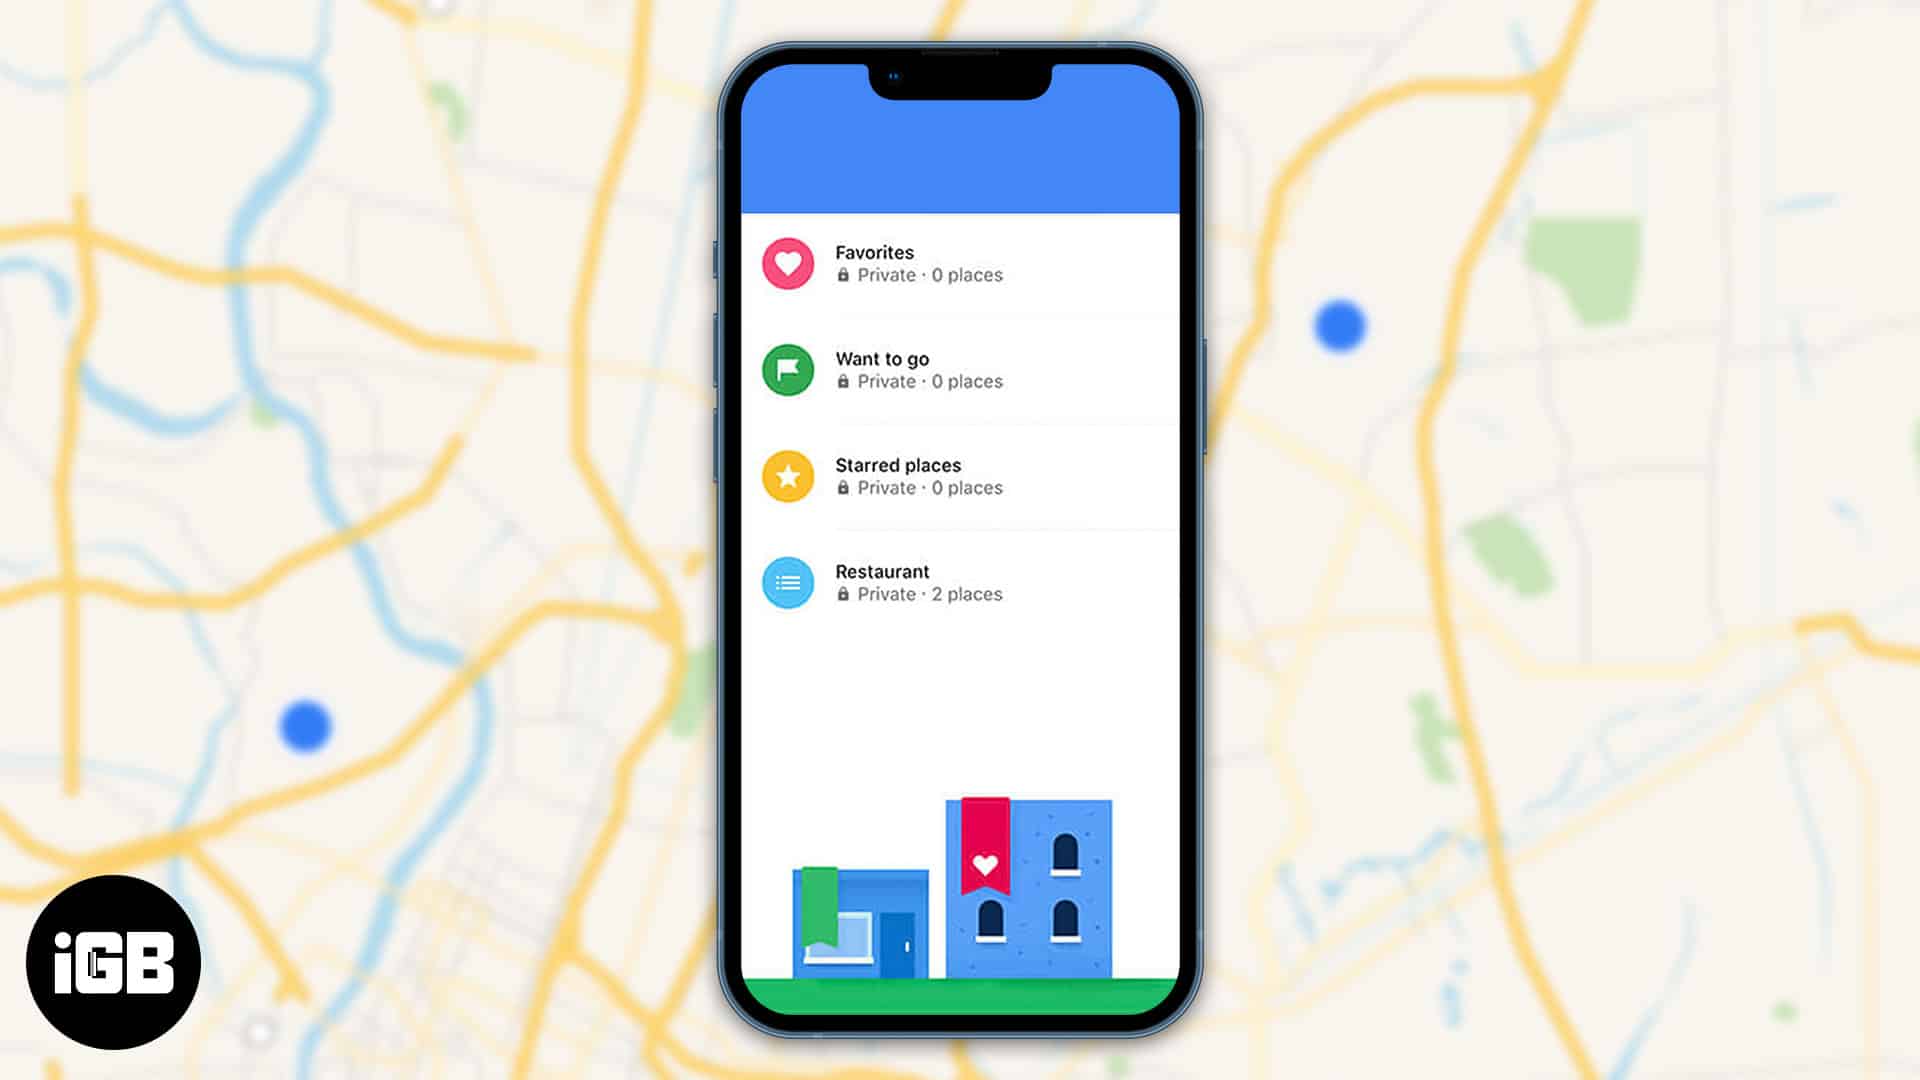
Google Maps is a great trip planner as it lets you save your favorite places and create a special list of them. In your exquisite collection, you may include the places you have visited or the ones you wish to visit and explore in the future. Also, you can seamlessly manage places on your list and even share them with others. Through this guide, I’ll help you create a list of places in Google Maps on iPhone and manage it.
- Find lists in Google Maps on iPhone
- How to make a new list in Google Maps on iPhone
- Add locations to lists in Google Maps
- How to add a note to a Google place list on iPhone
- How to edit a list in Google Maps on iPhone
- How to share Google Maps list on iPhone
- Manage who can edit your shared lists
- How to follow a list using a link
- Hide or delete a list in Google Maps
Find lists in Google Maps on iPhone
- Open the Google Maps app → tap Saved.
- Now you can see the pre-made lists like Favorites, Want to go, Travel plans, Labeled, and Starred places.
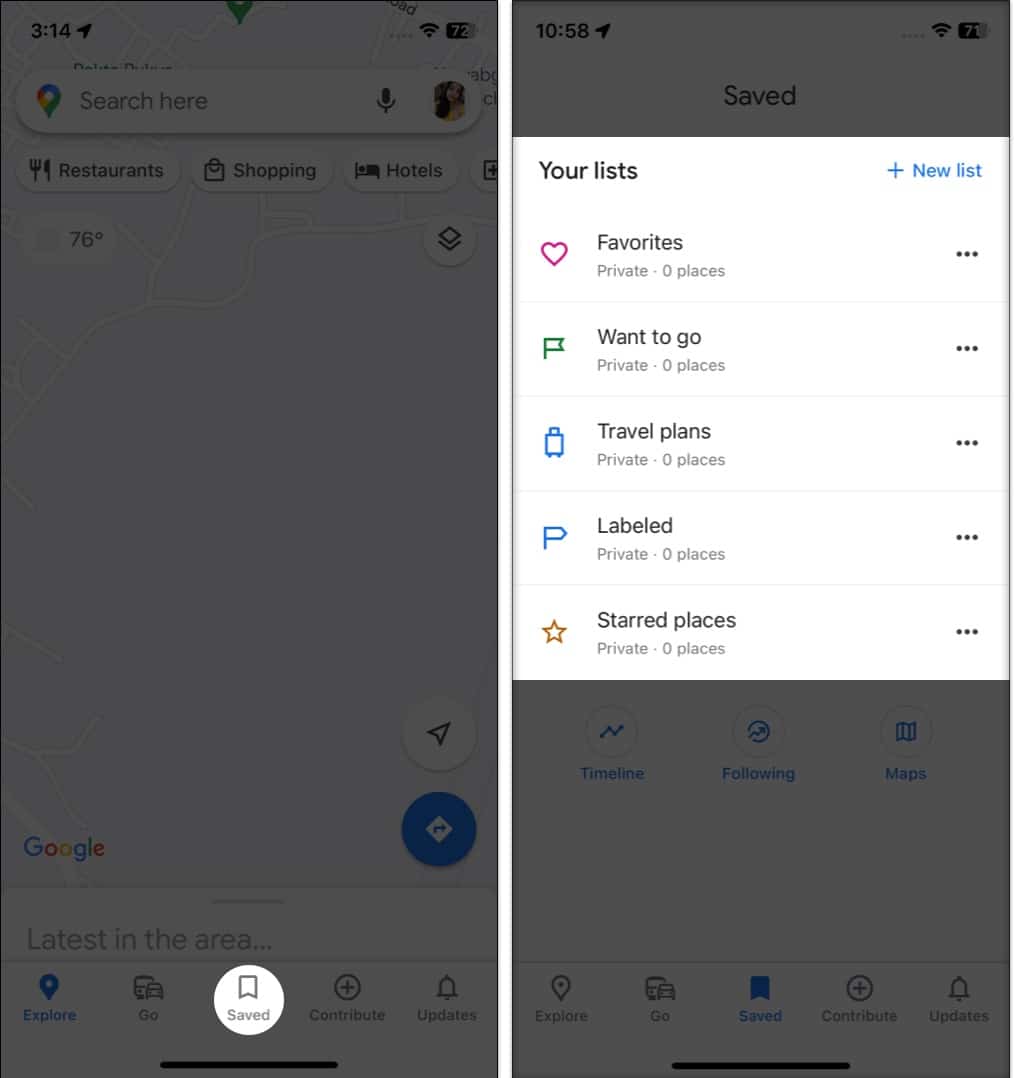
If you have made any lists before, you can find them here.
How to make a new list in Google Maps on iPhone
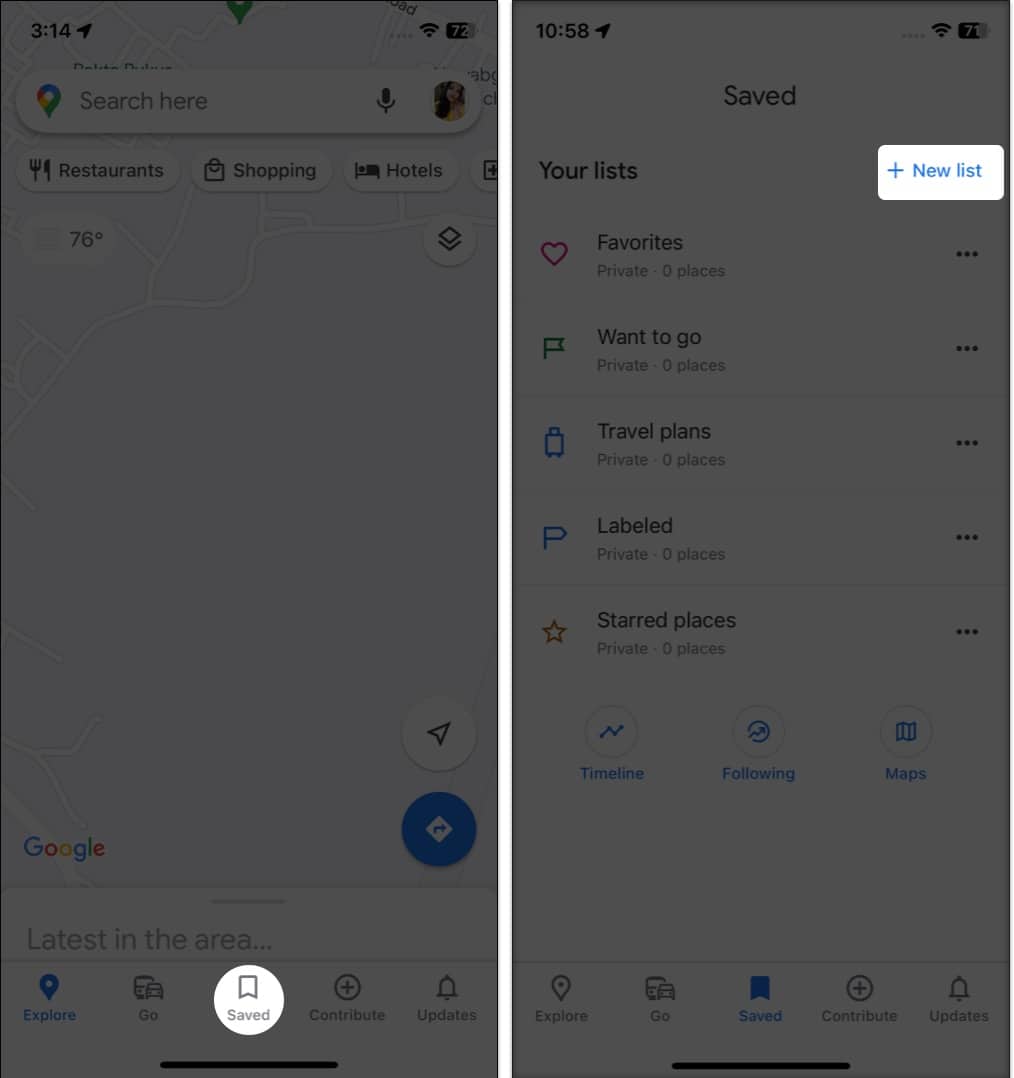
- Go to Google Maps → Saved.
- Tap New list (+).
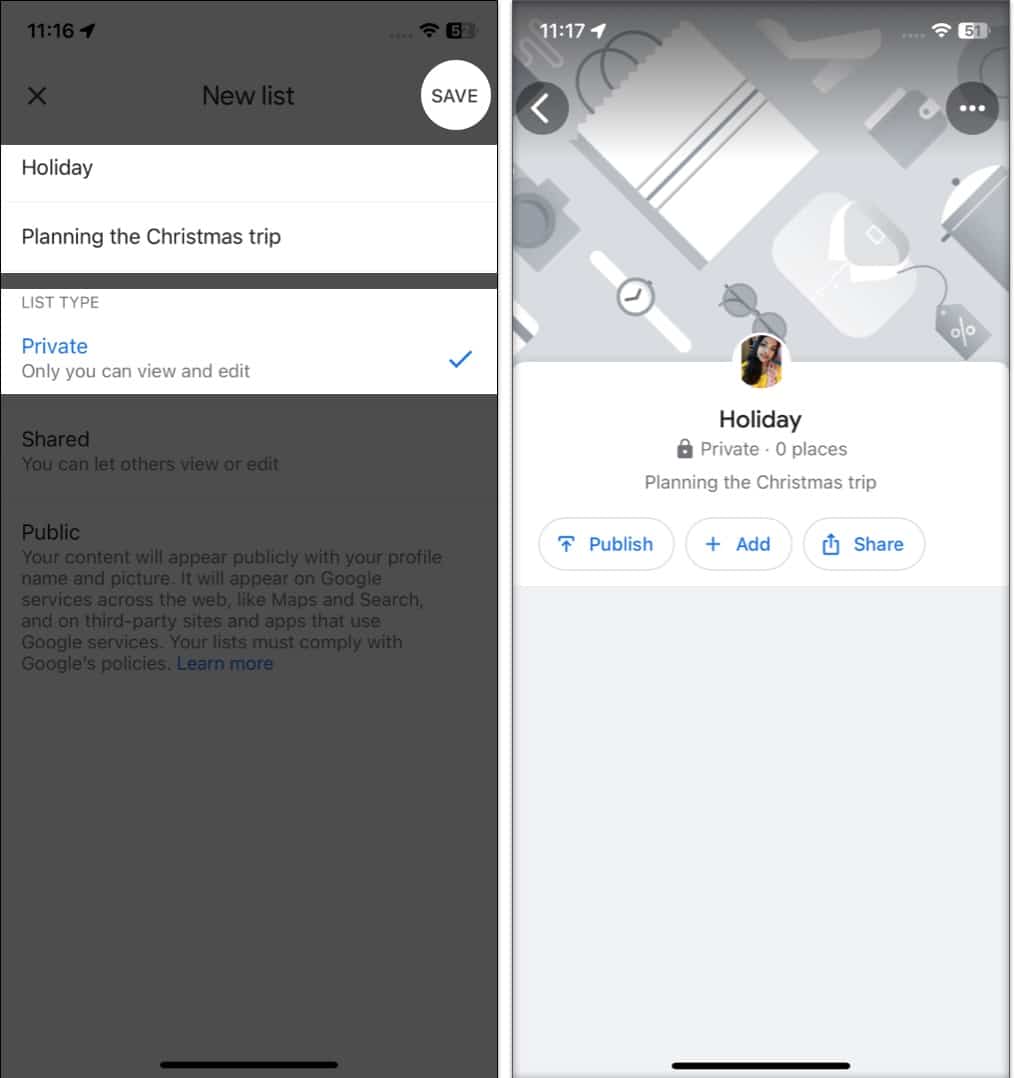
- Name your list and write a description for it so you can remember why you made a list in the first place.
- Also, select the privacy settings for your list.
- Private: Making the list private will only allow you to view and edit the list.
- Shared: Choosing this lets you and others view or edit your list.
- Public: Your list will be published on other Google services like Maps, Search, or third-party sites with your name and profile picture.
- Tap Save.
- Finally, it will make a new list in Google Maps on iPhone.
Add locations to lists in Google Maps
Now that you have created a new list for yourself, let’s add locations to it.
- Open Google Maps and search for a location you want to explore.
- Tap the place from the search result list.
You can see the ratings, the number of reviews, and the open or close status with timings. - Then tap Save → select the list of your choice.
Tapping New list at the top right corner, you can make a new list as well. - Finally, tap Finished.
It will revert back to the location page and show ❤️ Saved in Favorites.
Alternatively, if you want to add multiple places to a particular list:
- Go to Google Maps → Saved.
- Now choose the list to add places.
- Tap Add.
- After that, search for the place and choose the one you want to explore. It will directly save your favorite places on your list. Therefore, just search and tap the locations to extend your list.
How to add a note to a Google place list on iPhone
Suppose you have saved over 50 points of interest places on your Google Maps list. So, it’s nearly impossible to remember why you saved them in the first place.
That’s why whenever I save favorite places on Google Maps, I add a note. Pretty smart, right?
- Search for your desired location and tap Save.
- In the Save to list page, choose your list.
- Tap Add a note about this place? and enter your note.
- Choose Done to confirm.
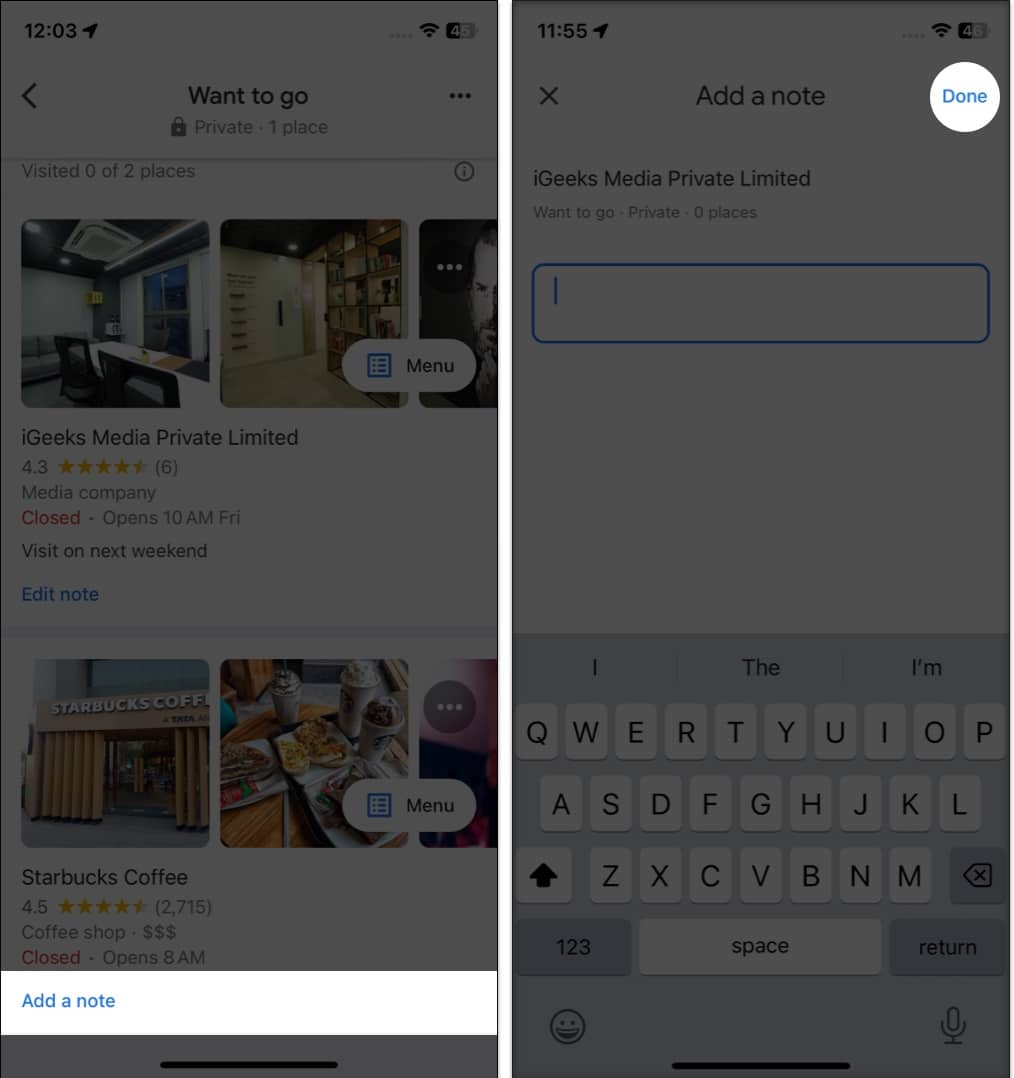
You may also edit the note later. Here’s how:
- Go to Saved → open your list.
- Scroll to find the location → tap Add a note under it.
- Do the modifications and select Done.
How to edit a list in Google Maps on iPhone
You can always alter the name or description of your list. Additionally, you can remove any unnecessary list. Note that you can’t edit or delete pre-made lists on Google Maps.
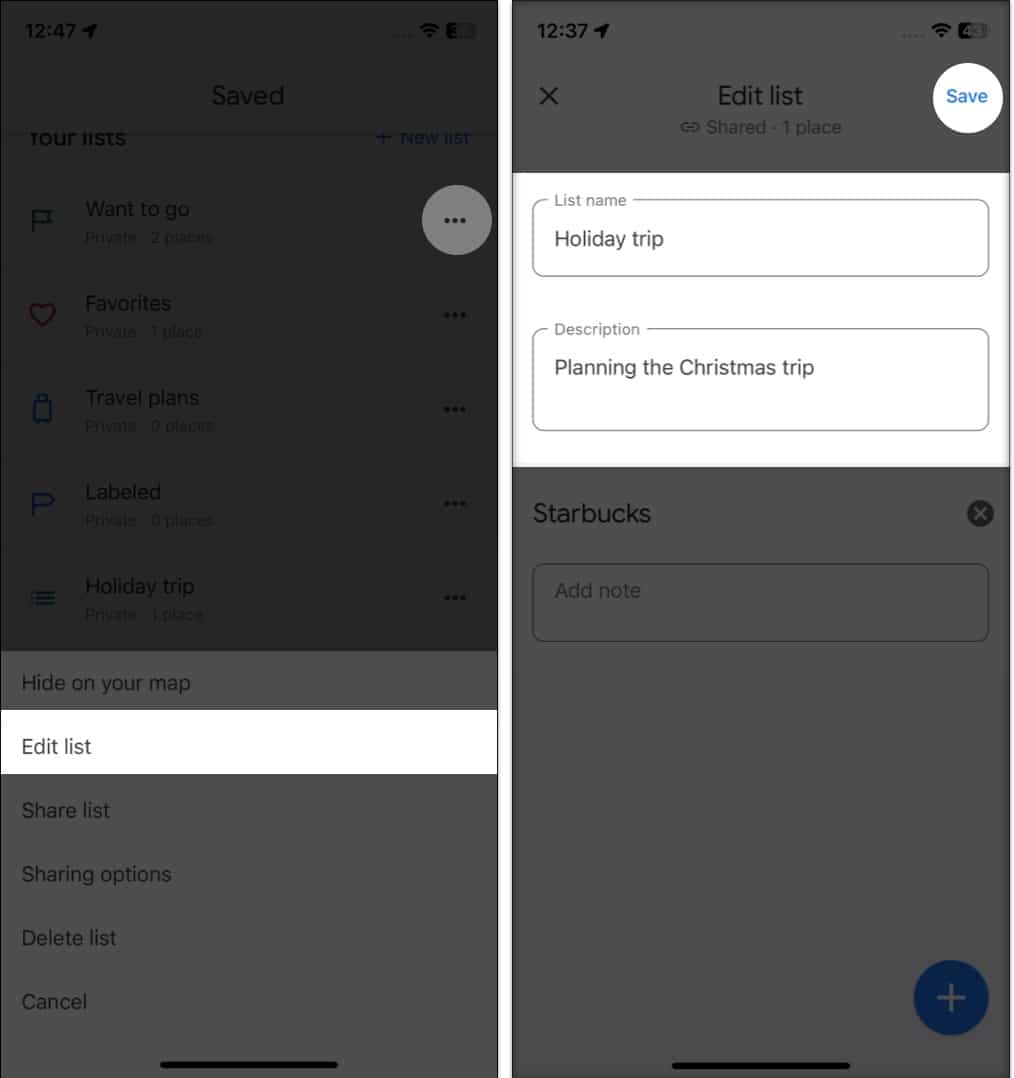
- Go to Google Maps → Saved.
If you have a long list, tap More. - Choose the three dots icon beside your list’s name.
- Tap Edit list.
- Make the desired changes → tap Save.
- Navigate to Google Maps → Saved → tap the three dots icon beside your list name.
- Follow the same steps as above and choose Share list from the menu.
- Toggle on the switch if you want others to modify your list.
- Tap Continue.
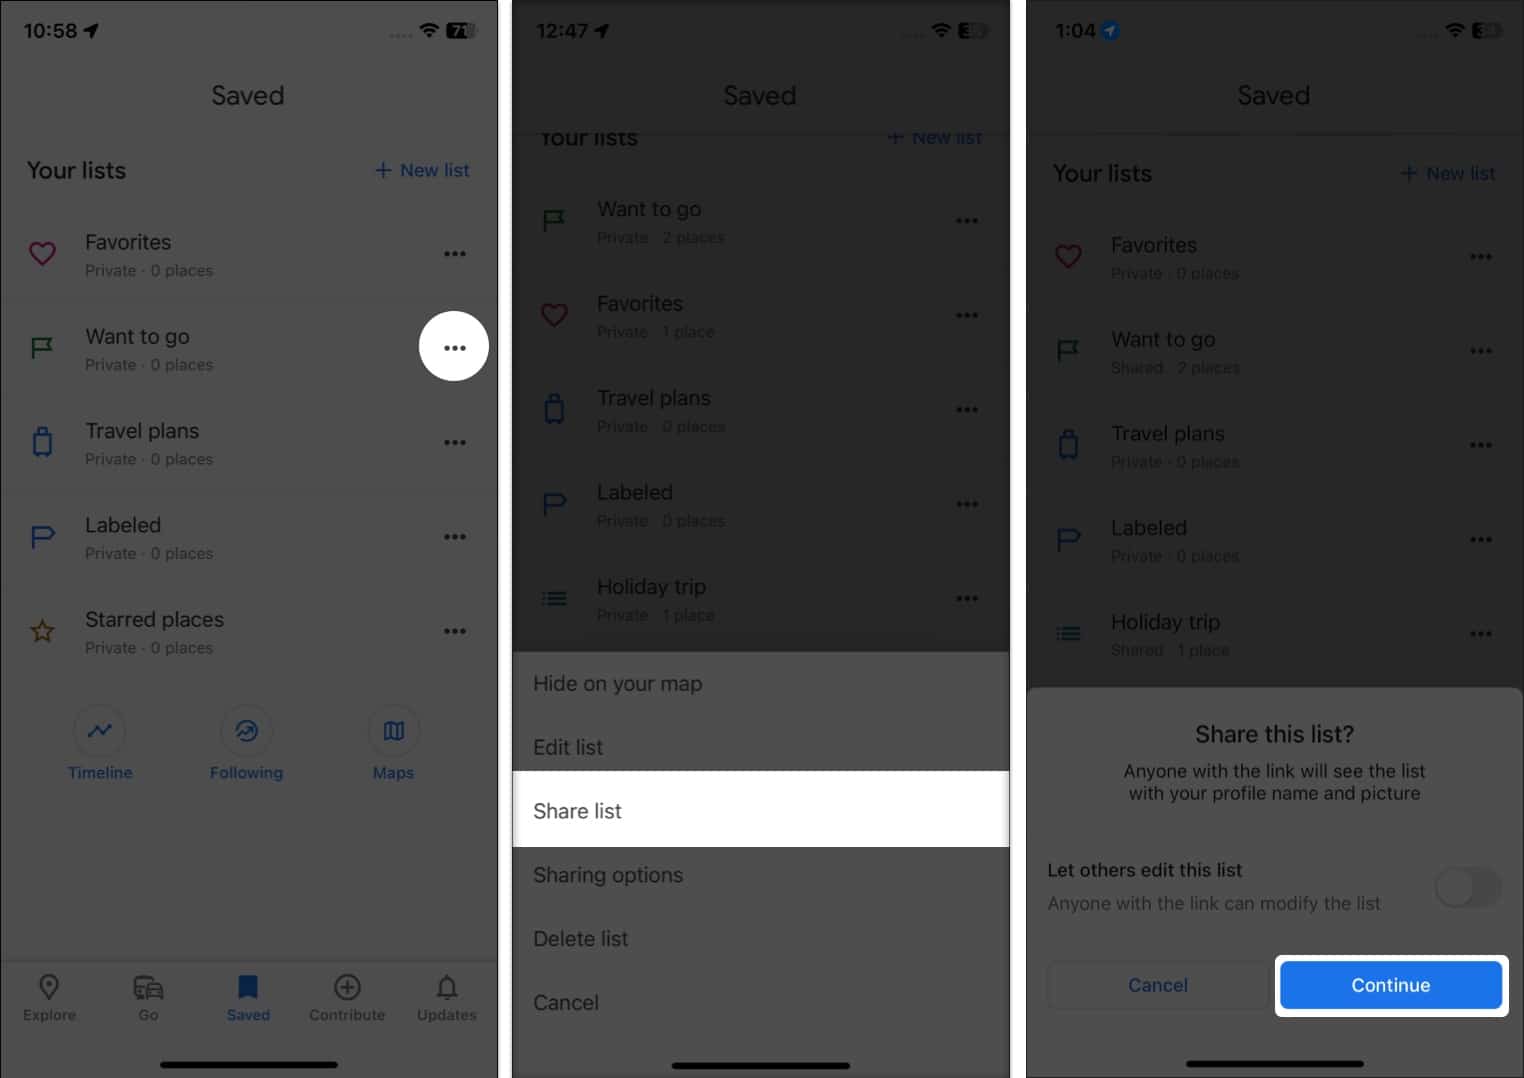
- Now it will open the share sheet. Select the app where you want to share the link. That’s all!
Manage who can edit your shared lists
Oops! Have you shared your private lists with others? Don’t worry. You can revert it back anytime. Also, it lets you remove editing access from people. Therefore, you have complete control over your places lists.
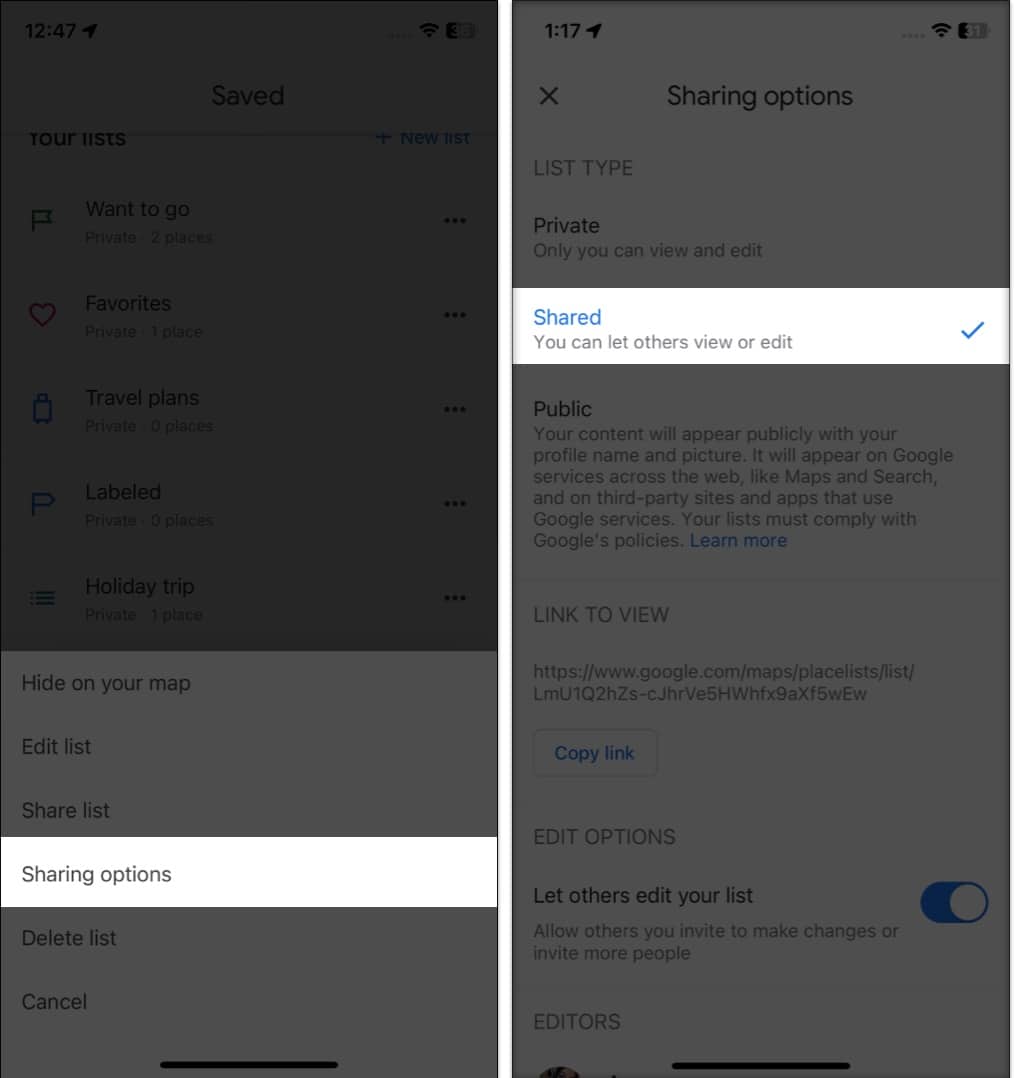
- Open the Google Maps app → Saved → tap the three dots icon next to your list.
- Tap Sharing options.
- Now you can convert your shared list to private again. Or make it Public if you wish to let anyone find and follow your list.
- If you have turned on Lets others edit your list, you may (+) Invite editors from here.
- To remove all current editors, toggle off the option.
How to follow a list using a link
When you start following a list created by others, their saved places will appear as suggested locations in Google Maps.
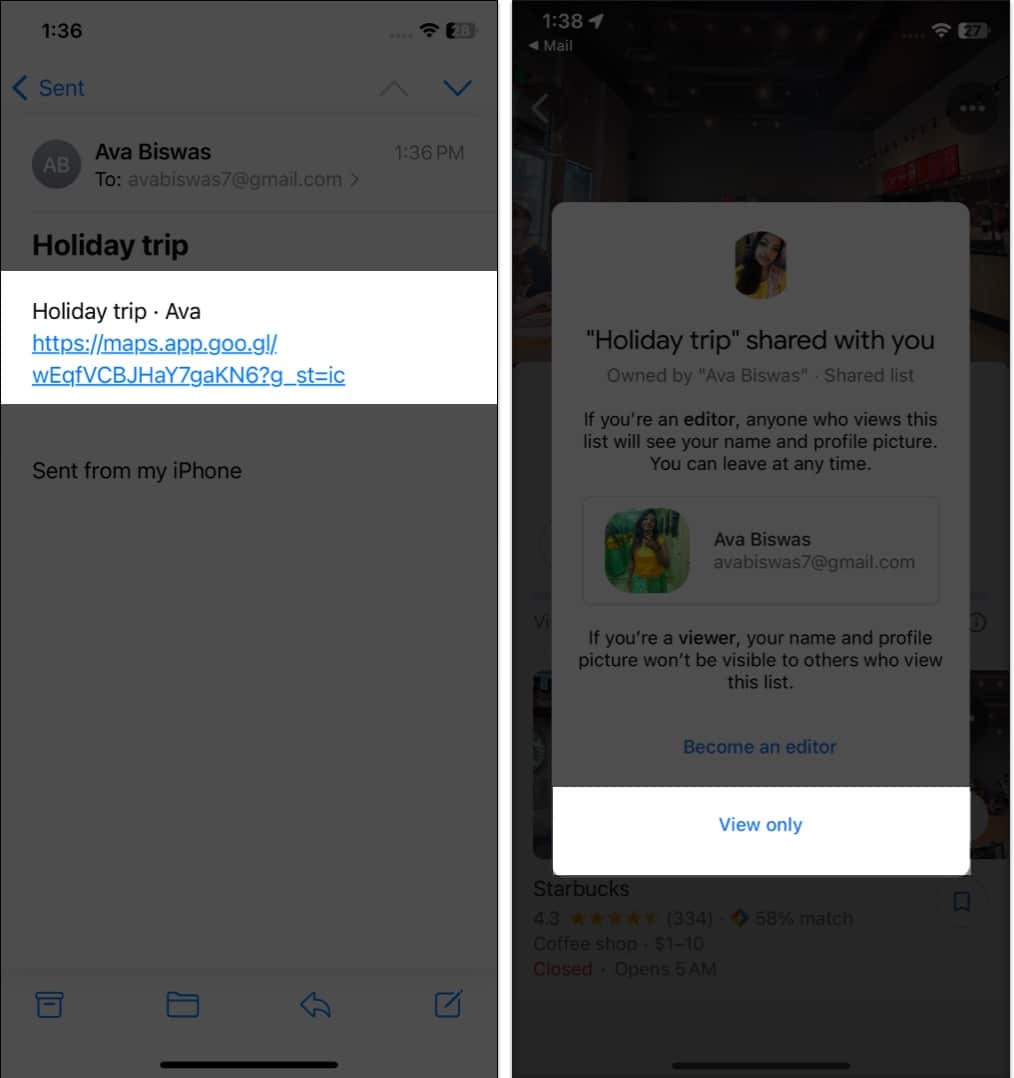
- Tap on the link you have received.
- Now a pop-up will ask if you want to become an editor or only wish to view the list. Choose View only.
- Then tap the three-dots icon at the top right corner.
- Select Follow list. Get back to the Saved pages to see all your lists. Scroll down below. You will find lists that you follow.
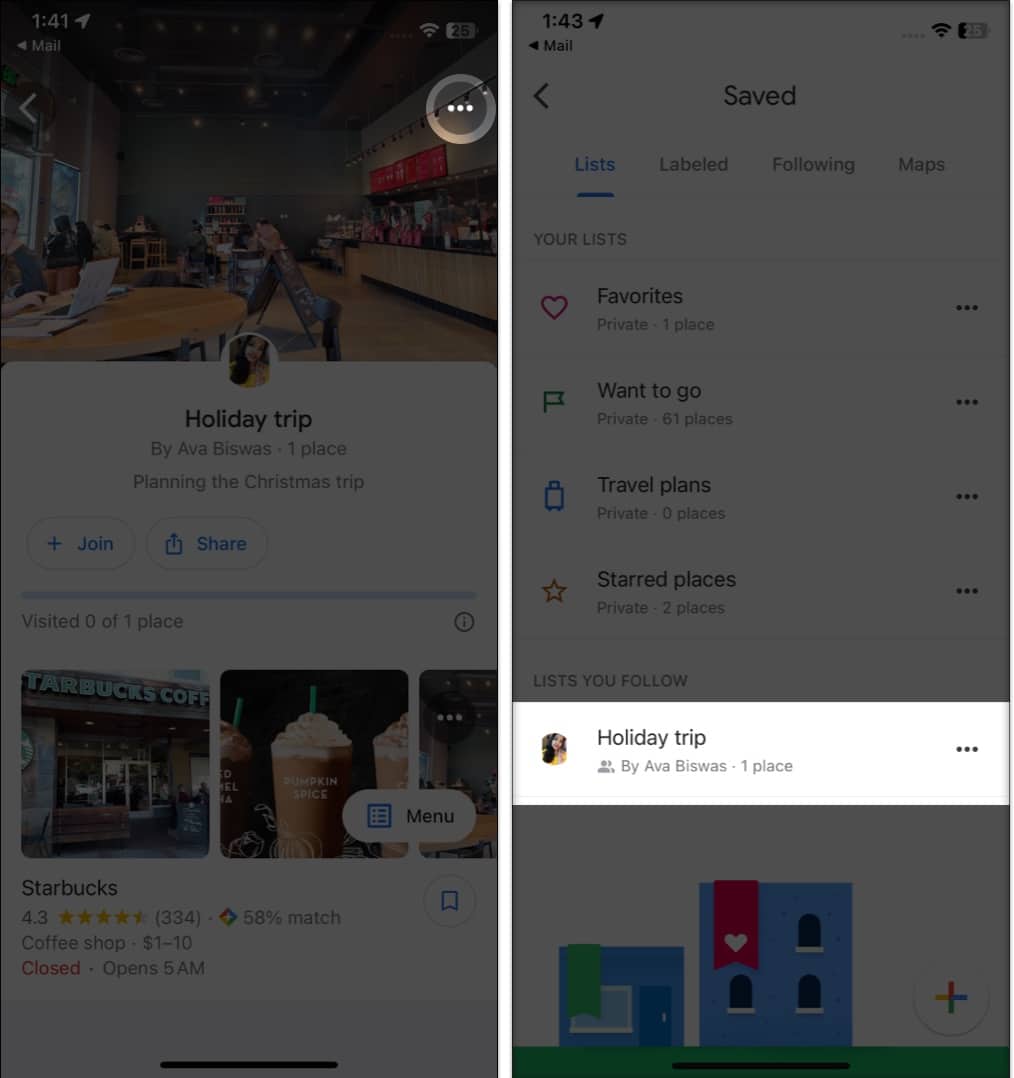
If you want to unfollow a list, tap Saved → tap on the list you want to unfollow → select Unfollow list.
Hide or delete a list in Google Maps
- Navigate to Google Maps → Saved → tap the three dots icon next to your list’s name.
- Choose Hide on your map.
To remove your list, repeat the same steps as above and choose Delete list from the context menu. Finally, confirm your choice by tapping Delete. 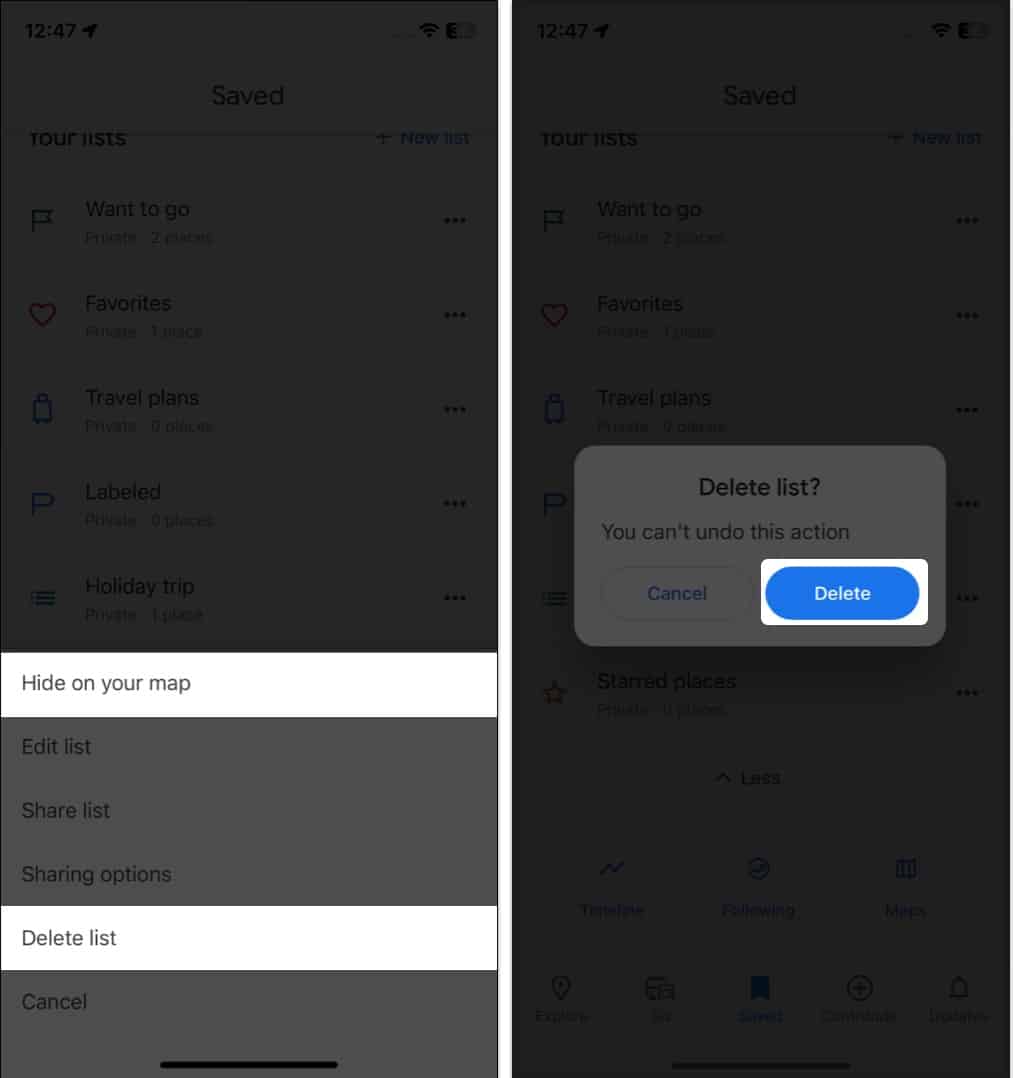
So, that’s all!
As a strong competitor of Apple Maps, Google Maps still wins hearts with its cool, easy-to-use features that enhance user experience. Which navigation app do you use? Let me know in the comments below.
Explore more…

