The iPhone camera has been constantly updated with every new iteration of the iPhone. Whether these are major changes in pixel count or subtle changes for a better user experience, the iPhone is lauded as one of the best camera phones in any generation.
However, this excellent camera system comes with multiple modes that require your attention. The iPhone’s Night Mode is great for clicking pictures during nighttime and in darker areas. Nonetheless, considering the many options available with the Night Mode, it can become slightly tricky for most users.
If you’re not an iPhone power user and aren’t sure about using the iPhone’s Night Mode, I’m pretty sure that this guide will help. I’ll cover every major aspect of the mode to ensure you can use your iPhone’s Night Mode to its full potential!
- What is Night Mode?
- Which iPhone models support Night Mode?
- How to use Night Mode on iPhone
- Understanding Time Intervals
- How to get the best Night Mode shots on iPhone
What is Night Mode?
Since the release of the iPhone 11 and 11 Pro, every iPhone has had a dual or triple camera setup. One of the lenses used in this setup is the wide-angle lens. This lens is used for Night Mode, as this larger lens can allow in more light. In other words, the lighter the lens captures, the brighter the picture.
This lens uses iOS’s built-in machine learning AI and Apple’s Neural Engine. When working together, these two features combine to process photos and reproduce them in better lighting.
Let’s look into this system in a bit more detail. The iPhone’s Night Mode uses time intervals, ranging from 1 second to 9 seconds, to capture a series of images. The larger the time interval, the more light that is captured. Ergo, the more light captured, the brighter the picture will be.
This time interval and the amount of light captured are based on the environment’s lighting. How does it realize how much light to let in, you ask? It’s all thanks to the optimizations of the iPhone camera and the machine learning AI.
However, here’s not where the magic happens. When you use DSLRs to capture frames in dark environments, various lenses can be used to capture the light and reproduce photos. With iPhones, machine learning AI combines frames from a series of pictures to create the best night photography!
Which iPhone models support Night Mode?
- iPhone 11, iPhone 11 Pro, and iPhone 11 Pro Max
- iPhone 12, iPhone 12 Mini, iPhone 12 Pro, iPhone 12 Pro Max
- iPhone 13, iPhone 13 Mini, iPhone 13 Pro, and iPhone 13 Pro Max
iPhone 14 Series -There’s a good chance that with the new 48MP sensor (as rumored), the Night Mode might also see various enhancements and improvements.
Which lenses use Night Mode?
Night Mode requires the camera lens to have 100 percent focus pixels to capture the light. Moreover, optical image stabilization is a must when using Night Mode. These features were only present in the wide-angle and telephoto lenses on the iPhone 11 series.
Since then, Apple has added Night Mode to the selfie and ultra-wide cameras on iPhone 12 series. Now, Night Mode is available in the selfie, wide-angle, ultrawide-angle, and telephoto lenses of the latest iPhones.
How to use Night Mode on iPhone
Apple has made using Night Mode much easier, thanks to an automatic setting that enables Night Mode if the iPhone deems it fit, according to the environment. In other words, it means that you can’t use Night Mode whenever you want to. It will enable by default based on the environment’s lighting.
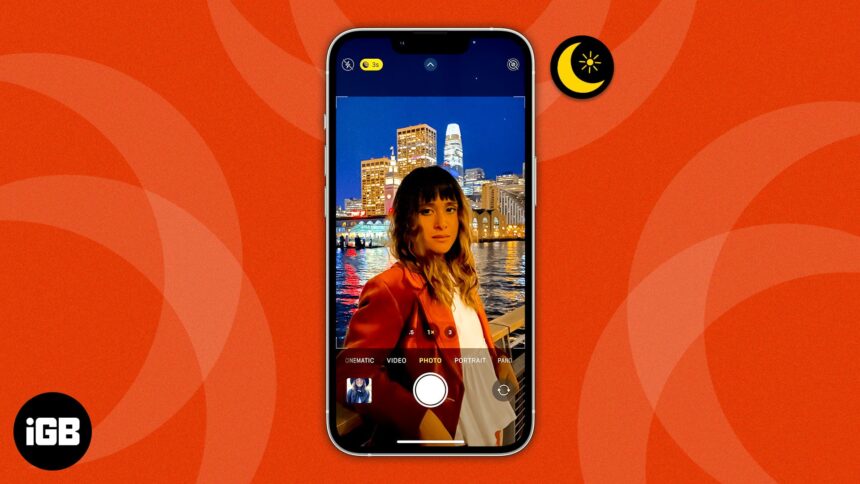
The only way to know if Night Mode is enabled in the Camera app is when you’re using the app and see a gray or yellow button on the interface. This button will accompany a moon icon in your screen’s top-left corner.
Since Night Mode is enabled by default, you’ll have to work to adjust it according to your requirements. For example, if you click a picture and find it too bright for your liking, you can make some adjustments. You can either change the camera’s exposure levels or switch it off.
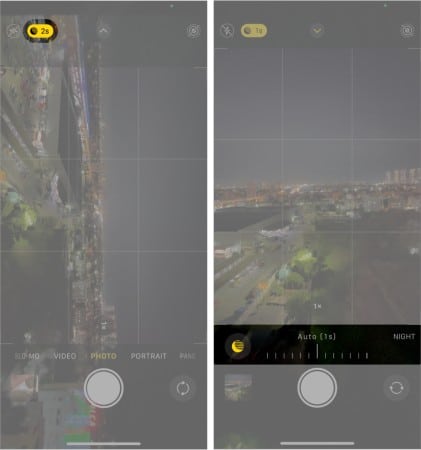
To turn off the Night Mode, here’s what you need to do:
- Tap on the Moon icon present in the top-left corner of the interface.
- You can then change the settings through the slider that will be shown at the lower end of the screen. Moving the slider to the extreme left will turn off Night Mode.
- After you’ve adjusted the settings according to your liking, tap the shutter icon to click a picture with adjusted Night Mode levels.
Understanding time intervals
As stated earlier, the Night Mode takes a series of frames based on time intervals. These intervals are essential to understand, as you’ll be able to get your desired picture based on your time interval needs. Usually, your iPhone will analyze the amount of light in the environment and set a time interval.
These intervals are usually between one and five seconds. If you want to change the time interval, you can select the moon icon on the app interface and adjust the time interval accordingly.
A simple rule of thumb to remember is this: if the subject and/or environment is darker, a longer time interval is better. This allows your phone’s camera to capture more light, making the resulting picture much brighter.
However, longer time intervals also mean that you have to hold the phone steady for the same amount of time. While this can be fine for intervals up to three seconds or five seconds, it can be problematic if you have to hold the phone for nine seconds. So, when you want to use the maximum time interval, having a tripod at hand would be better.
Remember – If you move or shake the phone too much while using Night Mode, your pictures will get blurred.
How to get the best Night Mode shots on iPhone
Night Mode shots work similarly to Long Exposure shots. So, if you have any idea about how to take Long Exposure shots, you’ll be able to use Night Mode to its full potential. However, I’d still recommend a tripod if you plan to experiment with the iPhone’s camera.
When you’re holding the phone for the set time interval, the iPhone can detect if it’s being held by hand or via a tripod. For the former, the time interval will be less. At best, optical image stabilization and machine learning AI will deliver a better picture if you can hold the phone steady for a while.
When using a tripod, the iPhone can provide time intervals of up to 30 seconds. This makes it an excellent choice for taking Night Mode shots of a darker sky. Moreover, bear in mind that the iPhone is clicking multiple pictures within the time interval. Since it takes the best parts of all the pictures and combines them for the final picture, you have to ensure steadiness and stability.
I hope that you’ve gained a better understanding of what Night Mode on iPhone cameras is and how it works. Furthermore, if you’re looking for some extra information to ensure the best Night Mode shot, you can check out the tips below:
Use stationary subjects
I’ve reiterated multiple times that Night Mode requires an exceptionally stable hand. Moreover, your subject needs to remain steady as well. So, you’re better off using inanimate objects or still environments for Night Mode shots. Try not to use Night Mode shots on pets or children, as they’re usually running around more often. This will result in a highly blurry picture.
Ambient lighting never hurts
A small amount of lighting that complements the environment can help you produce better Night Mode pictures. Night Mode shots in complete darkness aren’t recommended, as the color reproduction in this situation isn’t ideal. You can set up your own lighting and experiment with angles or light intensity to find the perfect shot.
Experimentation is key
Understanding Night Mode and using the automatic or default settings properly will almost always result in a good shot. However, you can always go for a shot that’s more your style or pertains to your niche. For this, and the perfect shot for your portfolio, you’ll have to experiment to find the best settings.
Whether it’s using a tripod, changing the lighting system, trying different angles, or changing the time intervals, mix and match to understand what works for you. After all, the default shot isn’t always the best. A little bit of patience and plenty of experimentation will give you the Night Mode tone that you might be looking for.
Use different lenses
Since the iPhone 11 and newer iPhone models support optical image stabilization, you can check which lens works best in your particular scenario. I’d recommend you start with the wide-angle lens, as it captures more light and results in brighter pictures. However, since the selfie camera also supports optical image stabilization on the more recent iPhone models, you could experiment with the front camera as well!
Overall, the multiple lenses offer plenty of opportunities for budding photographers or enthusiasts to understand the iPhone camera and its capabilities. Dedication and time devotion are key to mastering this powerful device!
Summing up
I hope that this guide for Night Mode on iPhone cameras makes your utilization of the Night Mode much easier. I’ve also provided some basic tips for those readers who are interested in understanding the Night Mode a bit more.
If you think I’ve missed out on some crucial points, do let me know about them in the comment section. I look forward to reading your thoughts, suggestions, and opinions!
Read more:
- How to use the timer on iPhone Camera
- How to take picture of Moon on iPhone
- Is your iPhone Camera upside down? How to fix inverted pictures
- iPhone camera blinking? 7 Ways to fix it!
🗣️ Our site is supported by our readers like you. When you purchase through our links, we earn a small commission. Read Disclaimer.