Everyone should know how to set up the emergency Medical ID on iPhone as it can potentially save your life. This feature stores essential health information about you that first responders and others can use during emergencies such as an accident.
It includes your emergency contacts and can be viewed even when your phone is locked. Further, it can be linked to your Apple Watch too. Here’s everything you need to know to create and share your Medical ID on your iPhone and Apple Watch. Let’s start with the basics.
- What is Medical ID on iPhone?
- How to create an emergency Medical ID on iPhone
- How to set up your Medical ID on an Apple Watch
- Edit emergency contacts on iPhone
- How to view someone’s Medical ID
What is Medical ID on iPhone?
Your Medical ID on the iPhone or Apple Watch stores medical details about you that can be useful in emergencies. The details include:
- Name, date of birth, and Apple ID photo
- Medical conditions, such as diabetes, hypertension, or asthma
- Medications you are currently on
- Medical notes such as if you have a pacemaker in your heart
- Allergies and reactions
- Blood type
- Organ donor status
- Height and weight
- Primary language
- Emergency contacts and their phone numbers
How to create an emergency Medical ID on iPhone
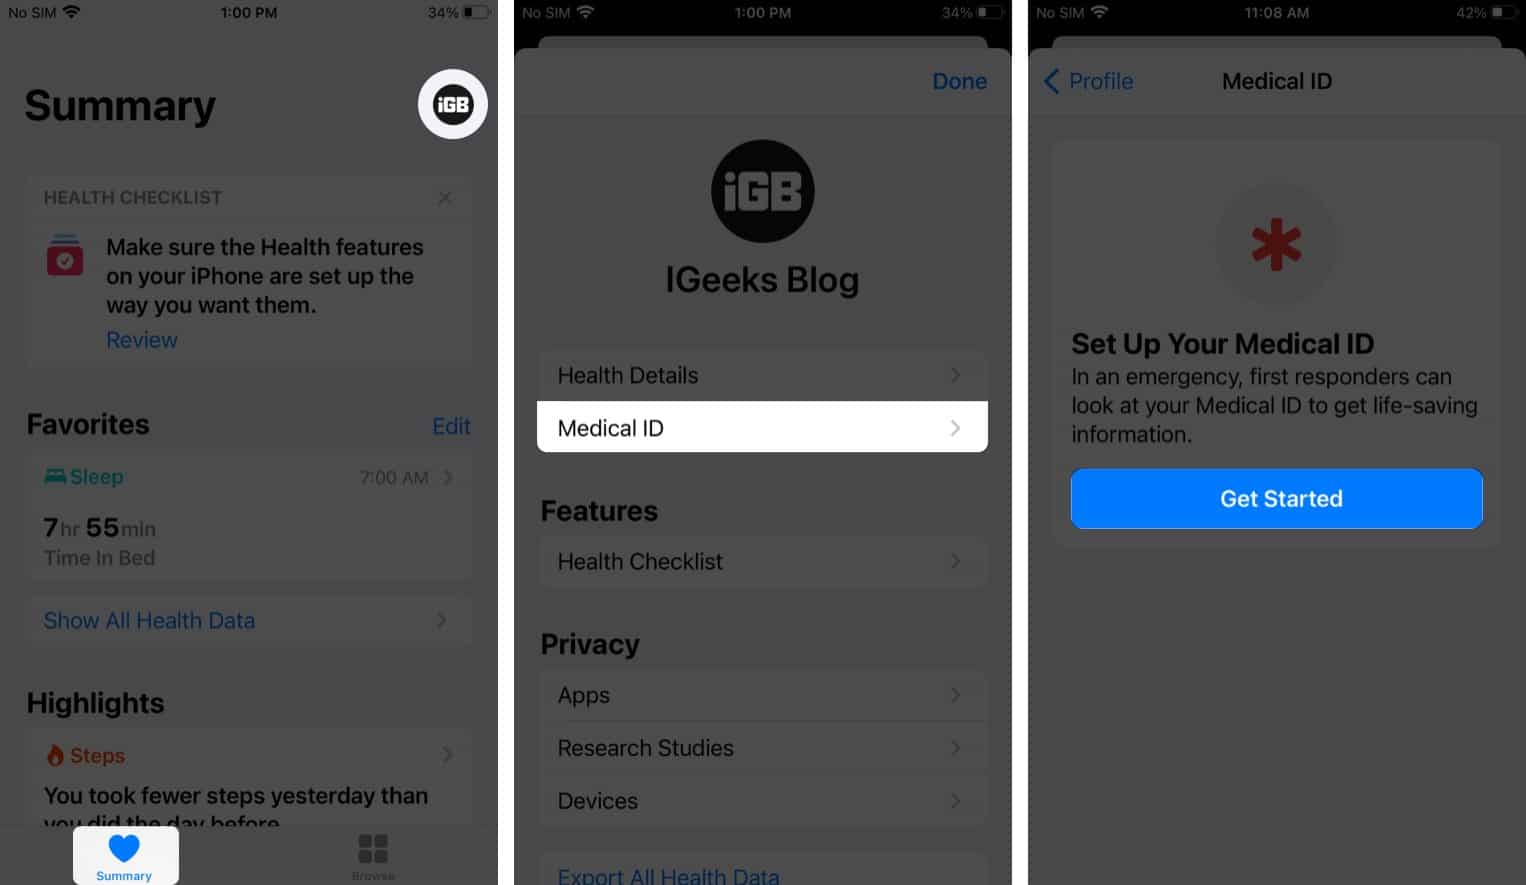
- Open the Health app and stay on the Summary tab.
- Tap your profile picture at the top-right and select Medical ID.
Alternatively, open Contacts and select your name at the top. Scroll down and tap Create Medical ID. - If you’re setting up the Medical ID for the first time, tap Get Started.

- If you have previously set up a Medical ID and want to update it, tap Edit in the upper-right corner.
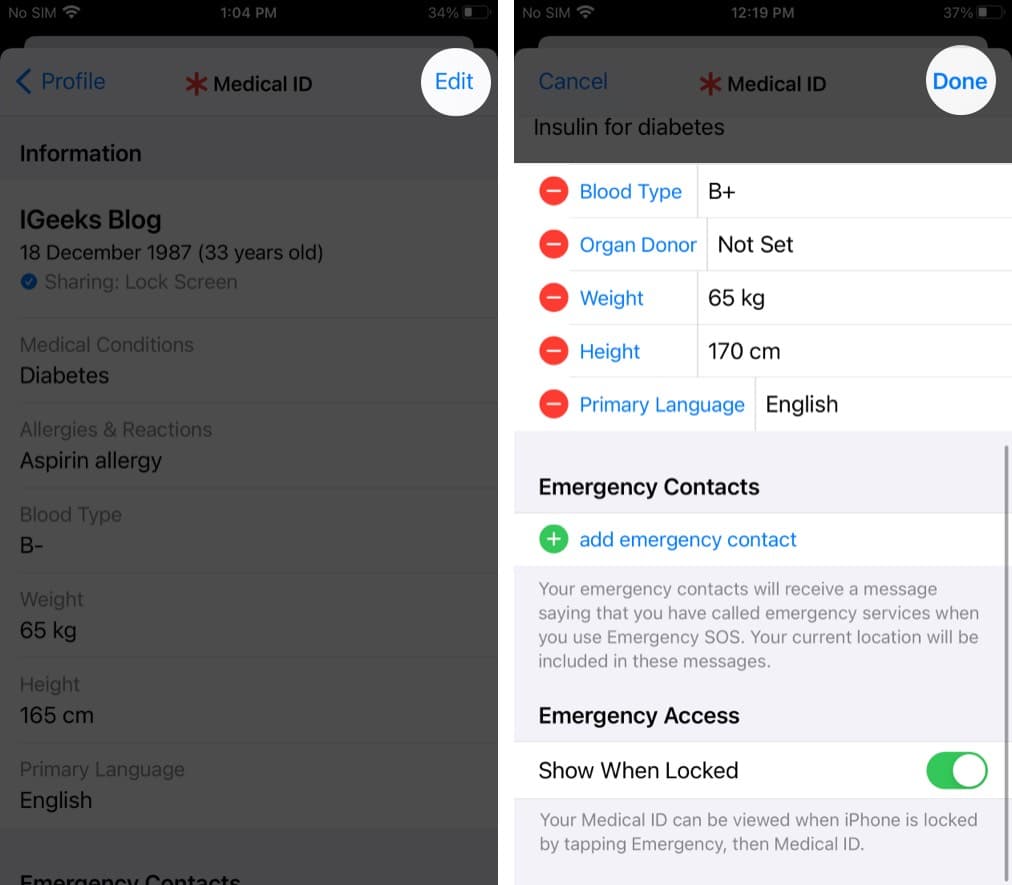
- Enter the relevant information like your date of birth, allergies, blood type, etc.
- To make your Medical ID available from your iPhone Lock screen, toggle on Show When Locked. This can enable others to see it during an emergency.
- Tap Done.

Note: If you’re in the United States, you can also turn on Share During Emergency Call. This will share your Medical ID with emergency responders through Emergency SOS.
How to set up Medical ID on an Apple Watch
After setting up your Medical ID on your iPhone, it’s essential to add it to your Apple Watch if you use one. Many first responders are trained to look for medical bracelets when attending to patients in an emergency.
This means your Apple Watch is more likely to be checked in an emergency than your iPhone. So, follow these steps to add your Medical ID to Apple Watch.
- Open the Watch app on your iPhone
- Go to My Watch → Health → Medical ID.
- Make sure all the details are accurate and enable the option to Show When Locked.

Along with your Medical ID, it’s vital to set up emergency contacts on your iPhone. They will be notified when using the Emergency SOS on your iPhone or Apple Watch. Here’s how to add or edit your emergency contacts:
Edit emergency contacts on iPhone
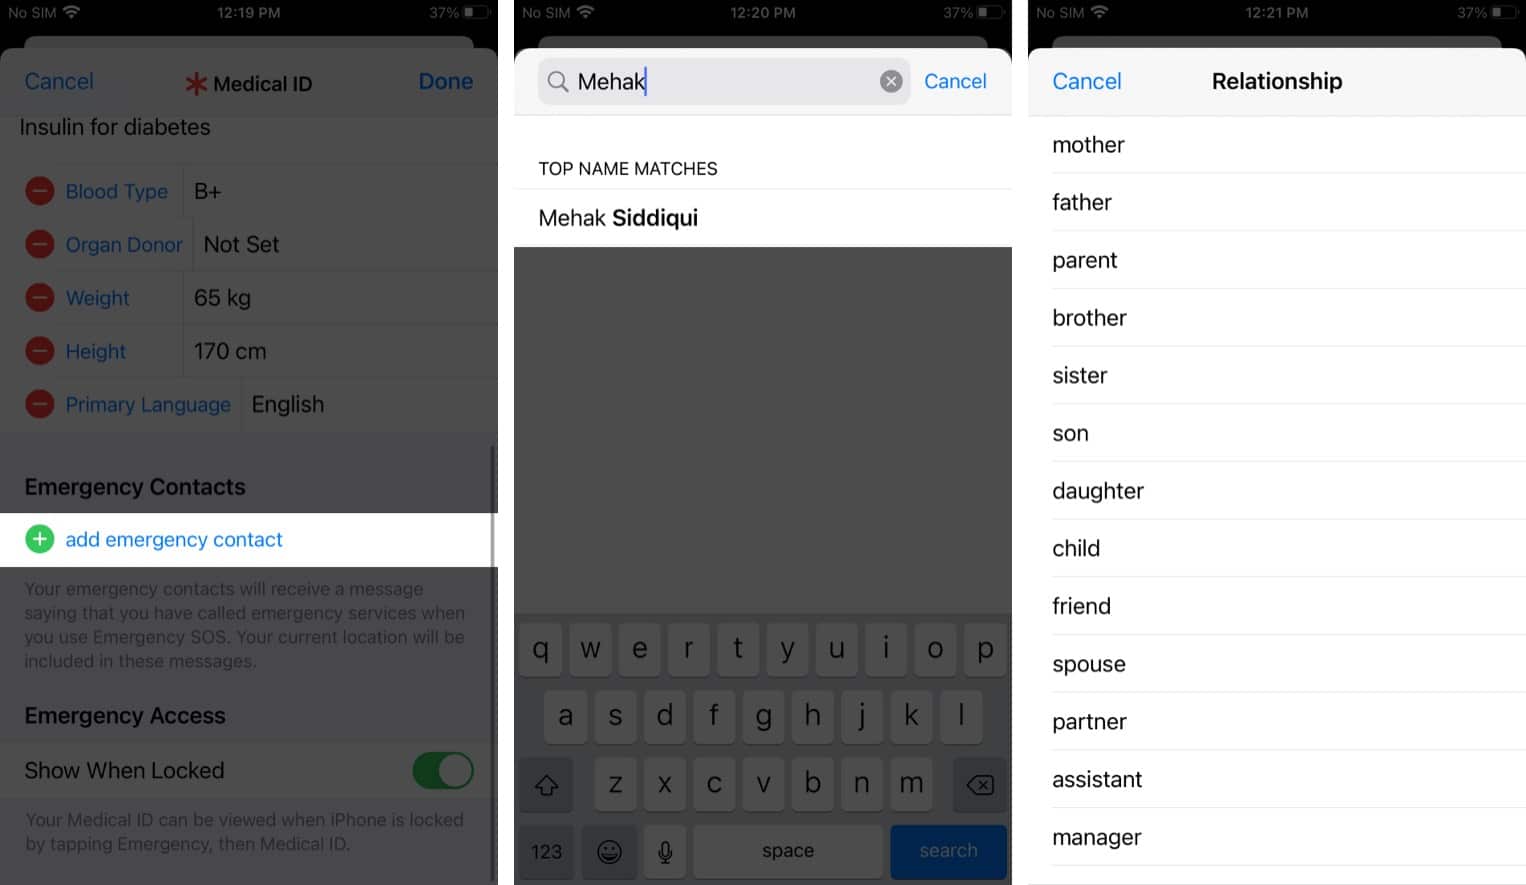
- Open iPhone’s Health app and go to the Summary tab.
- Tap your profile photo at the top-right and select Medical ID.
- Tap Add Emergency Contact.
- Choose the contact from the list and their relationship to you.
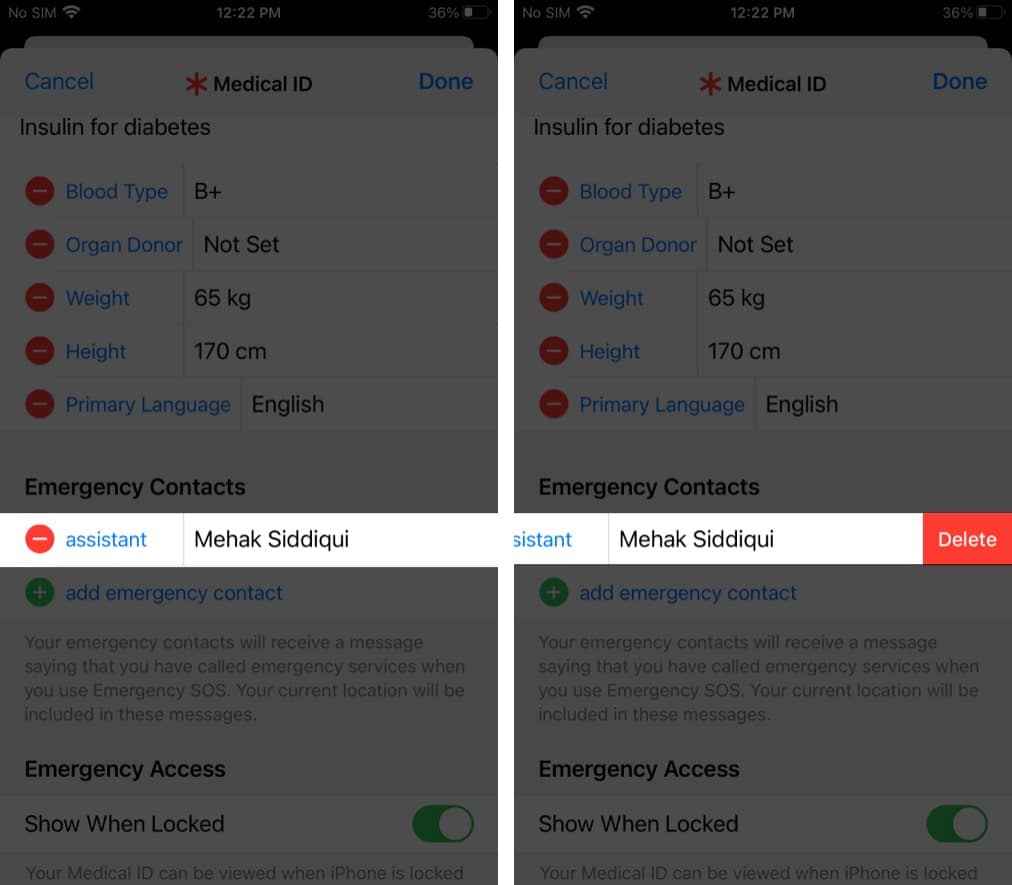
- To delete an emergency contact, tap the red minus symbol.
- Next, tap Delete to confirm.
You can access medical ID from the lock screen of an iPhone or Apple Watch, provided that the Show When Locked feature was enabled when setting it up. Let’s see how to view it.
How to view someone’s Medical ID
On iPhone
When iPhone is locked:
- On the Lock screen, swipe up or press the Home button to show the passcode entry screen.
- At the bottom left, tap Emergency → Medical ID.
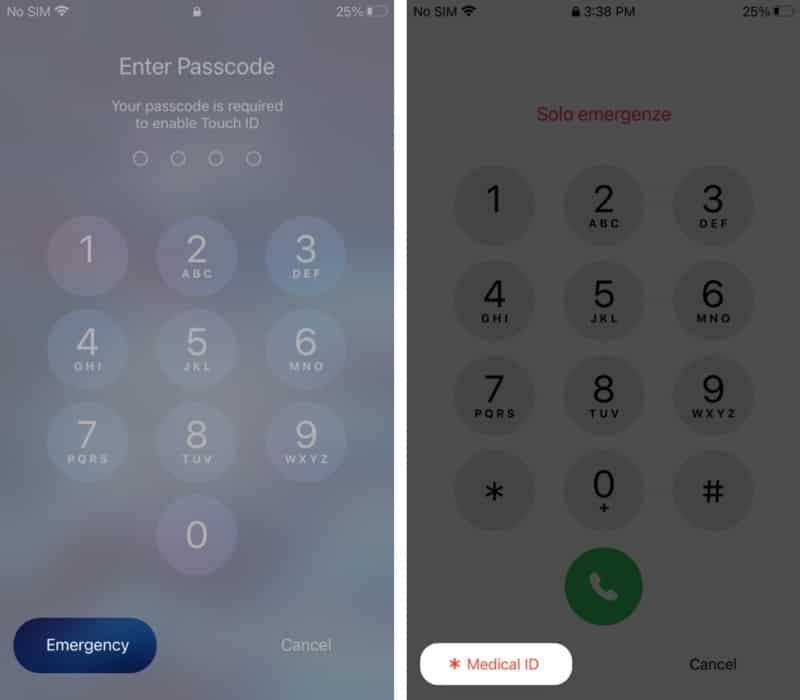
If the iPhone is unlocked:
Open the Health app → tap the profile picture → tap Medical ID.
If you need to call emergency services, hold down the Side button with either Volume button, then slide across on the Emergency SOS option. Or repeatedly press the Side button or the Sleep/Wake button five times.
This activates Emergency SOS and will call the emergency services in your country.
When you complete the call, the iPhone will send a message to emergency contacts and show the Medical ID.
On Apple Watch
- Long-press the Side button, then slide over the Medical ID option.
- To call emergency services, long-press the Side button, and slide across the Emergency SOS option.
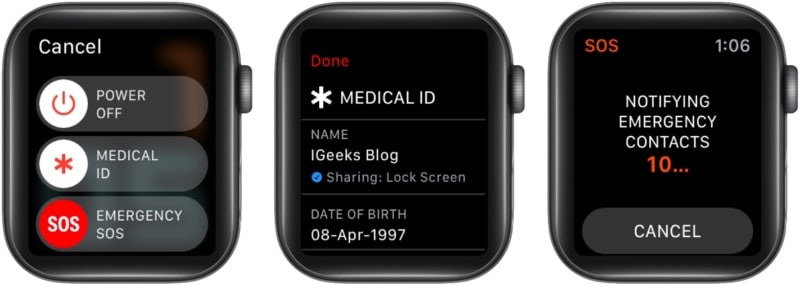
This will make a call to the emergency services in your country. If your Apple Watch does not have a cellular plan, it must be close to a paired iPhone for this function to work.
After the emergency call, the Apple Watch will alert each emergency contact and displays the Medical ID.
FAQ related to emergency Medical ID
Many emergency personnel and first responders check for a Medical ID on your iPhone or Apple Watch. However, since they may not have time to look through your pockets to find your phone, they are much more likely to check your Apple Watch if you are wearing one. So, it’s a good idea for everyone to keep their Medical ID updated.
To delete your Medical ID, open the Health app → go to Summary → tap your profile picture at the top right → select Medical ID → scroll down and select Delete Medical ID.
If you choose to show your Medical ID when your phone is locked, anyone can view it if they get hold of your phone. This raises a privacy concern, but it is offset by the safety factor that this option adds to your life.
So, don’t put highly personal details in your Medical ID but provide the essentials such as your health conditions, allergies, blood group, etc.
I hope this guide answered your questions about adding emergency info to your Phone’s Lock screen using the Medical ID feature. Let me know in the comments below if there’s anything else I can help you with.
Read more:
- How to use Cycle Tracking on iPhone and Apple Watch
- How to track steps with the iPhone Health app
- Best Health Apps for Apple Watch
- How to set up Health Sharing on iPhone
🗣️ Our site is supported by our readers like you. When you purchase through our links, we earn a small commission. Read Disclaimer.