DFU stands for Device Firmware Update. It’s the last possible solution to troubleshoot major problems on your iOS or iPadOS device.
You must put your iPhone in DFU mode when it refuses to turn on/off, stays stuck at the Apple logo, freezes on a screen, or becomes unresponsive. In summary, DFU Mode is the highest level of restoration you can perform on your device. Let’s check it out!
Things to know before putting iPhone in DFU mode
- Make a backup of your device on your computer or iCloud (if possible)
- DFU Restore will also update your device to the latest applicable iOS or iPadOS version
- Don’t try DFU Restore if your device is water-damaged. It may cause more harm than good!
- If your Mac runs macOS Catalina or later, use Finder. If you’re on an earlier version of macOS or Windows PC, use iTunes.
- Use the Lightning or USB-C cable that came with your iPhone or that is certified by Apple.
How to put your iPhone in DFU mode
The flagship iPhones like the iPhone 15, 14, 13, 12, 11, and X series have Face ID. Others, including the latest iPhone SE (2020, 2022) and iPhone 8/8 Plus, have a Home button. Still, the process of entering DFU mode is the same on these devices. Here it is:
- Connect your iPhone to a Mac or PC with the USB-C or Lightning cable that came with the device.
- Press and then release the Volume Up button.
- Immediately press and release the Volume Down button.
- Now, press and hold the Side button for 10 seconds.
The screen will go black. - Keep holding the Side button, and now press the Volume Down button for 5 seconds.
- After 5 seconds, release the Side button but keep holding the Volume Down button.
- Continue pressing the Volume Down button for another 10 seconds.
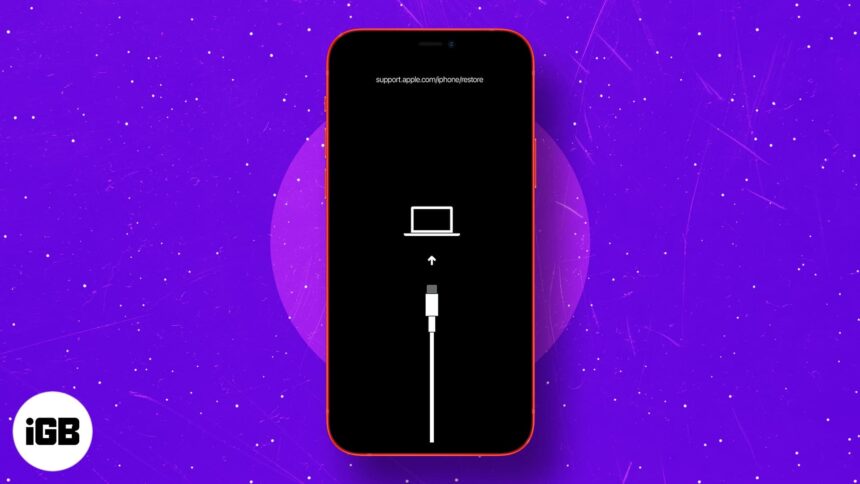
All this while your iPhone’s screen is black. - Let go of the Volume Down button after you see a popup in Finder or iTunes that says, ‘Your Mac has detected an iPhone in recovery mode. You must restore this iPhone before it can be used.’
- Now, click OK in the pop-up and click Restore iPhone.


Note: If you see the Apple logo or your iPhone restarts, that means one of the steps was not followed correctly. In such a case, carefully read and repeat the process.
Enter DFU Mode on iPhone 7 or earlier
- Connect the iPhone to a Mac or PC with a Lightning cable.
- Press and hold the Power/Sleep button and the Volume down button together for 8–10 seconds.
Note: If the Apple logo appears on the screen, you’ll have to restart the process. Make sure not to hold them for too long. - Now, release the On/Off Button but keep holding the Volume Down button for about 5 seconds.
Note: If the Plug into Computer notification appears on the screen, you’ll need to start again. Make sure not to hold it for too long. - Your iPhone will now be in DFU Mode. The screen will be black. You will get an alert from iTunes or Finder saying it has detected your iPhone.
- Select Restore iPhone.
How to put your iPad in DFU Mode
For iPad with Face ID
- Connect your iPad with Face ID to a Mac or PC.
- Press and hold the Power button at the top of the iPad for 3 seconds.
- Keep holding the power button. Next, press and hold the Volume Down button from the right side of the iPad. Keep holding both buttons for 10 seconds.
Note: If you see the Apple logo, it means you’ve held it for too long. In such a case, you’ll have to start the process again. - Now, release the top Power button, but keep holding the Volume Down button for the next 5 seconds.
- If the iPad screen stays black, and you see a popup in iTunes or Finder, it means you are successfully in DFU mode.

For iPad with Home button
The process of putting an iPad with a Home Button in DFU mode is similar to iPhone 6s and earlier. Take a look.
- Connect your iPad to a Mac or PC via Lightning cable.
- Press and hold the top Power button for 3 seconds.
- Next, while still holding the power button, press and hold the Home button at the front of your iPad.
Continue to hold both buttons for 10 seconds.
Note: If you hold them for too long, you’ll see the Apple logo. This means you have been unsuccessful and will have to start from step one again. - Immediately after 10 seconds, release the top Power button but continue to hold the Home button for the next 5 seconds.
Note: If the Plug into Computer screen appears, you’ll need to start it again. Make sure not to hold it for too long. - After you correctly follow step 5, your iPad’s screen will stay black. This means your device is now in DFU mode.
iTunes or Finder will also show a popup. Click Restore iPhone to proceed.

How to exit DFU Mode on any iPhone or iPad
If you change your mind and want to exit DFU mode midway, here’s how to exit DFU mode on the iPhone and iPad.
- To exit DFU mode on iPhone 15, 14, 13, 12, SE 2022/2020, iPhone 11, X series, and iPads with Face ID: Press and then release the Volume Up button. Immediately press and release the Volume Down button. Finally, press and hold the Power/Side button (Top button for iPad) until you see the Apple logo appear on the screen.
- To exit DFU mode on iPhone 7 and 7 Plus: Press and hold the Side power button and the Volume Down button together. Leave both buttons when you see the Apple logo on the screen.
- To exit DFU mode on an iPhone 6s and earlier or an iPad with a Home button: Press and hold the Home button at the front of the device and the Side power button (Top button for iPad) together. Leave the buttons when you see the Apple logo.
In short, you’ll need to use force restart to exit out of DFU mode on any iPhone or iPad.
That’s all!
This is how you can enter DFU mode on your iPhone or iPad. I hope this solves the issues you were facing with your device.
If you have any questions, please feel free to ask us in the comments below.
Read more:
- How to downgrade iOS 17 to iOS 16 without losing data
- How to restart an iPhone or iPad (All models)
- How to maintain your iPhone’s battery health
🗣️ Our site is supported by our readers like you. When you purchase through our links, we earn a small commission. Read Disclaimer.