The inbuilt Books app on iPhone and iPad lets you download paid or free ebooks, add PDFs and listen to Audiobooks. If you are new, you may want to know where to start and how to use it. Once you remember the basics, it becomes convenient to enjoy your favorite titles. Let us get straight in and learn how to manage your library in the Apple Books app on iPhone and iPad.
- How to Download Books from Apple Books
- How to Re-Download Books
- How to Sync Books on iPhone, iPad, and Mac
- How to Add PDFs from Anywhere to Apple Books App
- How to Customize Your Reading in Apple Books App
- How to Sort Your Books and Change Display Style
- How to Add a New Collection and Manage Them
- How to Hide Books from iBooks App
- How to Unhide Books from iBooks app
- How to Delete Books from iBooks App
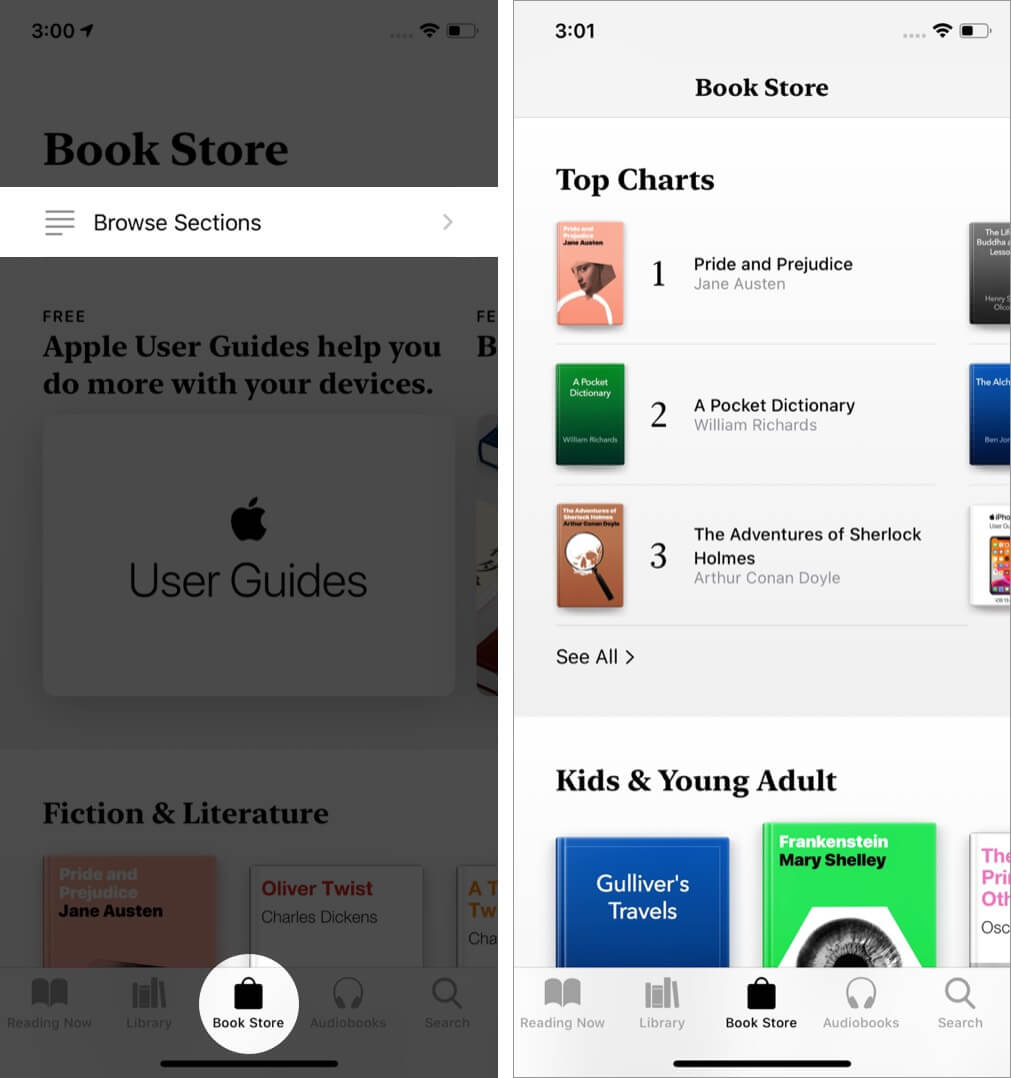
How to Download Books from Apple Books
- Open the Books app on your iPhone or iPad and tap on the Book Store.
- Tap on Browse Sections at the top. Or, scroll down to see Top Charts and other categories. You may also use the search option. Tap on the desired title.

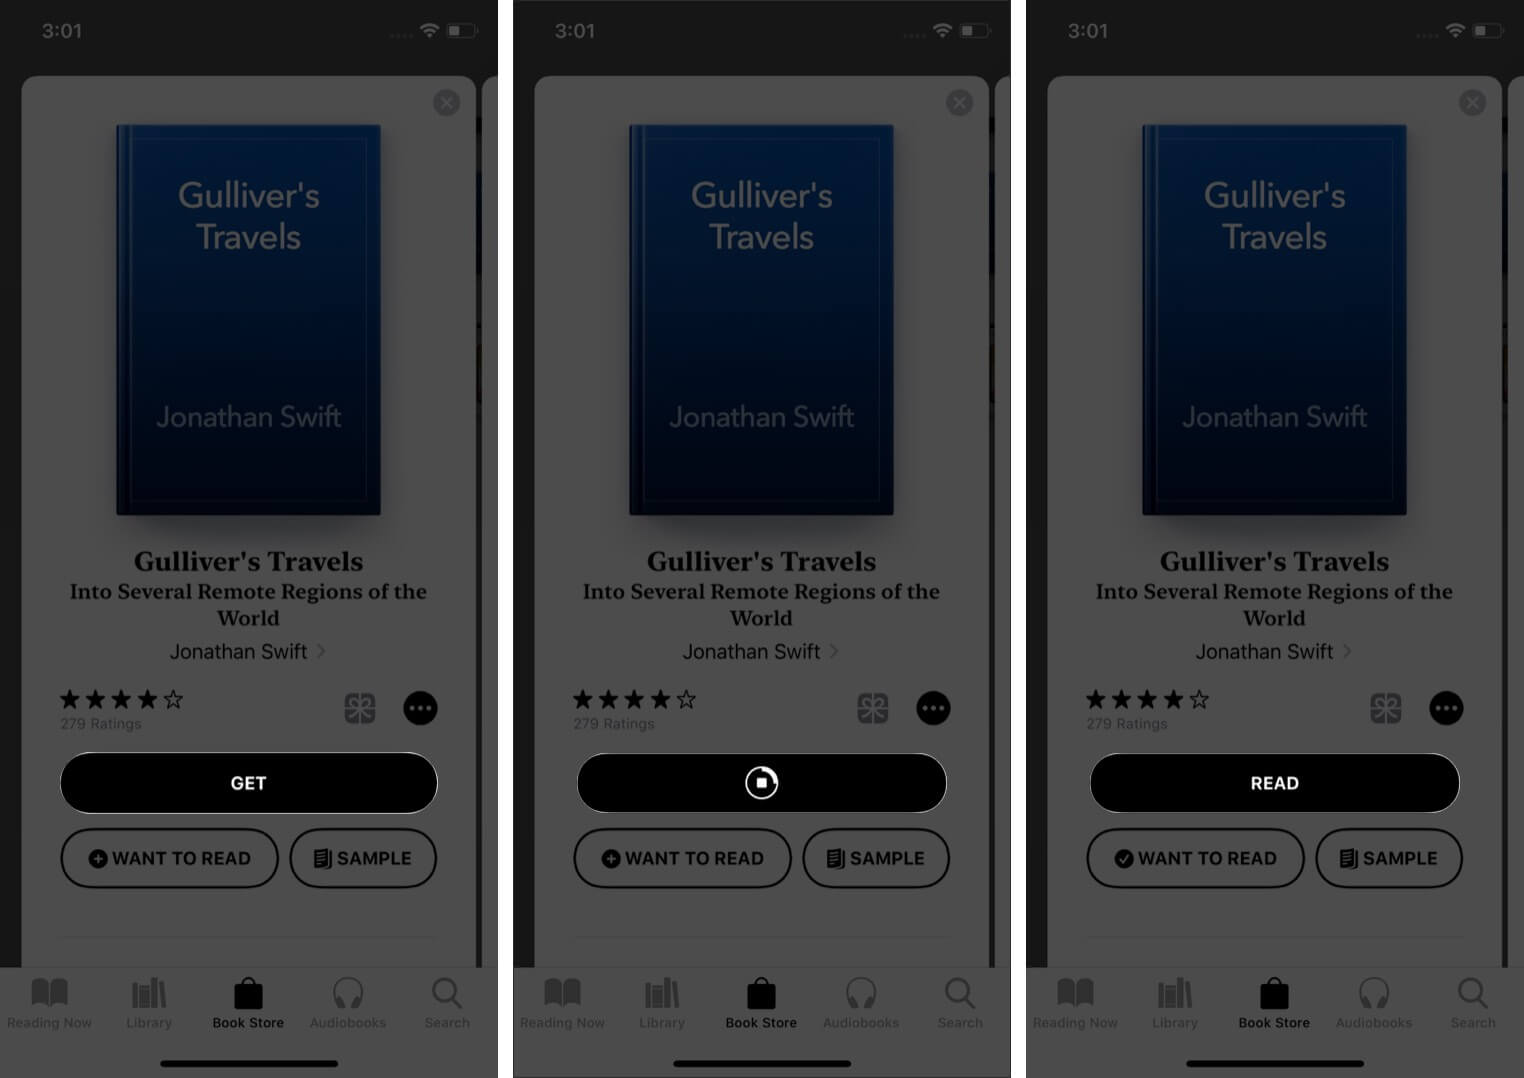
- Tap on GET. If asked, confirm your free download or purchase with Touch ID, Face ID, or Apple ID password. The book will start downloading. If you had already purchased this title, you might see a popup confirming this. Tap on OK.
- Once the book downloads, tap on READ. Or, tap on Library from the bottom row to see this book.

How to Redownload Deleted Books
You can re-download past purchased titles for free. The steps below also apply to free books that you may have downloaded in the past.
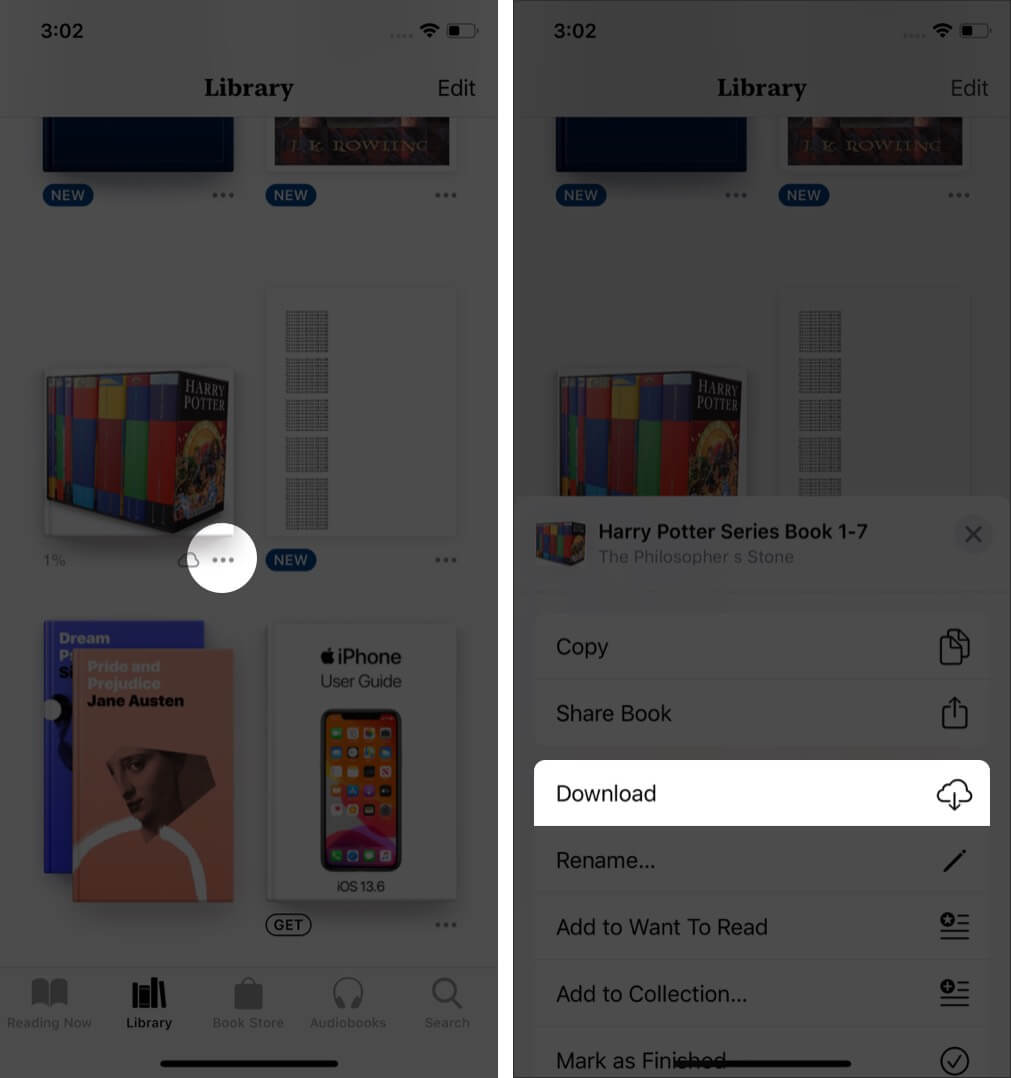
- Open the Books app and tap on Library. You will see all the books and added PDFs here. If you see a cloud icon below a title, it means this is added to your Library but not downloaded locally/offline. If you do not see a cloud icon, that means the book is already saved offline.
- Simply tap on a book. It will start downloading.
- You may also tap on the three-dots icon and choose Download from the Share Sheet.
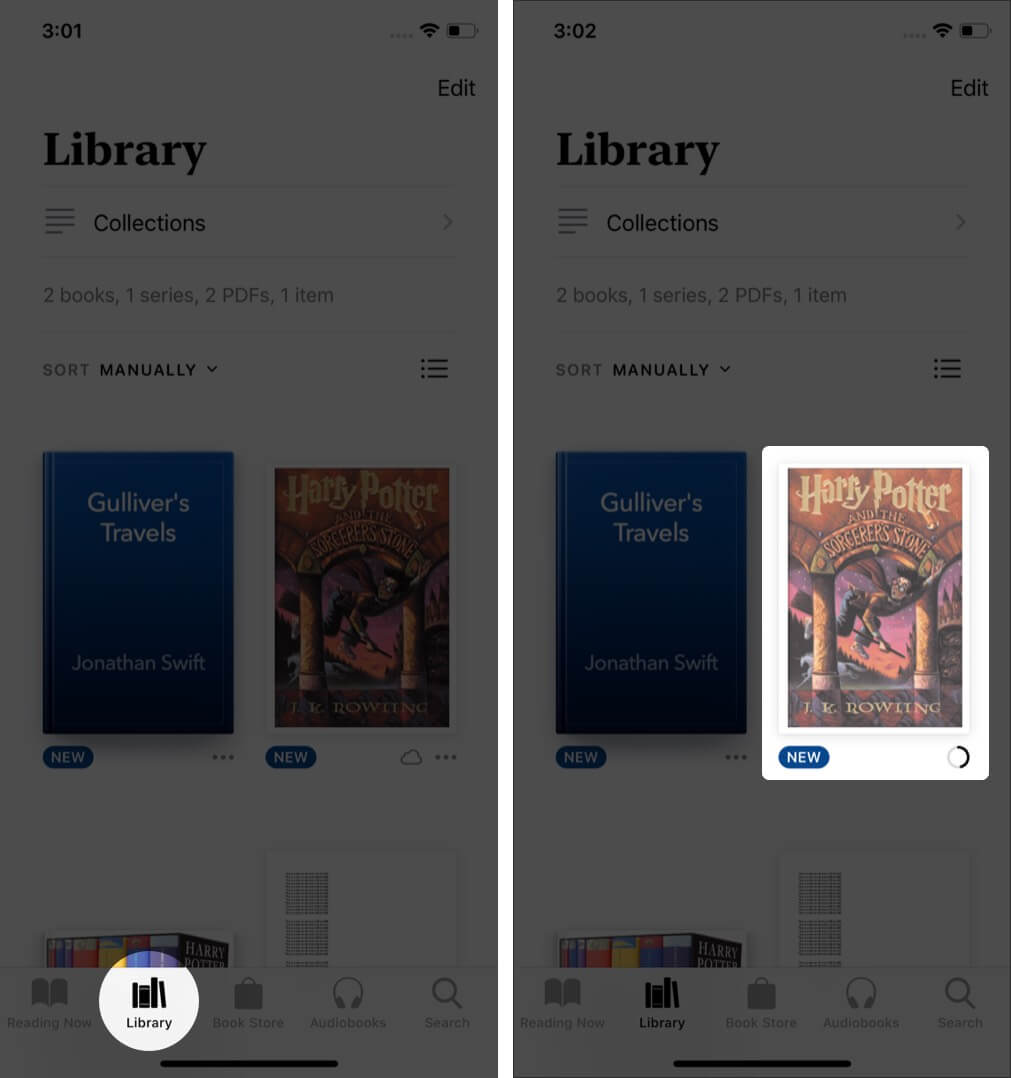
Note: Hidden books may not appear in Library.
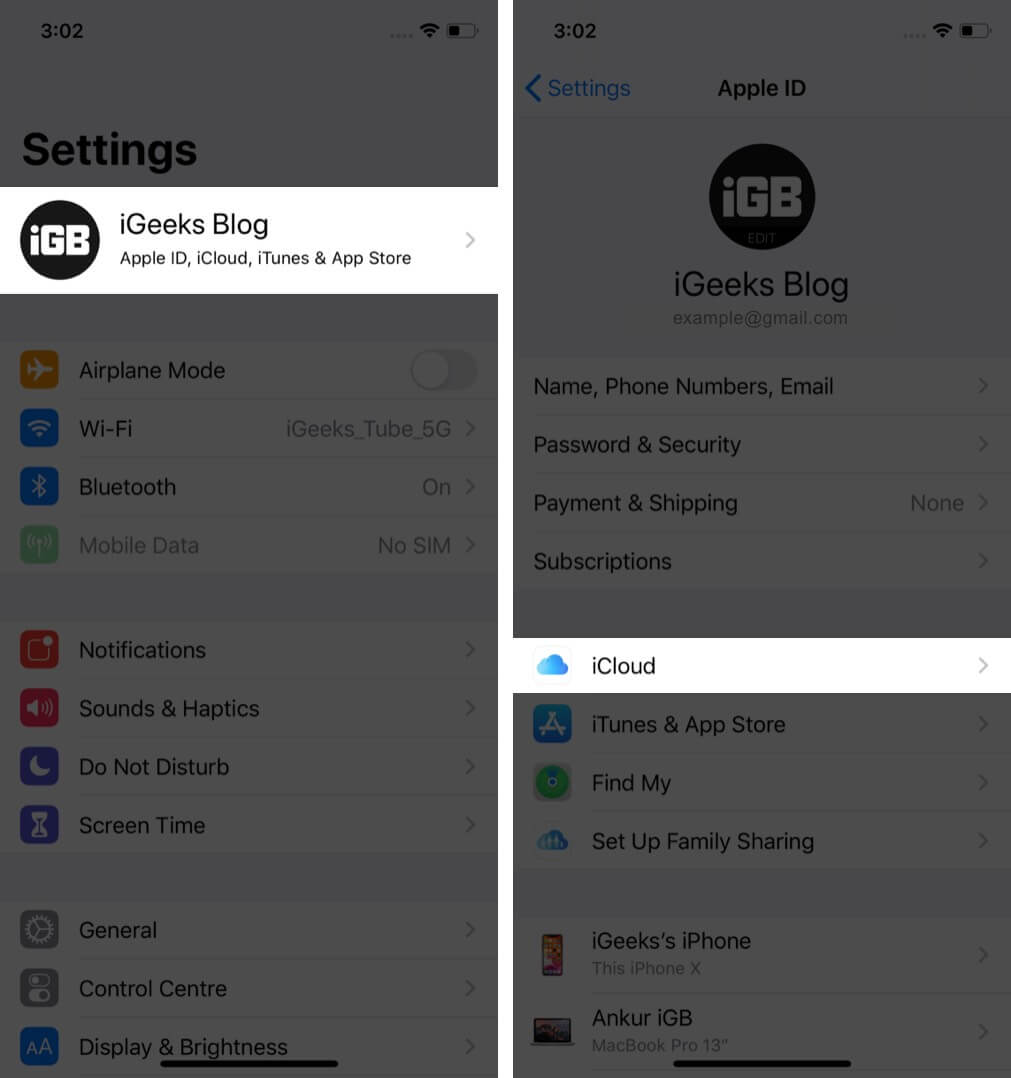
How to Sync Books on iPhone, iPad, and Mac
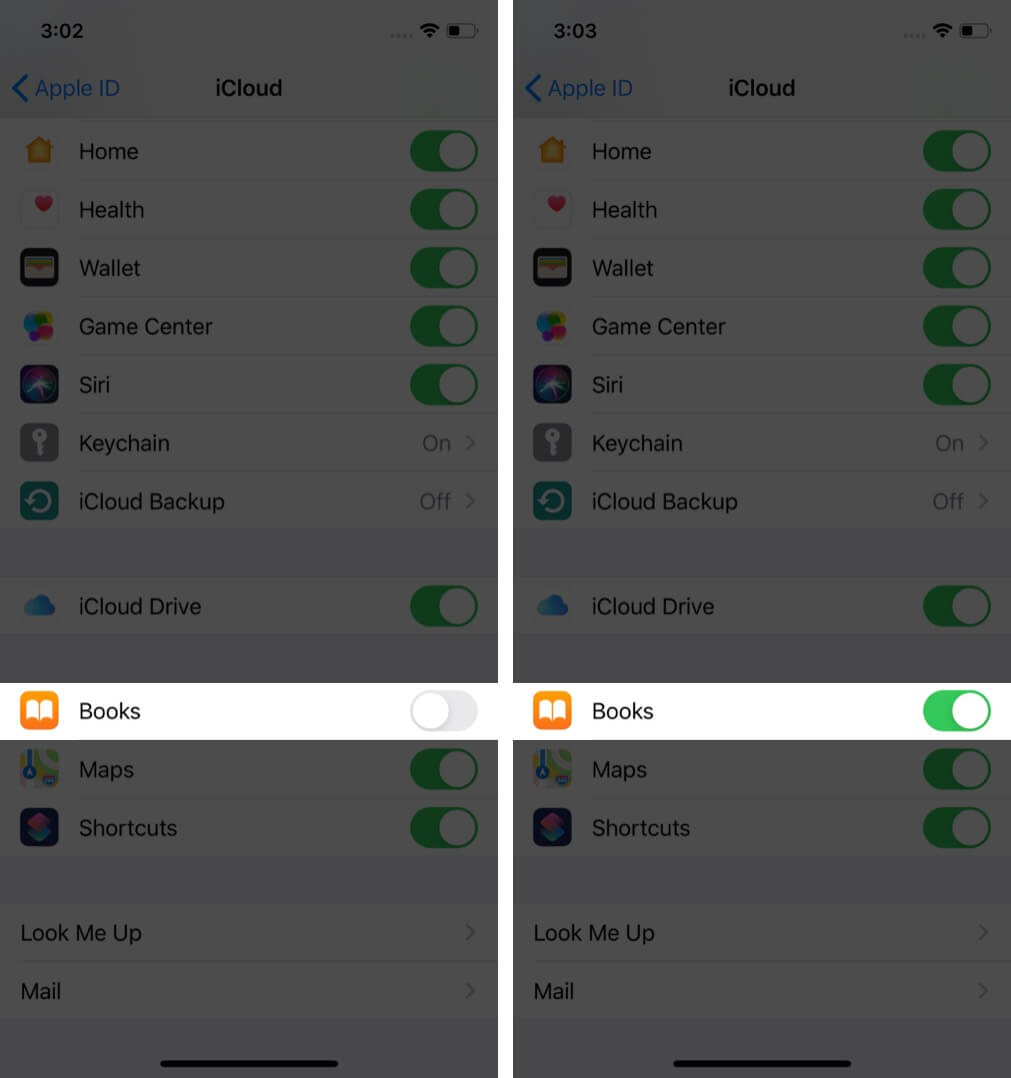
After you sign in to the Books app with your Apple ID on any device, all your titles are visible in the Library. However, to enjoy effortless syncing of your bookmarks, highlights, Reading Now collection, and added PDFs on all devices, you need to enable iCloud Drive for the Books app. Here is how to do that.
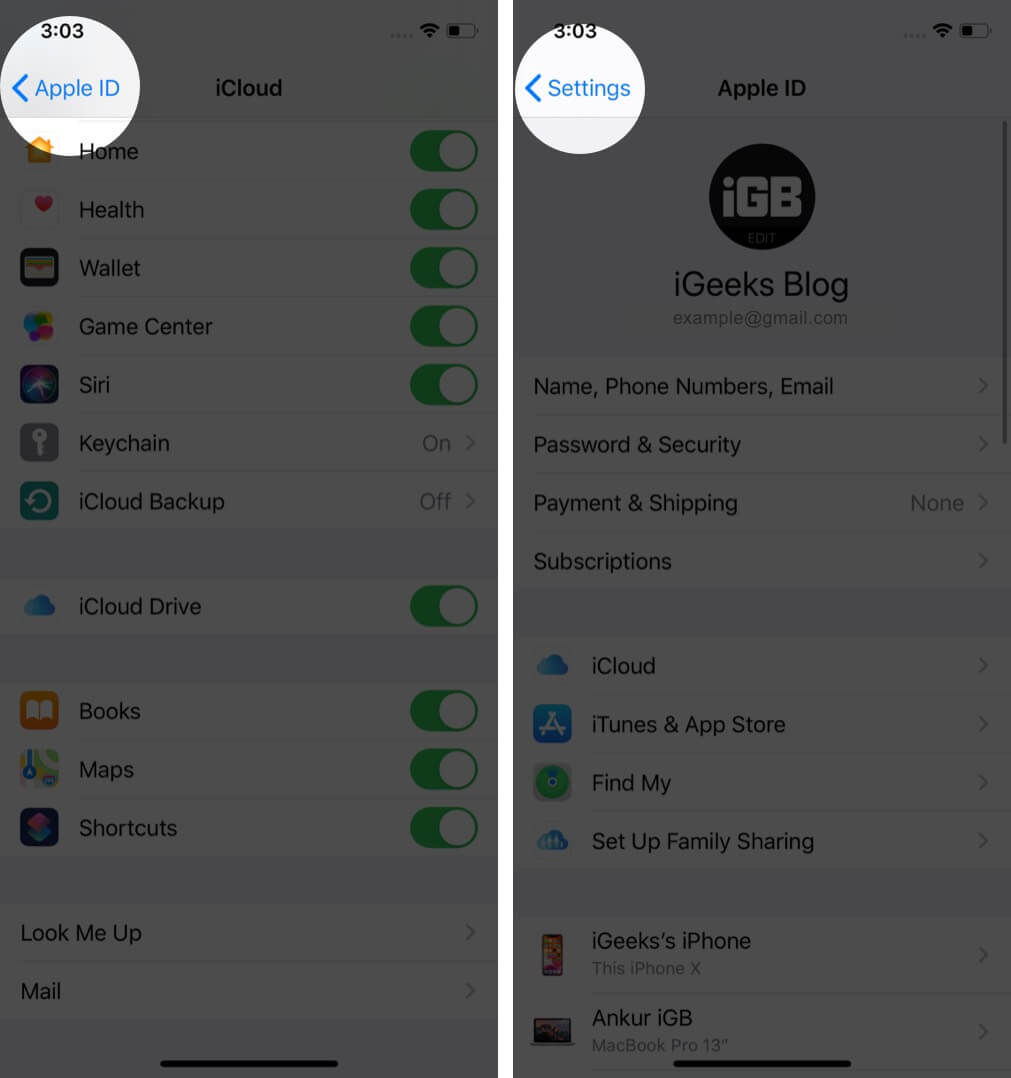
- Open the Settings app and tap on your Apple ID from the top.
- Tap on iCloud.
- Scroll down and enable the toggle for Books.
- Now go back, by tapping on <Apple ID from the top left. Next, tap <Settings to go back one more screen.
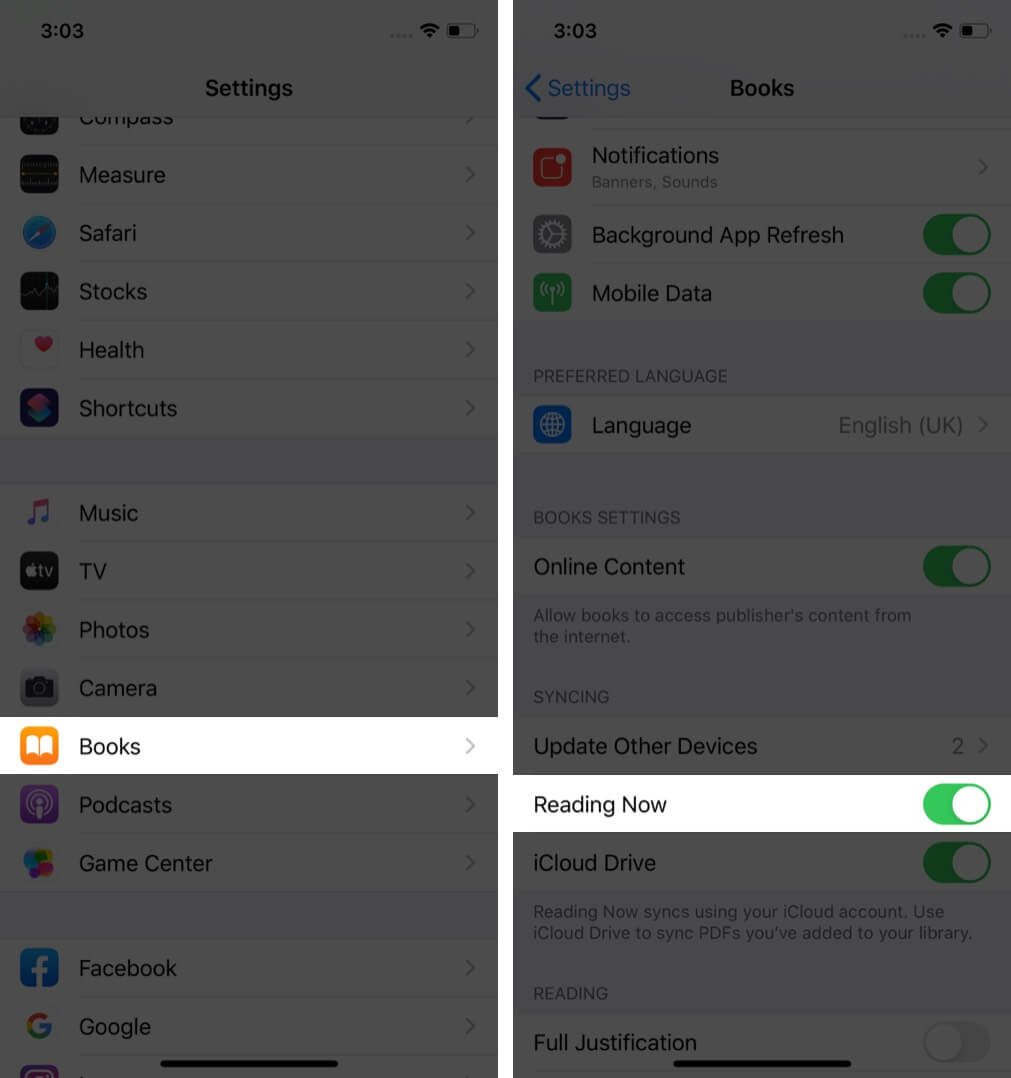
- Scroll down the Settings app and tap on Books.
- Under SYNCING, turn on the toggle for Reading Now and iCloud Drive.
On Mac: Open System Preferences → Apple ID → iCloud → Options next to iCloud Drive → check the box for Books and click Done. Next, open the Books app and click on Books from the top menu bar. After this, click on Preferences → General → check the box for Sync collections, bookmarks, and highlights across devices.
How to Add PDFs from Anywhere to Apple Books App
When you tap the share button in most inbuilt apps like Safari, Photos, Mail app, and third-party apps, you will see the Books option in the Share Sheet. This makes it possible to save several things to this app. You can even convert an image and save it as a PDF in the Books app! Here is how to do these.
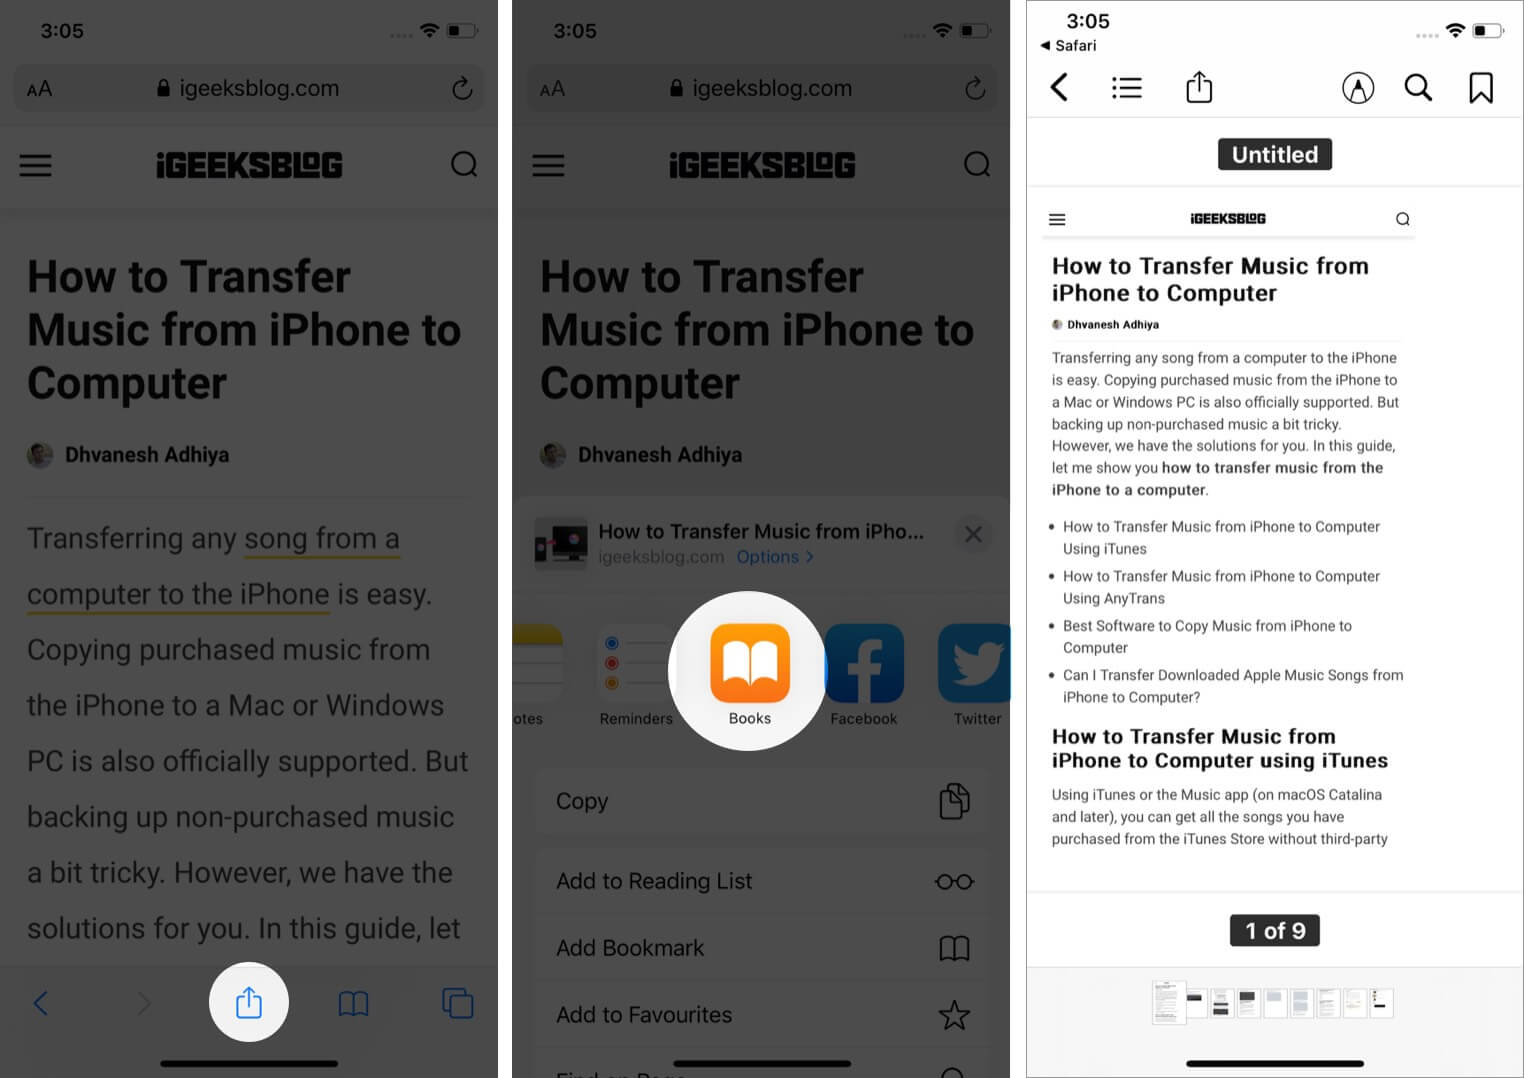
- From Safari: Visit a webpage. Let it load fully. Next, click on the Share icon. Horizontally swipe the row of app icons and tap on Books. The app will create a PDF and save it to the Books app. If iCloud Drive is enabled (above steps), then this PDF would be synced to all your Apple devices.
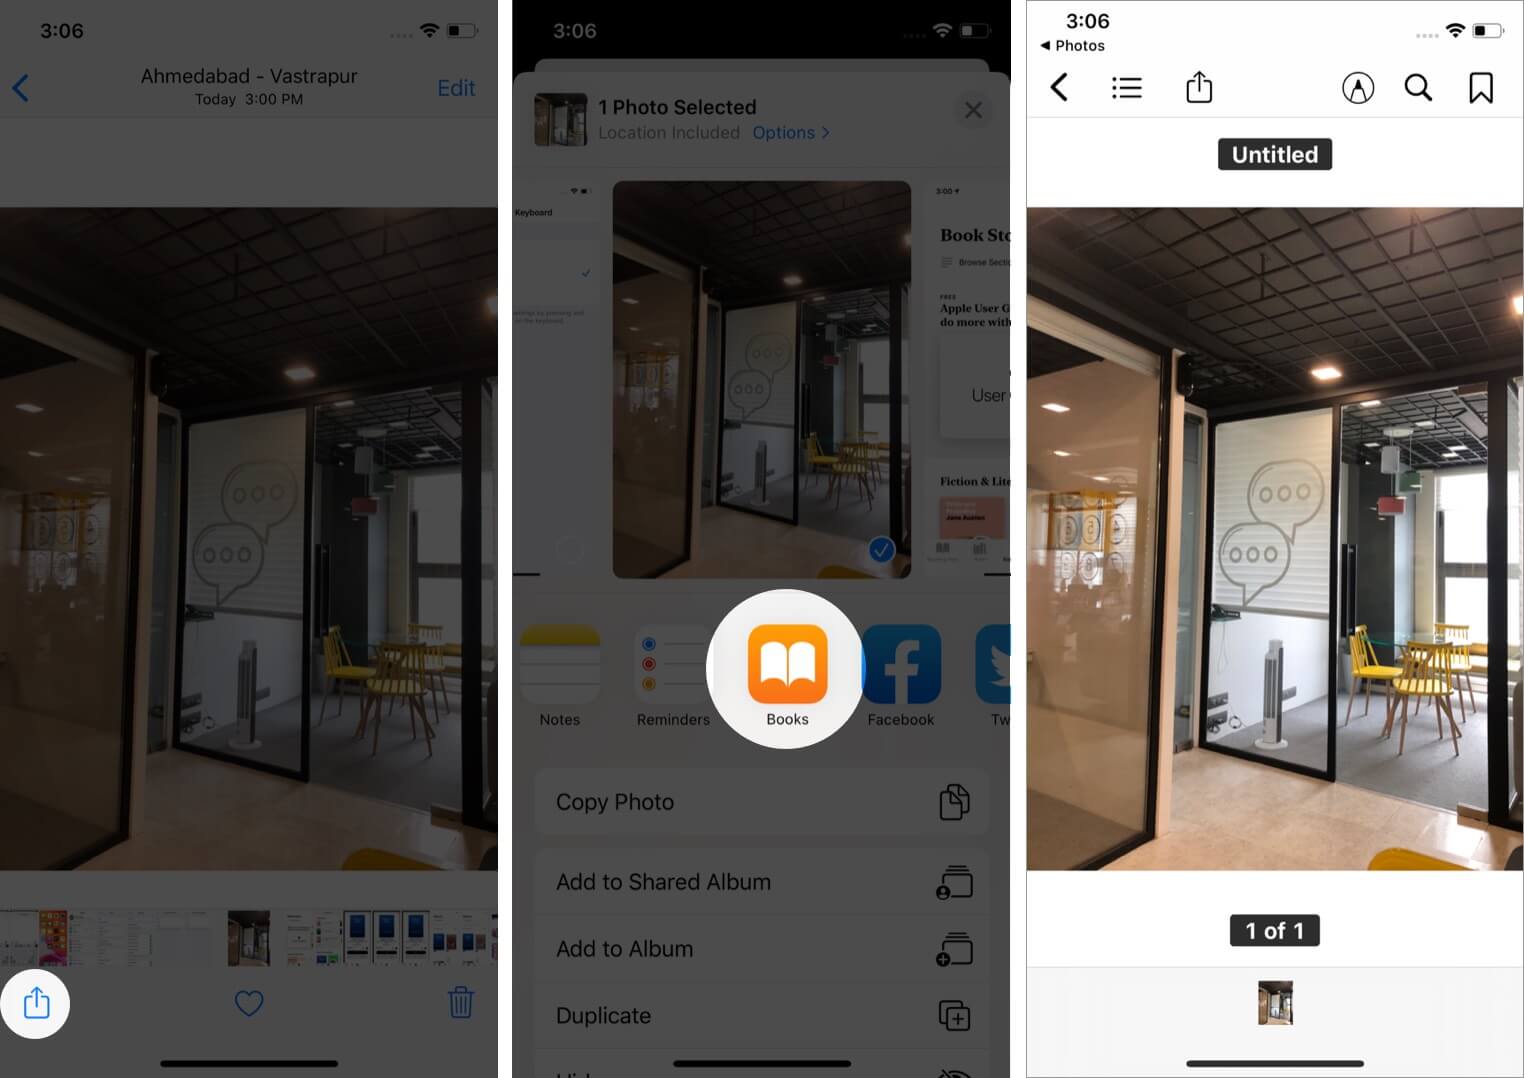
- From the Photos app: Open an image and tap on the Share icon. Next, tap on the Books app icon from the Share Sheet. The photo will be converted to PDF and added to the Books app.
- From the Notes app: Open a note and tap on the Share icon. Next, tap on Print. Place two fingers on the print thumbnail and expand it (zoom out/pinch outwards). Next, tap on the Share icon again. Finally, tap on Copy to Books. The note will be converted to PDF and get saved in the Books app. This method works for other apps too.
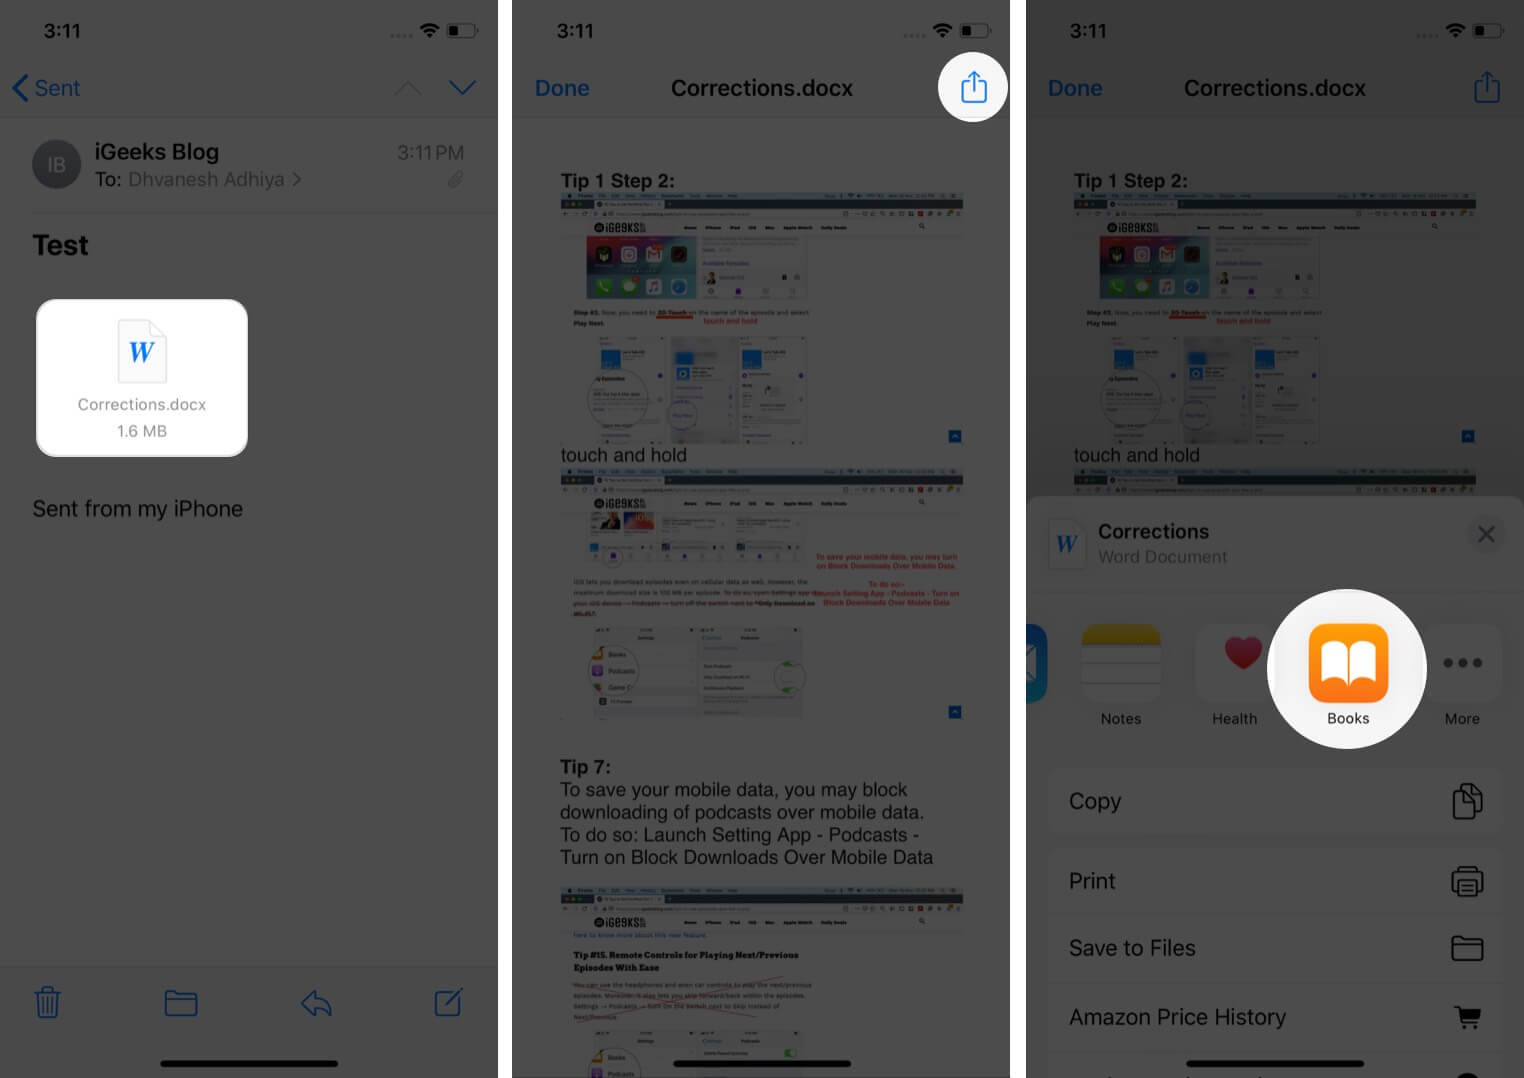
- From the Mail app: Open an email with an attachment. Tap on the attachment. Next, tap on the Share icon. Finally, tap on Books.
- Other Third-Party apps: You can save attachments from apps like WhatsApp to the Books app. All you have to do is tap the Share icon and then tap on Books or Copy to Books. This works universally across almost all apps.
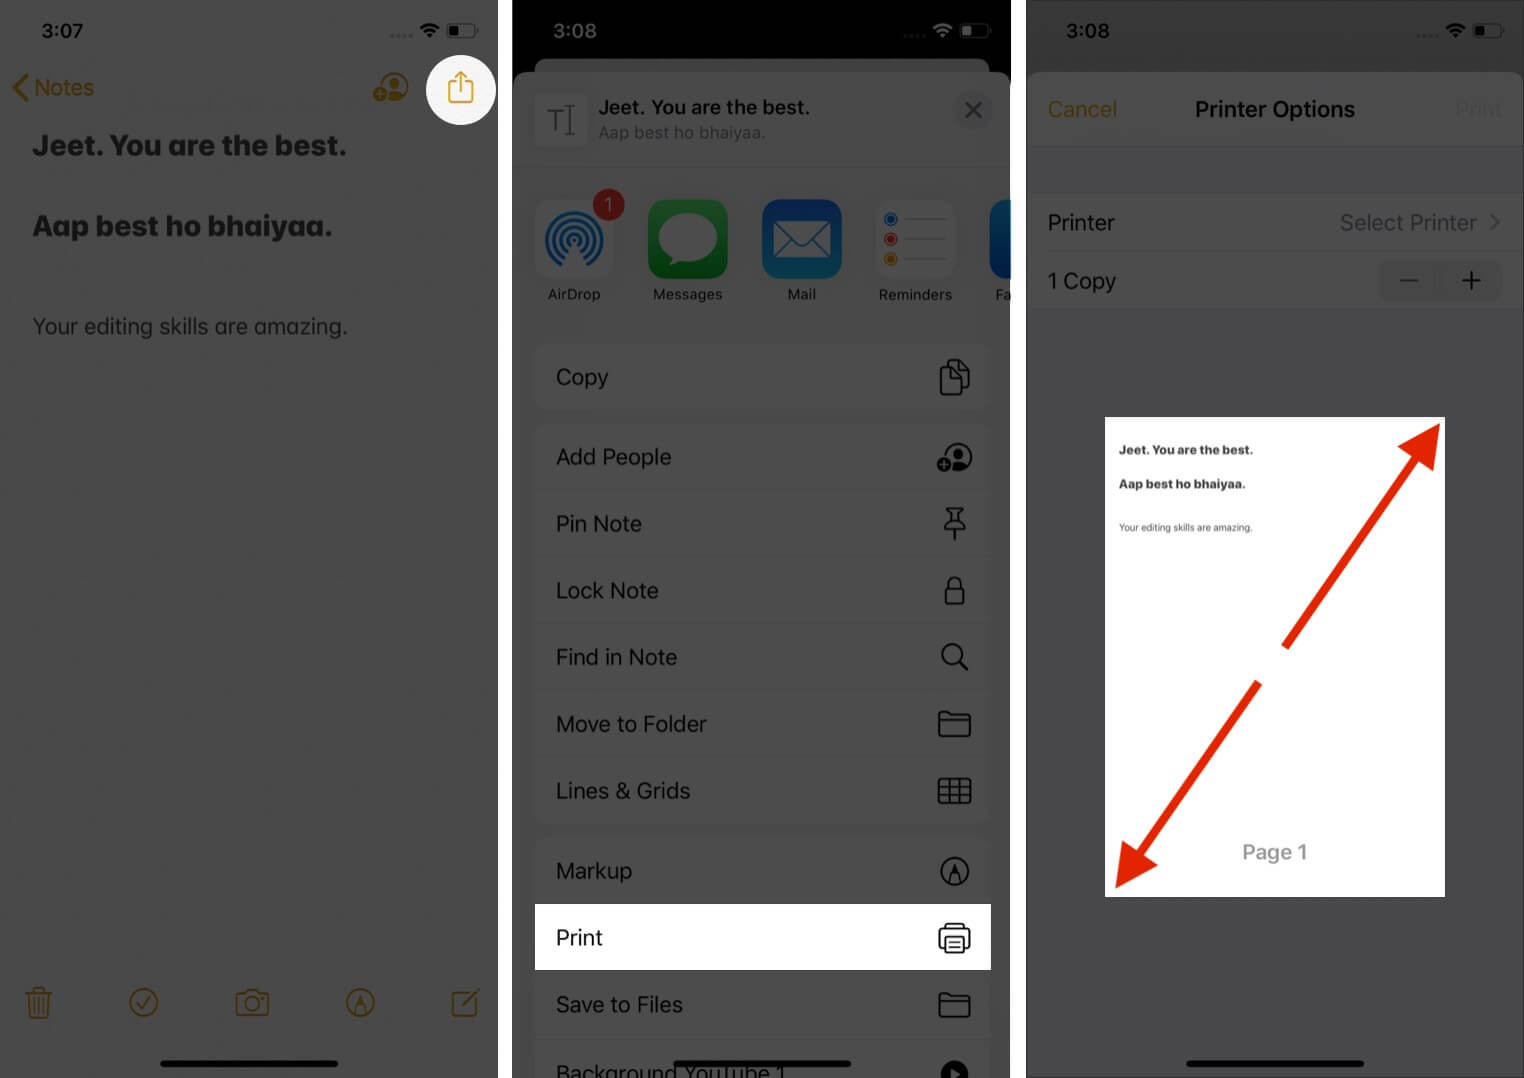 Next, tap on the Share icon again. Finally, tap on Copy to Books. The note will be converted to PDF and get saved in the Books app. This method works for other apps too.
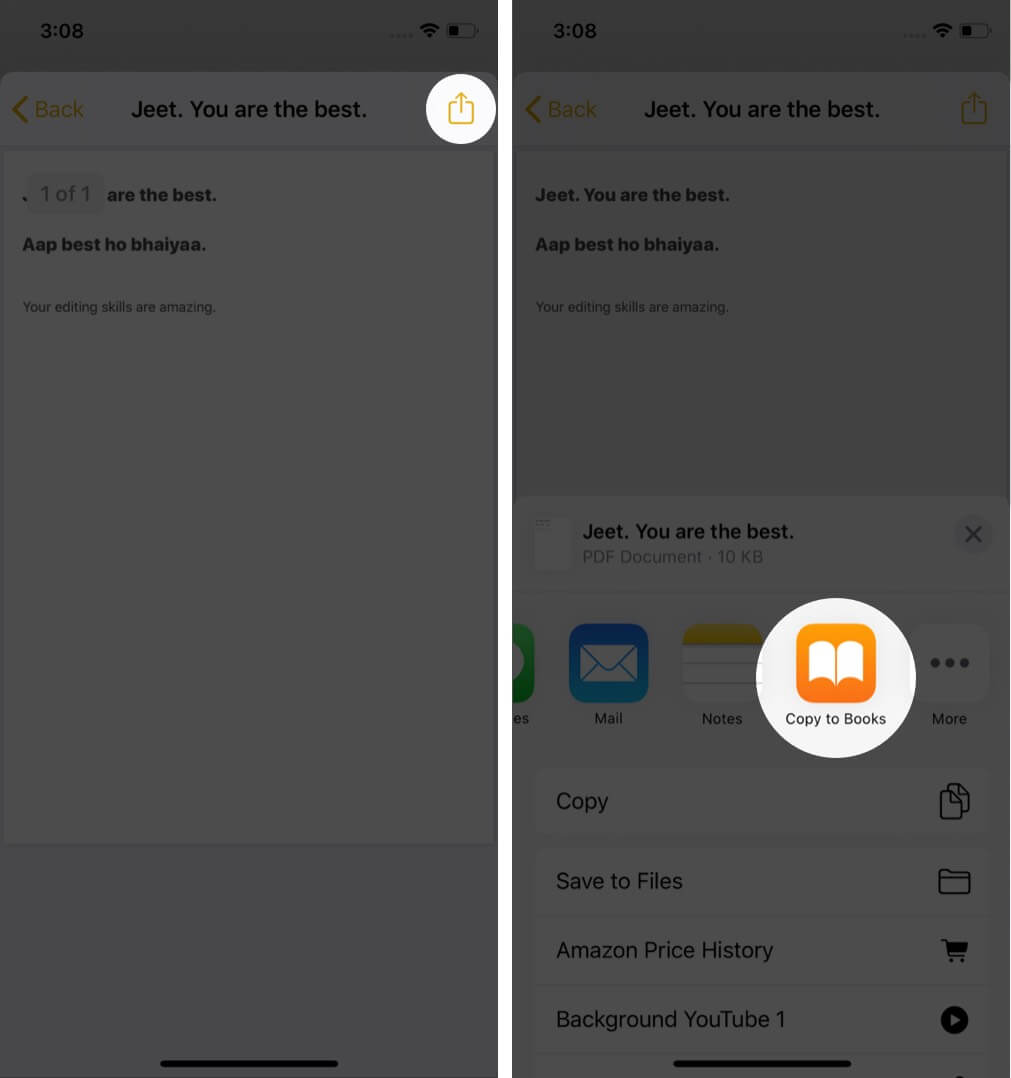
How to Customize Your Reading in Apple Books App
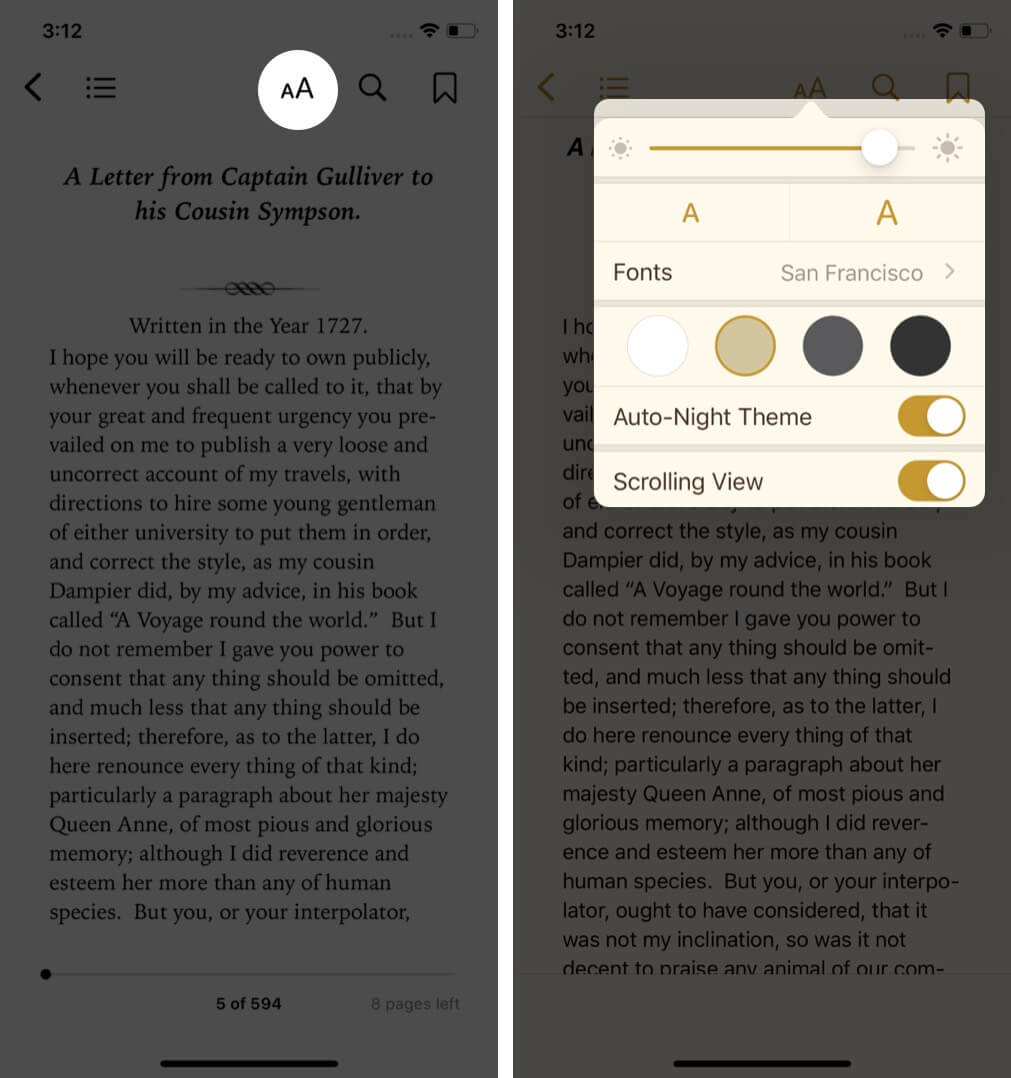
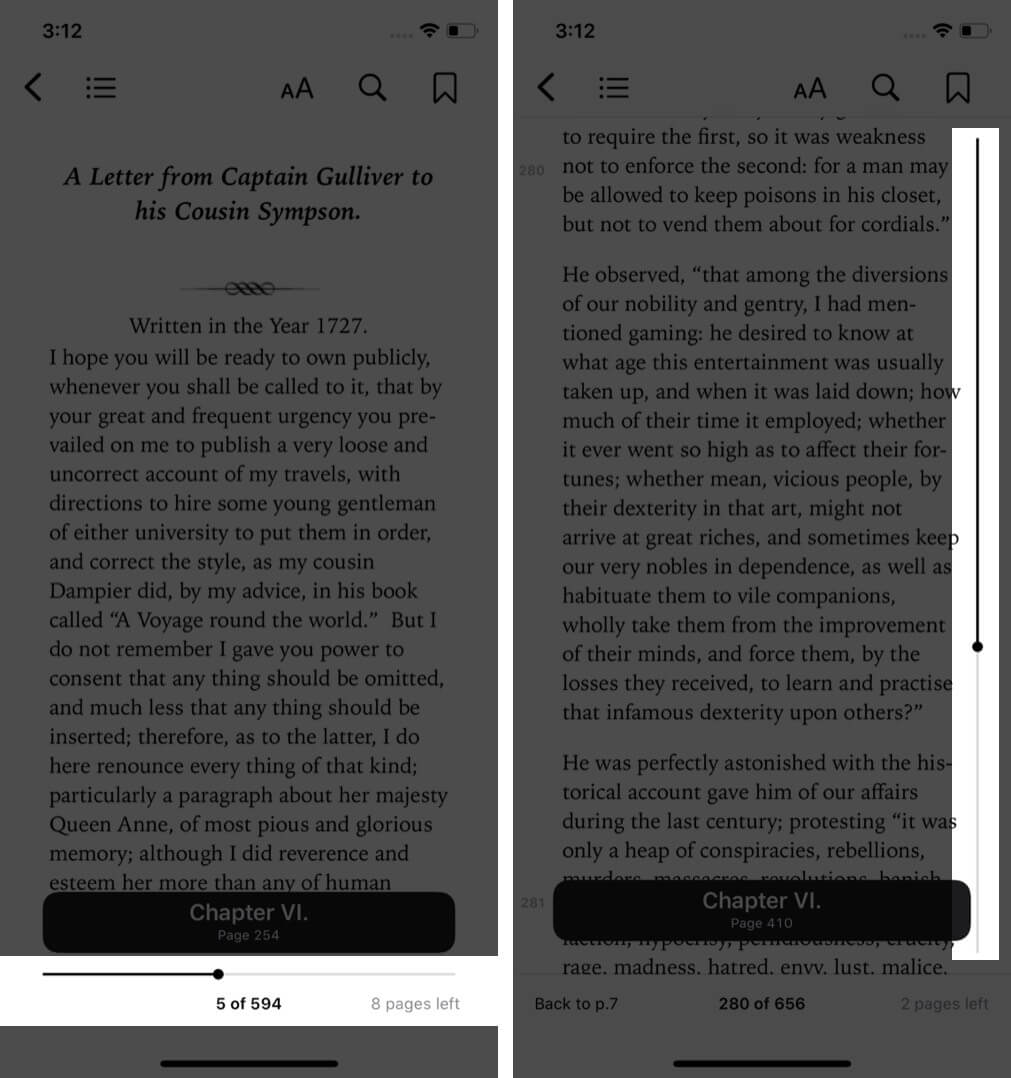
- While reading a book, you may change the font size, font type, background color, switch scrolling view, etc. To do so, tap on AA when you are inside a book. Please note that these settings do not apply if you are reading a PDF.
- Depending on the setting, drag the slider at the bottom or right of the screen to quickly go to a particular chapter or page.
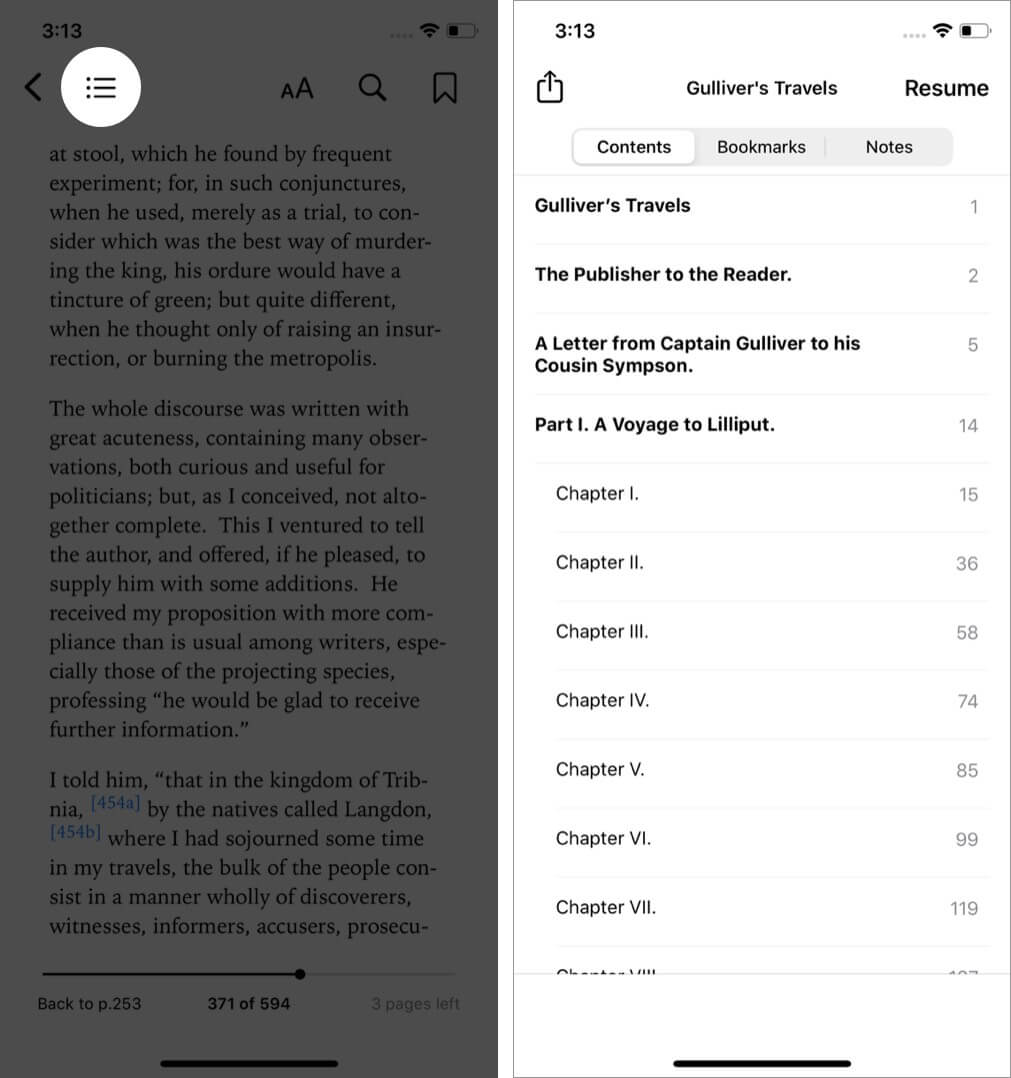
- To see the contents, bookmarks, and notes tap on the three horizontal lines icon from the upper left.
- To search, tap on the magnifying glass icon. To bookmark tap on the ribbon-like icon.
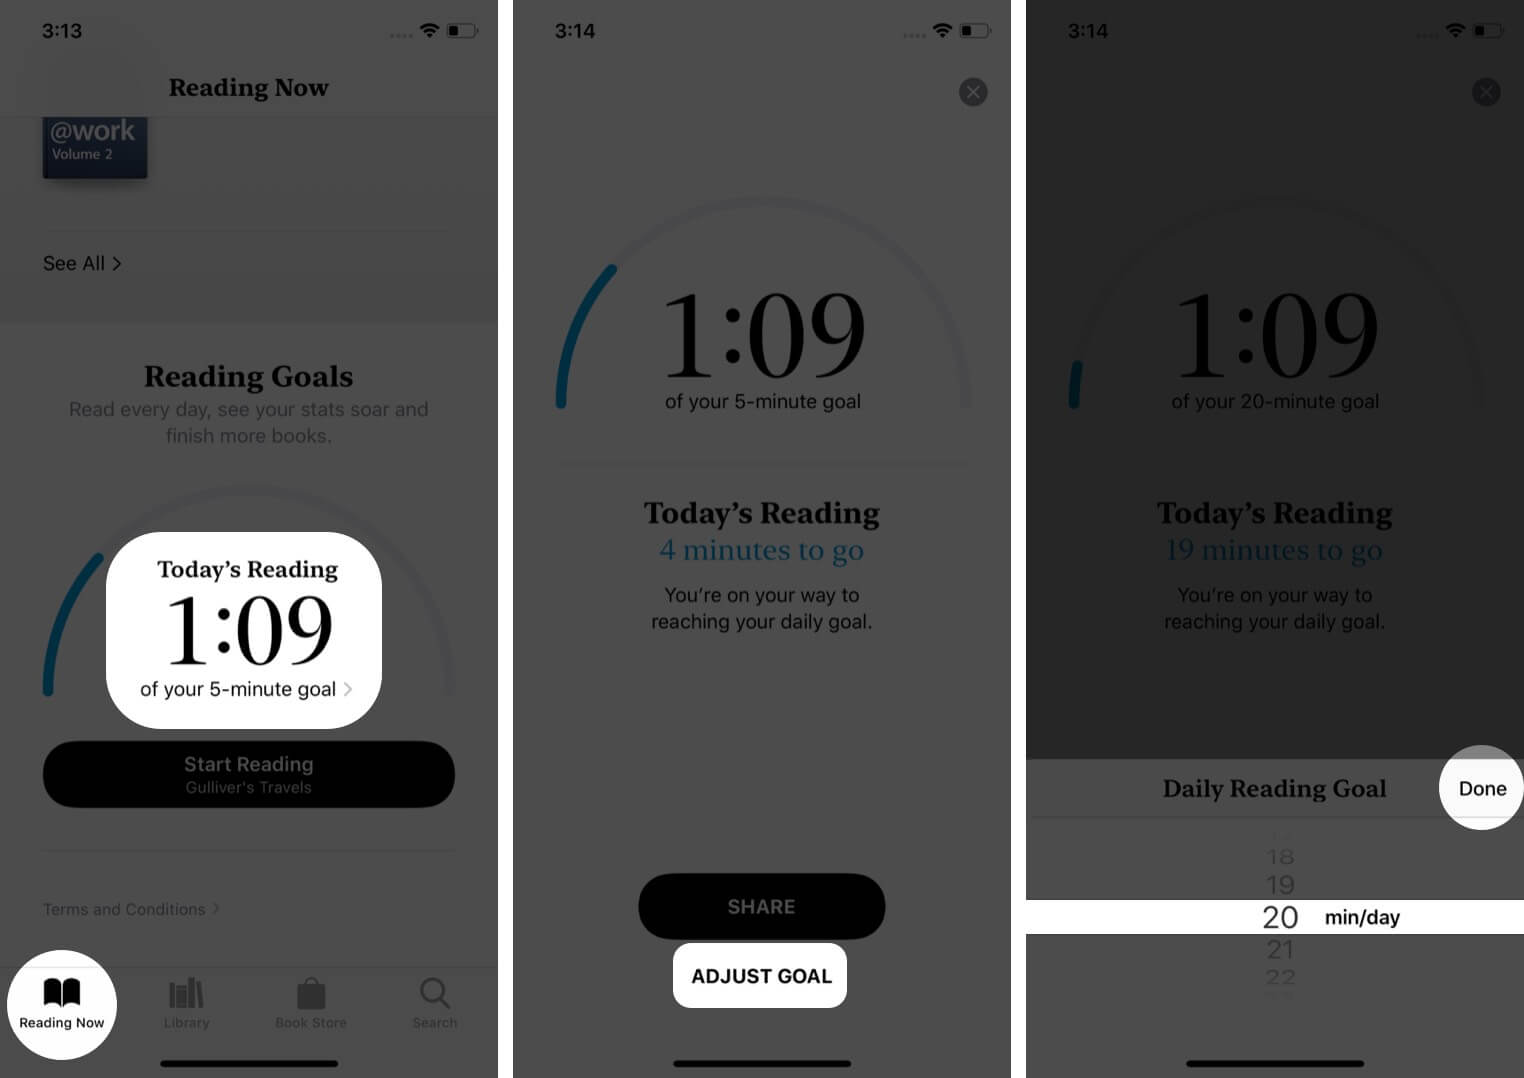
- To set reading goals, tap on Reading Now. Next, scroll down and tap inside Today’s Reading. Next, tap on ADJUST GOAL, choose the desired value and tap Done. If you do not see this option, open the Settings app → Books → enable the toggle for Reading Goals.
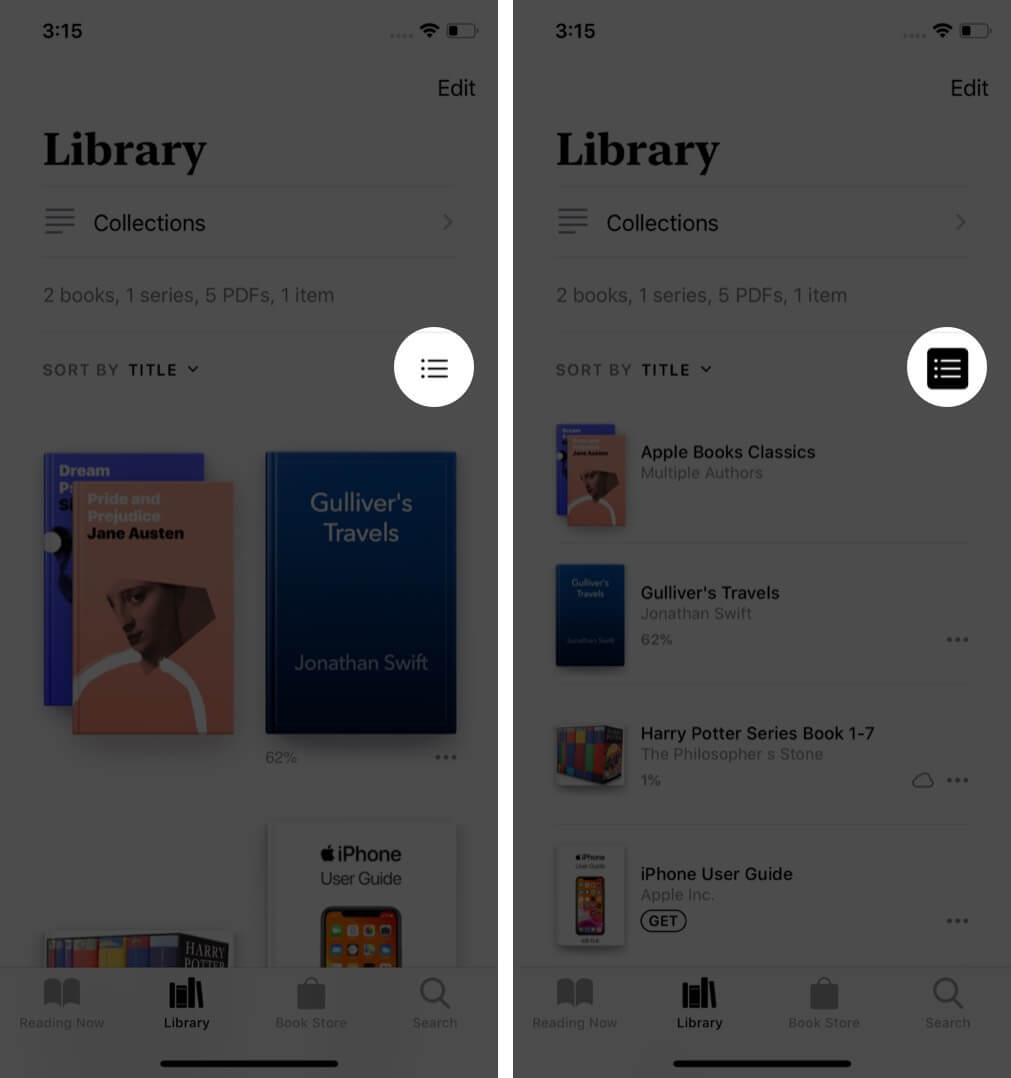
How to Sort Your Books and Change Display Style
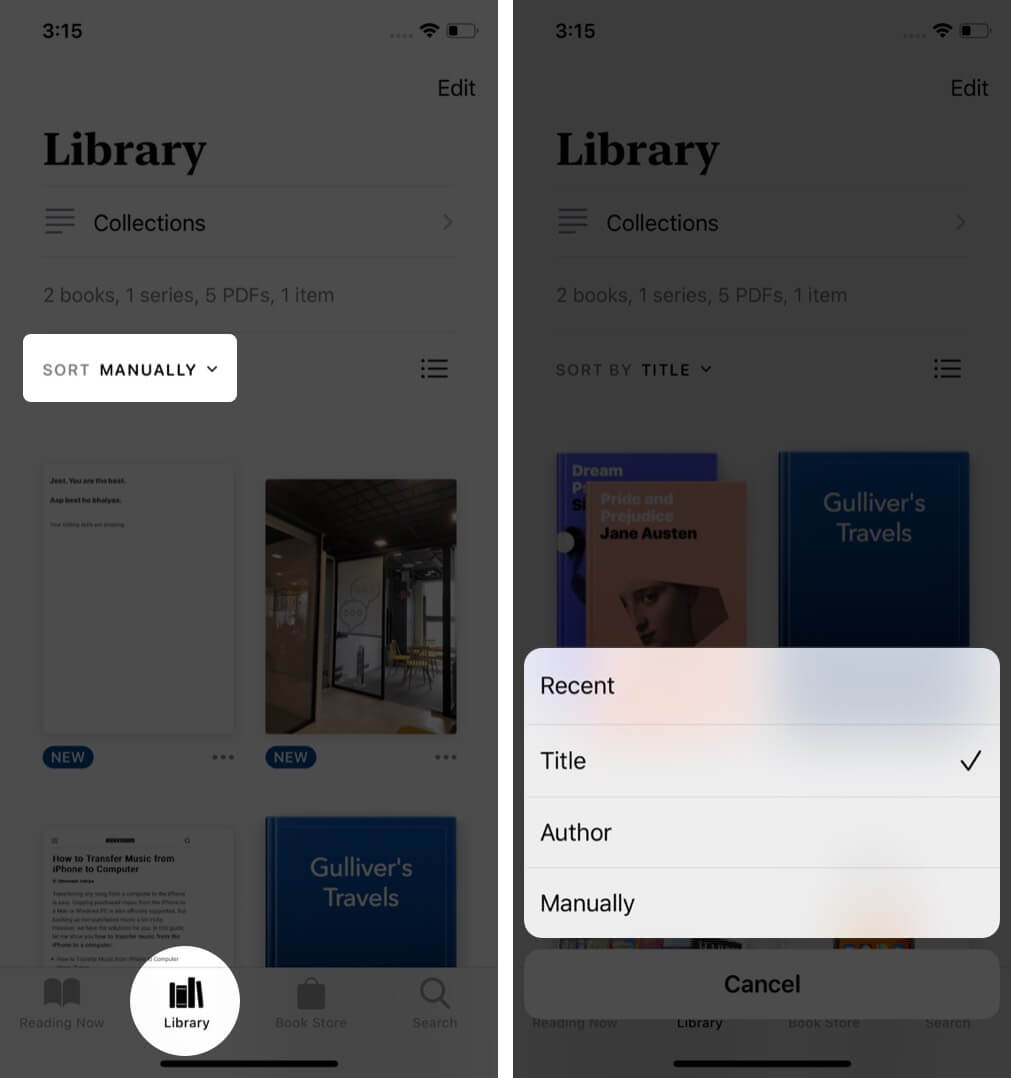
- Launch the Books app and tap on Library.
- Tap on SORT and choose to display your books and PDFs by Recent, Title, Author, or Manually. (Tip: If Manually is selected, you can long-press a thumbnail and drag it according to your preference.)
- To change display style, tap on three horizontal lines icon. This lets you switch into a list view or big thumbnail view.
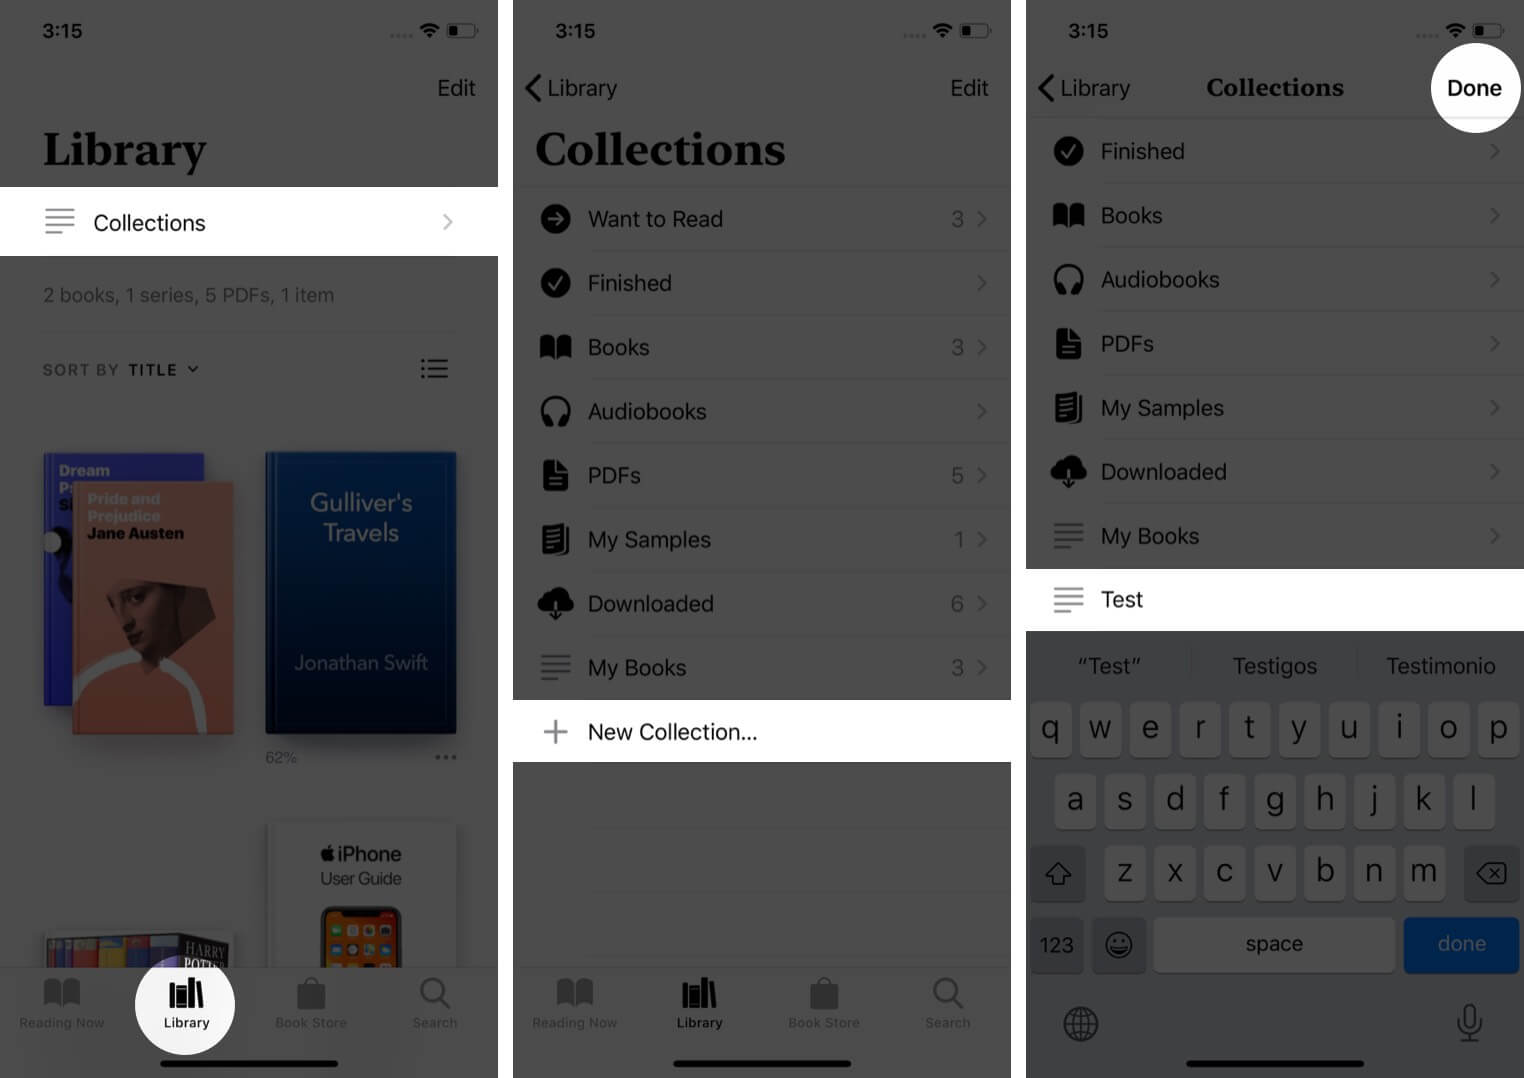
How to Add a New Collection and Manage Them
- Launch the Books app and tap on Library.
- Tap on Collections from the top.
- From the bottom, tap on New Collection and type a name. After that, tap Done.
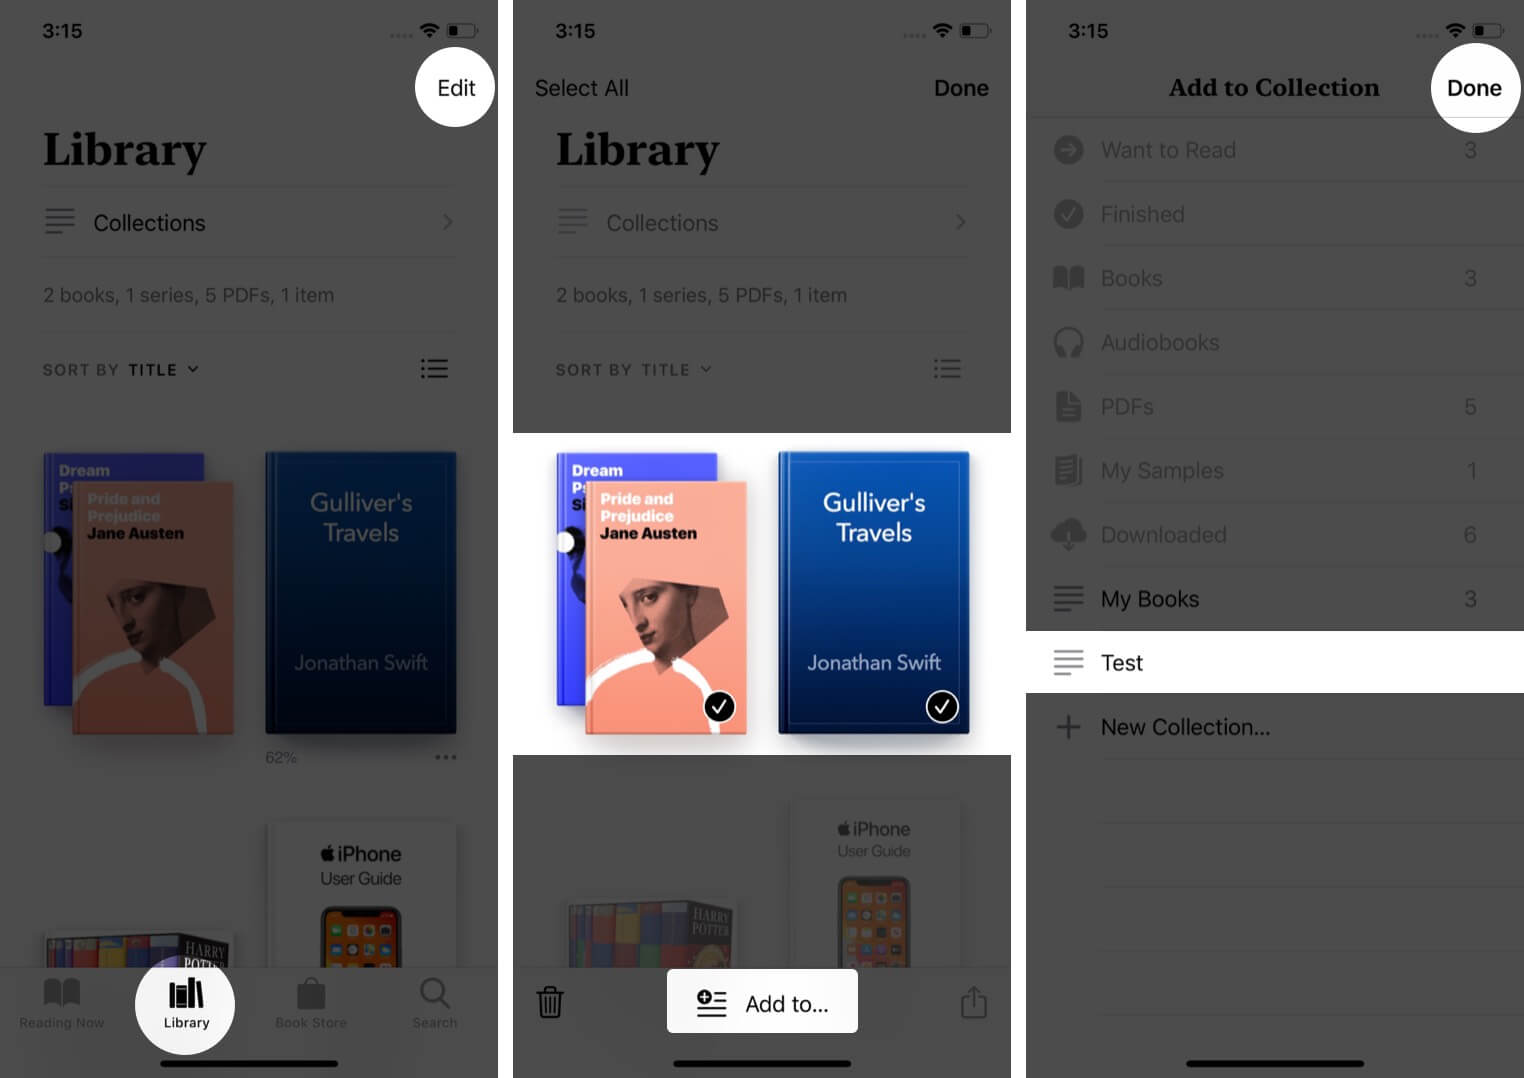
To add books and PDFs to the Collection tap on Library. Next, tap on Edit and select multiple books. Finally, tap on Add to… and tap on a Collection to add the selected titles to it.
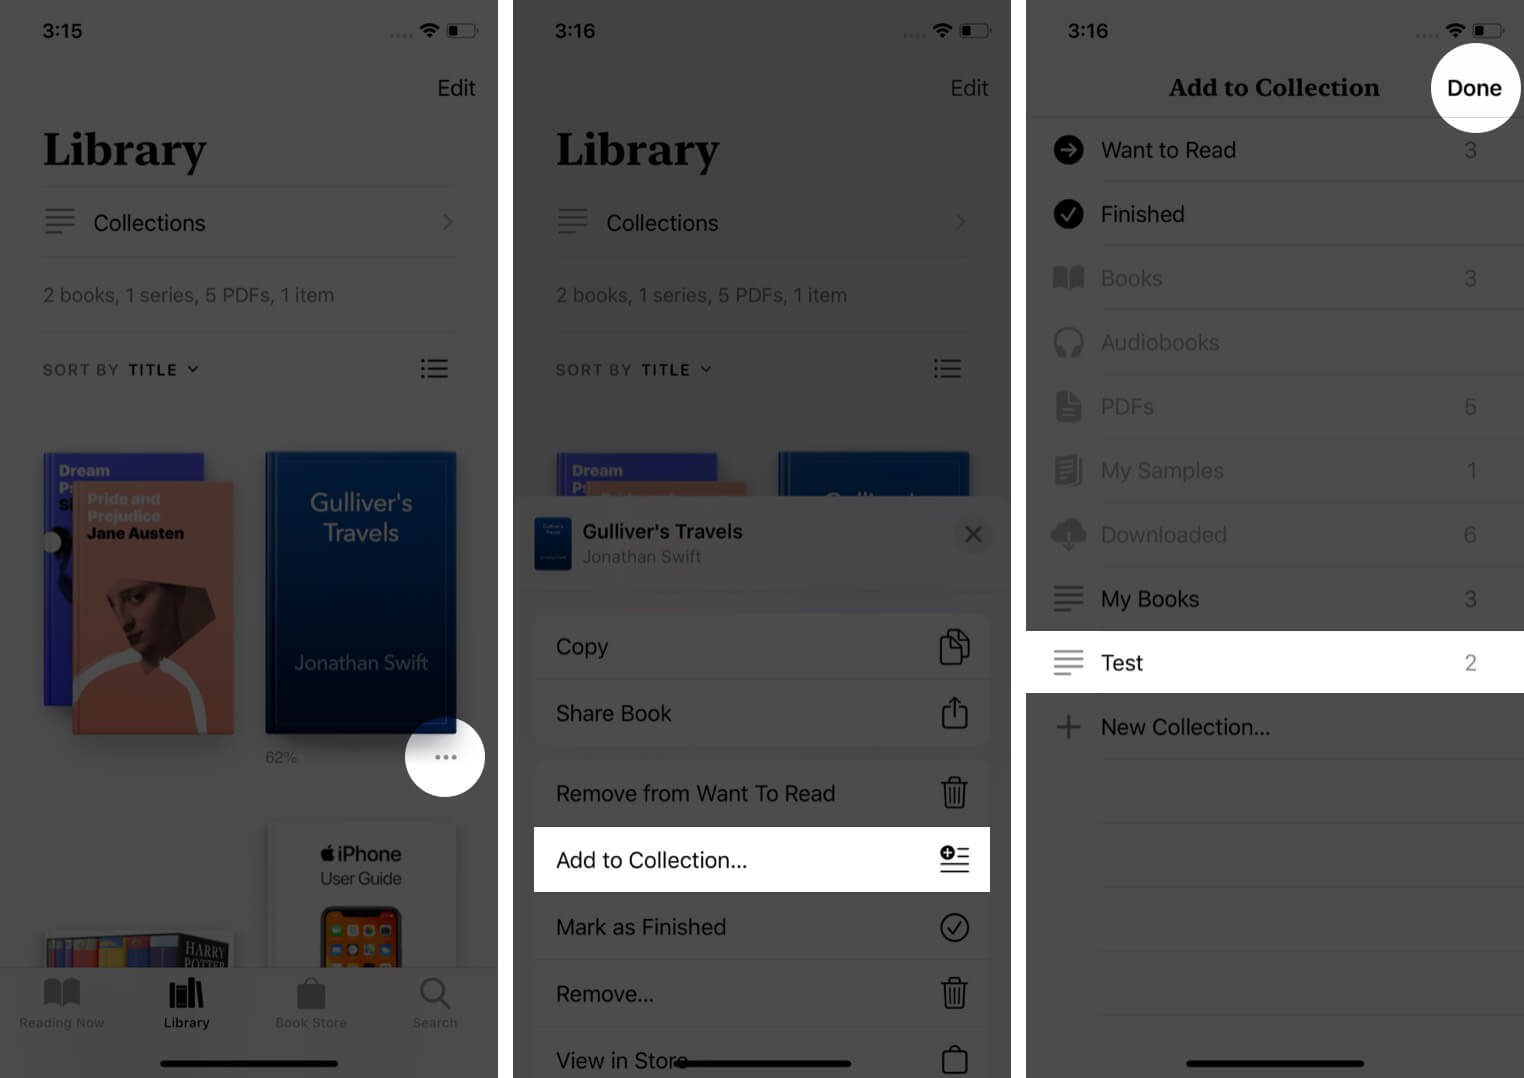
For single books, tap on the three-dots icon and then tap on Add to Collection. You may also copy books from one collection to another following the above methods.
To re-arrange the Collections, touch on one and drag it up or down.
To delete a Collection from the Books app, swipe right to left and tap Delete → Delete.
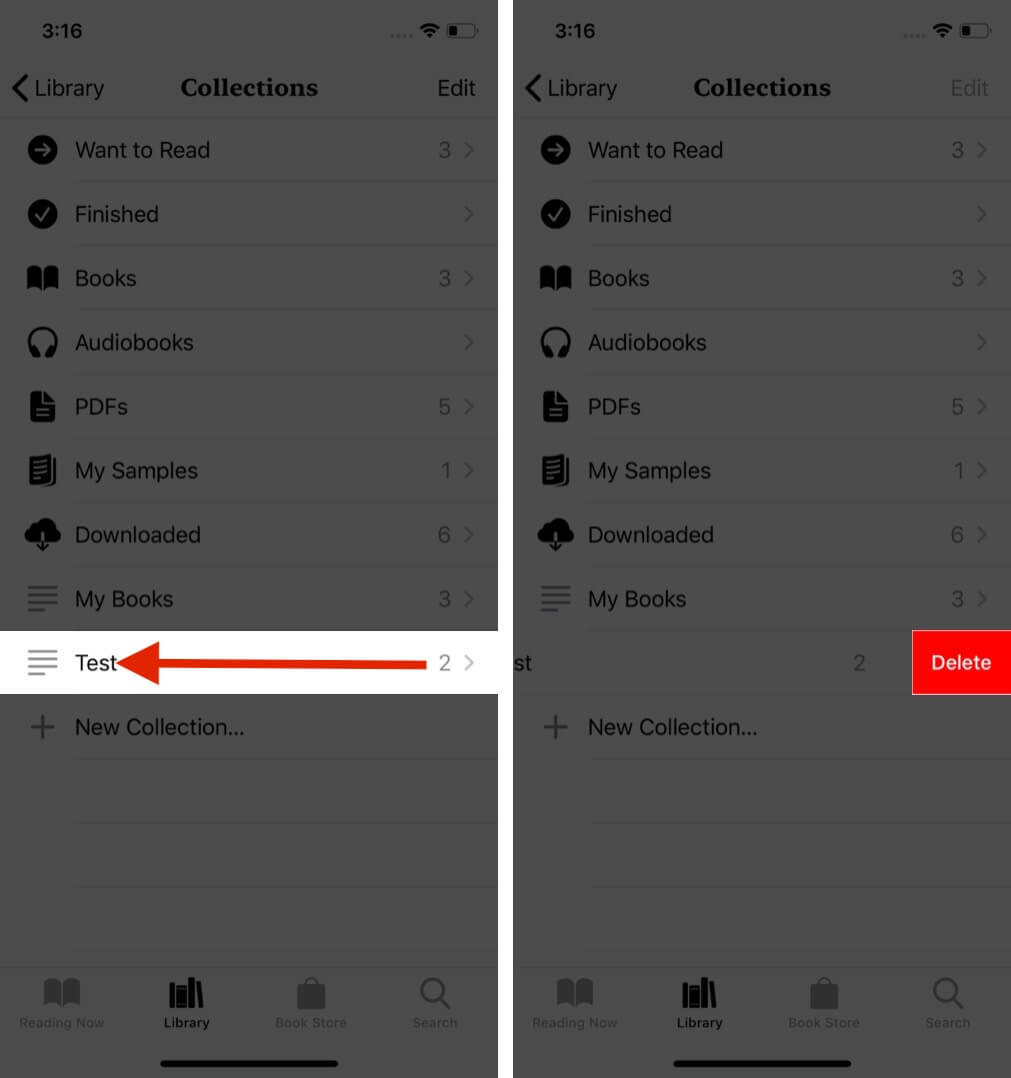
Or, tap on Edit, and then tap on the red minus button and choose Delete. After you delete a Collection, the actual books and PDFs that were in it are not deleted.
How to Hide Books from iBooks App
- Open the Books app → Library.
- Tap on the three-dots icon below a book.
- Scroll down and tap on Remove. Next, tap on Hide Book.
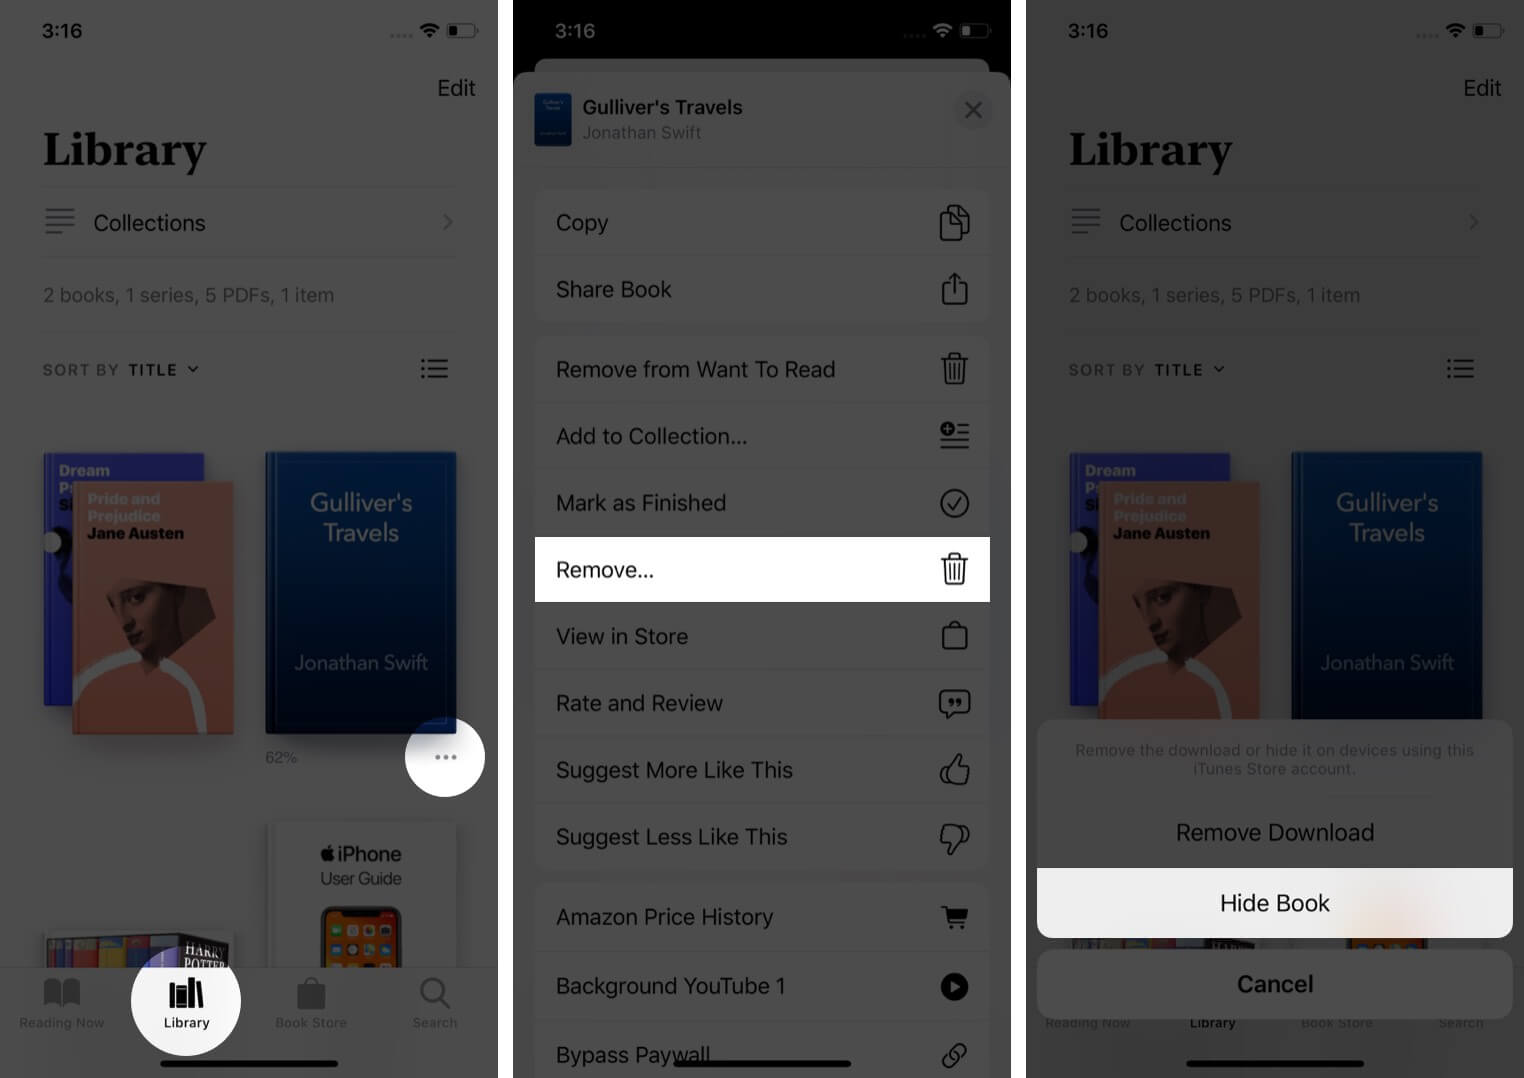
Note: You can not hide the PDFs you added to the Books app. You can remove them from downloads or delete them altogether.
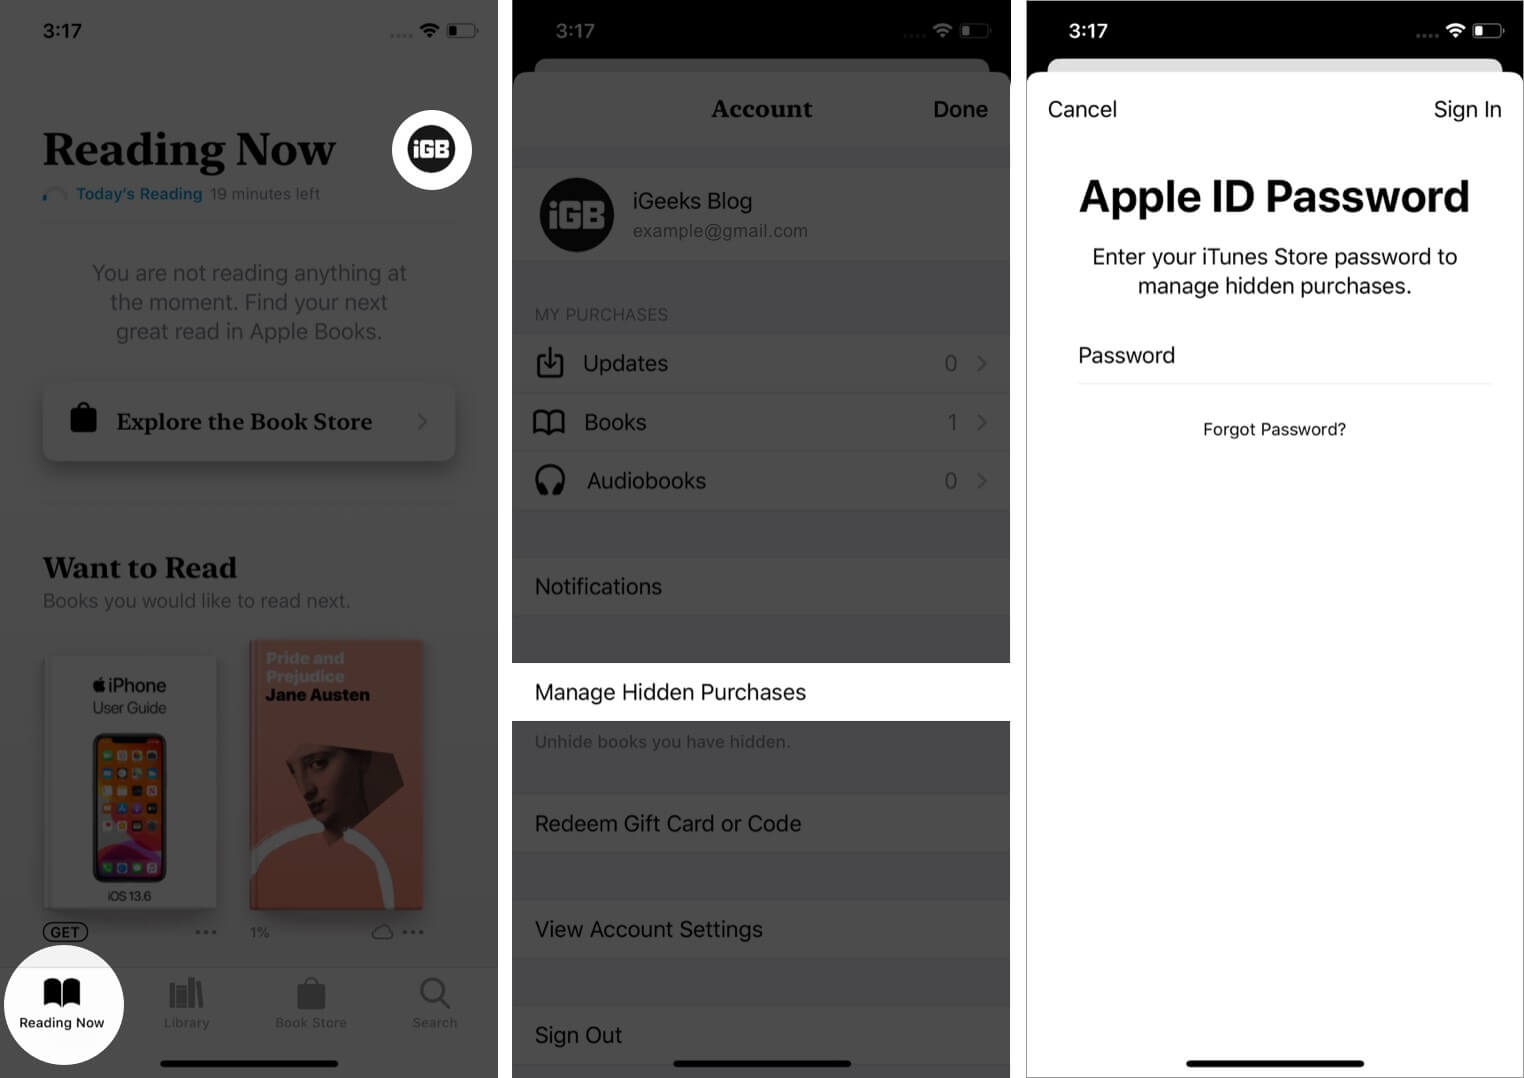
How to Unhide Books from iBooks app
- Launch the Books app → Reading Now.
- Tap on your profile picture.
- Tap on Manage Hidden Purchases. Enter your Apple ID password if asked, and tap on Sign In.
- Tap on UNHIDE next to a title. At last, tap Done.


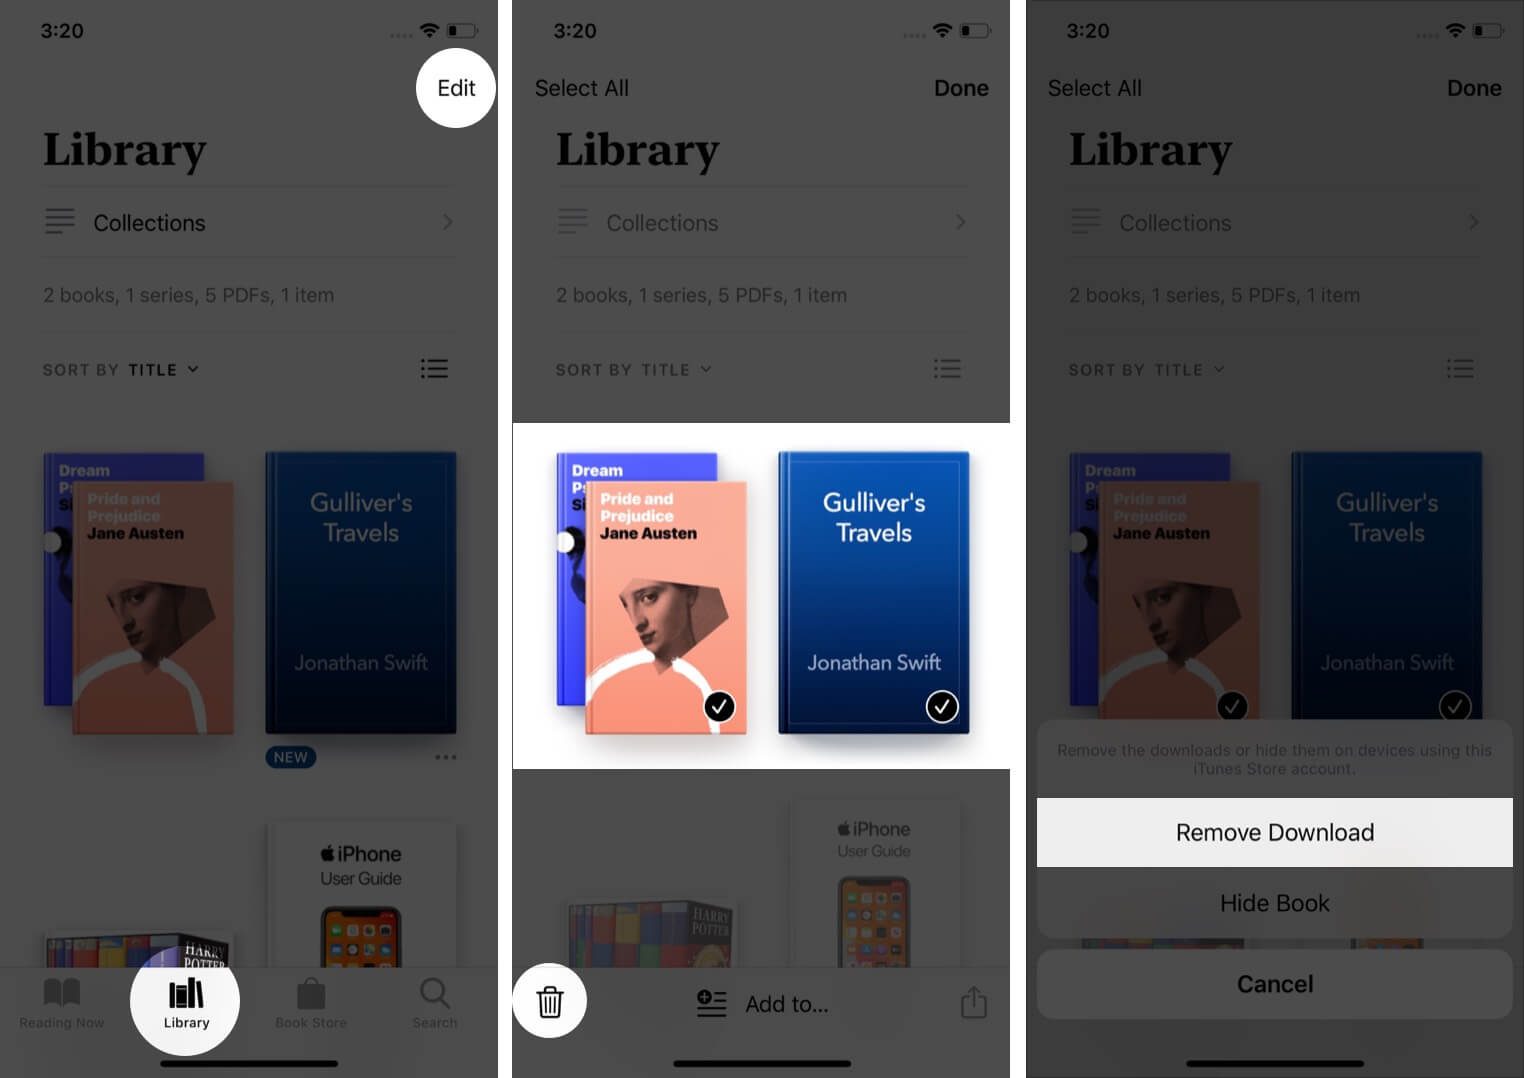
How to Delete Books from iBooks App
You can hide a book (explained above), or you can remove a downloaded book. This will stop occupying the local storage of your iPhone. Just like apps, books’ downloads and purchases are also tied to your Apple ID. There is no way to dissociate the two permanently.
For added PDFs, you can remove them from downloads, which frees up the local space. Or, you may also delete them permanently, which will remove the locally downloaded file as well as delete it from iCloud Drive and all other synced Apple devices.
- Open the Books app and tap on Library. This has all the books and PDFs you have added, downloaded offline, or purchased. If there is a cloud icon below an entry, that means the book or PDF is not downloaded locally but stored in your iCloud account.
- To delete a single book: Tap on the three dots icon and then tap on Remove. Next, choose Remove Download. For downloaded PDF, you will see Remove Download and Delete Everywhere. For non-downloaded PDFs, you may see Delete Everywhere in the Share Sheet.
- To delete multiple books: Tap on Edit. Next, tap on the trash can icon and choose Remove Downloads.

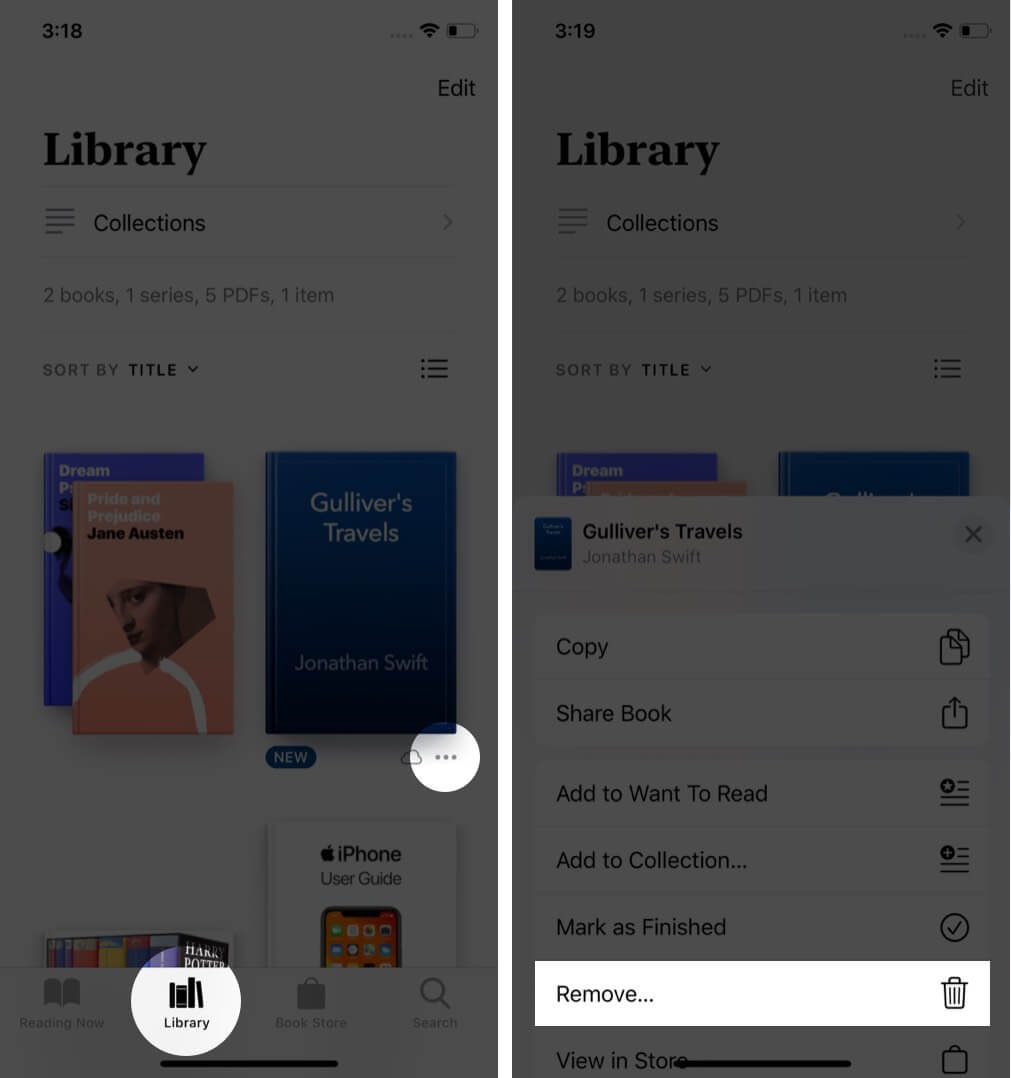 Next, choose Remove Download. For downloaded PDF, you will see Remove Download and Delete Everywhere. For non-downloaded PDFs, you may see Delete Everywhere in the Share Sheet.
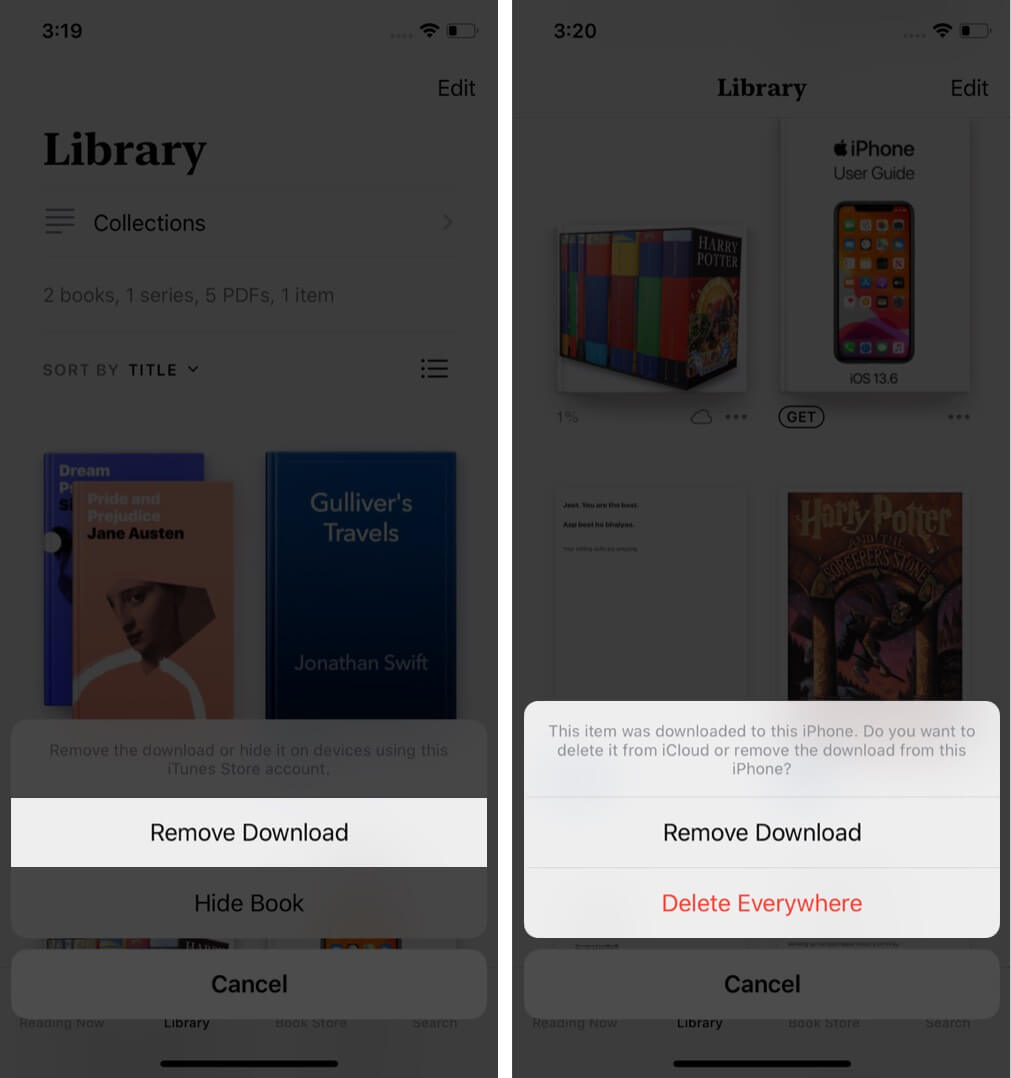
Signing off…
This is how you can manage the Library of the Books app on your iPhone and iPad. Once you start using the app, it becomes easy to discover more features and tweaks.
Additionally, you may also take a look at our list of the best ebook reader apps for iPhone and iPad.
READ NEXT:
- Best Books about Apple, Steve Jobs, Tim Cook, and Jony Ive
- App Library not working on iPhone? How to fix it!
- How to share Apple Books with family members on iPhone
🗣️ Our site is supported by our readers like you. When you purchase through our links, we earn a small commission. Read Disclaimer.