
If your iPhone has a habit of freezing up on the Apple logo and giving it a force restart doesn’t do you any good, it may be time to look at how to put your iPhone in Recovery Mode. Putting your iPhone in Recovery Mode restores it to factory settings and gives it a full round of updates, from firmware to iOS version.
Will it erase your saved photos and files? How do you even get to its settings page? Which iPhone models can you use Recovery Mode on? We’ll answer all these questions and more.
Let’s get started.
- What does putting your iPhone in Recovery Mode do?
- How to put iPhone 8 and later into Recovery Mode
- How to enter Recovery Mode on iPhone 7 and iPhone 7 Plus
- Enter Recovery Mode on iPhone 6s and earlier or iPad with Home button
- How to enter Recovery Mode on an iPad without Home button
- How to fix iPhone stuck in recovery mode
What does putting your iPhone in Recovery Mode do?
Like we briefly mentioned earlier, putting your iPhone into Recovery Mode allows it, when connected to a computer via lightning cable, to update to the latest firmware and iOS version.
Recovery Mode can be critical to restoring an iPhone that isn’t recognized by your computer, can’t get past the Apple logo, or has trouble updating to the latest version of iOS.
Will Recovery Mode delete my photos and files?
Yes. Your personal data and settings will be erased and reverted to the factory default.
This is why we strongly recommend making sure you’ve backed up your iPhone before proceeding to enter Recovery Mode. You can simply restore your photos and files from a backup if you plan ahead!
Does putting my iPhone in Recovery Mode hurt it?
Nope. In fact, it may be the only thing that saves you and your phone a trip to Apple Support. Again, make sure you have a backup stored on iCloud, an external drive, or another data backup service of your choosing as an extra line of defense.
Now that you know the basic info, let’s get to the step-by-step guide to enter Recovery Mode on iPhone.
How to put iPhone 8 and later into Recovery Mode
Here’s how to put your iPhone 15 or earlier (until the iPhone 7) in Recovery Mode:
- Connect your iPhone to a computer with a Lightning to USB cable.
Note: If your Mac runs macOS Catalina or Big Sur, use Finder. If you’re on an earlier version of macOS or Windows PC, use iTunes. - Press and release the Volume Up button on the left side of the device.
- Next, press and release the Volume Down button.
- Now, press and hold the Side button (power button) for about ten seconds. You’ll see an entirely black screen. Then you’ll see the Apple logo (boot up screen). DO NOT RELEASE THE BUTTON.

- After a few seconds, you’ll see a lightning cable with an arrow pointing towards a Mac. Now you can release the Side button. You will also see a pop-up in Finder or iTunes.
- The Finder or iTunes pop-up says “There is a problem with the iPhone that requires it to be updated or restored.”
- Click Update to fix the problem. This will keep all of your settings and iPhone data.
- If the update isn’t able to fix your problem, repeat the process and click on Restore. Restore will erase all settings and content. If you’ve backed up your iPhone as recommended, you can restore everything from the backup afterwards (while setting up your iPhone).

Note: If you don’t see a pop-up in Finder or iTunes in step 5, but see the lightning cable and MacBook logo on iPhone, release the button. Next, manually click your iPhone under Locations from the Finder sidebar on your Mac or via the iPhone icon in iTunes.
To exit Recovery Mode, just press the Side button on your iPhone and release it when the lightning cable and MacBook logo disappear from the screen. Your iPhone will boot up normally.

How to enter Recovery Mode on iPhone 7 and iPhone 7 Plus
- Connect your device to a computer and open iTunes or Finder. Then, be sure the device icon appears on the top left menu.
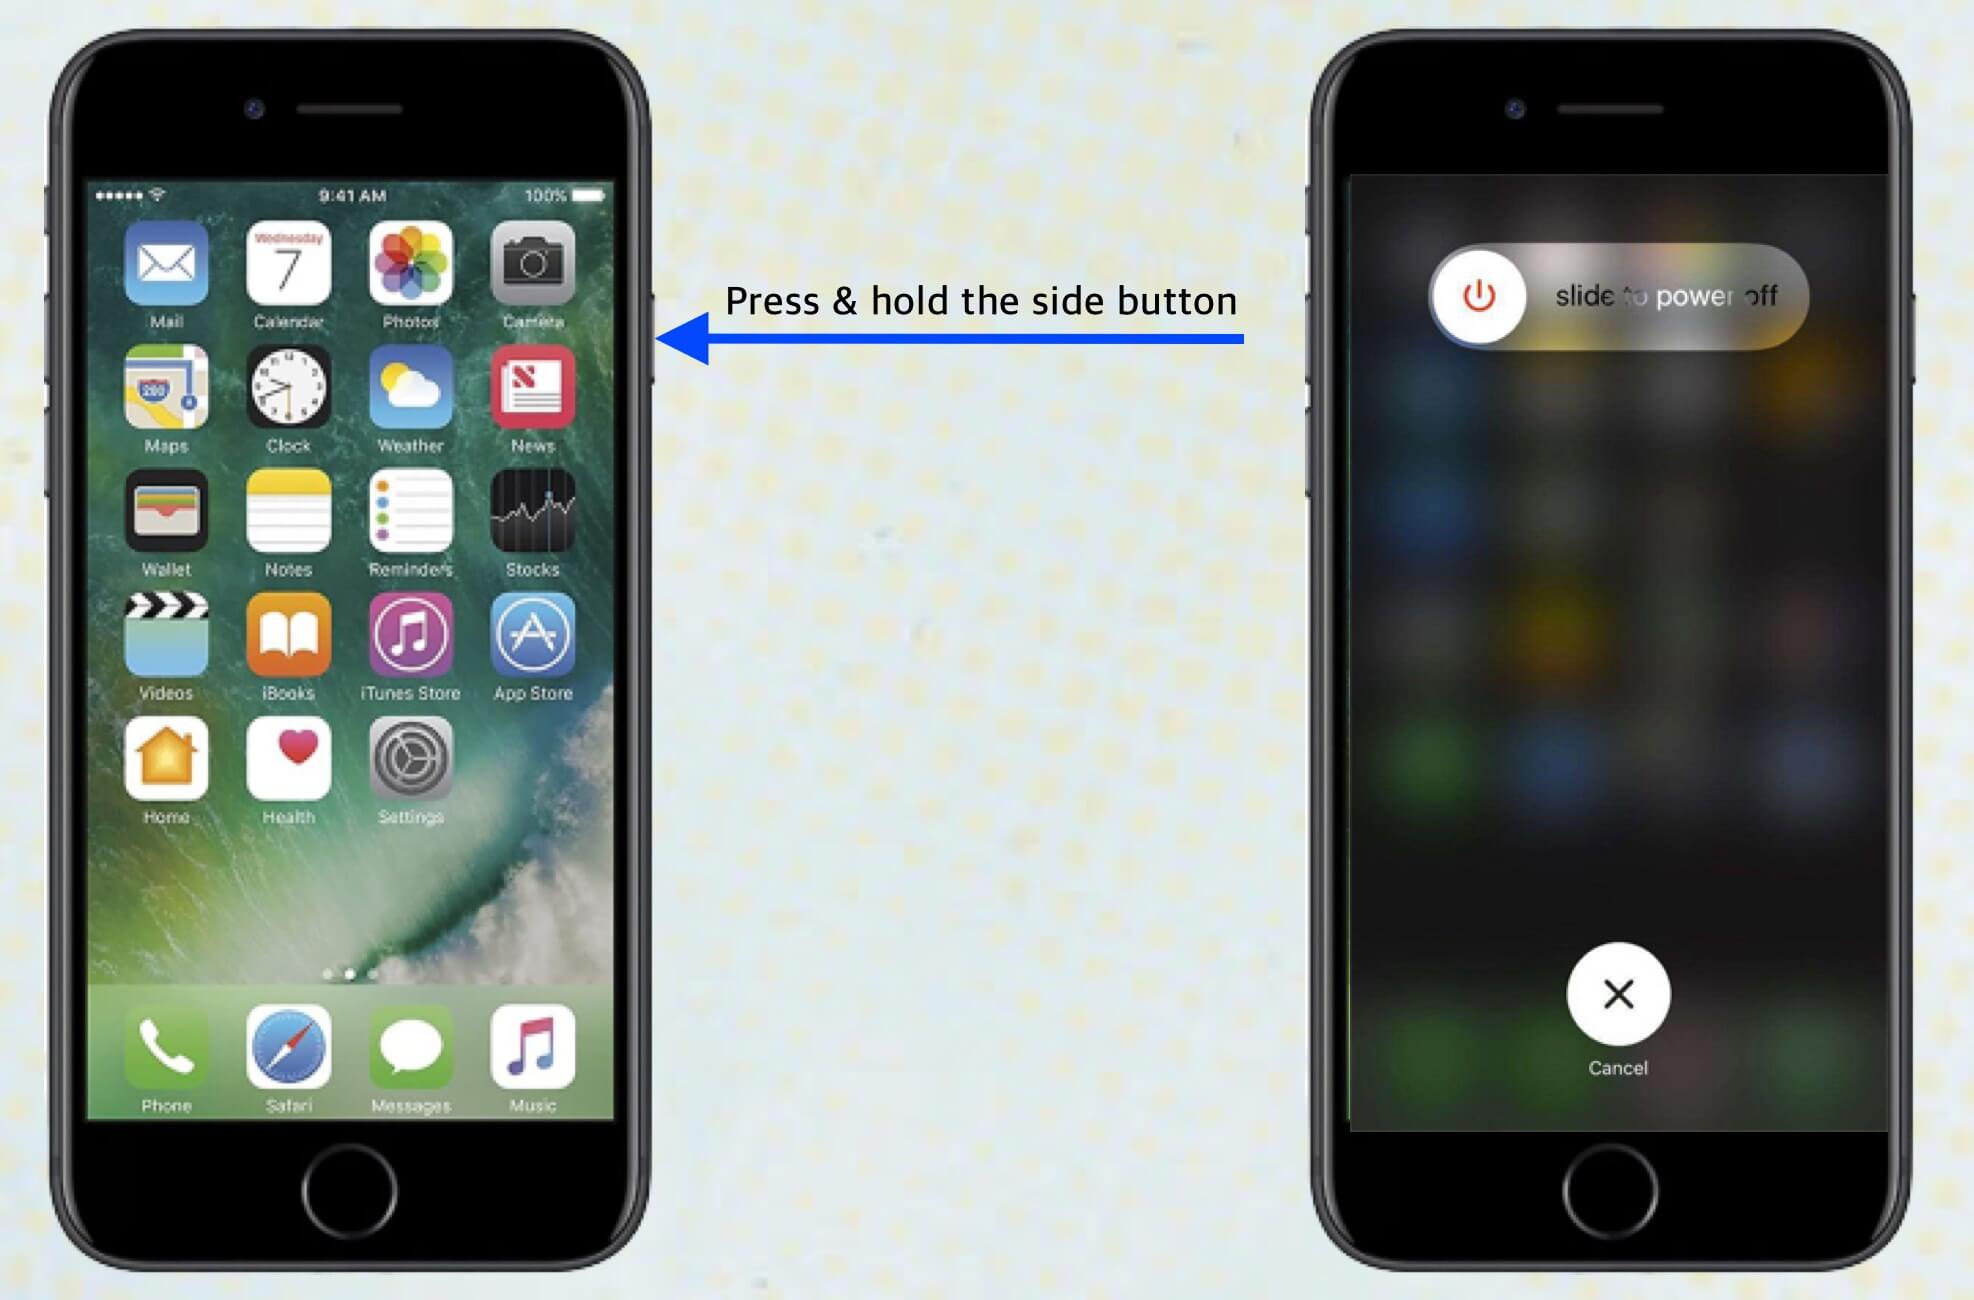
- Press and hold the Side button. Then, slide to power off.

- Now, press and hold the side button until the “Connect to iTunes” screen shows up on the screen.

To leave recovery mode, disconnect your device from the computer. Then, press and hold the Side button and Volume Down button until the Apple logo shows up.
Enter Recovery Mode on iPhone 6s and earlier or iPad with Home button
- Turn off your iOS device. Press and hold the On/Off button for 3 seconds.
- Now, slide to power off.
- Press and hold the Home button.
- Now, plug your iPhone or iPad into your Mac or Windows PC. Ensure iTunes is running on your computer.
- Next, release the Home button when the “Connect to iTunes” screen appears.
iTunes will display an alert saying it has detected an iPhone in Recovery Mode, and tell you to restore your device.
To exit Recovery Mode on iPad or iPhone 6s/SE and earlier, press and hold the Home and Power buttons for about 15 seconds till the screen goes blank. Then release the Home button, but keep the Power button pressed down until your device boots up.
How to enter Recovery Mode on an iPad without Home button
- Press and hold the Sleep/Wake (top) button and the Volume Up or Volume Down button together until you see the power-off slider.
- Slide to power off.
- Connect your device to a computer while also holding down the Sleep/Wake (top) button. Keep the button pressed until the Recovery Mode screen appears.

To exit Recovery Mode on an iPad without a Home button, disconnect your device from your computer. Then press and release the Volume Up button, then the Volume Down button. Finally, hold down the Power button until you see the Apple logo appear on the screen.
How to fix iPhone stuck in recovery mode
While the chances are rare, this could happen sometime. You have put the iPhone in recovery mode to troubleshoot an issue. However, now the iPhone is stuck on the recovery mode screen, and you’ll have to troubleshoot that first.
To fix the issues, you’ll have to restore your iPhone. You can do so via iTunes/Finder, though that would result in complete data loss, which is not such a great scenario. The better and smarter way is to use Dr. Fone.
Dr. Fone – System Repair is a complete iOS and iPadOS repair solution. It is a master of its trade and can fix various system issues like boot loop, black/white screen of death, frozen iPhone, and stuck in recovery mode. Most importantly, these issues are fixed with a few clicks and without data loss. Let’s see how:
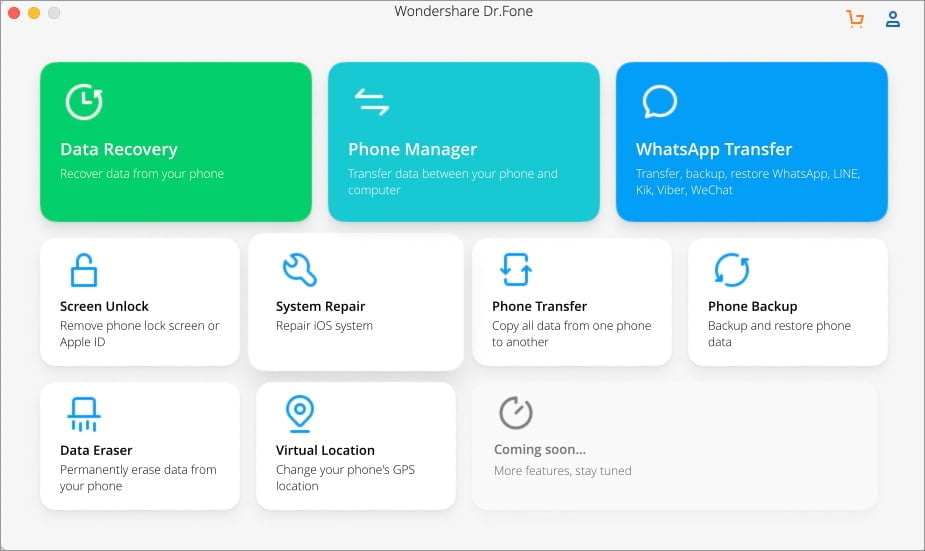
- Launch Dr. Fone on Mac/Windows PC and click System Repair.

- Connect your iPhone/iPad stuck in recovery mode via USB (if not already connected).
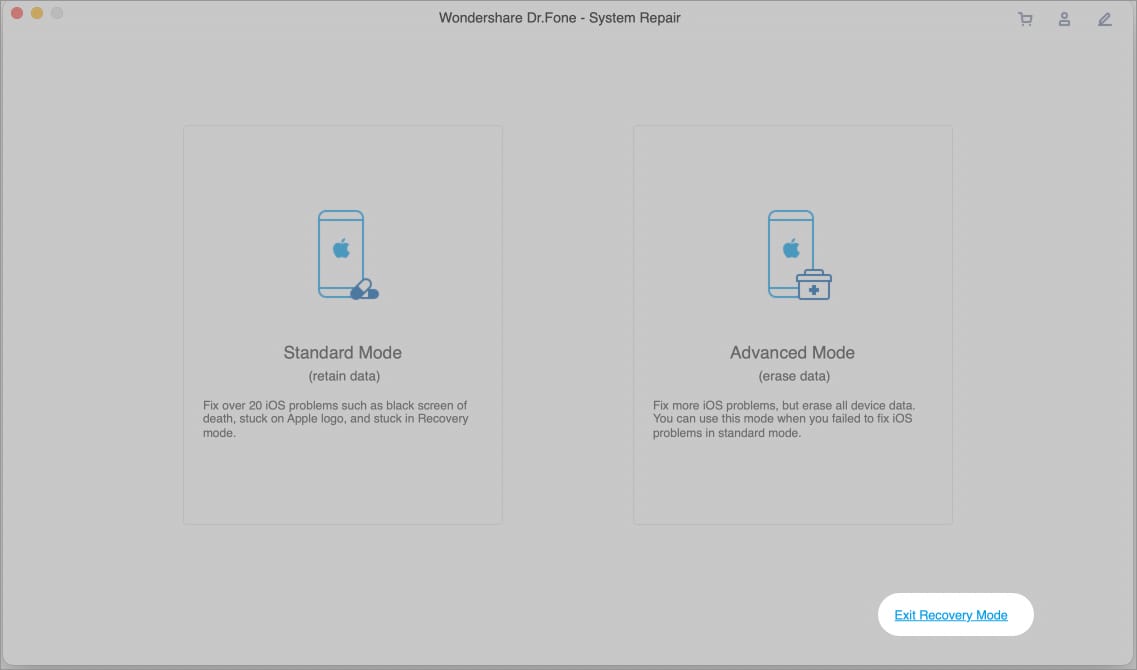
- Here, select Exit Recovery Mode from the bottom-right of the window.

- In the new window, click Exit Recovery Mode again.

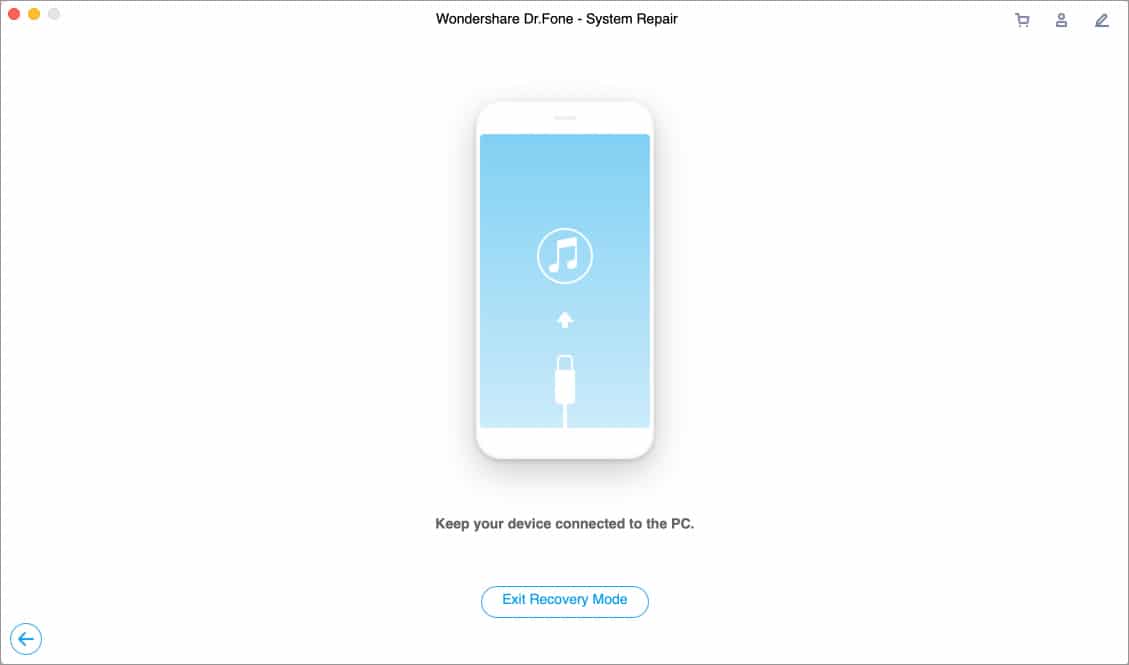
Let the software work its magic; it may take some time depending on device-to-device. Once done, your iPhone will restart, and an Exited Recovery Mode successfully window will pop up. Just disconnect the phone and enjoy.
If the original issue still exists, run the Dr. Fone System Repair again and click Standard Mode. There’s also the last resort Advanced Mode to fix the issue, although that’ll lead to data loss.
Dr. Fone System Repair tech specs
- iPhone/ iPad OS – iOS 15/iPadOS 15 and earlier.
- Windows – 11/10/8.1/8/7
- Mac – macOS Monterey and earlier
Generally, your move here is to force restart your iPhone. If that doesn’t work, make sure iTunes is up to date, and think about using DFU mode as an alternative.
This depends on a few factors, like your internet speed, iPhone or iPad model, and the amount of actively used storage on the device. In most cases, you’re looking at an hours-long process. Best to set it and forget it.
We hope you learned what you needed to put your iPhone in Recovery Mode. Did using Recovery Mode work in restoring your device? Let us know in the comments whether it did or not. If it didn’t, we’ll work towards finding you a proper solution.
Have any other Apple-related questions? Ask away in the comments, we want to hear from you!
You may like to read:
- How to force quit apps on iPhone and iPad
- How to hide apps on iPhone and iPad
- Tips to increase Cellular Data speed on iPhone
- FoneGeek iOS system recovery tool for Windows and Mac
🗣️ Our site is supported by our readers like you. When you purchase through our links, we earn a small commission. Read Disclaimer.