
The biggest gripe about email is that you can’t send large files as attachments from your iPhone or iPad. Most email clients, including Apple’s Mail app, let you attach and send files that are a few MBs large (10-25MB max). While this doesn’t bother you in day-to-day emails, there can be times when you want to send large or even multiple photos and videos (the size of which isn’t getting shorter anytime soon).
But fret not! I have found some alternative ways to help you send large files via email on iPhone or iPad without investing much time. Let’s have a look.
- Send large files attachments via email from iPhone using Mail Drop
- Compress and zip large email attachments on iPhone or iPad
- How to send large files via email using Cloud services
Send large files attachments via email from iPhone using Mail Drop
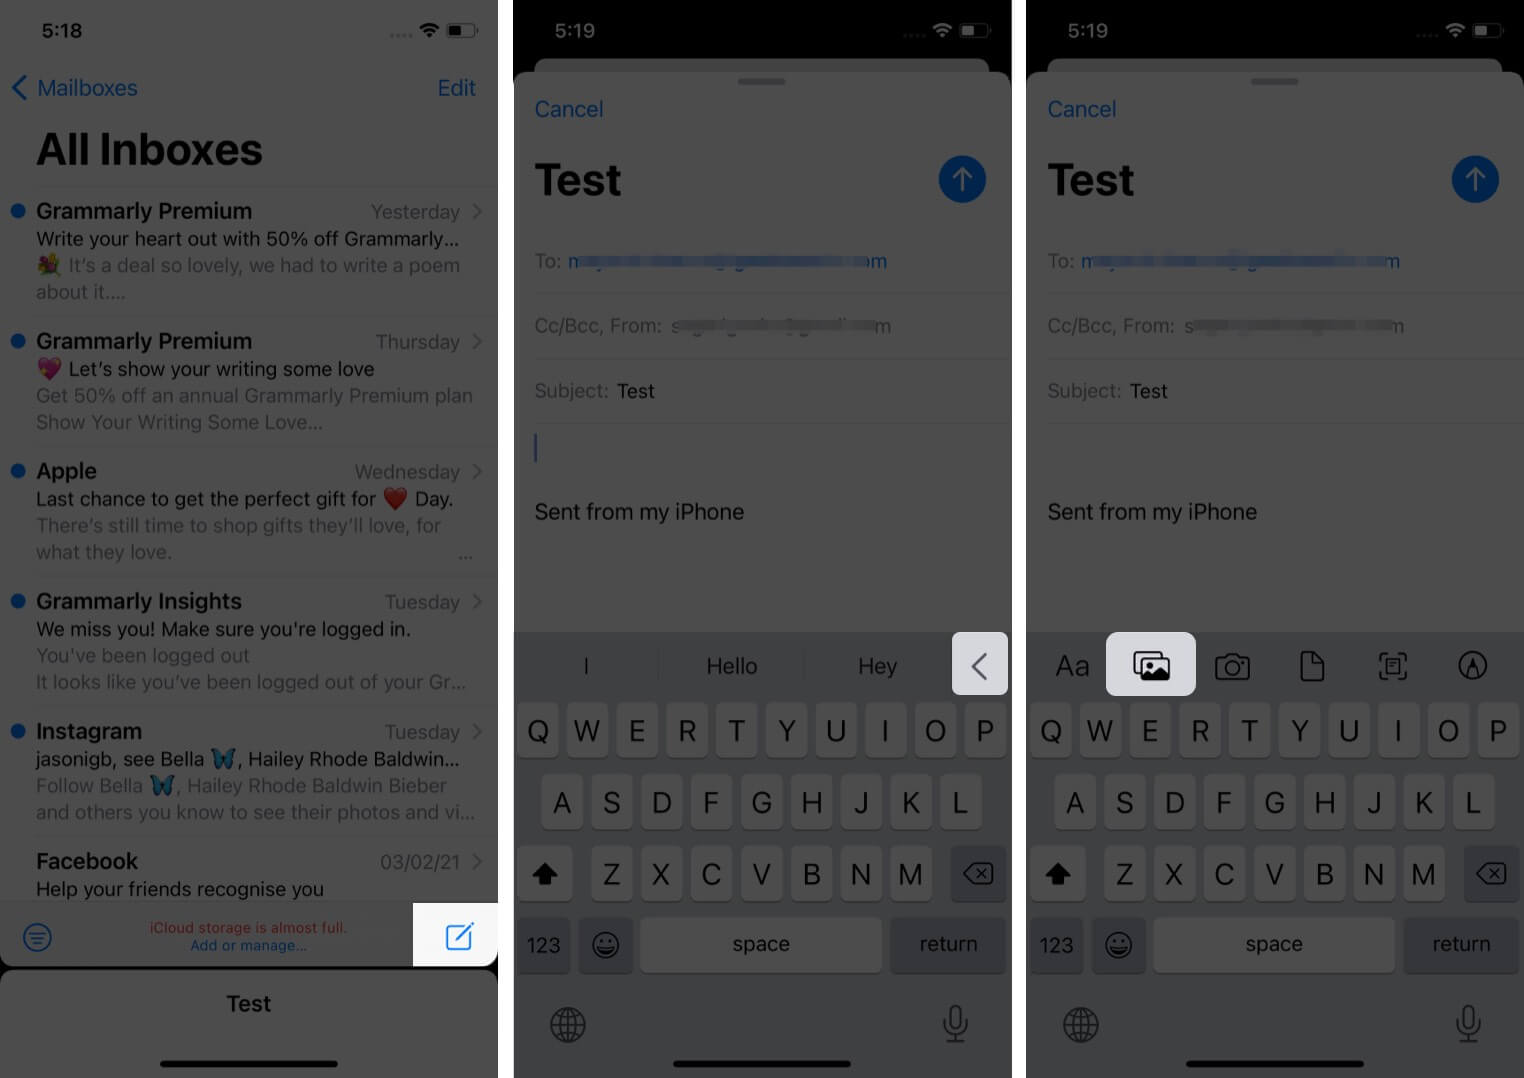
- Open your preferred mail app.
- Tap the compose icon at the bottom-right corner.
- Enter the details like mail ID, subject, and content.
- Tap the content section followed by the left arrow above the keyboard. Select the images icon.
- Now, tap All Photos at the top-right corner of the flag bottom flag.
- Select your preferred files and tap the close button.
- Tap the upward icon at the top-right corner to send the mail and select the file size from the options list.
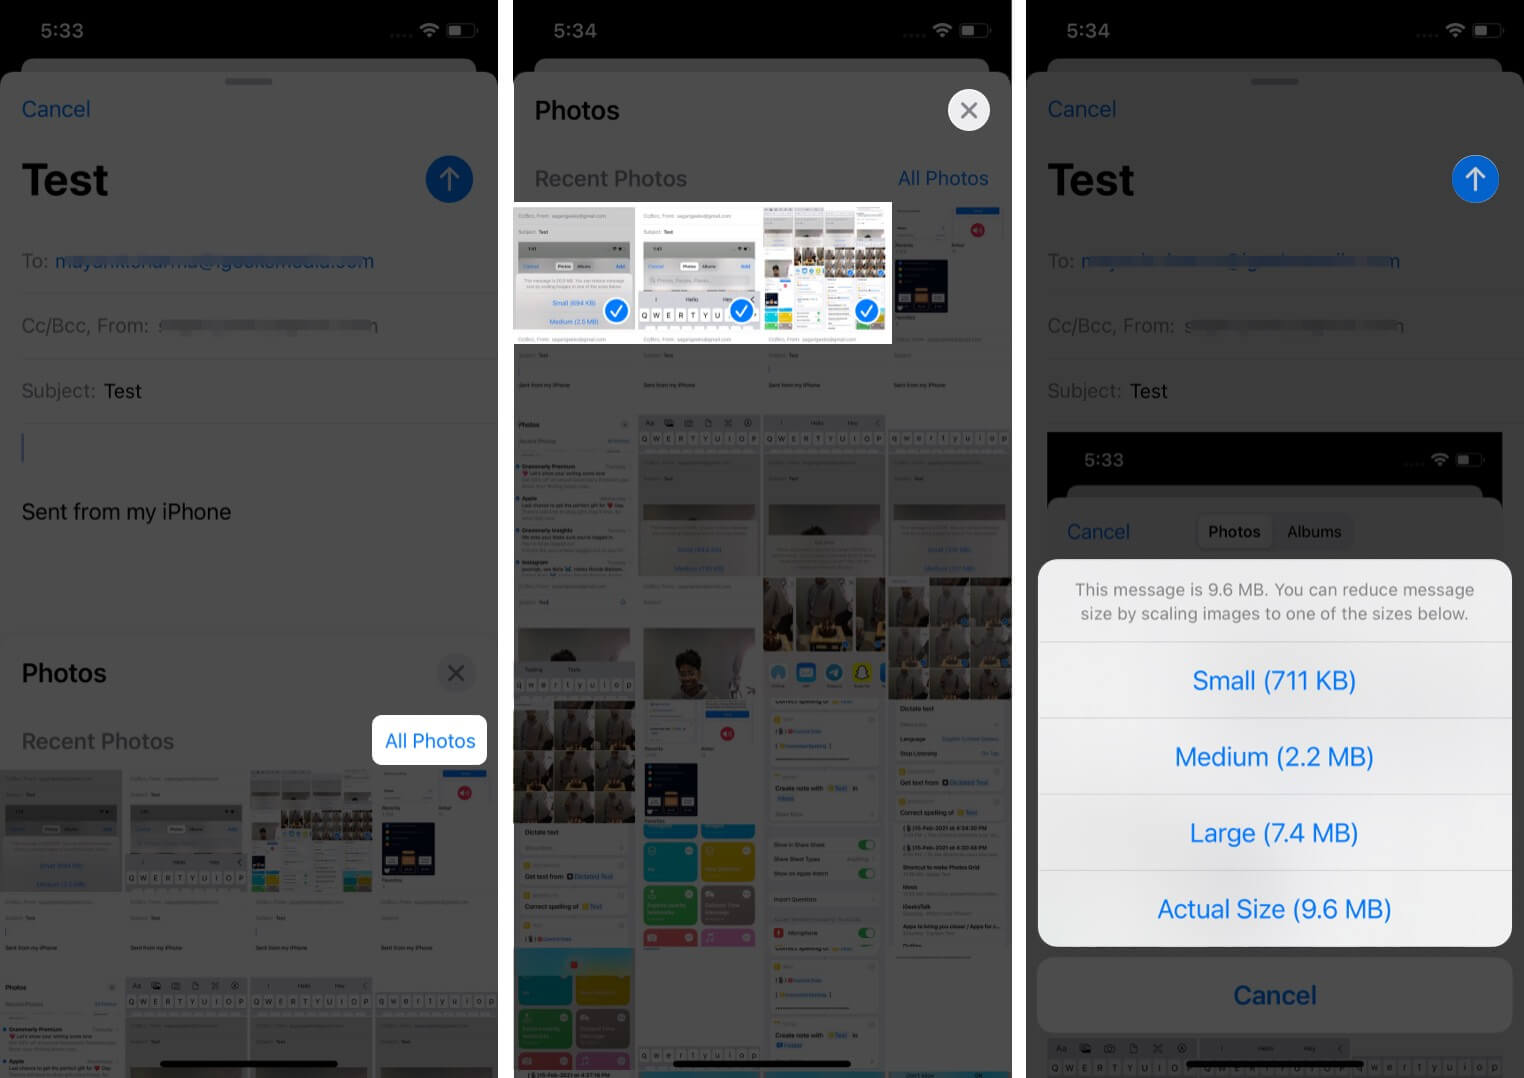
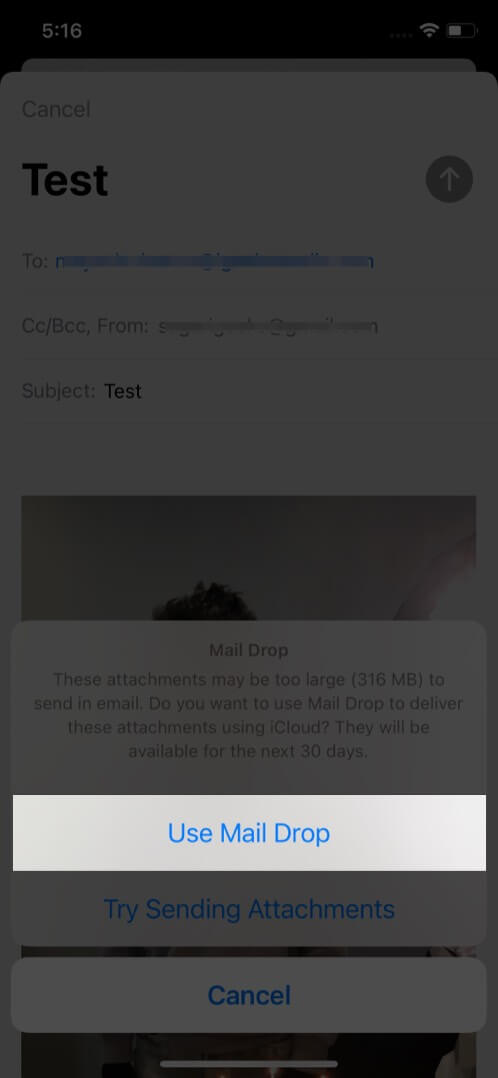
- A new window will pop-up asking your preference. Select Mail Drop. Files will be sent soon after uploading.
Alternatively, you can also go to the Photos app → select the photos/videos you want to mail → tap the upload icon at the bottom-left corner → select Mail. This will redirect you to the default mailing app. Next, enter all details, and follow the above steps from 6.
This should be the go-to option if you don’t want to delete photos later as the app deletes the data after 30 days. However, if you wish to store them for a longer time, check out the following ways.
Compress and zip large email attachments on iPhone or iPad
This is one of the simplest ways to send large files via Mail from your iPhone or iPad. You can even send the compressed files using your chat platforms like iMessage, WhatsApp, Signal, etc.
To compress the files, I would suggest installing the iZip app. It allows you to compress almost every format – PPT, PDF, TXT, RTF, DOC, Excel, Pages, JPG, GIF, PNG, audios, and videos. Besides, you can also unzip compressed files, including RAR, 7Z, ZIPX, TAR, etc., using this app. Here’s how to use it;
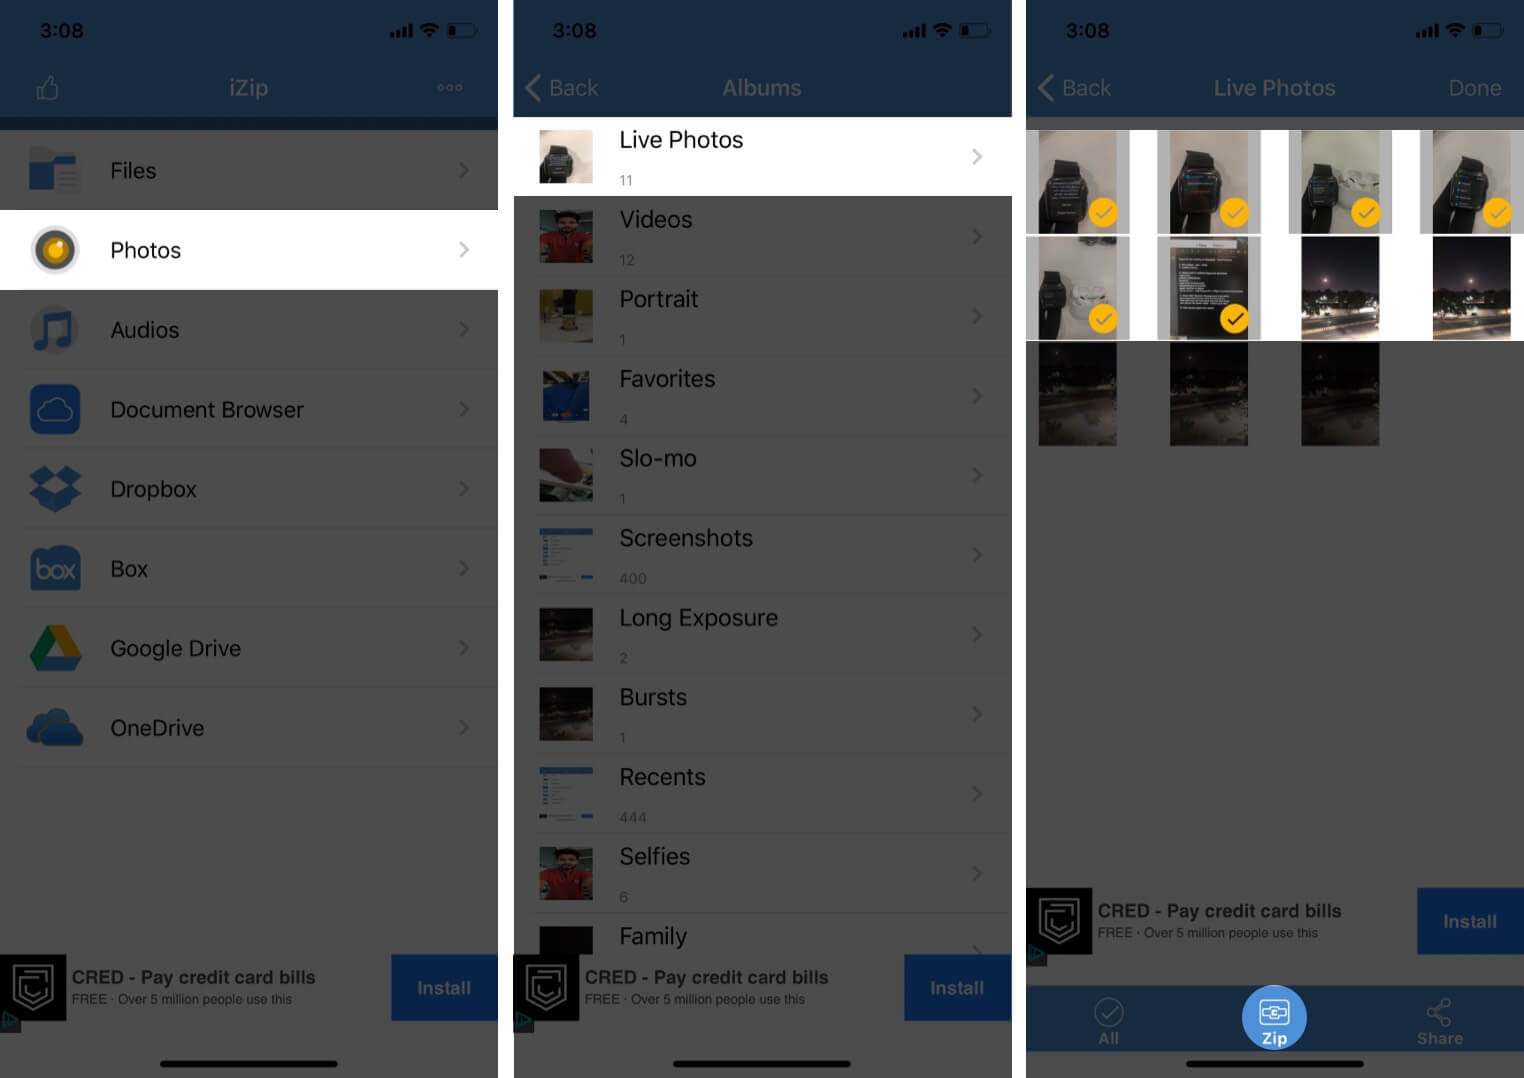
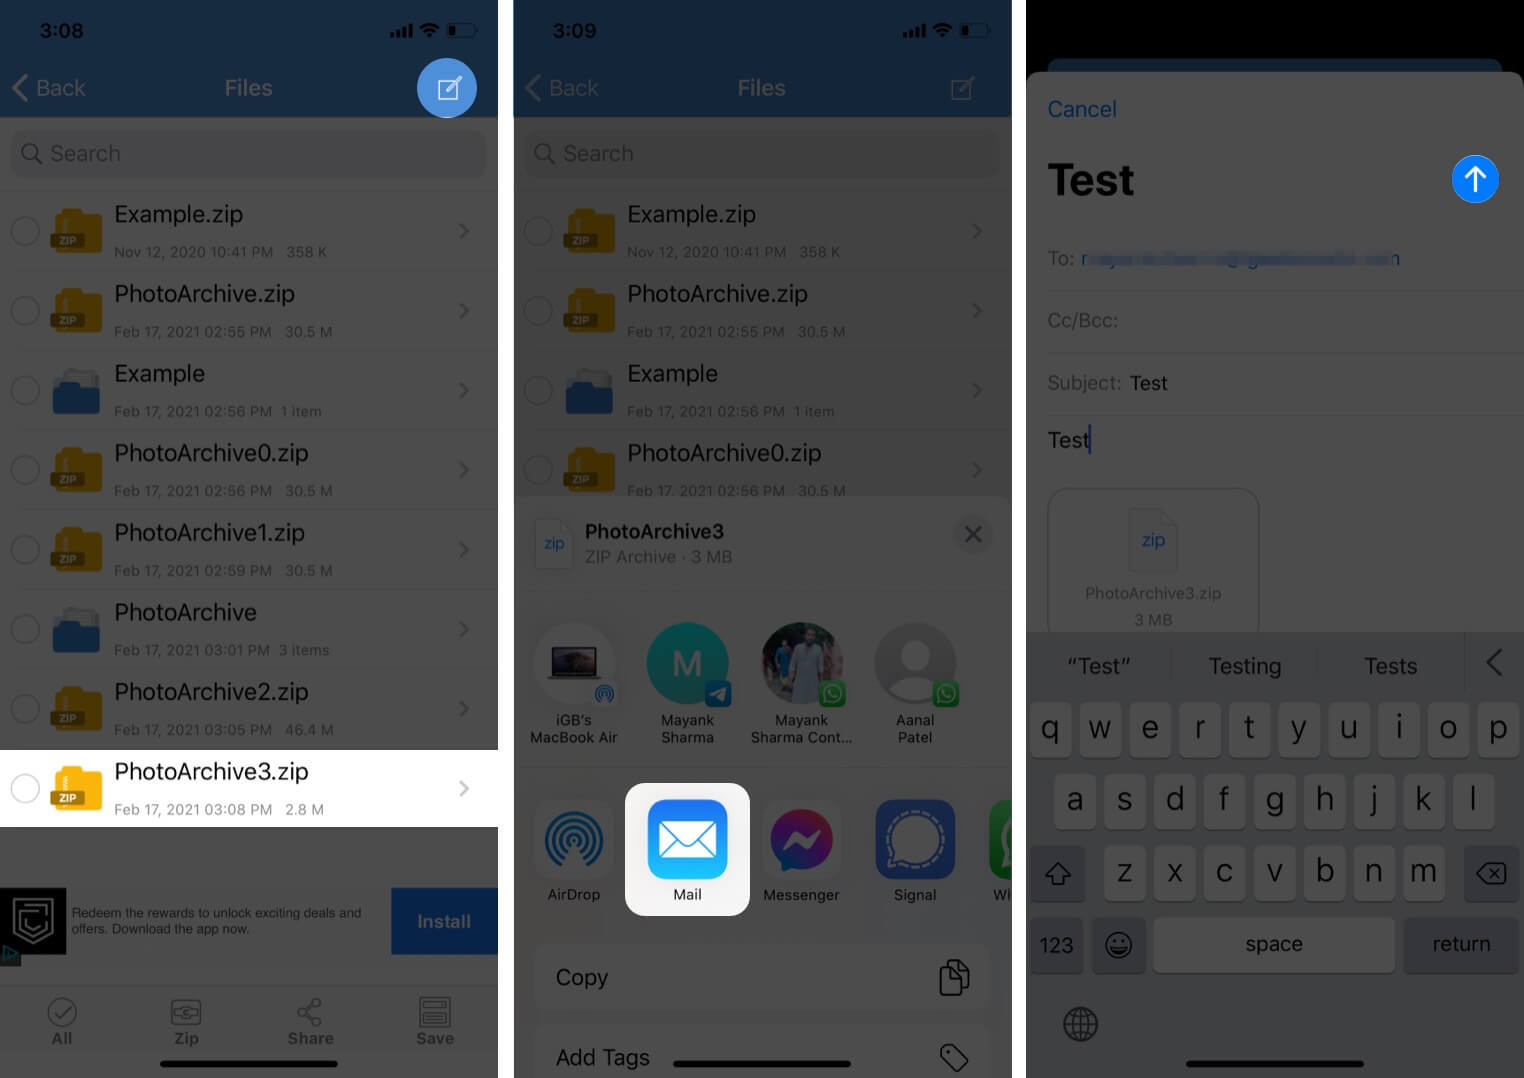
- Open the app and select the file format you wish (I chose photos).
When using for the first time, it’ll ask your permission to access the library. - Next, go to the folder and tap Select at the top-right corner.
- Tap the files you want to zip together and tap Zip at the screen’s bottom.
- The next window will have your zipped folder. It will automatically be named. Select it by tapping the circle against your file name followed by Share.
- From the options, select Mail. The file will be attached on its own in the next window.
- Enter other mail details and tap Send.
It’s that easy! However, if you don’t want to compress the files, let’s look at the next way.
How to send large files via email using Cloud services
Unlike Mail Drop that removes files after 30 days, these applications keep your uploaded and shared files till the time you want them.
While Dropbox and Google Drive are the most preferred options for sharing large files, online tools like Jumpshare have a different fanbase. Besides their website, you can also install the apps to leverage their Cloud experience on iPhone.
For better understanding, here’s a walkthrough of the Dropbox app. After you install the app, you can sign in or signup using Gmail or your Apple ID. Once done, here’s what to do.
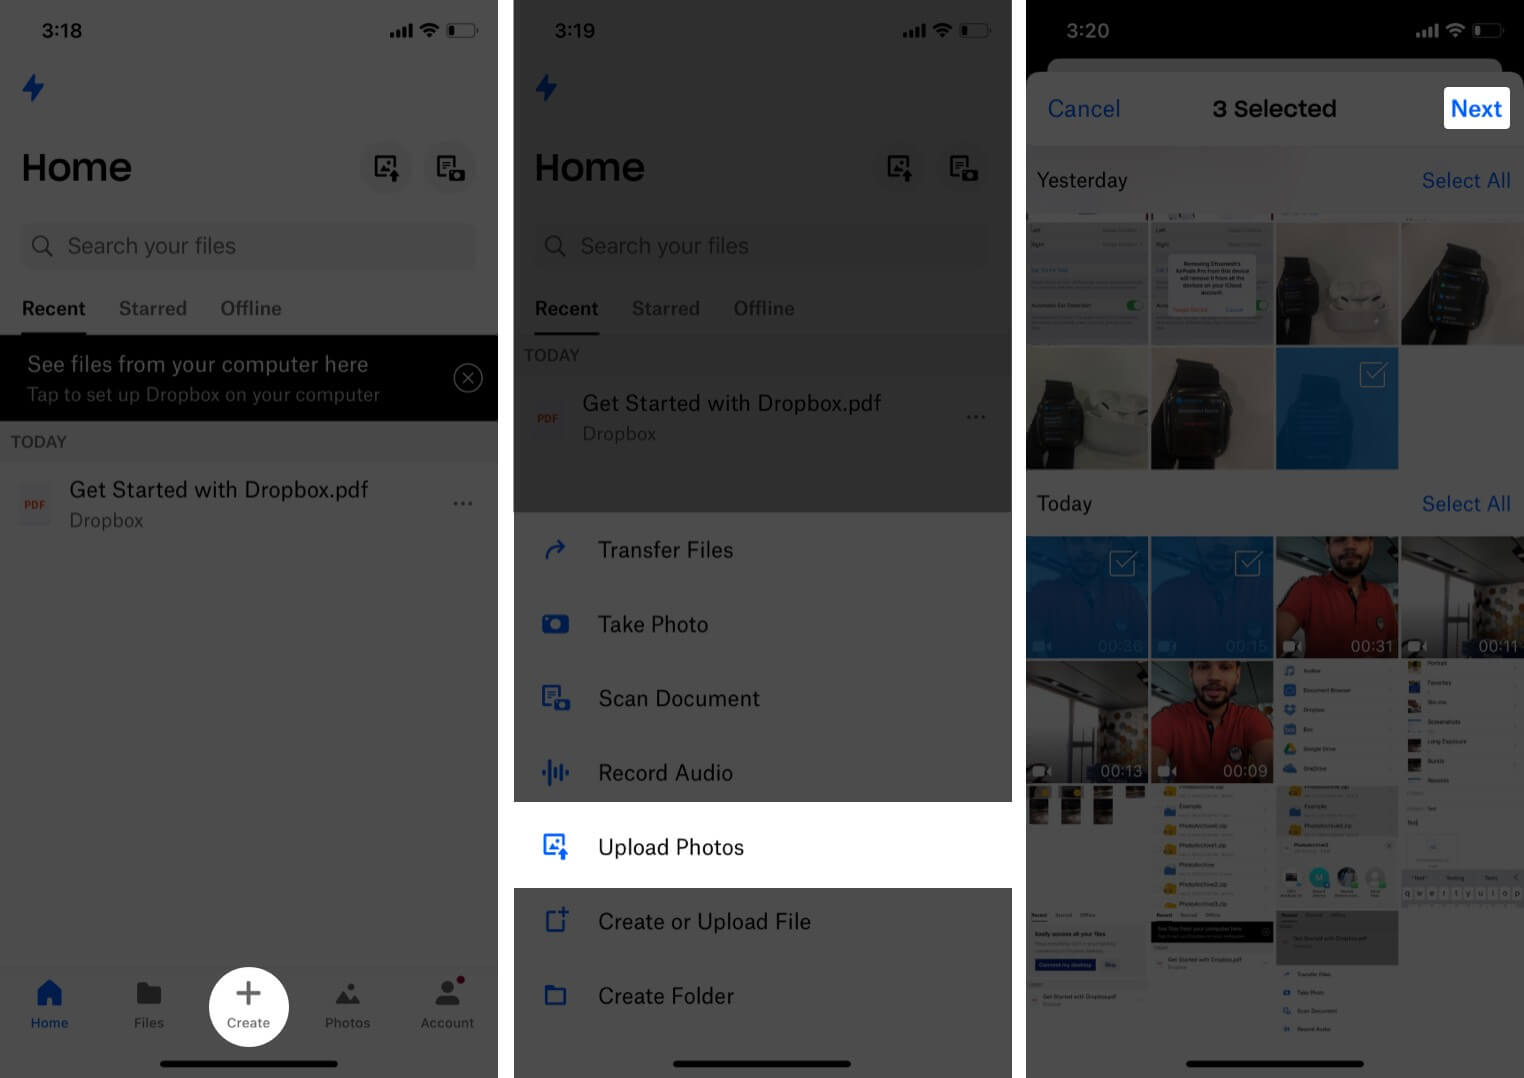
- Tap the ‘+’ icon at the bottom. Select the option you want. I chose Upload Photos.
- In the next window, tap and select the photos and videos you want to send and tap Next.
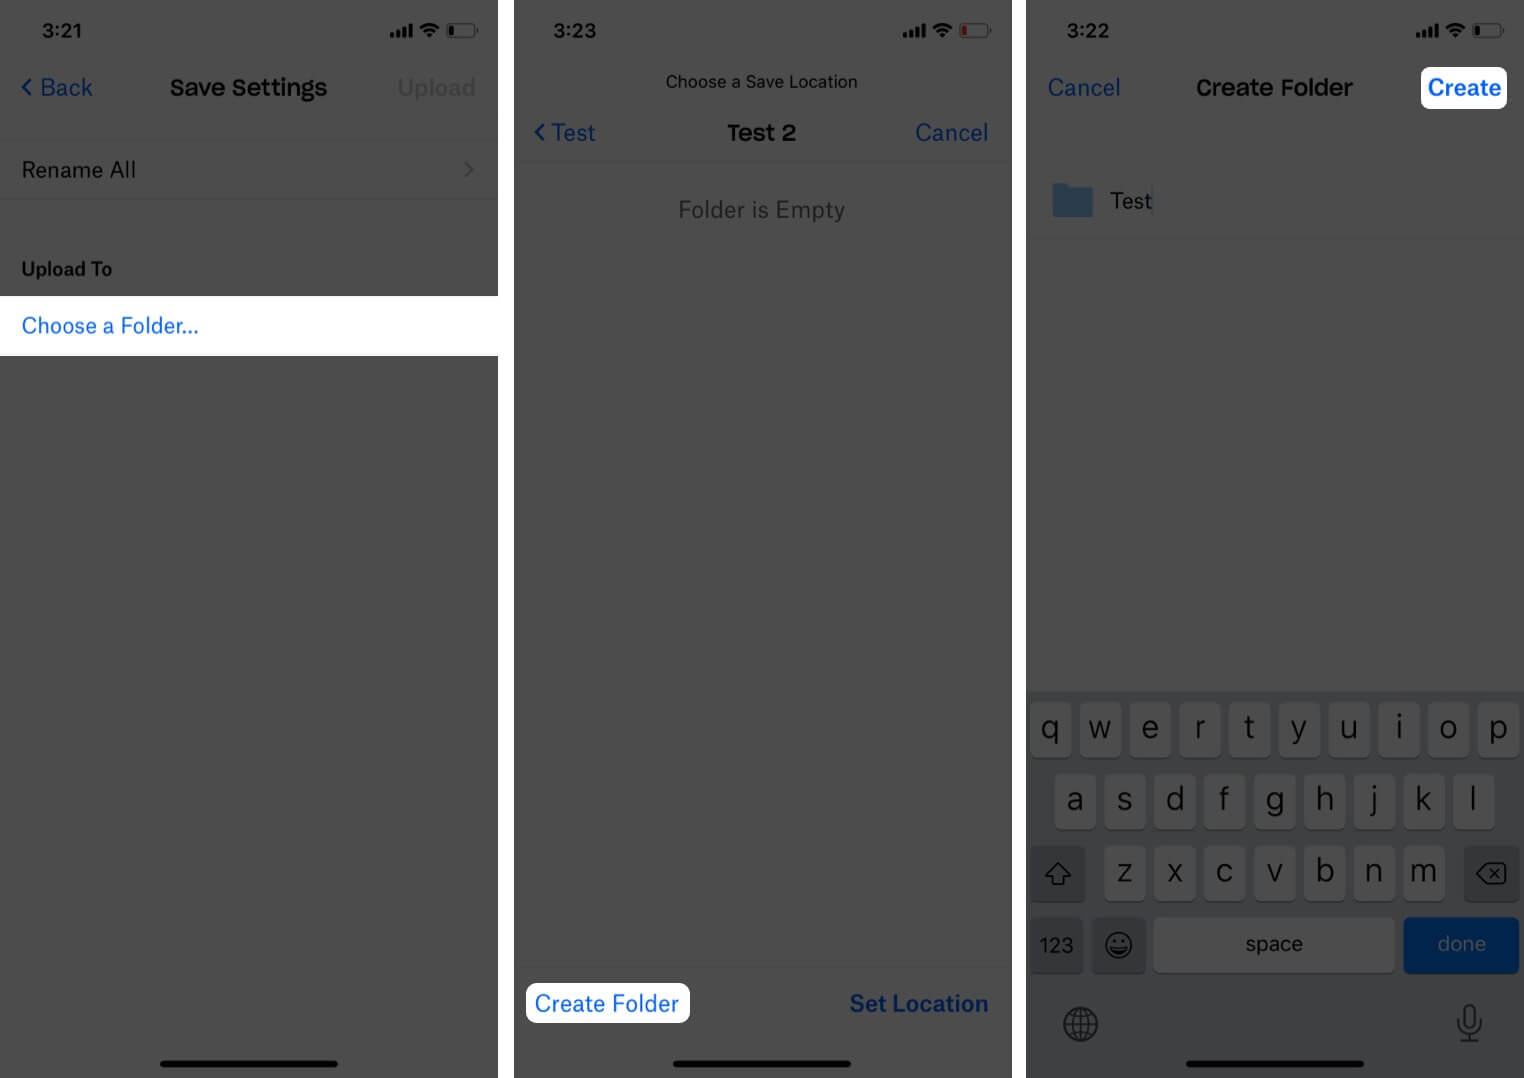
- Tap Choose a folder followed by Create Folder at the bottom-left corner.
- Enter the name and tap Create, followed by Set Location.
- Now you can see the upload progress on the home page.
- Once uploaded, tap three vertical dots next to your created folder.
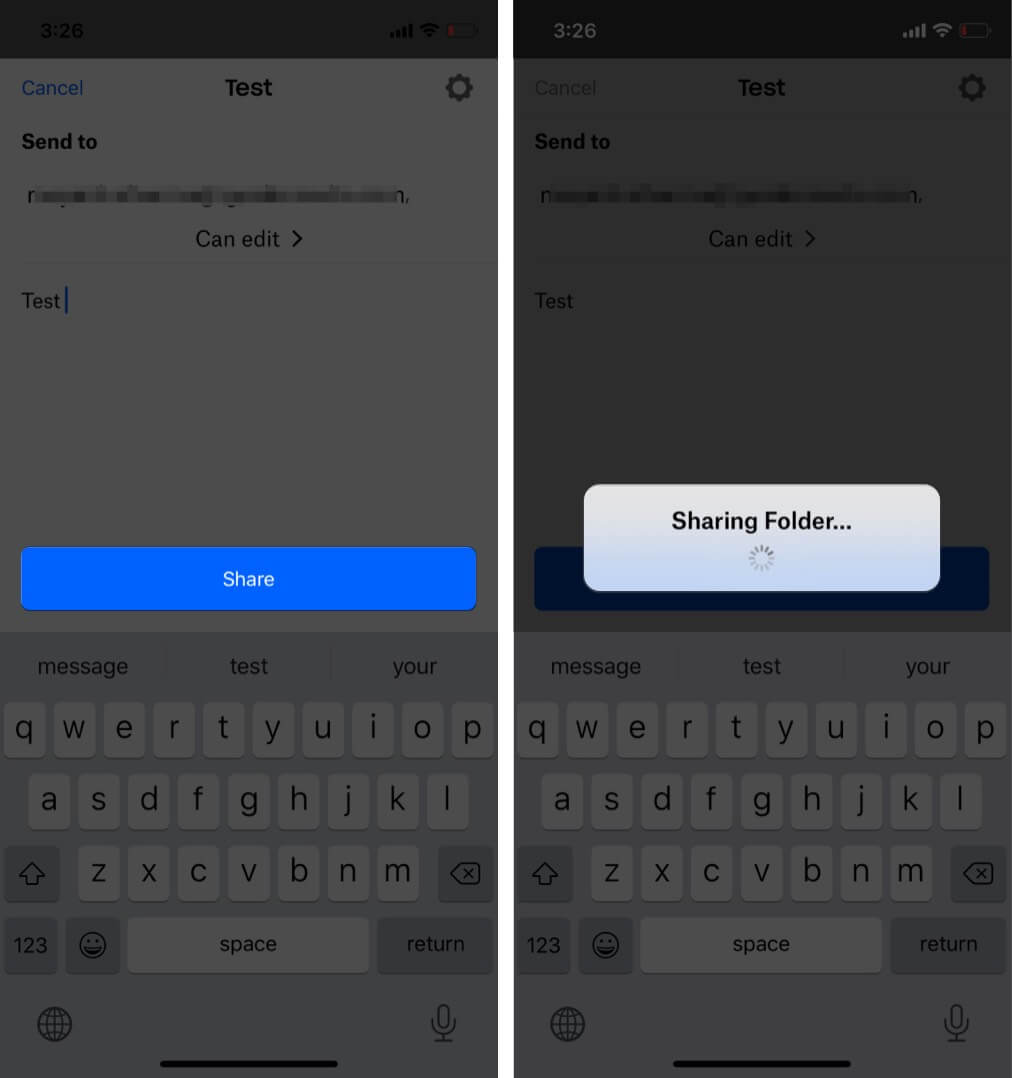
- Tap Share in the Dropbox app.
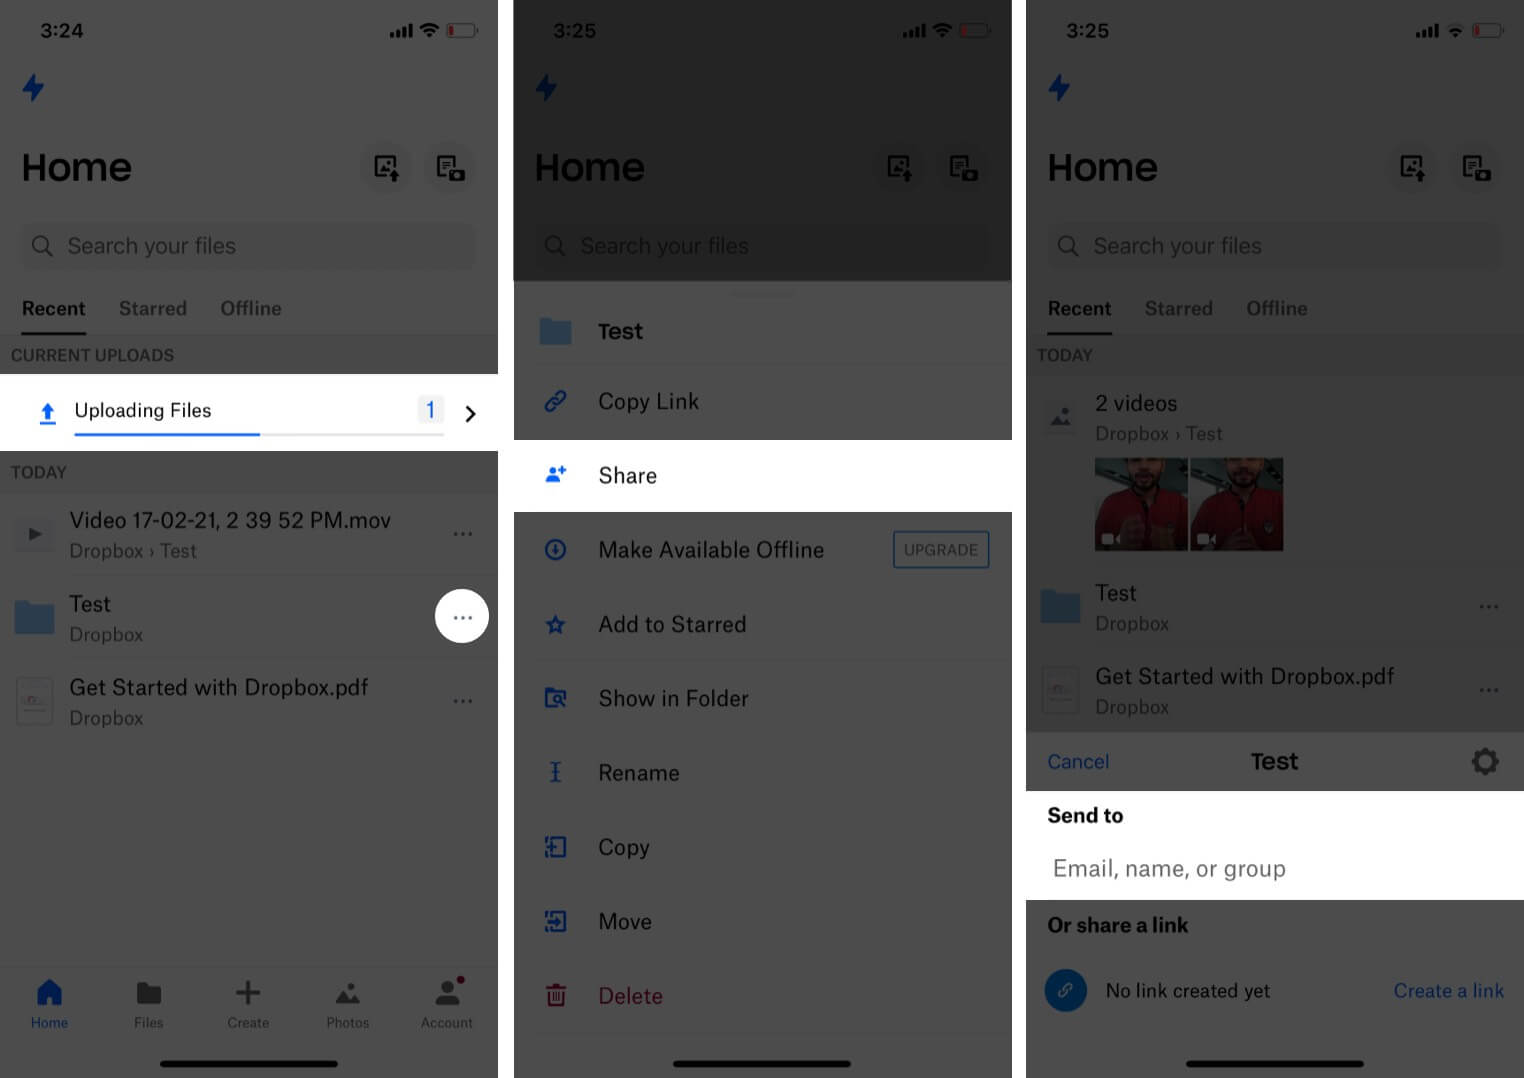
- Enter the mail ID and add a message (if needed) and tap Share. The folder will be shared with the person through a Dropbox link.
 Alternative way: You can also copy the link in your email to share it. (You can share the link on other platforms as well like WhatsApp, iMessage, Facebook, etc.)
Ready to attach and send large files through email?
Now that you are acquainted with different ways, which one looks more friendly to you? I use Mail Drop and Google Drive depending on need and the person I’m sharing the files with.
Share your views in the comment section below.
Read more:
- How to Send-Receive Apple Pay Cash Via iMessage on iPhone
- Schedule emails on iPhone, iPad, and Mac
- How to Schedule Text Messages on iPhone
- How to email tracking pixel on iPhone
Author
🗣️ Our site is supported by our readers like you. When you purchase through our links, we earn a small commission. Read Disclaimer.